概要
VSCodeで TypeScript + Node.js + Express を使用した開発環境を構築します。
データサーバーは使用していません。
外部からローカルホストにリクエストを飛ばして、値を返すだけのAPIを作成し、そのデバッグ環境を構築します。
この記事は、以下のコースの受講に伴って、備忘録として書いています。詳しく知りたい方は、是非受講してみてください。
環境
- Windows10
- TypeScript 4.2.4
- VSCode
構築
インストール
先にインストールするもの
npm install -g typescript
プロジェクトの初期化
VSCodeで空のプロジェクトを開いて、ターミナルで以下を実行します。
npm init
tsc --init
パッケージ
同様にVSCodeで、必要なパッケージをインストールします。
npm install --save express body-parser
npm install --save-dev nodemon @types/node @types/express
| パッケージ | 説明 |
|---|---|
| express | expressライブラリ |
| body-parser | expressのサーバーで受け取ったリクエストのパラメーターをパースするためのパッケージ |
| nodemon | jsファイルをnode.jsで実行し、ファイルやフォルダの変更を監視してくれるパッケージ |
| @types/node | node.jsの型定義ファイル |
| @types/express | expressの型定義ファイル |
ファイルの設定
package.json
nodemon を npm コマンドで実行できるように設定します。
debug はデバッグ用の設定で、--inspectを指定することで、実行中にアタッチできるようになります。
// ・・・
  "scripts": {
    "test": "echo \"Error: no test specified\" && exit 1",
    "start": "nodemon dist/app.js",
    "debug": "nodemon --inspect dist/app.js"
  }
// ・・・
tsconfig.json
{
  "compilerOptions": {
    /* Basic Options */
    "target": "ES2018",
    "module": "commonjs",
    "sourceMap": true,
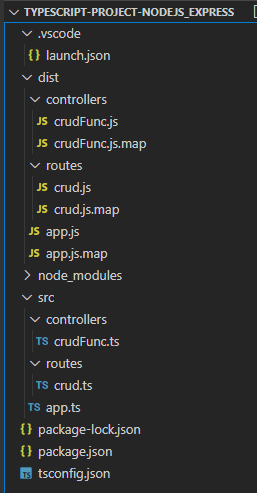
    "outDir": "./dist",
    "rootDir": "./src",

    /* Strict Type-Checking Options */
    "strict": true,

    /* Module Resolution Options */
    "moduleResolution": "Node",
    "esModuleInterop": true,

    /* Experimental Options */
    "experimentalDecorators": true,

    /* Advanced Options */
    "skipLibCheck": true,
    "forceConsistentCasingInFileNames": true
  }
}
デモファイルの作成
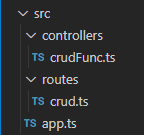
srcフォルダに、以下のようにデモファイルを作成しました。
ここでは、post のみ実装しています。
import express, { Request, Response, NextFunction } from 'express';
import router from './routes/crud';
import { json } from 'body-parser';

// ミドルウェア関数の登録

const app = express();

// ポストリクエストにわたされたjsonをパースして、requestオブジェクトのbodyに格納する
app.use(json());

// /crud へのリクエストは、すべて router のルーティング設定を使用する
app.use('/crud', router);

// エラーをキャッチするためのミドルウェア関数
// next関数は、リクエストを次のミドルウェア関数に送る場合に実行する関数
app.use((err: Error, req: Request, res: Response, next: NextFunction) => {
	// ステータスコード(500):インターナルサーバーエラー
	res.status(500).json({ message: err.message });
});

// ポート3000に接続
app.listen(3000);
import { Router } from 'express';
import { postFunc } from '../controllers/crudFunc';

const router = Router();

// サーバーを起動して指定したルートにリクエストがきたら、expressからpostFuncが自動的に実行される
router.post('/', postFunc);
// router.get('/', hoge);
// router.patch('/:id', hoge); // :id とすることで変数として扱える
// router.delete('/:id', hoge);

export default router;
import { RequestHandler } from 'express';

/**
 * postリクエスト時の処理
 * @param req リクエスト
 * @param res レスポンス
 * @param next リクエストを次のミドルウェア関数に送る場合に実行する関数
 */
export const postFunc: RequestHandler = (req, res, next) => {
	const text = (req.body as { text: string }).text;

	// 何かしらの処理
	const something = `${text}(${new Date()})`;

	// ステータスコード(201):リクエストが成功し、新しいリソースが作成された
	res.status(201).json({ message: 'POSTリクエストを受け付けました。', created: something });
};
何かしらの処理の部分で、実際にはデータサーバーにデータをpostする処理などを行います。
コンパイル&デバッグ
コンパイル
コンパイルは、ターミナルで以下のコマンドを実行します。
tsc
又は、
tsc -w
watchモード(tsc -w)を起動すると、tsファイルの変更を監視して、変更があったときは自動的に再コンパイルします。
終了する場合は、Ctrl + Cを押します。
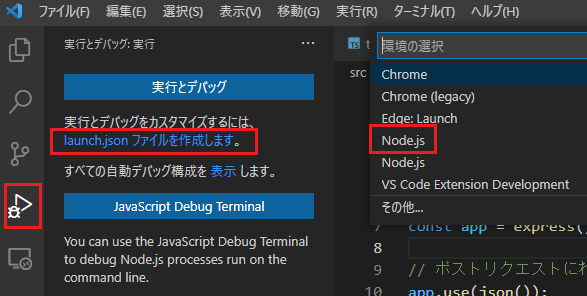
デバッグ
{
    "version": "0.2.0",
    "configurations": [
        {
            "type": "node",
            "request": "attach",
            "name": "Node: Nodemon",
            "processId": "${command:PickProcess}",
            "restart": true,
            "protocol": "inspector"
        }
    ]
}
デバッグをするためには、ターミナルで以下のコマンドを実行します。
※ watchモードを起動している場合は、新しいターミナルで実行します。
npm run debug
次に、[F5]を押してデバッガーを起動します。
アタッチ先の選択がでるので、npm run debug(nodemon)を選択します。
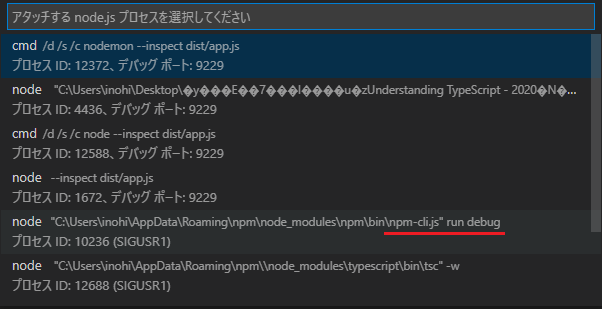
これで、ターミナルに Debugger attached. と表示されれば成功です。
POSTMAN
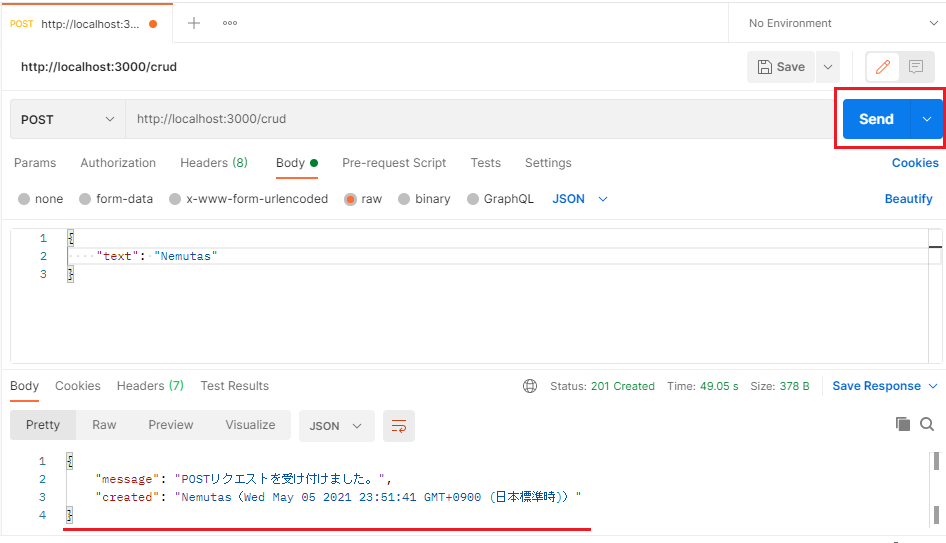
JSONデータをpostするのに POSTMAN を使用します。
ユーザー登録をしたら、デスクトップにアプリをダウンロード&インストールします。
デスクトップアプリで、
1)[Workspaces] - [My Workspace] を選択します
2)[+]タブを押して、Requestを作成します

3)[POST]、URL、Body - raw - JSONを指定して、JSONデータを記入します
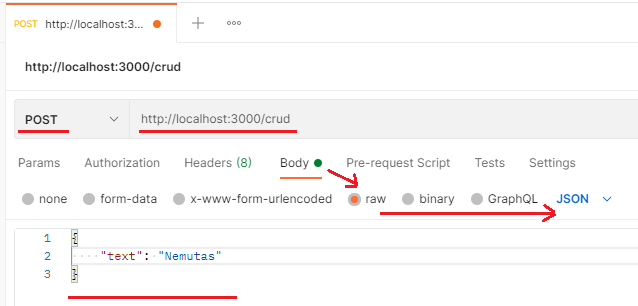
※ JSON のキーバリューは、crudFunc.ts でキャストした型と整合性が取れていることを確認してください。
5)このとき適当な箇所でブレークポイントを入れておけば、そこで止まります

確認
Tips
Node.js & Express では設定しなければならないことが多いです。
また、元がJavaScriptライブラリなので、TypeScriptに対応できないことが出てくる可能性があります。
もっと簡単に TypeScript でサーバー側の開発ができるライブラリとして、Nest.js があります。
