前提
RockyLinuxのインストール
Default ImagesのMinimal ISOにした
・Rocky-9.4-x86_64-dvdにした
手順はこちらを参考にしました(RockyLinux)
URL先が 404errorになってわからなくなった
centos8インストール
・CentOS-8.5.2111-x86_64-dvd1.isoにした
手順はこちらを参考にしました(centos8)
VirtualBOXのインストール
・Windows hostsにした
仮想マシンの基本設定
仮想マシンにNICを追加
ホストオンリーネットワークを追加 > VirtualBox Host-Only Ethernet Adapter #3
設定 > ネットワーク > アダプター2 > ネットワークアダプターを有効化 > ホストオンリーアダプター(VirtualBox Host-Only Ethernet Adapter #3)
NICを追加する際に参考にしたURL
https://qiita.com/tagucchan/items/22f826d4cd7ed018448e
・VirtualBoxマネージャの設定
・ホストオンリーネットワーク を作成
・ゲストOSの設定を変更する ( Ubuntuの例 )
nmtuiでGUIか、nmcliでCUIでアドレス設定
nmcli connection add ifname enp0s8 con-name enp0s8 type ethernet
nmcli device status
nmcli connection show
nmcli connection modify enp0s8 ipv4.method manual ipv4.addresses 192.168.133.2/24
ip a
systemctl restart NetworkManager.service
アドレスの設定で参考にしたURL
Rocky Linux画面
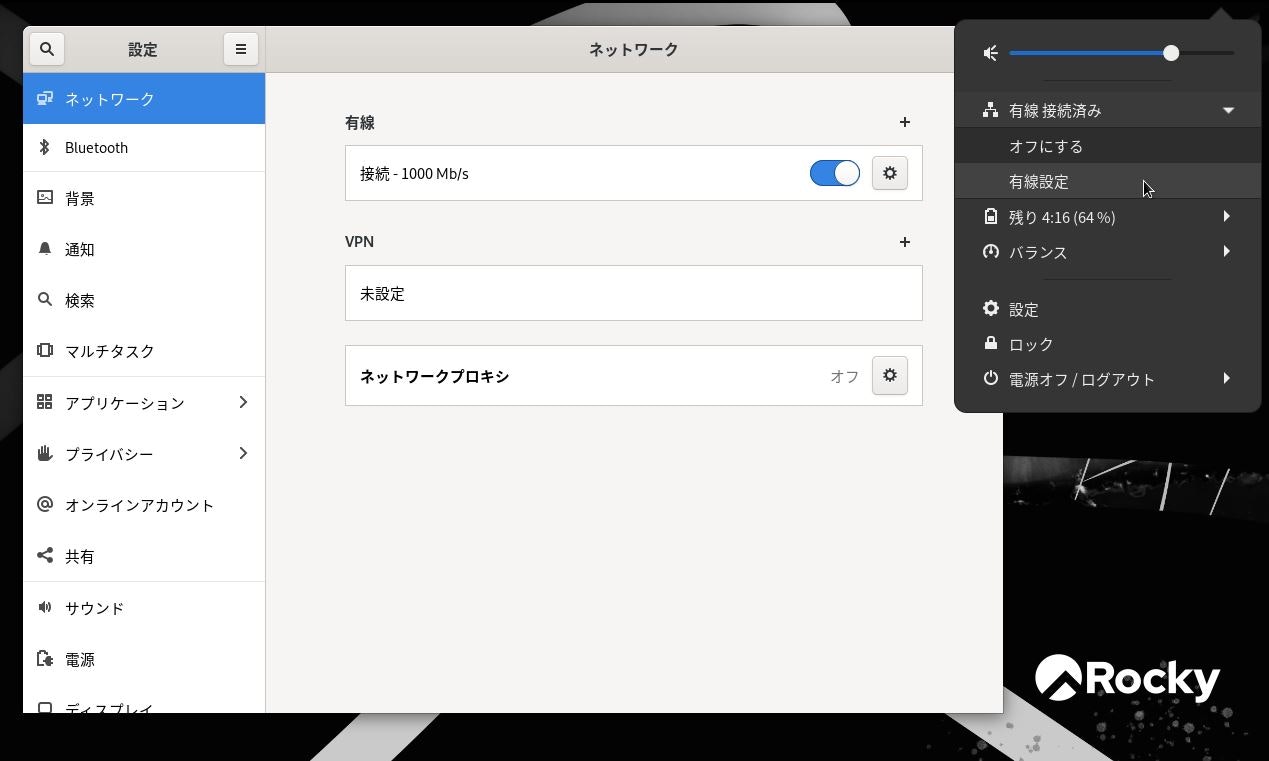
右上のネットワークアイコン > 有線設定

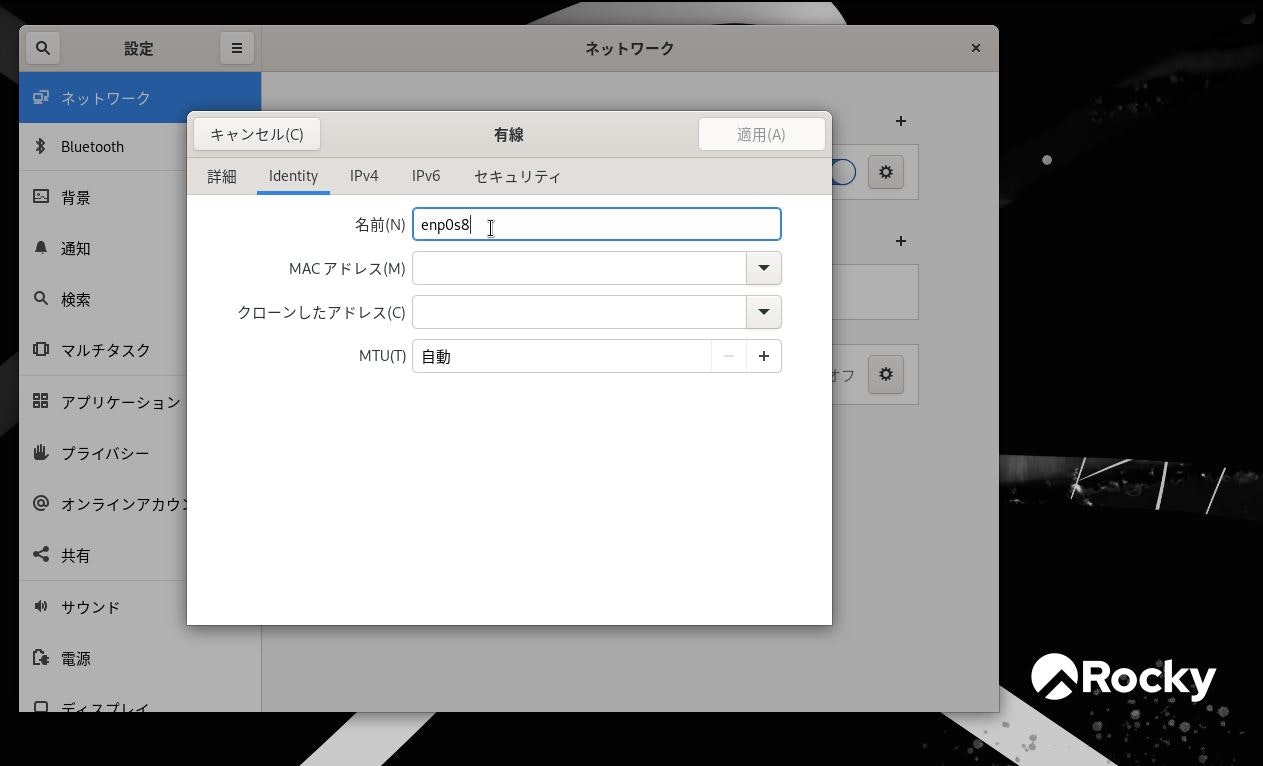
ネットワーク > 有線の歯車アイコン

ユーザ名とパスワードの作成
sudo su
useradd ユーザ名
passwd ユーザ名
Changing password for user
New password:
BAD PASSWORD:
The password fails the dictionary check - it is based on a dictionary word
Retype new password:
passwd: all authentication tokens updated successfully.
新規の作成ユーザでTeratermで公開鍵と秘密鍵の設定を行い、SSH接続
参考文献
公開鍵と秘密鍵の作成を参考にしました
ホストOS側でブラウザを開き、「http://(ゲストOSのIPアドレス)」にアクセスする際は、enp0s8のアドレスを入力
https://qiita.com/kito_engineer/items/61fe70a5eecbddb6d101
参考文献(rootユーザにてログイン方法)
Vagrantでやれば簡単なので、最初からやり直し!
Vagrant + Virtualboxで仮想環境構築
vagrantのインストール
・Windows I686 Version: 2.4.1
Centos8のBox
Centos7のBox
自分のPCのコマンドプロンプトにて作業
centos7用
バージョン確認
vagrant -v
Vagrant 2.4.1
cd C:\Users\ユーザ名\Vagrant
mkdir centos7
フォルダ移動し、初期設定ファイル(Vagrantfile)を作成しupしてssh
cd C:\Users\ユーザ名\Vagrant\centos7
vagrant init centos/7
Vagrantfile
config.vm.network "private_network", ip:の文面の#(コメントアウト)を削除
vagrant up
vagrant ssh
rocky用
cd C:\Users\ユーザ名\Vagrant
mkdir rocky
cd C:\Users\ユーザ名\Vagrant\rocky
vagrant init generic/rocky8
Vagrantfile
config.vm.network "private_network", ip:の文面の#(コメントアウト)を削除
vagrant up
vagrant ssh
cd C:\Users\ユーザ名\Vagrant\centos8
vagrant -v
出力 Vagrant 2.4.1
centos8
vagrant init centos/8
出力
AVagrantfilehas been placed in this directory. You are now
ready tovagrant upyour first virtual environment! Please read
the comments in the Vagrantfile as well as documentation on
vagrantup.comfor more information on using Vagrant.
vagrant up
時間がかかる
vagrant ssh
環境の複製
Vagrantfileにコマンドを書き、書き終わったら都度以下を実行する
vagrant up
vagrant ssh
Vagrantで参考にしたURL
エラー
vagrant initをしたがエラー
-> 解決した : vagrant の作成ディレクトリが異なっていた
https://qiita.com/Ryohei_U/items/8d8ea718b6d265c81bd7
ApacheでwordpressからmariaDBを取得し、PHPでHTMLに変換して、Webサイトを表示する。
Apache webサーバ
wordpress 簡単にホームページを作成できる
mariaDB データベース
php プログラミング言語
ここからCentOS8にWordPress構築する
1 タイムゾーン
2 Apache
3 PHP
4 WordPress
5 MariaDB
タイムゾーン
タイムゾーンがAsia/Tokyoに設定されているか確認
timedatectl
Asia/Tokyoに変更
timedatectl set-timezone Asia/Tokyo
Apacheのインストール
dnf -y install httpd
httpd -v
systemctl enable httpd
systemctl start httpd
systemctl status httpd
その後、ブラウザへlocalhostと入力
CentOS8へPHP8.3のインストール
EPELリポジトリ追加
dnf install https://dl.fedoraproject.org/pub/epel/epel-release-latest-8.noarch.rpm
PHP8.0以上が存在することを確認する
dnf module list php
Remi リポジトリ追加
dnf module enable php:remi-8.3
PHP8.3インストール
dnf install php
Apacheを再起動して適用
systemctl restart httpd
PHP8.3になっているか確認する
php -v
参考文献
WordPressのインストール
dnf -y install wget
cd /var/www/html
wget https://ja.wordpress.org/latest-ja.tar.gz
tar xvf latest-ja.tar.gz
chown -R apache:apache .
MariaDBインストール
dnf install -y mariadb-server mariadb mariadb-devel
systemctl start mariadb
systemctl status mariadb
ps -aux | grep mysqld
systemctl enable mariadb
systemctl is-enabled mariadb
mysql
# mysql
MariaDB [(none)]> create database wordpress default character set utf8;
wordpressというデータベース
show databases;
MariaDB [(none)]> grant all on wordpress.* to wordpress@localhost identified by 'password';
wordpressというユーザー
passwordというパスワード
MariaDB [(none)]> flush privileges;
cd /var/www/html/wordpress
cp wp-config-sample.php wp-config.php
このコマンドでconfigファイルのsampleをコピーして、コピーした方をエディタで編集していきます。
vim wp-config.php
DB_NAME
WordPressが接続しているデータベースの名前(DB名)

DB_USER
データベースユーザー名(DBユーザー名)

DB_PASSWORD
データベースユーザーが、データベースに接続するためのパスワード

https://api.wordpress.org/secret-key/1.1/salt/
で
自動生成しそれをコピー&ペーストして利用した
webブラウザで localhost/wordpress/ にアクセスしてwordpressの初期設定を行います。
ユーザ名
wordpress
パスワード
******
メールアドレス
*******
インストール
参考文献
http://holiday-programmer.net/miracle-php8/
https://qiita.com/shark_No95/items/9e00f952f0af43729530
https://affiliate-biz.jp/wp-config#index_id9
https://webantena.net/wordpress/wp-config-unique-authentication-key/
エラー対処
①phpを確認しようとしたら以下の文字が表示された
「お使いのサーバーのPHPではWordPressに必要なMySQL拡張を利用できないようです。」
->以下のコマンドでインストールをして解決
dnf install -y php php-mbstring php-xml php-xmlrpc php-gd php-pdo php-mysqlnd php-json
②ホストOSのブラウザでゲストOSを表示させたいが、データベース接続確立エラーと表示が出た
->以下のサイトで、自動生成しそれをコピー&ペーストして利用し解決
https://api.wordpress.org/secret-key/1.1/salt/
③vagrantがうまく動かない
->再起動して解決(vagrant reload)
https://qiita.com/nakamurashun0621/items/980890ed14645da5aee6
④ Centos7でもう一度構築し直した際に出たエラー
-1 拡張パッケージがない -> 拡張パッケージを入れて解決
-2 phpのバージョンが古い -> アップデートして解決
https://www.maruweb.jp.net/wp/?p=8075#%E2%97%86%E3%83%90%E3%83%BC%E3%82%B8%E3%83%A7%E3%83%B3%E7%A2%BA%E8%AA%8D
⑤Requires: pv
->以下のコマンドで解決(EPELリポジトリを有効にしたらインストールできた)
参考URL
https://teratail.com/questions/3a5r4vwk9cfmat
yum install epel-release
yum update
yum install MariaDB-server MariaDB-client
⑤MariDBをインストールできない
手順参考
https://www.rem-system.com/centos-mariadb-install/
->以下のコマンドで解決
https://downloads.mariadb.org/mariadb/repositories/
にて
Choose a Distro→Choose a Release→Choose a Version
CentOS7
11.4
選択
vi /etc/yum.repos.d/mariadb.repo
エディタにて先ほどのコピーしたものを貼り付けて保存します。
最下行にenable=1を追加します。
ここではレポジトリを有効にするために指定しています。
yum update
vi /etc/yum.repos.d/CentOS-Base.repo 編集
yum install https://dl.fedoraproject.org/pub/archive/epel/7/x86_64/Packages/e/epel-release-7-14.noarch.rpm -y
rpm -Uvh http://rpms.famillecollet.com/enterprise/remi-release-7.rpm
yum -y install wget
yum -y install MariaDB-server
yum -y install MariaDB-devel MariaDB-client MariaDB-server
systemctl start mariadb
⑦centos8へyum/dnfエラー解決方法
https://qiita.com/yamada-hakase/items/cb1b6124e11ca65e2a2b#comments
https://zenn.dev/muso_tensei/articles/2fd69284550d5d
/etc/yum.repos.d/CentOS*repoファイルの
CentOS-Stream-AppStream.repo
CentOS-Stream-BaseOS.repo
CentOS-Stream-Extras.repo
を以下2点編集すること
・mirrorlist~~ をコメントアウト
・baseurl=http://vault.centos.org/$contentdir/$releasever/BaseOS/$basearch/os/
と書き換え
->サポート切れでミラーサイトが停止したため
⑧ゲストOSとホストOS間のコピペができない(CentOs8)
参考URL
https://teratail.com/questions/281982
https://zenn.dev/nakashi94/articles/f42e0ace9766df
->解決しなかったのでvagrant sshでつなげてコピペすることにした
CentOS7 のwordpressインストール zabbixインストールできない苦戦中<-今ここ
■基本
cat /etc/redhat-release
バージョン確認
以下のファイルを①と②を修正
vi /etc/yum.repos.d/CentOS-Base.repo
①参照先のリポジトリをミラーサイトがサポート切れのためミラーサイトはコメントアウトして、別のサイトを指定した
①[base]mirrorlistをコメントアウト
②baseurl=https://ftp.jaist.ac.jp/pub/Linux/CentOS-vault/7.8.2003/os/$basearch/
http://ftp.jaist.ac.jp/pub/Linux/CentOS/ にアクセス
親ディレクトリ>CentOS-Vault>バージョン
参考URL
https://qiita.com/yamada-hakase/items/cb1b6124e11ca65e2a2b
②[updates]enabled=0を追加
[extras]enabled=0を追加
この二つの所は参照しないようにするためenable=0を追加した
■Apache
yum -y install httpd httpd-tools httpd-devel httpd-manual
systemctl enable httpd
systemctl start httpd
systemctl start firewalld
firewall-cmd --add-service=http --permanent
firewall-cmd --reload
■php
1epel-relese インストール
2remi レポジトリを追加
3PHP をインストール
1
yum repolist
rpm -qa epel-release
yum list epel-release
yum list epel-release
yum install epel-release
rpm -qa epel-release
yum list installed epel-release
yum repolist
2
rpm -qa | grep remi-release
rpm -qa | grep epel-release
yum install http://rpms.famillecollet.com/enterprise/remi-release-8.rpm
rpm -qa | grep remi-release
yum list remi-release
yum repolist | grep remi
3
php -v
rpm -qa | grep php
rpm -qa | grep remi-release
yum --enablerepo=remi-php83 install php
rpm -qa | grep php
php -v
その他
yum list epel-releaseの代わりに
EPELリポジトリ追加でもよい
yum install https://dl.fedoraproject.org/pub/epel/epel-release-latest-8.noarch.rpm
EPELリポジトリを追加したのでRemiリポジトリ追加できるようになるので、このコマンドでもよい
rpm -Uvh http://rpms.famillecollet.com/enterprise/remi-release-8.rpm
■MariDB
yum install -y mariadb-server mariadb mariadb-devel
systemctl start mariadb
systemctl status mariadb
ps -aux | grep mysqld
systemctl enable mariadb
systemctl is-enabled mariadb
mysql
create database [databasename];
create user '[username]'@'localhost' identified by '[password]';
grant all on [databasename].* to [username]@localhost;
quit
■wordpress
yum -y install wget
cd /var/www/html
wget https://ja.wordpress.org/latest-ja.tar.gz
tar xvf latest-ja.tar.gz
chown -R apache:apache .