ディップAdventCalendar2016、23日目です。(。・ω・)ノ
※Delegateの書き方を理解するに重点を置いてますので、Delegateの本来の使い方を知りたい方には向いておりません。
あくまでも取っ掛かりという目的で閲覧くださいm(_ _)m
swift初心者の多くは苦戦するDelegate。
まず最初にぶつかる壁と言っても良いでしょう。
私もその1人で、
分かりにくい分たくさんのDelegateの記事が存在していますが、
ありとあらゆる「わかりやすい!簡単!Delegate」の記事を見てもなかなかピンときませんでした..orz
(私の理解力の問題ですが..)
ということで、
世に溢れているわかりやすいDelegateの説明を見ても理解できなかった私が、
イラストを使ってさらにわかりやすく、Delegateの基本を書いていきたいと思います。
1.そもそもなぜ理解できないのか?
まず、そもそもなぜDelegateの理解が難しいのか。
端的に言いますと、結局のところ
「で、何ができるの?😰😰」
「使いどころがわからない..😰😰」
ってところに尽きるのかなと思います。
それだと結局、
「サンプルコード見て書き方は分かったよ、うん(でも自分で流用できない)」
= 理解できていない
となってしまうので、そこを紐解く必要があります。
2.Delegateとは?
プロトコルとデリゲートのとても簡単なサンプルについて
こちらの記事を参考にさせていただきますと、
Delegation is a design pattern that enables a class or structure to hand off(or delegate) some of its responsibilities to an instance of another type.
(The Swift Programing Language記載)
=『デリゲートは、デザインパターンです。』
「ん、デザインパターンって何😰」..となるので、ここは割愛。
結局のところDelegateは、
「あるクラスは、他のクラスのインスタンスに、処理を任せることができる。」
もの、なのですが、
とりあえず**「2つのクラス間で処理を跨ぐんだな😃」**くらいで大丈夫です。
3.具体例
まずは、具体的な使い方を見てみようと思います。
今回はよりDelegateの書き方がピンとくるように、
**「Delegateを使った場合」「使わなかった場合」**の2パターンで説明しようと思います。
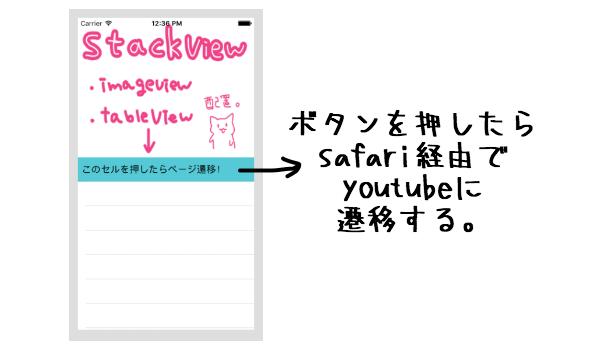
作るもの
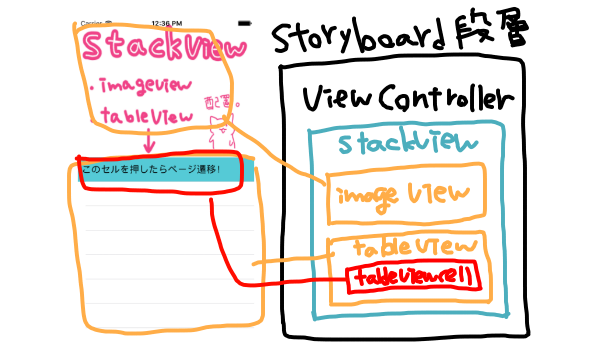
構造としてはこのような感じです。
このぺージの親はViewControllerですね。
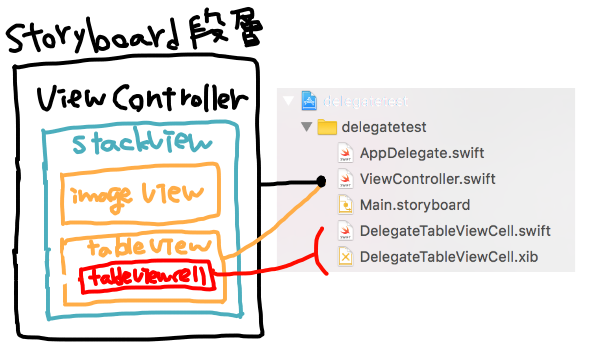
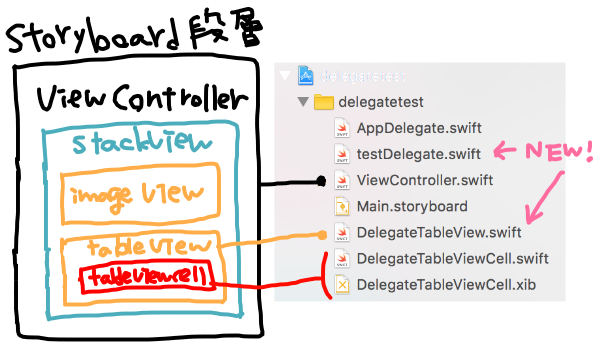
階層の違い
この2つのパターンは今回の場合クラス構成が一番の相違点で、
tableViewが親のViewControllerのクラスで処理が書かれているか否かに違いがあります。
■Delegateなし
■Delegateあり
押さえておく点
※解説の前に押さえておくべきこと。
今回のサンプルは
tableViewCellをタップした際にページ遷移する。
つまり、そのぺージから別のぺージに移動する、ということです。
ということは、
そのぺージを作る一番親が別のページに遷移するを実行しなければなりません。
ここが重要です。
ソースの違い
各々のDelegateが絡んでいる部分の書き方の違う部分をとりあえず記載。
下記2つはまったく同じ処理をしている部分です。
具体的には、didSelectRowAt indexPath:の書き方に違いがあります。
didSelectRowAt indexPath:とはTableView上のcellがタップされた際に呼ばれるメソッドです。
■Delegateなし
class ViewController: UIViewController, UITableViewDataSource, UITableViewDelegate {

    @IBOutlet weak var tableView: UITableView!

    //〜省略〜

    // MARK: - UITableViewDelegate
    func tableView(_ tableView: UITableView, didSelectRowAt indexPath: IndexPath) {
        tableView.deselectRow(at: indexPath, animated: true)

        guard let url = URL(string: "https://www.youtube.com/watch?v=GNIkcjccZlw") else {
            return
        }

        if UIApplication.shared.canOpenURL(url) {
            UIApplication.shared.open(url, options: [], completionHandler: nil)
        }
    }
}
■Delegateあり
class DelegateTableView: UITableView, UITableViewDataSource, UITableViewDelegate {

    //delegateを設定
    var testdelegate: TestDelegate?

    //〜省略〜

    // MARK: - UITableViewDelegate
    func tableView(_ tableView: UITableView, didSelectRowAt indexPath: IndexPath) {
        self.deselectRow(at: indexPath, animated: true)

        self.testdelegate?.test()
    }
}
protocol TestDelegate: class {

    func test()
}
class ViewController: UIViewController, TestDelegate {

    @IBOutlet weak var delegateTableView: DelegateTableView!

    override func viewDidLoad() {
        super.viewDidLoad()

        //子(DelegateTableView)の設定しているdelegateを自身にもセット
        delegateTableView.testdelegate = self
    }

    func test() {
        guard let url = URL(string: "https://www.youtube.com/watch?v=GNIkcjccZlw") else {
            return
        }

        if UIApplication.shared.canOpenURL(url) {
            UIApplication.shared.open(url, options: [], completionHandler: nil)
        }
    }
}
イメージ図
上の処理は絵で表すとこんな状況。
■Delegateなし
■Delegateあり
ポイント
変数の受け渡し
//delegateを設定
var testdelegate: TestDelegate?
//子(DelegateTableView)の設定しているdelegateを自身にもセット
delegateTableView.testdelegate = self
別クラスで定義されている変数を自身も持つことで
自分がそのdelegateを処理することができるようになります。
この辺りの受け渡しはミスしないように注意してください。
※この=selfはTestDelegate を継承しないとErrorとなり、
delegateTableView.testdelegate = self as! TestDelegate と補完しようとするのでこちらも注意です。
protocol
protocol TestDelegate: class {

    func test()
}
protocol (名前)と書くことで、継承できるようになります。

また、もともとswiftに備わっている、UITableViewDelegateは、
継承した際、cellForRowAt indexPath:、numberOfRowsInSection section:の2つのメソッドを書かなければ

このようなエラーをはきますよね、
これと同様に、上記の例だと、
testDelegateを継承したクラスでfunc test()を書かなければエラーとなります。
補足
処理を追いやすくする手として、extensionで書くことを検討するのもありです。
class ViewController: UIViewController {
    @IBOutlet weak var delegateTableView: DelegateTableView!

    override func viewDidLoad() {
        super.viewDidLoad()

        //子(DelegateTableView)の設定しているdelegateを自身にもセット
        delegateTableView.testdelegate = self
    }
}

extension ViewController: TestDelegate {
func test() {
        guard let url = URL(string: "https://www.youtube.com/watch?v=GNIkcjccZlw") else {
            return
        }

        if UIApplication.shared.canOpenURL(url) {
            UIApplication.shared.open(url, options: [], completionHandler: nil)
        }
    }
}
処理の場所
先ほど述べた「押さえておく点」の通り、
画面が遷移する処理である、
guard let url = URL(string: "https://www.youtube.com/watch?v=GNIkcjccZlw") else {
    return
}

if UIApplication.shared.canOpenURL(url) {
    UIApplication.shared.open(url, options: [], completionHandler: nil)
}
の処理はViewControllerに記載しています。
そこはDelegate使う使わないに限らず変わらないです。
4.まとめ
今回は少しでもわかりやすいようにDelegate有無の書き方で分けてみましたが、
delegateを使う大きなメリットは
- 移譲先を意識する必要がない
- 再利用ができる
なので、メリットの実感はあまりないサンプルかもしれません。笑
が、少しでも参考になれば幸いです。
ご指摘あればコメントよろしくお願いします。

