はじめに
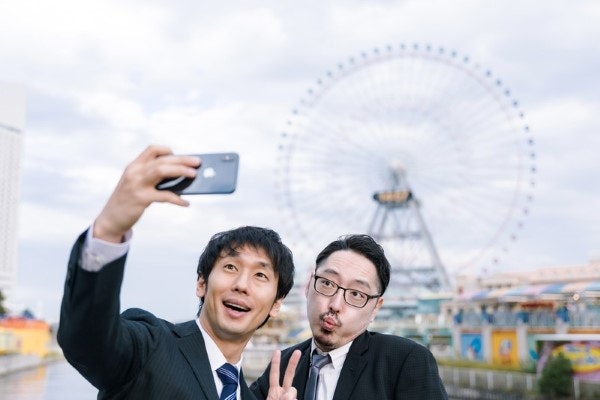
題名の文章では伝わりにくいので、始めにサンプルを(ぱくたそさんから拝借)
-
加工前
-
加工後

環境
- Windows10
- Python 3.9.4
※python3.6以降とかであれば問題ないかと
pip
python -m pip install cv2
python -m pip install numpy
コード
blur_except_face.py
import cv2
import logging
import numpy as np
import os
import sys


"""
指定画像に対して、顔を検出してそれ以外はモザイクをかけた画像を出力する

Parameters
----------
args[1] : 読み込み画像パス
args[2] : 出力画像パス
"""


def get_detect_data(face_cv2img):
    """
    検出処理

    Parameters
    ----------
    face_cv2img : numpy.ndarray(cv2画像読み込みデータ)
        モザイク加工前のcv2データ

    Returns
    -------
    detect_data : numpy.ndarray
        検出データ(座標とサイズ)
    """

    # 検出設定
    SCALE_FACTOR = 1.11
    MIN_NEIGHBORS = 3
    MIN_SIZE = (5, 5)
    CASCADE_XML = "haarcascade_frontalface_default.xml"

    # 検出速度向上のため、モノクロにする
    gray_img = cv2.cvtColor(face_cv2img, cv2.COLOR_BGR2GRAY)

    # カスケード分類器を設定
    cascade = cv2.CascadeClassifier(os.path.join(cv2.data.haarcascades, CASCADE_XML))

    # 検出処理&検出データ取得
    detect_data = cascade.detectMultiScale(
        gray_img, scaleFactor=SCALE_FACTOR, minNeighbors=MIN_NEIGHBORS, minSize=MIN_SIZE
    )

    return detect_data


def make_blurimg_except_face(face_cv2img, detect_data):
    """
    顔以外のぼかし画像を作成

    Parameters
    ----------
    face_cv2img : numpy.ndarray(cv2)
        モザイク加工前のcv2データ(cv2画像読み込みデータ)
    detect_data : numpy.ndarray
        検出データ(座標とサイズ)

    Returns
    -------
    blur_face_img : numpy.ndarray(cv2)
        顔検出してぼかし加工したcv2データ
        ※検出が出来ない時は、すべてぼかし
    """

    # ぼかしの強弱
    BLUR_SIZE = (20, 20)

    # 下地のぼかし画像を作成する
    blur_face_img = cv2.blur(face_cv2img, BLUR_SIZE)

    # 検出できているか(出来ていない場合は、モザイク画像をそのまま返す)
    if len(detect_data) > 0:
        # 検出値のループ処理
        for loc_x, loc_y, size_w, size_h in detect_data:

            # 検出内容を抽出
            detect_img = face_cv2img[loc_y : loc_y + size_h, loc_x : loc_x + size_w]

            # 円形マスク画像の作成
            mask_img = np.zeros((size_h, size_w), dtype=np.uint8)
            cv2.circle(
                mask_img,
                center=(size_h // 2, size_w // 2),
                radius=max(size_h, size_w) // 2,
                color=255,
                thickness=-1,
            )
            # 検出画像をマスク画像を使って円形にする
            detect_img[mask_img == 0] = [0, 0, 0]

            # RGBA形式に変換する
            detect_img_rgba = cv2.cvtColor(detect_img, cv2.COLOR_RGB2RGBA)

            # 黒の部分を透明にする
            detect_img_rgba[..., 3] = np.where(np.all(detect_img == 0, axis=-1), 0, 255)

            # 下地のぼかし画像に検出画像を上に重ねる
            blur_face_img[loc_y : size_h + loc_y, loc_x : size_w + loc_x,] = (
                blur_face_img[
                    loc_y : size_h + loc_y,
                    loc_x : size_w + loc_x,
                ]
                * (1 - detect_img_rgba[:, :, 3:] / 255)
                + detect_img_rgba[:, :, :3] * (detect_img_rgba[:, :, 3:] / 255)
            )

    return blur_face_img


if __name__ == "__main__":

    # コマンド引数取得
    args = sys.argv
    # 引数エラー処理
    if len(args) == 3:
        # パス取得
        base_photo_path = args[1]
        make_photo_path = args[2]

        # ベース画像取得
        face_cv2img = cv2.imread(base_photo_path)

        # 画像ファイルとして読み込めたとき
        if face_cv2img is not None:
            # 検出処理
            detect_data = get_detect_data(face_cv2img)
            # モザイク画像作成
            blur_face_img = make_blurimg_except_face(face_cv2img, detect_data)
            # 画像をファイル出力
            cv2.imwrite(make_photo_path, blur_face_img)
        else:
            # 指定パスに画像がないとき
            print("Can not file reading")
実行方法
python blur_except_face.py sample.jpg blursample.jpg
※引数は [読み込みファイル名] [出力ファイル名]
参考
さいごに
透過の扱いが難しい、、、