iOSには普段利用するシステムキーボードがあります。
これとは別にサービスによってスタンプや絵文字など独自の入力を行いたい場合があります。
そのような場合に独自入力は別UIViewで表示/非表示を制御する方法もありますが、
UITextField ではカスタムインプットビューを使うことでキーボードの一部として扱うことが出来ます。
この記事では以下のような表示の作り方や入力しやすい工夫について記載します。

キーボードで隠れないようにする
UITextFieldを追加しただけではキーボードを表示した際に隠れてしまいます。

その為、キーボードが表示されている場合にキーボードの真上に UITextField が表示されるように移動させます。
キーボードの表示/非表示イベントは以下のように Notification を登録することで取得することが出来ます。
import RxSwift
import RxCocoa

public final class SampleViewController: UIViewController {
    private var disposeBag = DisposeBag()

    public override func viewDidLoad() {
        super.viewDidLoad()
        bindNotification()
    }

    func bindNotification() {
        NotificationCenter.default.rx.notification(UIResponder.keyboardWillShowNotification)
            .takeUntil(rx.deallocated)
            .subscribe(onNext: { [weak self] notification in
                // キーボードが開く際の処理を記載
            })
            .disposed(by: disposeBag)

        NotificationCenter.default.rx.notification(UIResponder.keyboardWillHideNotification)
            .takeUntil(rx.deallocated)
            .subscribe(onNext: { [weak self] notification in
                // キーボードが閉じる際の処理を記載
            })
            .disposed(by: disposeBag)
    }
}
また、取得できる情報からキーボードの高さやアニメーション等も取得することが出来ます。
        NotificationCenter.default.rx.notification(UIResponder.keyboardWillShowNotification)
            .takeUntil(rx.deallocated)
            .subscribe(onNext: { [weak self] notification in
                guard let self = self else { return }
                guard let userInfo = notification.userInfo else { return }
                // アニメーションカーブ
                guard let curve = userInfo[UIResponder.keyboardAnimationCurveUserInfoKey] as? Int else { return }
                // キーボードのサイズ情報
                guard let keyboardInfo = userInfo[UIResponder.keyboardFrameEndUserInfoKey] as? CGRect else { return }
                // アニメーション秒数
                guard let duration = userInfo[UIResponder.keyboardAnimationDurationUserInfoKey] as? TimeInterval else { return }
            })
            .disposed(by: disposeBag)
この動きに合わせてUITextFieldをアニメーションさせることにより、キーボードに隠れないように表示することが可能です。
    // UITextFieldのBottomのNSLayoutを設定
    @IBOutlet private var textFieldBottom: NSLayoutConstraint!

    // キーボードを表示する時のアニメーション
    private var showKeyboardAnimation: UIViewPropertyAnimator?
    // キーボードを隠す時のアニメーション
    private var hideKeyboardAnimation: UIViewPropertyAnimator?

    func showTextField(curve: Int, keyboardInfo: CGRect, duration: TimeInterval) {
        if let curve = UIView.AnimationCurve(rawValue: curve) {
            let height = keyboardInfo.size.height
            let safeAreaHeight: CGFloat = 34// SafeAreaの高さを取得、こちらは省略させて頂きます。

            self.hideKeyboardAnimation?.stopAnimation(true)
            self.showKeyboardAnimation = .init(duration: duration, curve: curve) {
                self.textFieldBottom.constant = -(height - safeAreaHeight)
                self.view.layoutIfNeeded()
            }
            self.showKeyboardAnimation?.startAnimation()
        }
    }

    func hideTextField(curve: Int, duration: TimeInterval) {
        if let curve = UIView.AnimationCurve(rawValue: curve) {
            self.showKeyboardAnimation?.stopAnimation(true)
            self.hideKeyboardAnimation = UIViewPropertyAnimator(duration: duration, curve: curve) {
                self.textFieldBottom.constant = 0
                self.view.layoutIfNeeded()
            }
            self.hideKeyboardAnimation?.startAnimation()
        }
    }
アニメーションにはUIView.animateのメソッドも存在しますが、
こちらはアニメーション中にキャンセルが出来ません。
表示→非表示や、システムキーボード→カスタムインプットビューを素早く行った際に
アニメーションがぶつかってしまう為、UIViewPropertyAnimatorを利用しています。

カスタムインプットビューを追加する
カスタムインプットビューとは
The custom input view to display when the text field becomes the first responder.
UITextFieldにフォーカスが当たったときに表示するViewを独自に作成したViewに変更させることが出来ます。
こちらにnilの場合はデフォルトのシステムキーボードが表示され、デフォルトではnilになっています。
カスタムインプットビューは絵文字やスタンプ、
入力プリセット等サービスに特化した入力欄を用意する場合に用いられます。
カスタムインプットビューを表示/非表示する
UITextField.inputViewに対してカスタムインプットビューを追加します。
    @IBOutlet private weak var textField: UITextField!
    func showCustomInputView() {
        // 表示するカスタムインプットビューを生成
        let customInputView = generateCustomInputView()

        textField.resignFirstResponder()
        textField.inputView = customInputView
        textField.becomeFirstResponder()
    }
inputViewに対してカスタムインプットビューを設定する際に前後でresign, becomeを行っています。
これを行わなかった場合、システムキーボード表示中にカスタムインプットビューに切り替えることが出来ませんでした(要調査)
非表示にする場合はnilを代入します。
    @IBOutlet private weak var textField: UITextField!
    func hideCustomInputView() {
        textField.resignFirstResponder()
        textField.inputView = nil
        textField.becomeFirstResponder()
    }
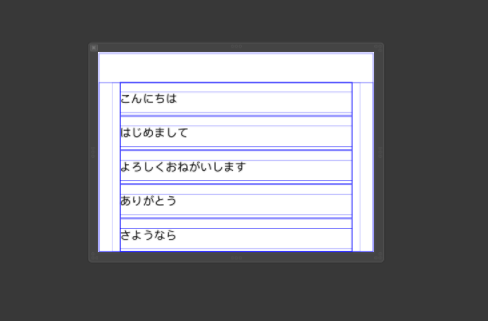
今回は例として下記のような定型文を入力する用のカスタムインプットビューを作成しました。
組み込んだ際の実際の動作は下記のようなものとなります。
システムキーボードとカスタムインプットビューの切り替えにはUIButtonのTapで行っています。
前述したとおり、UITextFieldのアニメーションにUIViewPropertyAnimatorを使っており、
表示/非表示をそれぞれキャンセル可能にしている為、
キーボードが切り替わってもスムーズに追従します。
以上