はじめに
HTMLおよびBootstrapの勉強の為に作成しました。
超初心者向けとなっております。
詳細なリファレンスは以下のページを参照ください。
http://bootstrap3.cyberlab.info/
また、Bootplyを使っているため、htmlやbodyタグは省略しております。
今回のプロジェクトでやること
Webアプリケーションでよくある入力画面と一覧画面の2つを
Bootstrapを使って簡単にカッコよくします。
それにより、HTMLおよびBootstrapについての理解を深めます。
プロジェクトを学習するために
本プロジェクトを学習するためにBootplyを用いることを推奨します。
Bootplyはその場でHTML、Javascript、CSSを実行することができ、
テスト的にWebアプリケーションを開発することができるサイトです。
Bootstrapがデフォルトで使用できるところが特徴です。
Play Nowから開始しましょう。
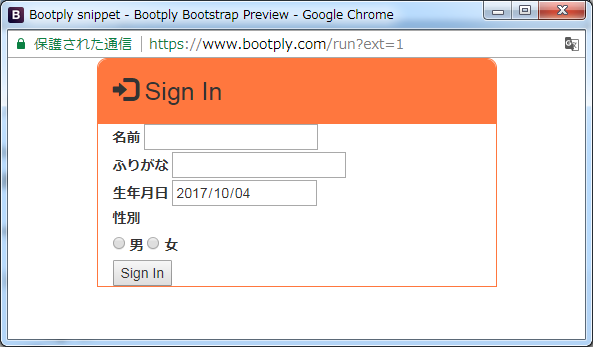
サンプル1:入力画面
会員登録画面のサンプルです。
サンプル1はこれをベースに進めていきます。
ソース
<div>
  <div>
    <div>
      Sign In
    </div>
    <form>
      <div>
        <div>
          <label>名前</label>
          <input type="text">
        </div>
        <div>
          <label>ふりがな</label>
          <input type="text">
        </div>
        <div>
          <label>生年月日</label>
          <input type="date" value="2017-10-04">
        </div>
        <div>
          <label>性別</label>
          <div>
            <label>
              <input type="radio" name="optionsRadios">
              男
            </label>
            <label>
              <input type="radio" name="optionsRadios">
              女
            </label>
          </div>
        </div>
        <button type="submit">Sign In</button>
      </div>
    </form>
  </div>
</div>
ヘッダー作り
※この部分はゴリゴリのcssです。
正直ここが一番かっこよくしている部分かもしれません。
ここではcontainerとheaderにスタイルを適用しています。
cssがしていることは以下です。
-
.containerがしていること - 最大横幅を400pxに
- 枠線を1pxのオレンジに
- 上部左右の角を丸に
-
.headerがしていること - 背景色をオレンジに
- 上部左右の角を丸に
- 内側余白を15pxに
- フォントサイズを25pxに
.container {
 	max-width:400px;
  	border: solid 1px #FF773E;
  	border-radius:10px 10px 0px 0px;
  }

.header {
  	background: #FF773E;
 	border-radius:10px 10px 0px 0px;
  	padding: 15px;
  	font-size: 25px;
  }
...
アイコン
Bootstrapは200種類のアイコンがあります。
適材適所に取り入れていきましょう。
今回はlog-inというアイコンを使いました。
アイコンはスタイルによって色やサイズを変えることができます。
今回はheaderのスタイルが適用されているため「Sign In」と同じ色、サイズになっています。
<div class="row header">
    <span class="glyphicon glyphicon-log-in" aria-hidden="true"></span>
    Sign In
</div>
...
入力フォーム
Bootstrapは入力フォームを一瞬でカッコよくしてくれます。
class属性にform-groupのあるdivを用意します。
次に、inputタグのclass属性をform-controlにします。
※inputタグすべてにこの設定を行ってください。
※今回はdivをfieldsetに変更しました。
fieldsetは入力フォームの塊としてBootstrapではよく使われています。
Javascriptを用いるとfieldset配下の入力フォームを一気に空にしたりできます。(今回は割愛します)
<form>
    <fieldset class="form-group">
      <div class="form-group">
        <label>名前</label>
        <input type="text" class="form-control">
      </div>
...
ラベル
これはBootstrapの機能ではありませんがご紹介します。
labelをlegendに変更するとカッコいいラベルになります。
<legend>名前</legend>
<input type="text" class="form-control">
...
ボタン
Bootstrapはボタンも一瞬でカッコよくしてくれます。
buttonタグのclass属性をbtnにします。(デフォルトの状態)
次に、ボタンに色を付けます。
class属性にbtn-primaryを追加します。
これでボタンが青になります。
これ以外にも以下のようなバリエーションがあります。
- btn-success(緑)
- btn-info(水色)
- btn-warning(黄色)
- btn-danger(赤)
また、ボタンを右寄せにするために
class属性にpull-rightを追加します。
これはボタンやテキストなどのインライン要素に使えます。
※以下のページに詳しく書かれています。
https://qiita.com/Rock22/items/e4e89f15c29e1415977d
<button type="submit" class="btn btn-primary pull-right">Sign In</button>
スタイル
最後にスタイルを微調整します。
ヘッダーと「名前」の間に隙間を入れます。
fieldset{
  	padding: 15px;
  }
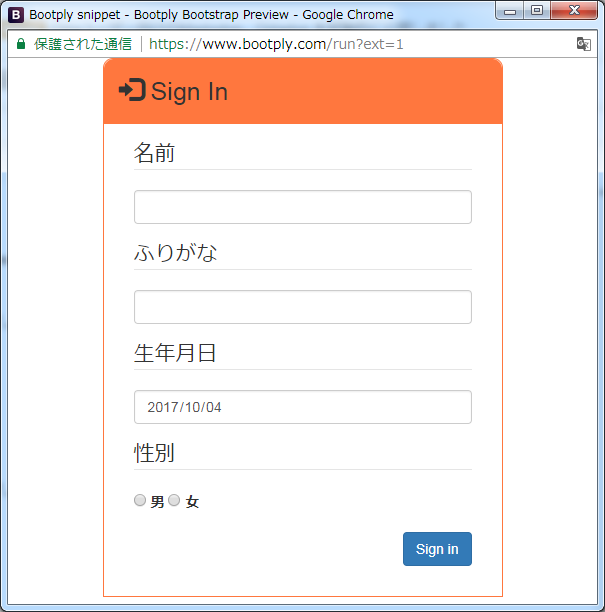
これで完成です。
ソースはこれ
<div class="container">
  <div class="row header">
    <span class="glyphicon glyphicon-log-in" aria-hidden="true"></span>
    Sign In
  </div>
  <form>
    <fieldset class="form-group">
      <div class="form-group">
        <legend>名前</legend>
        <input type="text" class="form-control">
      </div>
      <div class="form-group">
        <legend>ふりがな</legend>
        <input type="text" class="form-control">
      </div>
      <div class="form-group">
        <legend>生年月日</legend>
        <input type="date" class="form-control " value="2017-10-04">
      </div>
      <div class="form-group">
        <legend>性別</legend>
        <div>
          <label>
            <input type="radio" name="optionsRadios">
            男
          </label>
          <label>
            <input type="radio" name="optionsRadios">
            女
          </label>
        </div>
      </div>
      <button type="submit" class="btn btn-primary pull-right">Sign in</button>
    </fieldset>
  </form>
</div>
.container {
 	max-width:400px;
  	border: solid 1px #FF773E;
  	border-radius:10px 10px 0px 0px;
  }

.header {
    background: #FF773E;
 	border-radius:10px 10px 0px 0px;
  	padding: 15px;
  	font-size: 25px;
  }

fieldset{
  	padding: 15px;
  }
サンプル2:一覧画面
検索画面のサンプルです。
サンプル2はこれをベースに進めていきます。
ソース
divが多いのは目をつぶってください。。。
<div>
  <div>
    <div>
      <div>
        <div>
          <h3>
            <a>
              検索条件
            </a>
          </h3>
        </div>
        <div>
          <div>
            <form>
              <fieldset>
                <div>
                  <div>
                    <div>
                      <label>名前</label>
                    </div>
                    <div>
                      <input type="text" placeholder="テキスト入力欄">
                    </div>
                  </div>
                </div>
                <br>
                <div>
                  <div>
                    <div>
                      <label>ふりがな</label>
                    </div>
                    <div>
                      <input type="text" placeholder="テキスト入力欄">
                    </div>
                  </div>
                </div>
                <br>
                <div>
                  <div>
                    <div>
                      <label>生年月日</label>
                    </div>
                    <div>
                      <input type="text">
                    </div>
                  </div>
                </div>
                <br>
                <div>
                  <div>
                    <div>
                      <label>性別</label>
                    </div>
                    <div>
                      <select id="number" name="number">
                        <option value="1" selected="selected"> </option>
                        <option value="2">男</option>
                        <option value="3">女</option>
                      </select>
                    </div>
                  </div>
                </div>
                <br>
                <div>
                  <div>
                    <div>
                      <button>検索</button>
                      <button>クリア</button>
                    </div>
                  </div>
                </div>
              </fieldset>
            </form>
          </div>
        </div>
      </div>
    </div>
  </div>
  <div>
    <table>
      <thead>
        <tr>
          <th>選択</th>
          <th>名前</th>
          <th>ふりがな</th>
          <th>生年月日</th>
          <th>性別</th>
        </tr></thead>
      <tbody>
        <tr>
          <td>
            <input type="checkbox">
          </td>
          <td>田中 太郎</td>
          <td>たなか たろう</td>
          <td>1990/01/01</td>
          <td>男</td>
        </tr>
        <tr>
          <td>
            <input type="checkbox">
          </td>
          <td>鈴木 一郎</td>
          <td>すずき いちろう</td>
          <td>1991/02/02</td>
          <td>男</td>
        </tr>
        <tr>
          <td>
            <input type="checkbox">
          </td>
          <td>山田 花子</td>
          <td>やまだ はなこ</td>
          <td>1992/03/03</td>
          <td>女</td>
        </tr>
      </tbody>
    </table>
  </div>
  <div>
    <div>
      <button>登録</button>
    </div>
  </div>
</div>
ベース作り
Bootstrapには"グリッドシステム"というものがあります。
これを使うことで、画面サイズを変えてもスマホになっても画面レイアウトが崩れることがなくなります。
- グリッドシステムの基本
-
class属性がcontainer(固定枠)またはcontainer-fluid(流動枠)のdivを配置する
- 1.に
class属性がrowのdivを配置する - 2.配下の
class属性にcol-{prefix}-{columns}の形で記載する -
{columns}は合計が12になるようにする
col-{prefix}-{columns}の詳細は以下です。
今回は表示幅が自動のスマホサイズ(co-xs-{columns})を指定しております。
| スマホ | タブレット | PC | PC大画面 | |
|---|---|---|---|---|
| prefix | co-xs-{columns} |
col-sm-{columns} |
col-md-{columns} |
col-lg-{columns} |
| .containerの表示幅 | 自動 | 750px | 970px | 1170px |
この基本を用いてベースを作ります。
複数のrowで区切ることで、よりフレキシブルな画面レイアウトを実現できます。
<div class="container">
  <div class="row">
  ...
  </div>
  <div class="row">
  ...
  </div>
...
サンプル2では検索フォームと一覧、登録ボタンの3つの構造に分かれています。
「グリッドシステムの基本3」を適応します。
検索フォームをコンパクトにするため1つ目のrowのカラムサイズを8にしております。
<div class="container">
  <div class="row col-xs-8">
  ...
  <div class="row col-xs-12">
    <table>
  ...
  <div class="row row col-xs-12">
    <div>
      <button>登録</button>
  ...
アコーディオン
BootstrapはJavascriptも提供してます。
その一つのアコーディオンを検索フォームに適用してみたいと思います。
アコーディオンとは楽器のアコーディオンのように開閉するパネルのことです。
まずは、検索フォームをパネル化します。
- パネルの作り方
-
class属性がpanel-groupのdivを配置する
- 1.に
class属性がpanel panel-defaultのdivを配置する - 必要に応じて、2.に
panel-heading(ヘッダー)、panel-body(ボディー)、panel-footer(フッター)の何れかをclass属性に指定したdivを配置する - 必要に応じて、タイトルの
class属性にpanel-titleを指定する
今回はpanel-headingとpanel-bodyを使ってます。
<div class="container">
  <div class="row col-xs-8">
    <div class="panel-group">
      <div class="panel panel-default">
        <div class="panel-heading">
          <h3 class="panel-title">
            <a>
              検索条件
            </a>
          </h3>
        </div>
        <div>
          <div class="panel-body">
   ...
次に、アコーディオンを適応します。
- アコーディオンの作り方
-
class属性がpanel-groupのdiv要素にアコーディオン用ののidを付ける
-
class属性がpanel-titleのdiv要素にa属性を配置し、data-toggle="collapse" data-parent="1.のid" href="1.のid"を付ける -
class属性がpanel-bodyの親のdiv要素にid="1.のid" class="panel-collapse collapse in"を付ける
<div class="container">
  <div class="row col-xs-8">
    <div class="panel-group" id="sampleAccordion">
      <div class="panel panel-default">
        <div class="panel-heading">
          <h3 class="panel-title">
            <a data-toggle="collapse" data-parent="#sampleAccordion" href="#sampleAccordionCollapse1">
              検索条件
            </a>
          </h3>
        </div>
        <div id="sampleAccordionCollapse1" class="panel-collapse collapse in">
          <div class="panel-body">
   ...
パネルヘッダーをクリックすることで検索フォームを開閉することができるようになる。


アイコン
検索フォームのヘッダーにアイコンを配置する。
<span class="glyphicon glyphicon-lock" aria-hidden="true"></span>
<a data-toggle="collapse" data-parent="#sampleAccordion" href="#sampleAccordionCollapse1">
  検索条件
</a>
   ...
ラベル・入力フォーム
検索フォームはラベルと入力フォームを横並びにします。
手順は以下です。
-
class属性がform-groupのdiv要素を配置する
- 1.の配下に
class属性がrowのdiv要素を配置する - 2.の配下に
class属性がcol-{prefix}-{columns}の形のdiv要素を配置する -
{columns}は合計が12になるようにする
その他にもラベルを右寄せにしたりラベル用のクラスを設定しております。
個人的な意見ですが、ラベルを右寄せにする他のラベルとのバランスがよくなります。
<div class="form-group">
  <div class="row">
    <div class="col-xs-2 text-right">
      <label class="control-label">名前</label>
    </div>
    <div class="col-xs-8">
      <input type="text" class="form-control" placeholder="テキスト入力欄">
    </div>
  </div>
</div>
全体はこちら
...
<div class="form-group">
  <div class="row">
    <div class="col-xs-2 text-right">
      <label class="control-label">名前</label>
    </div>
    <div class="col-xs-8">
      <input type="text" class="form-control" placeholder="テキスト入力欄">
    </div>
  </div>
</div>
<br>
<div class="form-group">
  <div class="row">
    <div class="col-xs-2 text-right">
      <label class="control-label">ふりがな</label>
    </div>
    <div class="col-xs-8">
      <input type="text" class="form-control" placeholder="テキスト入力欄">
    </div>
  </div>
</div>
<br>
<div class="form-group">
  <div class="row">
    <div class="col-xs-2 text-right">
      <label class="control-label">生年月日</label>
    </div>
    <div class="col-xs-8">
      <input type="date" class="form-control">
    </div>
  </div>
</div>
<br>
<div class="form-group">
  <div class="row">
    <div class="col-xs-2 text-right">
      <label class="control-label">性別</label>
    </div>
    <div class="col-xs-3">
      <select class="form-control" id="number" name="number">
        <option value="1" selected="selected"> </option>
        <option value="2">男</option>
        <option value="3">女</option>
      </select>
    </div>
  </div>
</div>
...
検索・クリアボタン
グリッドシステムを用いて右側に配置したいと思います。
- ボタンの親要素に
class属性がcol-{prefix}-offset-{columns}の形のdiv要素を配置する
col-{prefix}-offset-{columns}は、右側に空を配置するため
これにより右側に配置することができます。
...
<div class="form-group">
  <div class="row">
    <div class="col-xs-offset-8">
      <button class="btn btn-primary">検索</button>
      <button class="btn">クリア</button>
    </div>
  </div>
</div>
...
テーブル
Bootstrapはテーブルも一瞬でカッコよくしてくれます。
-
tableタグのclass属性にtableを追加する - それ以外にも必要に応じて以下のクラスを追加する
-
table-striped(ストライプ柄の表) -
table-bordered(境界線付きの表) -
table-hover(カーソルを合わたとき、その行の背景色を変更する) -
table-condensed(セル内の余白を半分に) - etc
今回は、境界線付き&ホバーにしました。
<table class="table table-bordered table-hover">
選択列を間延びしているので縮めてみましょう。
thタグとtdタグの``class属性にclass="col-xs-1"`を付けると任意の幅に変更することができます。
※すべての行に適応してください。
<thead>
  <tr>
    <th class="col-xs-1">選択</th>
    <th>名前</th>
    <th>ふりがな</th>
    <th>生年月日</th>
    <th>性別</th>
  </tr></thead>
<tbody>
  <tr>
    <td class="col-xs-1">
      <input type="checkbox">
    </td>
    <td>田中 太郎</td>
    <td>たなか たろう</td>
    <td>1990/01/01</td>
    <td>男</td>
  </tr>
登録ボタン
以下の設定を行います。
- 右寄せ
- 緑
  <div class="row col-xs-12">
    <div class="text-right">
      <button class="btn btn-success">登録</button>
    </div>
  </div>
スタイル
最後に、検索フォームのヘッダーと一覧のヘッダーをオレンジに変更します。
fieldsetも入力画面と同じスタイルにします。
fieldset{
  	padding: 15px;
  }

.background-orange {
  	background-color: #FF773E !important;
  }
<div class="container">
  <div class="row col-xs-8">
    <div class="panel-group" id="sampleAccordion">
      <div class="panel panel-default">
        <div class="panel-heading background-orange">
...
  <div class="row col-xs-12">
    <table class="table table-bordered table-hover">
      <thead class="background-orange">
...
これで完成です。
ソースはこれ
<div class="container">
  <div class="row col-xs-8">
    <div class="panel-group" id="sampleAccordion">
      <div class="panel panel-default">
        <div class="panel-heading  background-orange">
          <h3 class="panel-title">
            <span class="glyphicon glyphicon-lock" aria-hidden="true"></span>
            <a data-toggle="collapse" data-parent="#sampleAccordion" href="#sampleAccordionCollapse1">
              検索条件
            </a>
          </h3>
        </div>
        <div id="sampleAccordionCollapse1" class="panel-collapse collapse in">
          <div class="panel-body">
            <form>
              <fieldset>
                <div class="form-group">
                  <div class="row">
                    <div class="col-xs-2 text-right">
                      <label class="control-label">名前</label>
                    </div>
                    <div class="col-xs-8">
                      <input type="text" class="form-control" placeholder="テキスト入力欄">
                    </div>
                  </div>
                </div>
                <br>
                <div class="form-group">
                  <div class="row">
                    <div class="col-xs-2 text-right">
                      <label class="control-label">ふりがな</label>
                    </div>
                    <div class="col-xs-8">
                      <input type="text" class="form-control" placeholder="テキスト入力欄">
                    </div>
                  </div>
                </div>
                <br>
                <div class="form-group">
                  <div class="row">
                    <div class="col-xs-2 text-right">
                      <label class="control-label">生年月日</label>
                    </div>
                    <div class="col-xs-8">
                      <input type="date" class="form-control">
                    </div>
                  </div>
                </div>
                <br>
                <div class="form-group">
                  <div class="row">
                    <div class="col-xs-2 text-right">
                      <label class="control-label">性別</label>
                    </div>
                    <div class="col-xs-3">
                      <select class="form-control" id="number" name="number">
                        <option value="1" selected="selected"> </option>
                        <option value="2">男</option>
                        <option value="3">女</option>
                      </select>
                    </div>
                  </div>
                </div>
                <br>
                <div class="form-group">
                  <div class="row">
                    <div class="col-xs-offset-8">
                      <button class="btn btn-primary">検索</button>
                      <button class="btn">クリア</button>
                    </div>
                  </div>
                </div>
              </fieldset>
            </form>
          </div>
        </div>
      </div>
    </div>
  </div>
  <div class="row col-xs-12">
    <table class="table table-bordered table-hover">
      <thead class="background-orange">
        <tr>
          <th class="col-xs-1">選択</th>
          <th>名前</th>
          <th>ふりがな</th>
          <th>生年月日</th>
          <th>性別</th>
        </tr></thead>
      <tbody>
        <tr>
          <td class="col-xs-1">
            <input type="checkbox">
          </td>
          <td>田中 太郎</td>
          <td>たなか たろう</td>
          <td>1990/01/01</td>
          <td>男</td>
        </tr>
        <tr>
          <td class="col-xs-1">
            <input type="checkbox">
          </td>
          <td>鈴木 一郎</td>
          <td>すずき いちろう</td>
          <td>1991/02/02</td>
          <td>男</td>
        </tr>
        <tr>
          <td class="col-xs-1">
            <input type="checkbox">
          </td>
          <td>山田 花子</td>
          <td>やまだ はなこ</td>
          <td>1992/03/03</td>
          <td>女</td>
        </tr>
      </tbody>
    </table>
  </div>
  <div class="row row col-xs-12">
    <div class="text-right">
      <button class="btn btn-success">登録</button>
    </div>
  </div>
</div>
fieldset{
  	padding: 15px;
  }

.background-orange {
  	background-color: #FF773E !important;
  }
最後に
HTMLおよびBootstrapについて理解が深まりましたら幸いです。


