はじめに
アーキテクチャや開発手法についてこれまでいくつかの教材に従った簡単なチュートリアルしかした事がないので、今回はある程度オリジナルのアプリを開発しながら実践したいと思います。
今回の内容
- 以前勉強した内容を整理する
- 開発環境を作成しflaskを起動する
- ORMとDBをセットアップする
- シンプルなpytestのサンプルを作成する
- 勉強開始を宣言する
作成したソースはGithubで公開しています。
勉強になった教材
自分の理解レベルはまだこの程度という参考として、これまでアプリケーションアーキテクチャとテスト駆動についてこれまで実践して大変勉強になった教材を紹介させて頂きます。
リバーシで学ぶアプリケーション設計入門〜仕様の整理からTypeScriptでの実装まで〜
アプリ内容:オセロ
言語:Typescript
フレームワーク:Express(Node.js)
学習内容:各種アーキテクチャの基本概念
教材元:Udemy
実践SpringBoot ~SpringBoot Advanced Tutorial~
アプリ内容:掲示板のAPI
言語:Java
フレームワーク:Springboot
学習内容:TDD、オニオンアーキテクチャ
教材元:Techpit
TDD Boot Camp 2020 Online #1
アプリ内容(関数):FizzBuzz
言語:Java
フレームワーク:なし
学習内容:TDD
教材元:Youtube(READMEに記載)
Test-Driven Development: Really, It’s a Design Technique
アプリ内容(関数):アラビア数字とローマ数字の変換
言語:Java
フレームワーク:Spring(Spring Test)
学習内容:TDD
教材元:InfoQ
アーキテクチャに関する教材を探すとSpringboot(Java)を使用したアプリ開発を題材にするものが多かったです。 これはSpringのDIコンテナがBeanと呼ばれるオブジェクトを使用し依存性注入(DI)を実現していたり、@(アノテーション)によりコンポーネントのレイヤーを簡潔に宣言する事ができるからだと感じます。
その点、Typescript(Express)を使用した教材では依存性を管理する便利機能は使用しておらず、各モジュールの依存関係を全体的に把握する事は出来ないと思います。
それだとテストを書く時モジュール毎に分離して検証する事を難しくすると思うので、その点についてはFlaskの対応方法を調べながら実装してみます。
環境構築
アプリの詳細は決めていませんが今回Docker等コンテナ技術は使用せず下記の記事を参考にfor Windowsツールで環境構築をしようと思います
pyenv 導入
pipenv 導入
上記の記事に従いツールを導入した後、pipenvによる仮想環境の構築を行います。
バージョンを指定してPythonをinstall
python3.12.0を選択
pyenv install 3.12.0
プロジェクトのpythonバージョン設定
pyenv local 3.12.0
仮想環境の作成
pipenv install --3.12.0
> Using default python from .pyenv\pyenv-win\versions\3.12.0\python.exe (3.12.0) to create virtualenv...
pipenvを使い仮想環境にflaskをインストール
pipenv install flask
仮想環境に入る
pipenv shell
app.pyを作成
from flask import Flask

app = Flask(__name__)

@app.route('/')
def index():
    return "Hello"

if __name__ == '__main__':
    app.run(debug=True)
pipenv shellを実行し仮想環境に入った状態でflask起動コマンド実行
cd src
flask run

* Debug mode: off
WARNING: This is a development server. Do not use it in a production deployment. Use a production WSGI server instead.
* Running on http://127.0.0.1:5000
Press CTRL+C to quit
APIにリクエストを送ってみる
curl http://127.0.0.1:5000

StatusCode        : 200
StatusDescription : OK
Content           : Hello
RawContent        : HTTP/1.1 200 OK
                    Connection: close
                    Content-Length: 5
                    Content-Type: text/html; charset=utf-8
                    Date: Sun, 18 Feb 2024 23:27:06 GMT
                    Server: Werkzeug/3.0.1 Python/3.12.0

                    Hello
単純なサンプルですが、Flaskをローカルで起動させ作成したエンドポイントがレスポンスを返す事を確認できました。
SQLAlchemy(ORM)でPostgreSQLと接続
PostgreSQL 導入
こちらを参考にローカルDBはPostgreSQL for windowsで準備します。
接続用のサンプルDBを作成
create database sample;
sampleデータベースに入る
\c sample
ユーザー情報のテーブルを作成
CREATE TABLE users (
    id SERIAL PRIMARY KEY,
    username TEXT NOT NULL,
    email TEXT NOT NULL,
    created_at TIMESTAMP DEFAULT CURRENT_TIMESTAMP
);
ユーザー名、パスワード、port番号をデフォルトで設定すると接続情報は以下のようになると思います。
postgresql://postgres:postgres@localhost:5432/sample
SQLAlchemy導入
pyenvで仮想環境に関連ライブラリをインストール
pyenv install sqlalchemy flask-sqlalchemy psycopg2
最終的にpipenvが管理するパッケージは以下のようになりました。
[[source]]
url = "https://pypi.org/simple"
verify_ssl = true
name = "pypi"

[packages]
flask = "*"
sqlalchemy = "*"
flask-sqlalchemy = "*"
psycopg2 = "*"

[dev-packages]

[requires]
python_version = "3.12"
app.pyにDB接続、DBセッション作成、モデル定義、レコード挿入、APIの処理を書いてみる。
from flask import Flask, jsonify
from flask_sqlalchemy import SQLAlchemy
from datetime import datetime
from dataclasses import dataclass


app = Flask(__name__)

# PostgreSQLの接続情報を設定(.envに設置すべき情報)
app.config['SQLALCHEMY_DATABASE_URI'] = 'postgresql://{user}:{password}@{host}/sample'.format(**{
                'user': 'postgres',
                'password': 'postgres',
                'host': 'localhost:5432'})

# SQLAlchemyの初期化
db = SQLAlchemy(app)

# データベースモデルの定義
@dataclass
class User(db.Model):
    __tablename__ = 'users'

    id = db.Column(db.Integer, primary_key=True)
    username = db.Column(db.String(80), unique=True, nullable=False)
    email = db.Column(db.String(120), unique=True, nullable=False)
    created_at = db.Column(db.TIMESTAMP, default=datetime.utcnow)

# ユーザー名が存在しない場合のみデータを挿入
def insert_user_if_not_exists(username, email):
    try:
        # データ処理
        if not User.query.filter_by(username=username).first():
            new_user = User(username=username, email=email)
            db.session.add(new_user)
        else:
            print(f"User '{username}' already exists.")

        db.session.commit()
    except Exception:
        db.session.rollback()
        # raiseでExceptionを返す
        raise

# コンテキスト内でDB操作を行う
with app.app_context():
    # データを挿入
    insert_user_if_not_exists('john_doe', 'john@example.com')
    insert_user_if_not_exists('jane_smith', 'jane@example.com')

# ルーティング
@app.route('/')
def index():
    # SQLAlchemyのモデルを使用しUserテーブルから全レコードを取得
    users = User.query.all()
    user_list = []
    for user in users:
        user_data = {
            'id': user.id,
            'username': user.username,
            'email': user.email
        }
        user_list.append(user_data)
    # リスト化してjsonで返す
    return jsonify(user_list)

if __name__ == '__main__':
    app.run(debug=True)
APIにリクエストを送ってみる
curl http://127.0.0.1:5000

StatusCode        : 200
StatusDescription : OK
Content           : [{"email":"john@example.com","id":1,"username":"john_doe"},{"email":"jane@example.com","id":2,"username":"jane_smith"}]
リスト化されたユーザー情報が取得できました。
FlaskからSQLAlchemyを使用してDB操作を行う簡単なサンプルができました。
pytestとVScode設定
テストライブラリとしてpytestをインストールします。
pipenv install pytest
シンプルな単体テストのサンプルとしてsrcにテスト対象のファイルを追加します。
class Sample:
    """Sampleクラス"""

    def add_and_double(self, x, y):
        """xとyを足して2倍した値を返却する

        Args:
            x: 入力値1
            y: 入力値2
        """
        # intでない場合は、ValueErrorとする
        if not isinstance(x, int) or not isinstance(y, int):
            raise ValueError

        # 計算処理
        result = x + y
        result *= 2

        return result

sample = Sample()
print(sample.add_and_double(3,4))
testsフォルダを作成しsample.pyに対するテストを作成します。
from src import sample
import pytest

class TestSample:
    """Sampleクラスのテスト用クラス"""

    # @classmethod:インスタンス化したオブジェクトではなくクラスへの変更を行う
    # setup_class:クラス生成時に実行される。引数は生成されるクラス自身
    @classmethod
    def setup_class(cls):
        # テスト対象のsampleクラスをインスタンス化してTestSampleクラス変数に保持
        cls.temp = sample.Sample()

    def test_add_and_double(self):
        """テストケース1: 正常計算"""
        # selfから自分自身のクラス変数としてadd_and_double関数を呼び出す
        assert self.temp.add_and_double(1, 1) == 4
        assert self.temp.add_and_double(2, 2) == 8
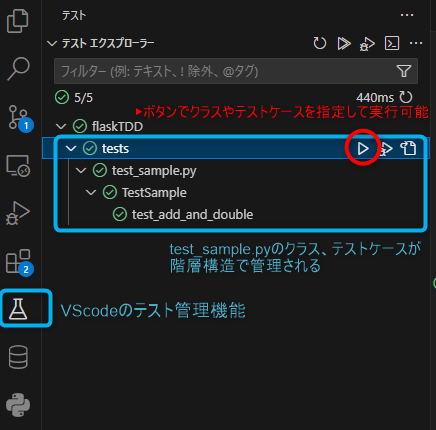
VScodeに設定を行う事でテストを管理できます。
pythonのunitテスト機能を使用せずpytestを使う設定とテストコードが置いてあるディレクトリを指定しています。
{
	"python.testing.pytestArgs": ["tests"],
	"python.testing.unittestEnabled": false,
	"python.testing.pytestEnabled": true
}
上記設定を行うとtestsフォルダの各テストケースが階層構造で管理されます。
またディレクトリやクラス、テストケース毎の実行も▶ボタンで実行できるようになります。
上記のテストは単純な計算を行う関数に対するテストだったため難しくなかったですが、対象がアプリの機能になってくると、リクエスト内容やロジック、DBの整合性などチェックする項目がとても多くなると思います。
またカバレッジの出力と表示方法について、こちらの記事を参考に設定しました。
実践したい内容
app.pyに記載したコードはかなり簡略化されていますが、リクエストからDB処理、レスポンスの返却というWebアプリの一部の流れを再現できてはいると思います。
ただこの調子でコードを追加していくとほどなくして開発が崩壊すると思います。
そうならないようレイヤー毎に役割分担を行い関係性を整理してテストを書きながら安全に開発できるようになりたいところです。
今後はSNSアプリの作成を通じて実装内容が多くなってきた時でも保守性や拡張性を維持できるような技術を勉強したいと思います。
まとめ
- 以前勉強した内容を整理する
- 開発環境を作成しflaskを起動する
- ORMとDBをセットアップする
- シンプルなpytestのサンプルを作成する
- 勉強開始を宣言する
次回の内容
アーキテクチャとディレクトリ構造の検討

