0.アプリを作成した経緯
自分は元々SEとして、プログラミングやテスト実施、セキュリティ脆弱診断などをしていました。これから先のキャリアを考えたときに自分の強みがないこと、本当にやりたいことを考えたとき、機械学習エンジニアやデータサイエンティストなどの仕事に興味を持ったのがきっかけで、Aidemyで基礎から勉強してみようと思いました。
成果物としてBTSのメンバーの顔を識別するアプリケーションを作成しましたので、それについてまとめます。
作成した環境は以下の通りです。
- windows10
- python3.6.10
- anaconda1.7.2
- tensorflow2.0.0
- face-recognition1.3.0
- (一部Google Colabを使用)
1.画像収集
BTSのメンバーの顔写真を集めるため、googleとNaverからスクレイピングと手動でトリミングを行い、各メンバー200枚ほど画像を集めました。Naverは韓国のインターネットサービスで、BTSのメンバーの写真が多くあり、ありがたかったです。以下にNaverでスクレイピングした際のコードを記載します。
実行環境
- Google Colab
!apt-get update
!apt install chromium-chromedriver
!cp /usr/lib/chromium-browser/chromedriver /usr/bin
!pip install selenium

from selenium import webdriver
from selenium.webdriver.common.keys import Keys
from selenium.webdriver.chrome.options import Options
import requests
from bs4 import BeautifulSoup
import urllib
import time
import os

def scrollDownAllTheWay(driver):
    old_page = driver.page_source
    while True:
        for i in range(2):
            scrollDown(driver,200)#どの程度スクロールさせるか
            time.sleep(3)#読み込まないページの待機時間
        new_page = driver.page_source
        if new_page != old_page:
            old_page = new_page
        else:
            break
    return True

def scrollDown(driver, value):
    driver.execute_script("window.scrollBy(0,"+str(value)+")")

# ブラウザを開く
option = Options()
option.add_argument('--headless')
option.add_argument('--no-sandbox')
option.add_argument('--disable-dev-shm-usage')
driver = webdriver.Chrome('chromedriver',options=option)  # ブラウザをバックグラウンドで起動(この行をコメントアウトすることでブラウザの動作を確認することができる)

# 対象のページを開く
driver.get("----対象のURLを指定する----")
time.sleep(3)  # レンダリングのため3秒待機

scrollDownAllTheWay(driver)
time.sleep(3)  # レンダリングのため3秒待機

# レンダリング後のhtmlを取得する
html = driver.page_source

# imgタグの要素を取得する
soup = BeautifulSoup(html, "lxml")
images = soup.find_all('img', class_='_image _listImage')

# 画像ダウンロードのための関数を定義する
def download_file(url, path):
    try:
        with urllib.request.urlopen(url) as web_file, open(path, 'wb') as local_file:
            local_file.write(web_file.read())
    except urllib.error.URLError as e:
        print(e)

# 保存先ディレクトリがない場合作成する
directry = './bts_pic/v/'
if not os.path.isdir(directry):
    os.makedirs(directry)

# 画像のURLを取得し、ダウンロードを実施する
i = 1
for target in images:
    url = target['src']
    if not 'jpg' in url:
        continue
    path = directry + 'img_' + str(i) + '.jpeg'
    download_file(url, path)
    i += 1
print("finished")
2.画像加工
BTSのメンバーは髪色をよく変えているので、髪色によってモデルの精度が変わってしまうことを考え、集めた画像を白黒画像に変換しました。cv2を用いて白黒画像に変換し、保存しなおしました。
各メンバーによって多少画像数が異なっていたため、for文のrangeのとディレクトリの部分はメンバーによって適宜変更してコードを実行しました。
import cv2
import numpy as np

# 画像を白黒に変換する
for i in range(1,201):
    img = cv2.imread('member/V/V_' + str(i) + '.jpg')
    img_gray = cv2.cvtColor(img, cv2.COLOR_BGR2GRAY)
    cv2.imwrite('member_gray/V/V_' + str(i) + '.jpg', img_gray)
さらに髪型(明るめ、暗め、前髪分けなど)に左右されないようにするため、顔だけ検出するコードも作成しました。
最初は顔だけを切り取るためにopenCVを使用していましたが、耳だけの画像や顔を検出できなかった画像が多く、学習に使用する画像数が減ってしまいました。そこでface_recognitionライブラリを使用してみました。OpenCVより顔検出がうまくできていて、画像数もそんなに減りませんでした。
face_recognitionライブラリはうまく顔検出できないとエラーが発生してしまうので、顔検出ができなかった画像については、元の画像を出力するようif文で指定しています。face_recognitionで顔検出のコードを実行したあと、手動でうまく検出できなかったが画像を削除しました。枚数はそんなに多くなかったので、時間はかかりませんでした。
1.で白黒画像に変換する際に変換に時間がかかった、ローカルPCで(model='hog')で試したところ、HOG特徴量では認識できなかった、GPUを使用したかったため(model='cnn'とすることで高精度な顔認識ができる)、こちらはGoogle Colabで実行しました(ローカルPCにはGPUは搭載されていませんでした)。
(実行した後からですが、try-except文でエラー処理を行えば、手動で削除する手間を省けたなと気づきました(Aidemyのチューターさんからのアドバイスです)。)
# google colaboratoryで実行
# !pip install face_recognition

import os
from pathlib import Path
import subprocess
import sys
import cv2
import numpy as np
import face_recognition

input_path = '/content/drive/MyDrive/JIN'
output_path = '/content/drive/MyDrive/JIN_change'
os.makedirs(output_path, exist_ok=True)

path_obj = Path(input_path)
files_path = path_obj.glob('*')

def get_face_location(img_path):
    img = cv2.imread(img_path)
    height = img.shape[0]
    width = img.shape[1]
    image = face_recognition.load_image_file(img_path)
    location = face_recognition.face_locations(image, model='cnn',number_of_times_to_upsample=2)
    if location == []:
      location = [(0,width,height,0)]
    top = location[0][0]
    right = location[0][1]
    bottom = location[0][2]
    left = location[0][3]
    return top, right, bottom, left

file_path_posix = [file_path.as_posix() for file_path in files_path]

for file_path in file_path_posix:
    file_name = file_path.split('/')[-1]
    top, right, bottom, left = get_face_location(file_path)
    img = cv2.imread(file_path)
    img_face = img[top:bottom, left:right]
    cv2.imwrite(f'{output_path}/{file_name}',img_face)
3. モデルの作成、学習
herokuに作成したアプリをデプロイするために、anacondaで仮想環境を作成し、作成した仮想環境(ローカル)でモデルの作成を行いました。以前、他のアプリケーションをherokuにデプロイした際、ライブラリのバージョンが合わなかったのか、最新のバージョンだとbuildに失敗してしまったことがあるため、pythonなどのバージョンなどは下げています(0.で記載した環境です)。
'''
BTSのメンバーを分類するモデルを作成
'''

MEMBER = ["J-HOPE","JIMIN","JIN","JUNGKOOK","RM","SUGA","V"]
# 画像とラベルを保存
X = []
y = []
# メンバーの画像を読み込み
def read_dir_img(member,label):
    for i in os.listdir("member_0409/" + member + "/"):
        X.append(image.img_to_array(image.load_img("member_0409/" + member+"/"+i,target_size=(150,150,1),grayscale=True)))
        y.append(label)

for j in range(len(MEMBER)):
    read_dir_img(MEMBER[j],j)

# データのロード
X_train, X_test, y_train, y_test = train_test_split(X,y,test_size=0.2,random_state=42)
# list型をnumpy配列に変換
X_train = np.array(X_train)
X_test = np.array(X_test)
# 正解ラベルをOnne-hot形式に変換
y_train = to_categorical(y_train)
y_test = to_categorical(y_test)

# モデルの定義
model = Sequential()
model.add(Conv2D(filters=64, kernel_size=(3, 3),input_shape=(150,150,1)))
model.add(Activation('relu'))
model.add(Conv2D(filters=64, kernel_size=(3, 3)))
model.add(Activation('relu'))
model.add(Dropout(0.25))
model.add(MaxPooling2D(pool_size=(2, 2)))
model.add(Activation('relu'))
model.add(Conv2D(filters=32, kernel_size=(5, 5)))
model.add(Activation('relu'))
model.add(Dense(64))
model.add(Dropout(0.25))
model.add(Flatten())
model.add(Dense(32))
model.add(Dropout(0.25))
model.add(Dense(7,activation='softmax'))

model.compile(loss='categorical_crossentropy',
              optimizer='adadelta',
              metrics=['accuracy'])

history = model.fit(X_train, y_train,
          batch_size=128,
          epochs=150,
          verbose=1,
          validation_data=(X_test, y_test))

# 精度の評価
scores = model.evaluate(X_test, y_test, verbose=1)
print('Test loss:', scores[0])
print('Test accuracy:', scores[1])

# 予測(テストデータの先頭の10枚)
pred = np.argmax(model.predict(X_test[0:10]), axis=1)
y_pred = model.predict_classes(X_test)
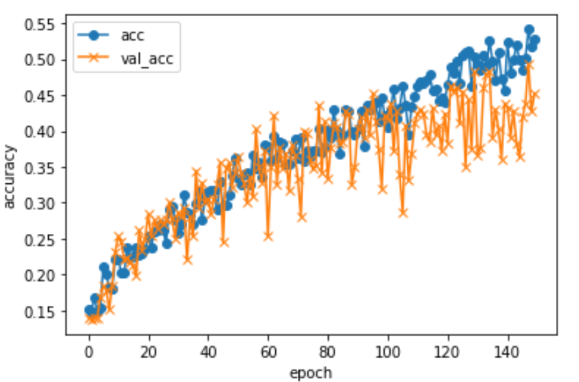
作成したモデルに対して、精度がどれくらいか・エポック数は適切かを確認するために以下のコードも実行しました。
エポック数120あたりで収束しているので、エポック数は適切であると判断しました。
## accとval_accのプロット
plt.plot(history.history["accuracy"], label="acc", ls="-", marker="o")
plt.plot(history.history["val_accuracy"], label="val_acc", ls="-", marker="x")
plt.ylabel("accuracy")
plt.xlabel("epoch")
plt.legend(loc="best")
plt.show()
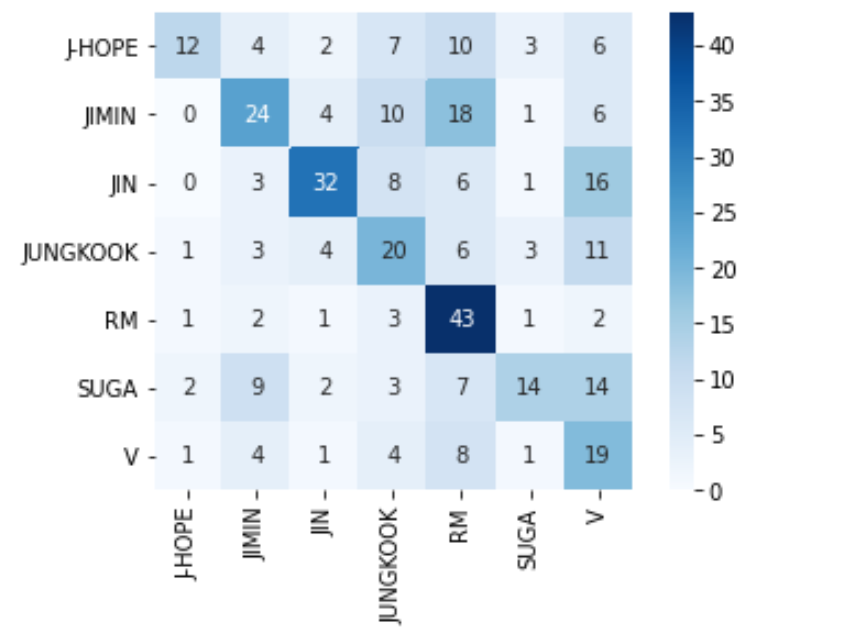
一番精度が良かったモデルを上記に記載しました。30パターン試した結果です。
Test loss: 3.5982584953308105
Test accuracy: 0.45179063081741333
0.45と精度が低かったのですが、混同行列などを見るとまあまあメンバーの顔の識別ができているのかなと思われます。
# 混同行列表示
y_true = np.argmax(y_test,axis=1)
cm = confusion_matrix(y_true,y_pred)
cm = pd.DataFrame(data=cm,index=MEMBER,columns=MEMBER)
sns.heatmap(cm,square=True,cbar=True,annot=True,cmap='Blues')
plt.show()
4. 考察
各メンバーの髪型や表情、メイクなどが結構な頻度で変わってしまうためか、なかなか精度が上がらず、難しかったです。
1メンバーあたりの画像数が少ないのが精度が低い原因と思われます。
5. 最後に
8割~9割の精度を目指していたので、これからも精度を上げるために試行錯誤を繰り返していきたいと思います。
現在、画像数を増やしてモデルの作成中です。
herokuにアプリをデプロイしたので、ご興味があれば見ていただけると幸いです(精度が低いので当てることは難しいですが...)。
https://bts-judgment.herokuapp.com/
https://github.com/natsupon/BTS_Judgment
参考URL
参考にさせていただきました、ありがとうございます。