
前提
この記事では.Netに実装されているタイマークラスが、独自に描画するスムーズなアニメーションに対応できないことを題材にしています。そして、その問題に対しての答えを示します。
独自に描画するというのは、例えばグラフのアニメーションとかスクロールアニメーションといったところでしょうか。
スムーズなアニメーションとは、現在の標準なリフレッシュレート60Hz-120Hzでなめらかに動作するアニメーションを指します。
リフレッシュレート120Hzでなめらかに動作するアニメーションを実現するということは、約8ミリ秒(1秒/120)ごとに描画を更新する120fpsということです。
.Netに実装されているタイマーの種類
System.Windows.Forms.Timer
WinFormsで使用できるタイマークラスです。
コールバックのイベントがUIスレッドで呼び出され、そのあたりを考慮せずに実装できます。
System.Timers.Timer
スレッドプールスレッドでイベントを発生させます。
コールバック時にUIスレッドへのアクセスを考慮する必要があります。
System.Threading.Timer
System.Timers.Timerと似たようなもので、使い方が少し違うだけです。
結論
検証は後述しますが、表題の通り.Netに実装されているタイマー機能を使用しては120fpsを実現できません。
ではどうするか
1. timeBeginPeriodを使用する
timeBeginPeriodを実行するとプロセス内でタイマーの割り込み頻度が上がり、System.Timers.Timerや、System.Threading.Timer、Task.Delayなどの精度が向上します。System.Windows.Forms.Timerは変わりません。
この関数を呼び出した後はプロセス内におけるすべてのタイマーの精度が向上します。
そして、タイマー使用後は必ずtimeEndPeriodを呼び出してタイマーの割り込み頻度を元に戻さなくてはなりません。
2. CreateWaitableTimerExを使用する
CreateWaitableTimerExは高精度な待機を行う関数です。
timeBeginPeriodを呼び出す必要はなく、プロセス全体に影響を与えません。
どちらを選択するか
既存のコードで.Netのタイマークラスを使用している場合、手軽に精度を向上させるtimeBeginPeriodを使用するのも一つの手だとは思います。
しかし、対象のタイマー処理以外にも影響を与えてしまうtimeBeginPeriodはなるべく避けるべきでしょう。
CreateWaitableTimerExを使用することを私はお勧めします。
.Netのタイマー機能の検証
以下、それぞれの検証になります。※終了処理は省略してます。
System.Windows.Forms.Timer
public static void Test1()
{
    var stopwatch = new Stopwatch();

    var timer = new System.Windows.Forms.Timer();
    timer.Interval = (int)(1000.0 / 120.0);
    timer.Tick += (_, _) =>
    {
        Console.WriteLine(stopwatch.ElapsedMilliseconds);
        stopwatch.Restart();
    };
    timer.Enabled = true;
}
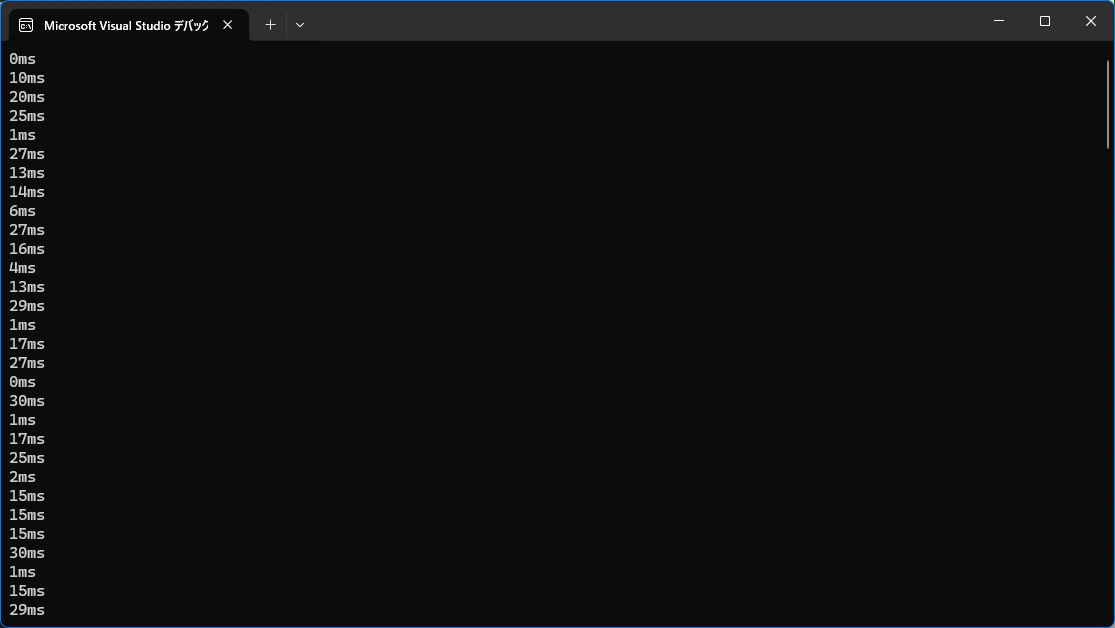
60fpsでもきついですね。
System.Timers.Timer
public static void Test2()
{
    var stopwatch = new Stopwatch();

    var timer = new System.Timers.Timer((int)(1000.0 / 120.0));
    timer.AutoReset = true;
    timer.Elapsed += (_, _) =>
    {
        SynchronizationContext.Current.Post(_ =>
        {
            Console.WriteLine($"{stopwatch.ElapsedMilliseconds}ms");
            stopwatch.Restart();
        }, null);
    };
    timer.Start();
}
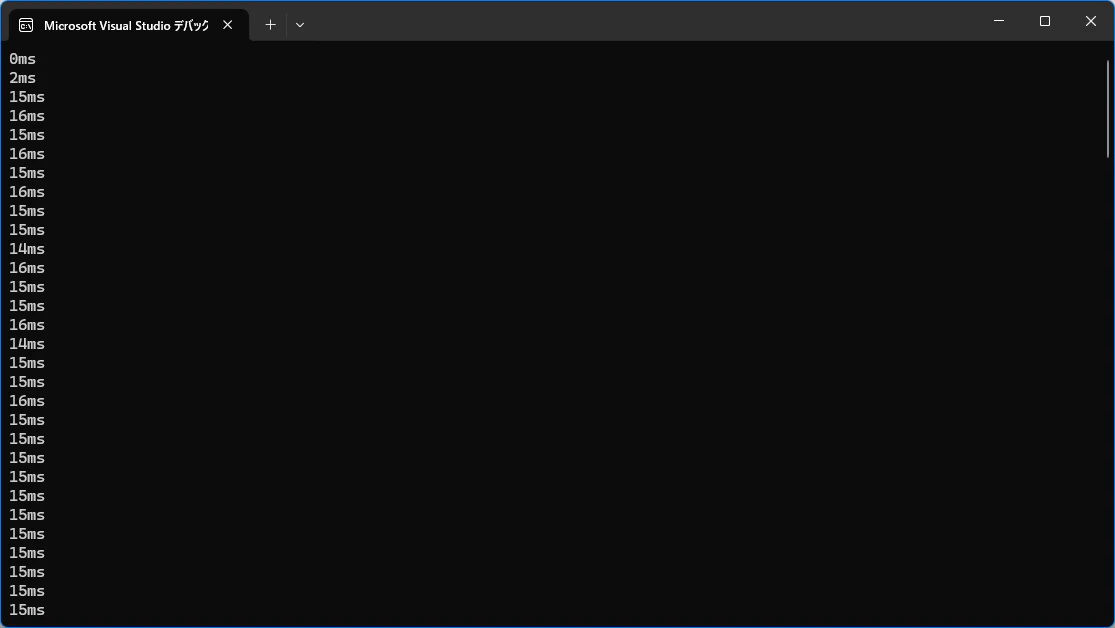
60fpsならギリというところでしょうが、目の肥えた今の時代のアニメーションではカクついて見えると思います。
System.Threading.Timer
public static void Test3()
{
    var stopwatch = new Stopwatch();

    var timer = new System.Threading.Timer(_ =>
    {
        SynchronizationContext.Current.Post(_ =>
        {
            Console.WriteLine($"{stopwatch.ElapsedMilliseconds}ms");
            stopwatch.Restart();
        }, null);
    }, null, 0, (int)(1000.0 / 120.0));
}

System.Timers.Timerと同じですね。
System.Threading.Timer と timeBeginPeriod
[DllImport("winmm.dll")]
private static extern int timeBeginPeriod(int period);

public static void Test3()
{
    _ = timeBeginPeriod(1);

    var stopwatch = new Stopwatch();

    var timer = new System.Threading.Timer(_ =>
    {
        SynchronizationContext.Current.Post(_ =>
        {
            Console.WriteLine($"{stopwatch.ElapsedMilliseconds}ms");
            stopwatch.Restart();
        }, null);
    }, null, 0, (int)(1000.0 / 120.0));
}
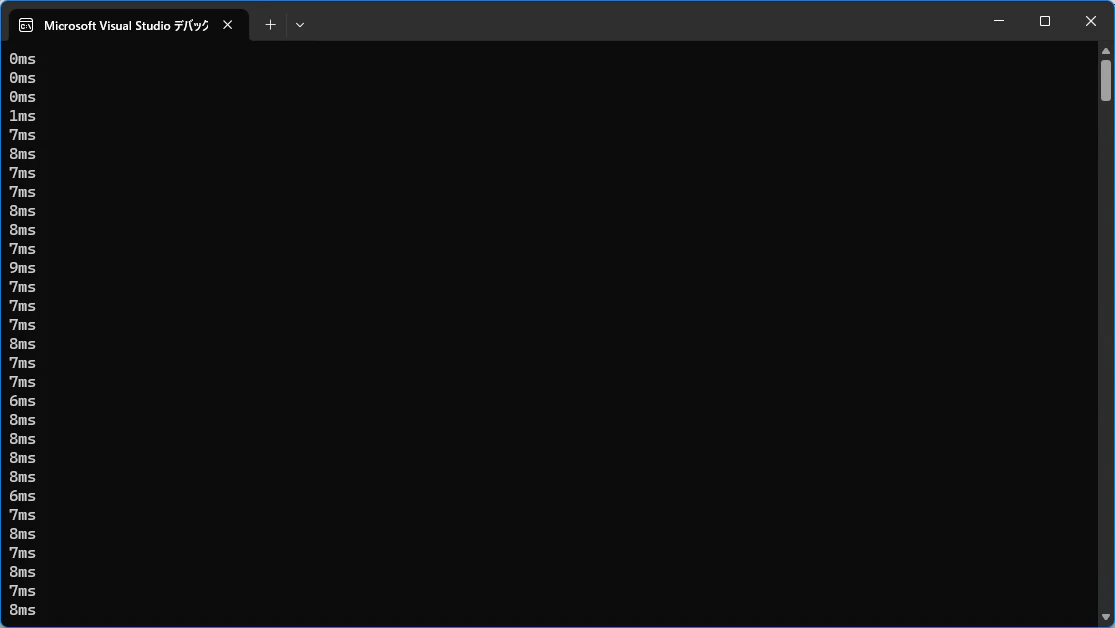
120fpsが実現できています。
ただし、前述の通りタイマー処理以外にも影響を与えますし、タイマー処理が終了したら必ずtimeEndPeriodを呼び出す必要があります。
CreateWaitableTimerExの検証
まずはざっくりCreateWaitableTimerExを使用してタイマーライクに動作するクラスを実装します。
検証クラス
public sealed class AnimationTimer
    : IDisposable
{
    private const uint CREATE_WAITABLE_TIMER_HIGH_RESOLUTION = 0x00000002;
    private const uint TIMER_ALL_ACCESS = 0x1F0003;

    [DllImport("kernel32.dll", SetLastError = true)]
    private static extern IntPtr CreateWaitableTimerEx(
        IntPtr lpTimerAttributes,
        string? lpTimerName,
        uint dwFlags,
        uint dwDesiredAccess);

    [DllImport("kernel32.dll", SetLastError = true)]
    private static extern bool SetWaitableTimer(
        IntPtr hTimer,
        ref long pDueTime,
        int lPeriod,
        IntPtr pfnCompletionRoutine,
        IntPtr lpArgToCompletionRoutine,
        bool fResume);

    [DllImport("kernel32.dll", SetLastError = true)]
    private static extern bool CancelWaitableTimer(IntPtr hTimer);

    [DllImport("kernel32.dll", SetLastError = true)]
    private static extern uint WaitForSingleObject(IntPtr hHandle, uint dwMilliseconds);

    [DllImport("kernel32.dll", SetLastError = true)]
    private static extern bool CloseHandle(IntPtr hObject);

    private readonly Action _tick;
    private IntPtr _hTimer = IntPtr.Zero;
    private CancellationTokenSource? _cts = null;
    private Task? _task = null;
    private bool _enable = false;
    private bool _disposed = false;

    public AnimationTimer(Action tick)
    {
        this._tick = tick;
    }

    public void Dispose()
    {
        if (this._disposed)
        {
            return;
        }

        this.Stop();
        this._disposed = true;

        GC.SuppressFinalize(this);
    }

    public void Start(int intervalMs)
    {
        if (this._enable)
        {
            this.Stop();
        }

        this._enable = true;

        this._hTimer = CreateWaitableTimerEx(
            IntPtr.Zero,
            null,
            CREATE_WAITABLE_TIMER_HIGH_RESOLUTION,
            TIMER_ALL_ACCESS);
        if (this._hTimer == IntPtr.Zero)
        {
            throw new InvalidOperationException("タイマーの作成に失敗しました");
        }

        var dueTime = -10000L * intervalMs;
        SetWaitableTimer(this._hTimer, ref dueTime, intervalMs, IntPtr.Zero, IntPtr.Zero, false);

        this._cts = new CancellationTokenSource();
        var token = this._cts.Token;

        this._task = Task.Run(() =>
        {
            try
            {
                while (!token.IsCancellationRequested)
                {
                    if (WaitForSingleObject(this._hTimer, 0xFFFFFFFF) == 0)
                    {
                        if (!token.IsCancellationRequested)
                        {
                            this._tick();
                        }
                    }
                }
            }
            finally
            {
                CancelWaitableTimer(this._hTimer);
                CloseHandle(this._hTimer);
                this._hTimer = IntPtr.Zero;
            }

        }, token);
    }

    public void Stop()
    {
        if (this._cts != null)
        {
            this._cts.Cancel();
            this._task?.GetAwaiter().GetResult();
            this._cts.Dispose();
            this._cts = null;
        }

        this._task = null;
        this._enable = false;
    }
}
検証
public static void Test4()
{
    var stopwatch = new Stopwatch();

    var timer = new AnimationTimer(() =>
    {
        SynchronizationContext.Current.Post(_ =>
        {
            Console.WriteLine($"{stopwatch.ElapsedMilliseconds}ms");
            stopwatch.Restart();
        }, null);
    });
    timer.Start((int)(1000.0 / 120.0));
}
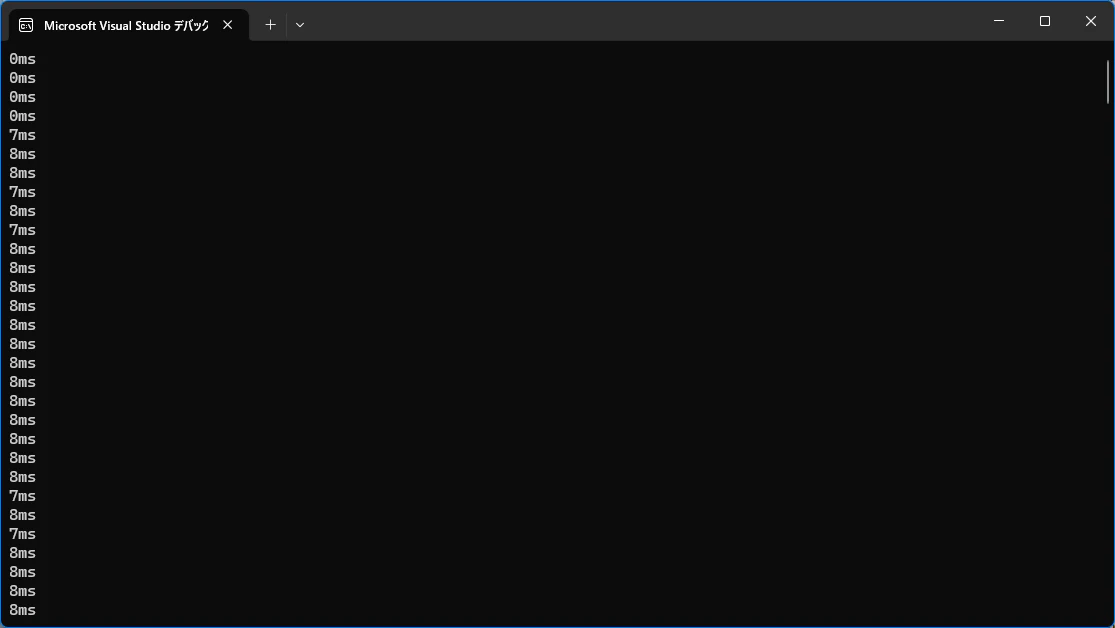
120fpsが実現できています。
この記事は以上になります。