M5Atom(M5Stack)シリーズのATOM EchoでMQTT周りを試してみます。
LチカのプログラムはM5Atomシリーズで動きそうですが、MQTT周りのプログラムはATOM Echo(ESP32 pico)じゃなくても他のESP32シリーズでも動くと思います。
Arduino IDEではなくPlatformIOで実行しています。
環境
- Mac Book Air M2 / macOS Venture
- PlatformIO
- Node.js v20.0.0
ATOM Echoの挙動を試すLチカ
こちらの記事をもとにとりあえずLチカサンプルを試してみました。
RGBがズレてそうだったのでそこだけ少し直しました。
#include "M5Atom.h"

uint32_t convert(CRGB color) {  // GRB
  return (color.r << 16) | (color.g << 8 ) | color.b;
}

void setup() {
  M5.begin(true, false, true);
}

uint8_t state = 0;

void loop() {
  M5.update();  // ボタン状態更新
  CRGB color = 0;
  switch(state >> 2) {
    case 0:
      color = CRGB::Red;
      break;
    case 1:
      color = CRGB::Green;
      break;
    case 2:
      color = CRGB::Blue;
      break;
    default:;
      color = 0;
  }
  M5.dis.drawpix(0, convert(color));
  delay(50);
  if (!M5.Btn.isPressed()) {
    state = ++state & 0xf;
  }
}
; PlatformIO Project Configuration File
;
;   Build options: build flags, source filter
;   Upload options: custom upload port, speed and extra flags
;   Library options: dependencies, extra library storages
;   Advanced options: extra scripting
;
; Please visit documentation for the other options and examples
; https://docs.platformio.org/page/projectconf.html

[env:m5stack-atom]
platform = espressif32
board = m5stack-atom
framework = arduino
lib_deps =
	m5stack/M5Atom@^0.1.0
	fastled/FastLED@^3.5.0

monitor_speed = 115200
test.mosquitto.orgを使ってMQTTを利用する
※後述するshifter.ioが便利だったのでスキップしても良いかも
test.mosquitto.orgを使ってMQTTを利用する場合以下の記事を参考に作れました。
#include <PubSubClient.h>
#include <WiFi.h>
char ssid[] = ""; //WiFiのSSID
char pass[] = ""; //WiFiのパスワード
const char* mqtt_server = "test.mosquitto.org";
const char* mqtt_topic = "n0bisuke/ESP32/TEST/TOPIC";

WiFiClient mqttClient;
PubSubClient client(mqttClient);

char mqtt_clientid[32];

void callback(char* topic, byte* payload, unsigned int length) {
    char payload_ch[32];
    int chlen = min(31, (int)length);
    memcpy(payload_ch, payload, chlen);
    payload_ch[chlen] = 0;

    Serial.println(payload_ch);
}

void wait_mqtt() {
    if (!client.connected()) {
        Serial.print("Waiting MQTT connection...");
        while (!client.connected()) { // 非接続のあいだ繰り返す
            if (client.connect(mqtt_clientid)) {
                client.subscribe(mqtt_topic);
            } else {
                delay(2000);
            }
        }
        Serial.println("connected");
    }
}

void setup() {
    Serial.begin(115200);

    Serial.print("connecting wifi");
    WiFi.mode(WIFI_STA);
    if (String(WiFi.SSID()) != String(ssid)) {
        WiFi.begin(ssid, pass);
    }
    WiFi.setSleep(false);
    while (WiFi.status() != WL_CONNECTED) {
        delay(500);
        Serial.print(".");
    }
    Serial.println("connected");

    byte mac_addr[6];
    WiFi.macAddress(mac_addr);
    sprintf(mqtt_clientid, "ESP32CLI_%02x%02x%02x%02x%02x%02x", mac_addr[0], mac_addr[1], mac_addr[2], mac_addr[3], mac_addr[4], mac_addr[5]);

    client.setServer(mqtt_server, 1883);
    client.setCallback(callback);
}

void loop() {
    wait_mqtt();
    client.loop();

    // client.publish(mqtt_topic, "test publish"); //送信はこう
}
設定は以下のような感じで、PubSubClientのライブラリが追加されてます。
現時点でのパッと見の更新が2020年ほどで止まっていて怪しい感じもありますが、他も試してみたところ一番よさそうな雰囲気でした。
[env:m5stack-atom]
platform = espressif32
board = m5stack-atom
framework = arduino
lib_deps =
	m5stack/M5Atom@^0.1.0
	fastled/FastLED@^3.5.0
	Wire
	knolleary/PubSubClient@^2.8
通信を確認するために別のクライアントをNode.jsで実装して試します。
$ npm init -y && npm i mqtt
const mqtt = require("mqtt");

const client = mqtt.connect("mqtt://test.mosquitto.org", {
  clientId: "javascript",
});

client.on("connect", function () {
  console.log("connected!");

  client.subscribe("n0bisuke/ESP32/TEST/TOPIC");
});

client.on("message", function (topic, message) {
  console.log(topic + ": " + message.toString());

  client.publish("n0bisuke/ESP32/TEST/TOPIC", "MQTT.jsを用いたパブリッシュ");
});
この辺り @youtoy さんの記事がすごく参考になっています。

こんな感じでうまく接続できました。
shifter.ioのパブリックインスタンスでMQTTを使ってみる
shifter.ioはMQTTのブローカーサービスです。
https://www.shiftr.io/try にアクセスするとmqtt://public:public@public.cloud.shiftr.ioのアドレスが表示されています。接続してMQTTを試せる場を提供してくれていて、公開される代わりに無料で使えます。
shiftr.ioの公式にArduino向けの接続ドキュメントが書いてありますが、PlatformIOで利用する際は256dpi/MQTTを追加することで使えました。
また、GitHubのこちらのサンプルが使えそうだったのでこちらを真似して書いてみます。
#include <WiFiClientSecure.h>
#include <MQTT.h>

const char ssid[] = ""; //ssid
const char pass[] = ""; //password

WiFiClientSecure net;
MQTTClient client;

unsigned long lastMillis = 0;

void connect() {
  Serial.print("checking wifi...");
  while (WiFi.status() != WL_CONNECTED) {
    Serial.print(".");
    delay(1000);
  }

  Serial.print("\nconnecting...");
  net.setInsecure();
  while (!client.connect("arduino", "public", "public")) {
    Serial.print(".");
    delay(1000);
  }

  Serial.println("\nconnected!");

  client.subscribe("/n0bisuke/hello");
}

void messageReceived(String &topic, String &payload) {
  Serial.println("incoming: " + topic + " - " + payload);
}

void setup() {
  Serial.begin(115200);
  WiFi.begin(ssid, pass);

  client.begin("public.cloud.shiftr.io", 8883, net);
  client.onMessage(messageReceived);

  connect();
}

void loop() {
  client.loop();
  delay(10);  // <- fixes some issues with WiFi stability

  if (!client.connected()) {
    connect();
  }

  // publish a message roughly every second.
  if (millis() - lastMillis > 1000) {
    lastMillis = millis();
    client.publish("/n0bisuke/hello", "world");
  }
}
client.connect("arduino", "public", "public")の部分ですが、arduinoはクライアントIDとして識別しになる模様なので、Arduino側から送ってるよーという意味合いでそのままで良さそうでした。
こちらのサンプルはtest.mosquitto.orgのときに使ったPubSubClientのライブラリは使わなくて良さそうなので消してみました。
[env:m5stack-atom]
platform = espressif32
board = m5stack-atom
framework = arduino
lib_deps =
	m5stack/M5Atom@^0.1.0
	fastled/FastLED@^3.5.0
	Wire
	256dpi/MQTT@^2.5.1
monitor_speed = 115200
Node.js側も先ほど同様に書いてみます。
改めてみるとこちらのコードのクライアントIDはJavaScriptになってますね。
const mqtt = require("mqtt");

const client = mqtt.connect("mqtt://public:public@public.cloud.shiftr.io", {
  clientId: "javascript",
});

client.on("connect", function () {
  console.log("connected!");

  client.subscribe("/n0bisuke/hello");
});

client.on("message", function (topic, message) {
  console.log(topic + ": " + message.toString());

  client.publish("/n0bisuke/hello", "MQTT.jsを用いたパブリッシュ");
});

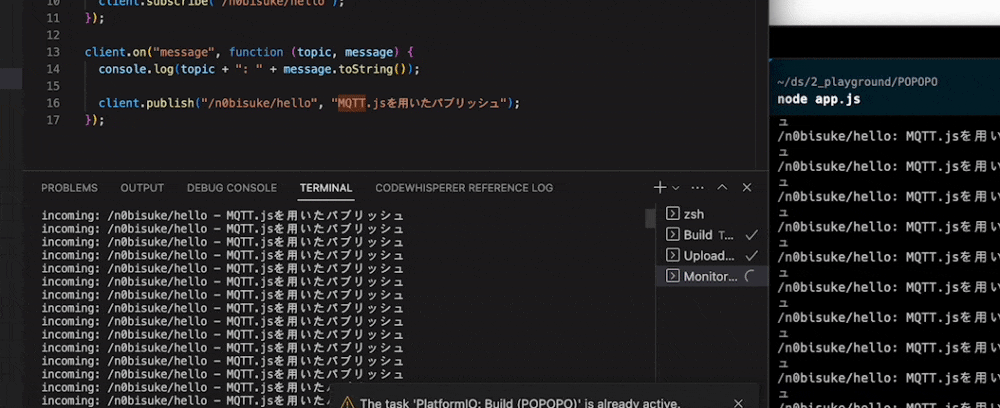
うまくいくと以下のようになります。
HTTPリクエストで外部からshiftr.ioにアクセス
これも @youtoy さんの記事に詳細が書いてますが、外部からHTTPリクエストで呼び出せます。
以下のコマンドで呼び出すことができます。
curl -X POST "https://public:public@public.cloud.shiftr.io/broker/n0bisuke/hello" -d "テストメッセージです!"
httpで何かトリガーを叩いて、デバイス側はMQTTサブスクライブで反応してくれるのは良いですね。
応用: 外部からLEDの色を変える
LEDのコードを合わせてみました。
#include "M5Atom.h"

// GRB
uint32_t convert(CRGB color) {
  return (color.r << 16) | (color.g << 8 ) | color.b;
}

uint8_t state = 0;

#include <WiFiClientSecure.h>
#include <MQTT.h>

const char ssid[] = "";
const char pass[] = "";

WiFiClientSecure net;
MQTTClient client;

unsigned long lastMillis = 0;

void connect() {
  Serial.print("checking wifi...");
  M5.begin(true, false, true);

  while (WiFi.status() != WL_CONNECTED) {
    Serial.print(".");
    delay(1000);
  }

  Serial.print("\nconnecting...");

  net.setInsecure();
  while (!client.connect("arduino", "public", "public")) {
    Serial.print(".");
    delay(1000);
  }

  Serial.println("\nconnected!");

  client.subscribe("/n0bisuke/color"); //色を指定
  // client.unsubscribe("/hello");
}

void messageReceived(String &topic, String &payload) {
  Serial.println("incoming: " + topic + " - " + payload);

  // MQTTでメッセージを受信したらLEDの色を変える
  CRGB color = 0;
  if(payload == "red"){
    color = CRGB::Red;
  }else if(payload == "blue"){
    color = CRGB::Blue;
  }else if(payload == "green"){
    color = CRGB::Green;
  }else{
    // color = CRGB::Red;
  }

  M5.dis.drawpix(0, convert(color));
}

void setup() {
  Serial.begin(115200);
  WiFi.begin(ssid, pass);

  client.begin("public.cloud.shiftr.io", 8883, net);
  client.onMessage(messageReceived);

  connect();
}

void loop() {
  client.loop();
  delay(10);  // <- fixes some issues with WiFi stability

  if (!client.connected()) {
    connect();
  }

  // publish a message roughly every second.
  if (millis() - lastMillis > 1000) {
    lastMillis = millis();
  }
}
PCなどから
curl -X POST "https://public:public@public.cloud.shiftr.io/broker/n0bisuke/color" -d "red"
といった形でredやblueやgreenを送ることで色が変わります。
今更ながらhttps://t.co/r2QDJhPKmiの便利さに触れた #iotlt #もいせんハッカソン #mqtt pic.twitter.com/JaxQlqmBOu
— 菅原のびすけ (プロトアウト8期募集中) (@n0bisuke) April 29, 2023
便利。
まとめ
調べて触ってみた感想ですがshifter.io便利ですね。HTTPで外部呼び出しが簡単なことと接続の安定性を感じています。
昔の記憶だとtest.mosquitto.orgは結構不安定だったのでパブリックなもので安定してくれてるのはありがたいです。
このやり方で送るデータはフル公開なので機密っぽい何かにはくれぐれも使わないようにご注意くださいませ。
おまけ
パブリックなところで世界中の人が使ってますが、こんな感じでn0bisuke/helloのトピックを見つけられます。変なデータ流れてるかもなので眺めるの楽しいですね。
