1.はじめに
Rustとrppalを使って、RaspberryPiのI2C通信端子に接続したIOエキスパンダMCP23017を操作してみます。
実行環境
| ハードウェア | Raspberry Pi 4 |
| OS | Raspbian Buster |
| rustc | Ver.1.47.0 |
| IOエキスパンダ | MCP23017 |
| →これを、RaspberryPiのI2C通信端子に接続済 |
$ uname -a
Linux raspi4 4.19.97-v7l+ #1294 SMP Thu Jan 30 13:21:14 GMT 2020 armv7l GNU/Linux
$ rustc --version
rustc 1.47.0 (18bf6b4f0 2020-10-07)
$ sudo i2cdetect -r -y 1
     0  1  2  3  4  5  6  7  8  9  a  b  c  d  e  f
00:          -- -- -- -- -- -- -- -- -- -- -- -- --
10: -- -- -- -- -- -- -- -- -- -- -- -- -- -- -- --
20: 20 -- -- -- -- -- -- -- -- -- -- -- -- -- -- --
30: -- -- -- -- -- -- -- -- -- -- -- -- -- -- -- --
40: -- -- -- -- -- -- -- -- -- -- -- -- -- -- -- --
50: -- -- -- -- -- -- -- -- -- -- -- -- -- -- -- --
60: -- -- -- -- -- -- -- -- -- -- -- -- -- -- -- --
70: -- -- -- -- -- -- -- --
2.LEDの点滅例
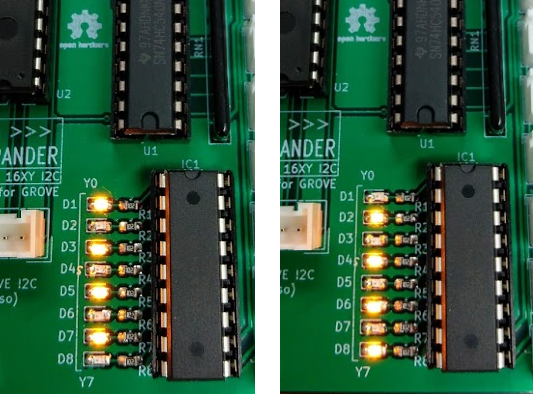
MCP23017のポートAのピン0~7につないだLEDを、1個ずつ交互に、流れるように点灯する例です。
回路の繋ぎ方は、こちらの記事を参考にしてください。
(1)MCP23017の主要コマンド
レジスタ名の
*Aは、MCP23017のGPA0~7。
*Bは、MCP23017のGPB0~7に対応します。
| レジスタ名 | 値 | 機能 |
|---|---|---|
| IODIRA | 0x00 | 入出力方向 (0: 出力 1:入力) |
| IODIRB | 0x01 | 〃 |
| GPIOA | 0x12 | 出力レジスタ (GPIOの値) |
| GPIOB | 0x13 | 〃 |
(2)準備
コマンドライン
$ cargo new i2cexp --bin
     Created binary (application) `i2cexp` package
$ cd i2cexp/
$
(3)ソースコード
dependenciesにrppalを追加します。
Cargo.toml
[package]
name = "rp-i2c"
version = "0.1.0"
authors = ["pi"]
edition = "2018"

# See more keys and their definitions at https://doc.rust-lang.org/cargo/reference/manifest.html

[dependencies]
rppal = "0.11.3"
src/main.rs
use rppal::i2c::I2c;
use std::{thread, time};

//I2C接続先アドレス
const ADDR: u16 = 0x20;
//レジスタ:GPA側の入出力方向設定
const REG_CTRL_IODIRA: u8 = 0x00;
//レジスタ:GPA側の出力値設定
const REG_CTRL_GPIOA: u8 = 0x12;

//制御関数
fn led() -> Result<u8, rppal::i2c::Error> {

    //I2Cを開く
    let mut i2c = I2c::new()?;
    i2c.set_timeout(100)?;
    i2c.set_slave_address(ADDR)?;

    //初期化コマンドをI2C経由で送る
    //MCP23017のPORTAを、出力に設定
    i2c.smbus_write_word(REG_CTRL_IODIRA, 0x00)?;

    //ウェイトの設定:0.1秒
    let ten_millis = time::Duration::from_millis(100);

    //10回繰り返し
    for _n in 1..10 {
        //PORTAの0,2,4,8chをLOWに, 1,3,5,7をHIGHにする
        i2c.smbus_write_word(REG_CTRL_GPIOA, 0xaa)?;
        //ウェイト
        thread::sleep(ten_millis);

        //PORTAの0,2,4,8chをHIGHに, 1,3,5,7をLOWにする
        i2c.smbus_write_word(REG_CTRL_GPIOA, 0x55)?;
        //ウェイト1秒
        thread::sleep(ten_millis);
    }

    //PORTAの0~7chをLOWにする
    i2c.smbus_write_word(REG_CTRL_GPIOA, 0x00)?;

    Ok(0)
}

//メイン
fn main() {
    println!(" --- I2C Expander Test (Output) ---");

    //実行
    let result = led();

    //実行結果の判断
    match result {
        Ok(v) => println!(" Done : {}", v),
        Err(e) => println!(" Error : {}", e),
    };
}
(4)実行
コマンドライン
pi@raspi4:~/gitwork/rust/i2cexp $ cargo run
   Compiling i2cexp v0.1.0 (/home/pi/gitwork/rust/i2cexp)
    Finished dev [unoptimized + debuginfo] target(s) in 1.48s
     Running `target/debug/i2cexp`
 --- I2C Expander Test (Output) ---
 Done : 0
実行すると下記のような感じで、黄色LEDが交互に点滅しています。
4.おわりに
Rustでの組込機器の練習として、I2C通信を使った制御を試してみました。
I2Cが使えると、センサーなど色々接続を増やせるので、今後作例を増やしていきます。
補足:失敗編
Rustとrppalから、Grove Base Hat for Raspberry Piに搭載されているADコンバータの制御にチャレンジしてみましたが、こちらは失敗でした。
詳しくは下記の別記事を参考ください。