AndroidでchatGPTアプリを作る方法【内部処理編】です。
プロジェクトの作成からUIの作成まではAndroidでchatGPTアプリを作る方法【UI編】を確認してください。
UI編を書いてから本記事を書くまでにiOS版のchatGPTアプリがリリースされましたが、Android版はまだリリースされていないようなので、Android版のリリースが待てない!!という人は作成してみてください。
作るもの
UI編でも紹介しましたが、ChatGPTに聞きたいことを入力してsendボタンを押すとChatGPTからの回答が表示されるアプリになります。
必要なもの
- ChatGPTのAPIアカウント
- AndroidStudio
インストール方法の紹介やAndroidStudioのプロジェクトの作成方法などはAndroidでchatGPTアプリを作る方法【UI編】で紹介しているので本記事では割愛します。本記事はUI編が完了している状態からの内容になります。
プログラムの作成
本記事ではChatGPTに問い合わせを行うことができるAndroidアプリを作成します。
AndroidでchatGPTアプリを作る方法【UI編】の続きの記事になるので、UI編を実施していない人はUI編を実施した後に作成していただければと思います。
内部処理の作成
[java]→[com.example.chatgptapp]→[MainActivity]を開きます。

下記のプログラムに置き換えます。
[ChatGPT APIキー]に関してはChatGPTのAPIアカウントと置き換えてください。
APIキーがsk-ABCD1234の場合は、下記のようになります。
private static final String API_KEY = "sk-ABCD1234";
package com.example.chatgptapp;

import androidx.appcompat.app.AppCompatActivity;

import android.os.AsyncTask;
import android.os.Bundle;
import android.text.method.ScrollingMovementMethod;
import android.util.Log;
import android.view.View;
import android.widget.Button;
import android.widget.EditText;
import android.widget.TextView;

import org.apache.http.HttpEntity;
import org.apache.http.HttpResponse;
import org.apache.http.client.HttpClient;
import org.apache.http.client.methods.HttpPost;
import org.apache.http.entity.ContentType;
import org.apache.http.entity.StringEntity;
import org.apache.http.impl.client.HttpClients;
import org.apache.http.util.EntityUtils;
import org.json.JSONArray;
import org.json.JSONException;
import org.json.JSONObject;

import java.io.IOException;

public class MainActivity extends AppCompatActivity {

    private EditText editTextMessage;
    private Button sendBT;
    private TextView textView;
    private static final String GPT_ENDPOINT = "https://api.openai.com/v1/chat/completions";
    private static final String API_KEY = "[ChatGPT APIキー]";

    @Override
    protected void onCreate(Bundle savedInstanceState) {
        super.onCreate(savedInstanceState);

        // 画面レイアウトの設定
        setContentView(R.layout.activity_main);

        // ボタンの定義
        sendBT = (Button)findViewById(R.id.button);

        // テキストエリアの定義
        editTextMessage = (EditText)findViewById(R.id.edit_text);
        editTextMessage.setMovementMethod(new ScrollingMovementMethod());
        textView = (TextView) findViewById(R.id.text_view);
        textView.setMovementMethod(new ScrollingMovementMethod());

        // 入直値の初期化
        editTextMessage.getEditableText().clear();
    }

    public void onClick(View view){
        // sendボタンが押されたときの処理
        if(view==sendBT){
            textView.setText("回答を考えています...");
            sendBT.setEnabled(false);
            String queryText = editTextMessage.getText().toString();
            new HttpAsyncTask().execute(queryText);
        }
    }
    private class HttpAsyncTask extends AsyncTask<String, Void, String> {
        @Override
        protected String doInBackground(String... params) {
            Log.i("info","----postGPT");
            HttpClient httpClient = HttpClients.createDefault();
            HttpPost httpPost = new HttpPost(GPT_ENDPOINT);
            Log.i("info","----click!!");

            // リクエストヘッダーの設定
            httpPost.setHeader("Content-Type", "application/json");
            httpPost.setHeader("Authorization", "Bearer " + API_KEY);
            String queryText = params[0];

            // リクエストの作成
            StringEntity requestEntity = new StringEntity("{\"model\": \"gpt-3.5-turbo\",\"messages\": [{\"role\": \"user\", \"content\": \""+ queryText +"\"}]}", ContentType.APPLICATION_JSON);
            httpPost.setEntity(requestEntity);

            // リクエストの送信
            HttpResponse response = null;
            try {
                response = httpClient.execute(httpPost);
            } catch (IOException e) {
                throw new RuntimeException(e);
            }

            // レスポンスの取得
            HttpEntity responseEntity = response.getEntity();
            String responseBody = null;
            String answer = null;
            try {
                responseBody = EntityUtils.toString(responseEntity);
                JSONObject jsonObj = null;
                try {
                    jsonObj = new JSONObject(responseBody);
                    // レスポンスから回答結果を取得
                    JSONArray choices = jsonObj.getJSONArray("choices");
                    JSONObject choice = choices.getJSONObject(0);
                    JSONObject message = choice.getJSONObject("message");
                    String content = message.getString("content");
                    answer = new String(content.getBytes("ISO-8859-1"), "UTF-8");
                    Log.i("info",answer);
                } catch (JSONException e) {
                    throw new RuntimeException(e);
                }
            } catch (IOException e) {
                throw new RuntimeException(e);
            }
            return answer;
        }

        @Override
        protected void onPostExecute(String result) {
            // 回答を表示
            textView.setText(result);
            sendBT.setEnabled(true);
        }
    }
}
この段階ではHttpClientなどが赤くなり警告が出ていると思いますが、現時点では無視していただいて大丈夫です。次のbuild.gradleを作成することで警告はなくなります。

build.gradleの作成
MainActivity.javaを作成したときに、HttpClientなどで警告がでていました。
警告の理由としてはimportしようとしているパッケージが参照できないためです。パッケージを利用するために、build.gradleに今回利用するパッケージを追加します。
[Gradle Scripts]→[build.gradle(Module :app)]を開きます。

まずandroidの項目にpackagingOptionsの設定を追加します。
android {
    namespace 'com.example.chatgpt'
    compileSdk 33
    android { packagingOptions { resources.excludes.add("META-INF/*") } }
次にdependenciesの項目にhttpclientを追加します。
dependencies {

    implementation 'androidx.appcompat:appcompat:1.6.1'
    implementation 'com.google.android.material:material:1.5.0'
    implementation 'androidx.constraintlayout:constraintlayout:2.1.4'
    testImplementation 'junit:junit:4.13.2'
    androidTestImplementation 'androidx.test.ext:junit:1.1.5'
    androidTestImplementation 'androidx.test.espresso:espresso-core:3.5.1'
    implementation 'org.apache.httpcomponents:httpclient:4.3.4'
}
最後にbuild.gradleのファイルの一番下にエンコードの設定を追加します。
tasks.withType(JavaCompile) {
    options.encoding = 'UTF-8'
}
ファイルの修正が終わったら右上の[Sync Now]を押下して設定を反映してください。

正常に読み込まれるとMainActivity.javaの警告が消えます。
マニュフェストファイルの作成
Androidアプリではネットワーク通信やカメラでの撮影を行うときの設定を行うファイルになります。
今回はネットワーク通信を行うため、今回作成するアプリに対してネットワーク通信を行うことをマニュフェストファイルで許可します。
[manifests]→[AndroidManifest.xml]を開きます。

android.permission.INTERNETとandroid.permission.ACCESS_NETWORK_STATEのパーミッションを追加します。
<?xml version="1.0" encoding="utf-8"?>
<manifest xmlns:android="http://schemas.android.com/apk/res/android"
    xmlns:tools="http://schemas.android.com/tools">

    <uses-permission android:name="android.permission.INTERNET" />
    <uses-permission android:name="android.permission.ACCESS_NETWORK_STATE" />

    <application
        android:allowBackup="true"
        android:dataExtractionRules="@xml/data_extraction_rules"
        android:fullBackupContent="@xml/backup_rules"
        android:icon="@mipmap/ic_launcher"
        android:label="@string/app_name"
        android:roundIcon="@mipmap/ic_launcher_round"
        android:supportsRtl="true"
        android:theme="@style/Theme.ChatGPTApp"
        tools:targetApi="31">
        <activity
            android:name=".MainActivity"
            android:exported="true">
            <intent-filter>
                <action android:name="android.intent.action.MAIN" />

                <category android:name="android.intent.category.LAUNCHER" />
            </intent-filter>
        </activity>
    </application>

</manifest>
これでアプリの作成は完了です。
アプリの実行
エミュレーターの作成
AndroidStudioにはエミュレーター機能があります。
手元のAndroid端末をPCにつなげて実行してもいいですが、面倒なときなどはを使って実行することをおすすめします。
右上の[Device Manager]を押下してください。

Device Managerが開いたら[Create device]を押下してください。

エミュレーターで使うことができる端末の一覧が表示されます。私はPixel 6aを普段使っているためPixel 6を選択することが多いですが、普段使っている端末と同じ画面サイズのものを選ぶと自分のスマホで実行したときの見え方に近い状態で確認することができるので、なるべく画面サイズが近いものを選ぶのがおすすめです。
端末を選んだあとの選択肢は特にこだわりがなければそのまま進めてください。

エミュレーターが作成されました。

アプリの実行
エミュレーターの隣の再生ボタンを押すことで、アプリの実行ができます。

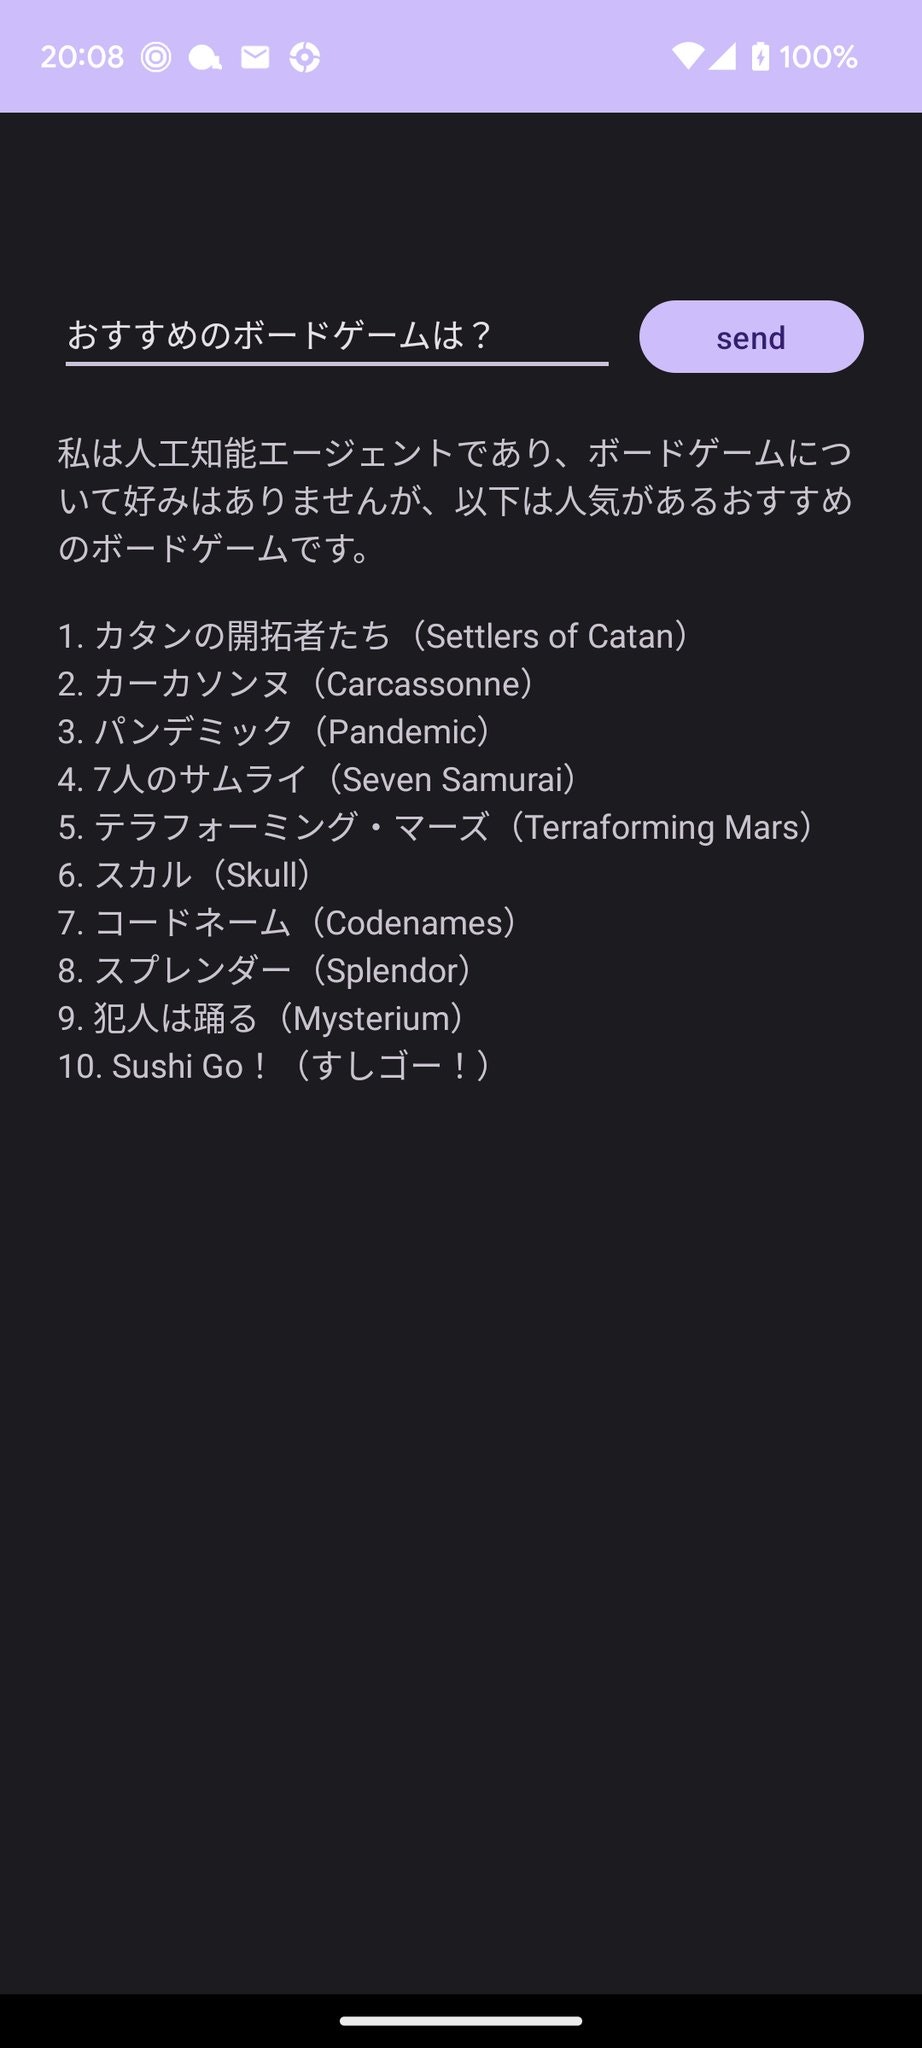
テキストボックスにChatGPTに聞きたい内容を入力し[send]を押すとChatGPTからの回答を確認することができます。

おわりに
UI編と合わせてAndroid版のChatGPTのアプリを作ることができました。
BartやBingもAPIを提供しているので今回作ったアプリをベースに好きなAIと連携してたアプリなどを作っていただければ幸いです。