1. はじめに
みなさんはLINEのメッセージ取り消し機能をご存じでしょうか?
「○○がメッセージの送信を取り消しました」
って表示されるアレです。
「○○がメッセージの送信を取り消しました」と表示されていると、なんて書いてあったんだろ?って気になります。単純な誤字かもしれないし、誤爆かも知れないし、他の何かかも知れない。
そして最近LINEプレミアムの機能でこんなものが追加されました。

引用元:https://premium.yahoo.co.jp/benefit/line/premium-unsend
消したことに気づかせない...だとっ、、LINEプレミアム恐るべし。。。
「気づかければ気にならないのでは??」という最もな指摘は置いておいて
私はエンジニアらしく、この突如削除されるLINEメッセージにエンジニアリングで対抗してみることにしました。
2. 対抗手段
「LINEの通知を一定期間保管するアプリを作成する!」
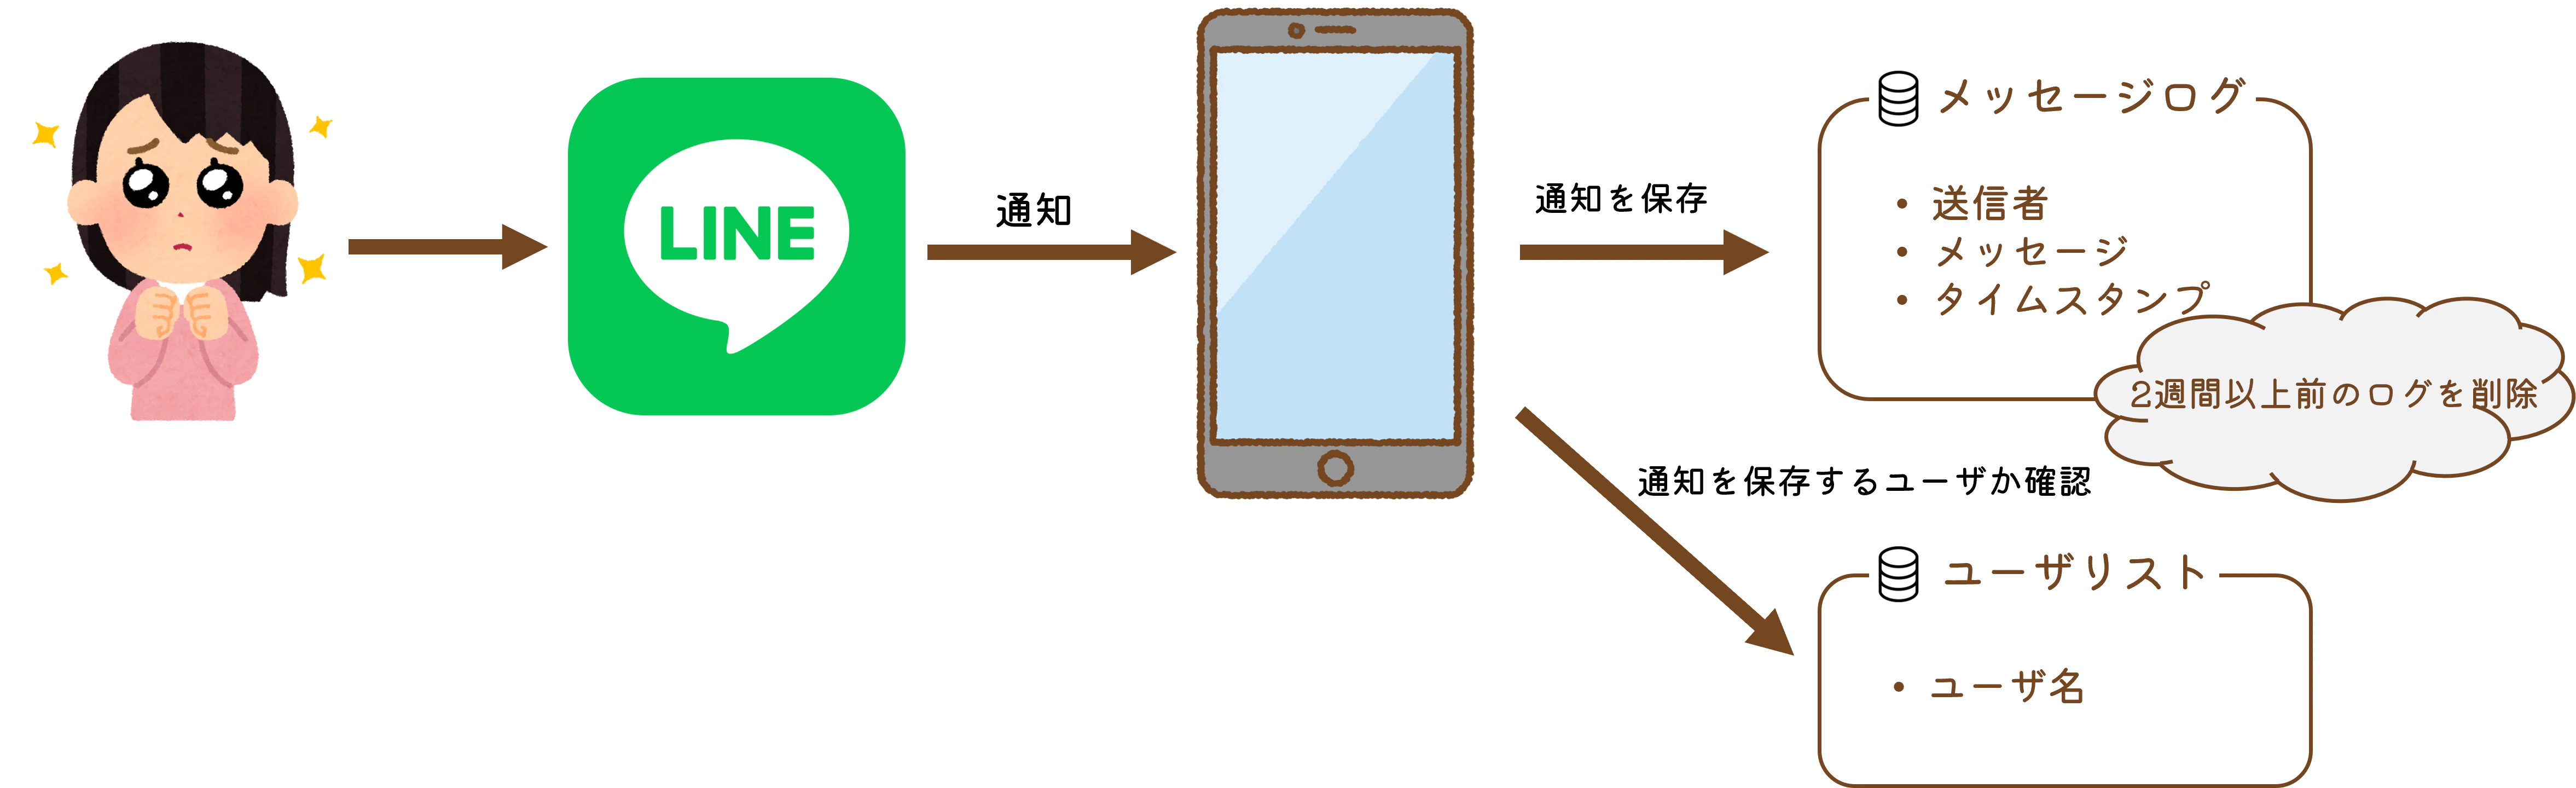
LINEでメッセージが取り消された場合、トーク画面はもちろん一度スマホに届いた通知も削除されてしまいます。なのでメッセージが消される前に、通知が届いた瞬間にログとして保管してやろうという魂胆です。
3. 設計
環境:Android(私のスマホがAndroidのため)
開発環境:Android Studio(Kotlin)
上述の通り、LINEから通知が来たらログを保管します。
保管先として「LINE通知ログを保管するDB」をローカルに用意し、1レコードに「送信者」「メッセージ」「タイムスタンプ」を保存します。また保存し続けるとDB容量が肥大化するので、タイムスタンプが二週間より前のレコードは削除されるようにします。
また公式アカウントなど、全てユーザからのメッセージを保存したいわけではないので、「LINE通知ログを残したいユーザのDB」をローカルに用意し、登録されているユーザのメッセージのみ保存するようにします。
4. 環境準備
- Android Studioを入れます
- Android Studioにエミュレータを追加
- 自分の手持ちデバイスを選択して追加
プロジェクトを作成して、とりあえずエミュレータ上でRunしてみる
私は自分の物理デバイスでデバッグできるように、こちらの手順でUSBデバッグができるように設定しました。
5. ディレクトリ構造
結果論ですが、Android Studio公式のベストプラクティスを参考にディレクトリ構造はこのようにしました。
LINENotifyLogger/
└── app/
    ├── src/
    │   ├── main/
    │   │   ├── java/
    │   │   │   └── com.linenotifylogger.linenotifylogger/
    │   │   │       ├── db/
    │   │   │       │   ├── dao/
    │   │   │       │   │   ├── ChatHistoryDao.kt
    │   │   │       │   │   └── TargetUserDao.kt
    │   │   │       │   ├── entity/
    │   │   │       │   │   ├── ChatHistoryEntity.kt
    │   │   │       │   │   └── TargetUserEntity.kt
    │   │   │       │   └── AppDatabase.kt
    │   │   │       │
    │   │   │       ├── service/
    │   │   │       │   └── LineNotificationListenerService.kt
    │   │   │       │
    │   │   │       ├── ui/
    │   │   │       │   ├── chat_history/
    │   │   │       │   │   ├── ChatHistoryFragment.kt
    │   │   │       │   │   └── ChatHistoryAdapter.kt
    │   │   │       │   ├── main/
    │   │   │       │   │   ├── MainActivity.kt
    │   │   │       │   ├── settings/
    │   │   │       │   │   └── SettingsFragment.kt
    │   │   │       │   └── target_user/
    │   │   │       │       ├── TargetUserAdapter.kt
    │   │   │       │       └── TargetUserFragment.kt
    │   │   │
    │   │   └── res/
    │   │       ├── color/
    │   │       │   └── bottom_nav_color_selector.xml
    │   │       ├── drawable/
    │   │       │   ├── ic_delete.xml
    │   │       │   ├── ic_history.xml
    │   │       │   └── ... (他のアイコン)
    │   │       ├── layout/
    │   │       │   ├── activity_main.xml
    │   │       │   ├── fragment_chat_history.xml
    │   │       │   ├── fragment_settings.xml
    │   │       │   ├── fragment_user_management.xml
    │   │       │   ├── item_notification.xml
    │   │       │   └── item_target_user.xml
    │   │       ├── menu/
    │   │       │   └── bottom_nav_menu.xml
    │   │       ├── navigation/
    │   │       │   └── nav_graph.xml
    │   │       └── values/
    │   │           ├── colors.xml
    │   │           ├── strings.xml
    │   │           └── themes.xml
    │   │
    │   └── AndroidManifest.xml
    │
    └── build.gradle.kts (または build.gradle)
6. 処理部分の実装
まず「LINE通知ログを保管するDB」と「LINE通知ログを残したいユーザのDB」の作成と「LINEから通知が来たらDBに保存する」一連の処理を実装していきます。
6.1. ローカルDBの作成
Androidではローカルストレージ用データベースとしてSQLiteの抽象化ライブラリであるRoomがAndroid Jetpack(Androidアプリ開発を簡単にするライブラリ群)として提供されています。
Roomを使って「LINE通知ログを保管するDB」と「LINE通知ログを残したいユーザのDB」をローカルに作成します。
Roomの簡単な使い方はこちらなどを参考にしました。それぞれ「Database」「Entity」「DAO」を作成していきます。
6.1.1. Entity
EntityはDBのテーブル定義です。
「LINE通知ログを保管するDB」は「送信者」「メッセージ」「受信時間」を保持します。主キーは自動採番されるIDにしておきます。
「LINE通知ログを残したいユーザのDB」は「ユーザ名」を主キーとして保持します。
以下は「LINE通知ログを保管するDB」のEntity実装例です。
package com.linenotifylogger.linenotifylogger.db.entity

import androidx.room.Entity
import androidx.room.PrimaryKey

@Entity(tableName = "line_notifications")
data class ChatHistoryEntity(
    @PrimaryKey(autoGenerate = true) val id: Int = 0,
    val sender: String?,     // 送信者
    val message: String?,   // メッセージ内容
    val timestamp: Long     // 受信時間
)
6.1.2. DAO (Data Access Object)
DAOはDBをCRUD(Create,Read,Update,Delete)するためのインタフェースを定義します。
「LINE通知ログを保管するDB」でしたい操作は「メッセージの登録」「過去メッセージ一覧の取得」「一定期間を過ぎたメッセージの削除」です。
「LINE通知ログを残したいユーザのDB」でしたい操作は「ユーザの登録」「ユーザの削除」「ユーザの登録確認」「登録ユーザ一覧の取得」です。
以下は「LINE通知ログを保管するDB」のDAO実装例です。
package com.linenotifylogger.linenotifylogger.db.dao

import androidx.room.Dao
import androidx.room.Insert
import androidx.room.Query
import com.linenotifylogger.linenotifylogger.db.entity.ChatHistoryEntity

@Dao
interface ChatHistoryDao {
    @Insert
    suspend fun insert(notification: ChatHistoryEntity)

    @Query("SELECT * FROM line_notifications ORDER BY timestamp DESC")
    suspend fun getAll(): List<ChatHistoryEntity>

    /**
     * 指定されたタイムスタンプより古い履歴をすべて削除
     * @param thresholdTimestamp このタイムスタンプ(ミリ秒)より前のデータが削除対象
     */
    @Query("DELETE FROM line_notifications WHERE timestamp < :thresholdTimestamp")
    suspend fun deleteOldHistory(thresholdTimestamp: Long)
}
6.1.3. Database
Databaseを作成し、関連するEntityとDAOの紐づけを行うことで初めてDBを利用することができます。
Databaseは一つのファイルで定義するのがベストプラクティスのため、「LINE通知ログを保管するDB」「LINE通知ログを残したいユーザのDB」それぞれのDatabaseをAppDatabase.ktに記述します。
package com.linenotifylogger.linenotifylogger.db

import android.content.Context
import androidx.room.Database
import androidx.room.Room
import androidx.room.RoomDatabase
import com.linenotifylogger.linenotifylogger.db.dao.*  //作成した各DAO
import com.linenotifylogger.linenotifylogger.db.entity.*  //作成した各Entity

@Database(entities = [ChatHistoryEntity::class], version = 1) //LINE通知ログを保管するDB
abstract class ChatHistoryDatabase : RoomDatabase() {
    abstract fun chatHistoryDao(): ChatHistoryDao
    companion object {
        @Volatile private var INSTANCE: ChatHistoryDatabase? = null
        fun getChatHistoryDatabase(context: Context): ChatHistoryDatabase {
            return INSTANCE ?: synchronized(this) {
                val instance = Room.databaseBuilder(
                    context.applicationContext,
                    ChatHistoryDatabase::class.java,
                    "chat_history_db"
                ).build()
                INSTANCE = instance
                instance
            }
        }
    }
}

@Database(entities = [TargetUserEntity::class], version = 1) //LINE通知ログを残したいユーザのDB
abstract class TargetUserDatabase : RoomDatabase() {
    abstract fun targetUserDao(): TargetUserDao
    companion object {
        @Volatile private var INSTANCE: TargetUserDatabase? = null
        fun getTargetUserDatabase(context: Context): TargetUserDatabase {
            return INSTANCE ?: synchronized(this) {
                val instance = Room.databaseBuilder(
                    context.applicationContext,
                    TargetUserDatabase::class.java,
                    "target_user_db"
                ).build()
                INSTANCE = instance
                instance
            }
        }
    }
}
6.2. LINEの通知を取得部分の実装
サービスDBができたので、LINE通知があると保存すべきユーザか確認した上でDBに保存するサービスLineNotificationListenerServiceを作成します。
LineNotificationListenerServiceはNotificationListenerServiceを継承することでAndroidシステムからの通知イベントを受け取れるようになります。
CoroutineScopeにDispatchers.IOを指定することで、バックグラウンドのI/O処理に最適化されたスレッドプールで処理するようにし、アプリのUIが固まるのを防ぎます。
「LINEからの通知か確認」→「直前のメッセージと同じか確認」→「ログを残したいユーザか確認」→「LINE通知ログを保管するDBに登録」の順で処理します。
package com.linenotifylogger.linenotifylogger.service

import android.app.Notification
import android.service.notification.NotificationListenerService
import android.service.notification.StatusBarNotification
import android.util.Log
import com.linenotifylogger.linenotifylogger.db.ChatHistoryDatabase
import com.linenotifylogger.linenotifylogger.db.TargetUserDatabase
import com.linenotifylogger.linenotifylogger.db.entity.ChatHistoryEntity
import kotlinx.coroutines.CoroutineScope
import kotlinx.coroutines.Dispatchers
import kotlinx.coroutines.launch

class LineNotificationListenerService : NotificationListenerService() {
    private val ioScope = CoroutineScope(Dispatchers.IO)
    private var lastText: String? = null //直前の通知内容を保存する変数

    // Databaseインスタンスを生成
    private val targetUserDb by lazy {
        TargetUserDatabase.Companion.getTargetUserDatabase(applicationContext)
    }

    private val chatHistoryDb by lazy {
        ChatHistoryDatabase.Companion.getChatHistoryDatabase(applicationContext)
    }

    // 通知があった場合の処理
    override fun onNotificationPosted(sbn: StatusBarNotification) {  //sbn = 通知の全て情報を含むオブジェクト

        // LINEアプリからの通知だけを対象にする
        if (sbn.packageName == "jp.naver.line.android") {

            val extras = sbn.notification.extras
            val sender = extras.getString(Notification.EXTRA_TITLE)  // 送信者名を取得
            val text = extras.getString(Notification.EXTRA_TEXT)    // メッセージ内容を取得
            if (text == lastText) {
                return // 同じメッセージ内容の場合はスキップ
            }
            lastText = text  //直前の通知内容を更新

            if (!sender.isNullOrEmpty() && !text.isNullOrEmpty()) {
               ioScope.launch {
                   // 「LINE通知ログを残したいユーザのDB」に送信者が登録されているか確認
                   val usrExists: Boolean = targetUserDb.targetUserDao().exists(sender) > 0
                   if (usrExists) {
                       // 「LINE通知ログを保管するDB」のデータ形式に整形
                       val notification = ChatHistoryEntity(
                           sender = sender,
                           message = text,
                           timestamp = System.currentTimeMillis()
                       )
                       //  「LINE通知ログを保管するDB」に通知内容を登録
                       chatHistoryDb.ChatHistoryDao().insert(notification)
                   }
                }
            }
        }
    }
}
LineNotificationListenerServiceを作成しただけでは、通知を保存することはできません。LineNotificationListenerServiceに通知を取得する権限を設定します。
AndroidManifest.xmlの<application>タグの内側に以下を追記します。
<service
    android:name=".service.LineNotificationListenerService"
    android:exported="true"
    android:label="Notification Listener"
    android:permission="android.permission.BIND_NOTIFICATION_LISTENER_SERVICE">
    <intent-filter>
        <action android:name="android.service.notification.NotificationListenerService" />
    </intent-filter>
</service>
7. 画面部分の実装
今回のアプリでは1つのView上で3つのFragment(チャット履歴、ユーザ登録、設定)をNavigation Barで切り替えられるようにしていきます。
Fragmentの実装方法はこちらを参考に、NavigationによるFragmentの切り替えはこちらを参考にしました。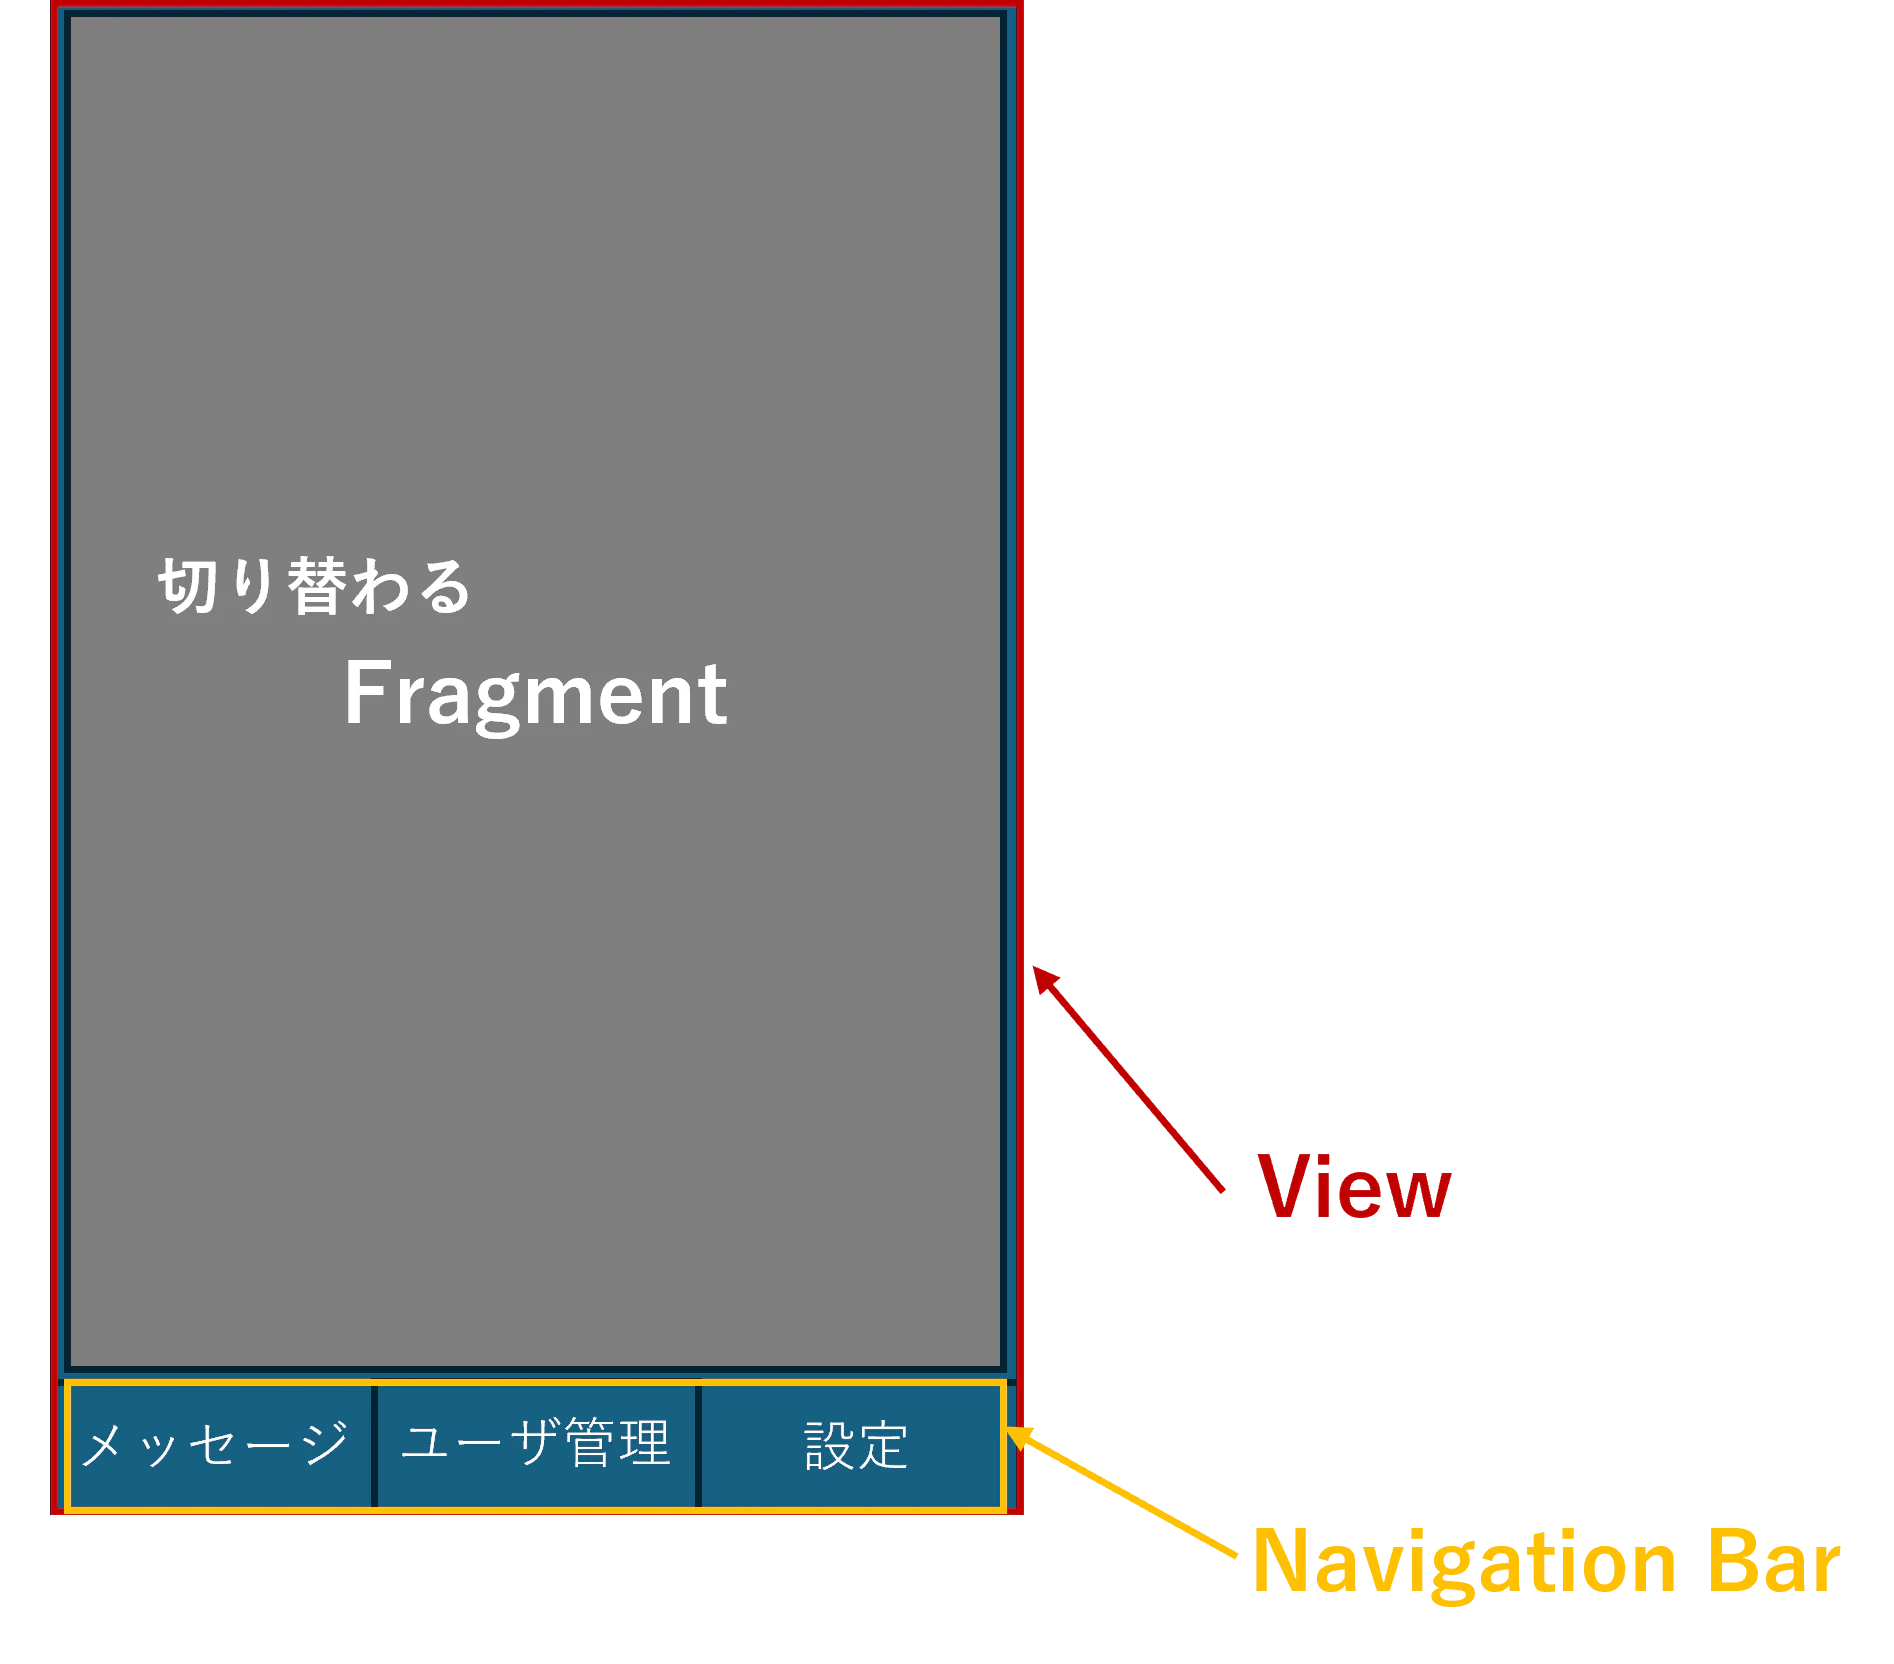
7.1. チャット履歴画面(Fragment)
RecyclerViewを使用することで、画面に表示されている行のViewだけを生成し、スクロールして下から出てくる行はその画面外に行ったViewを再利用できるため、画面表示を効率化できます。
RecyclerViewの実装はこちらなどを参考にしました。
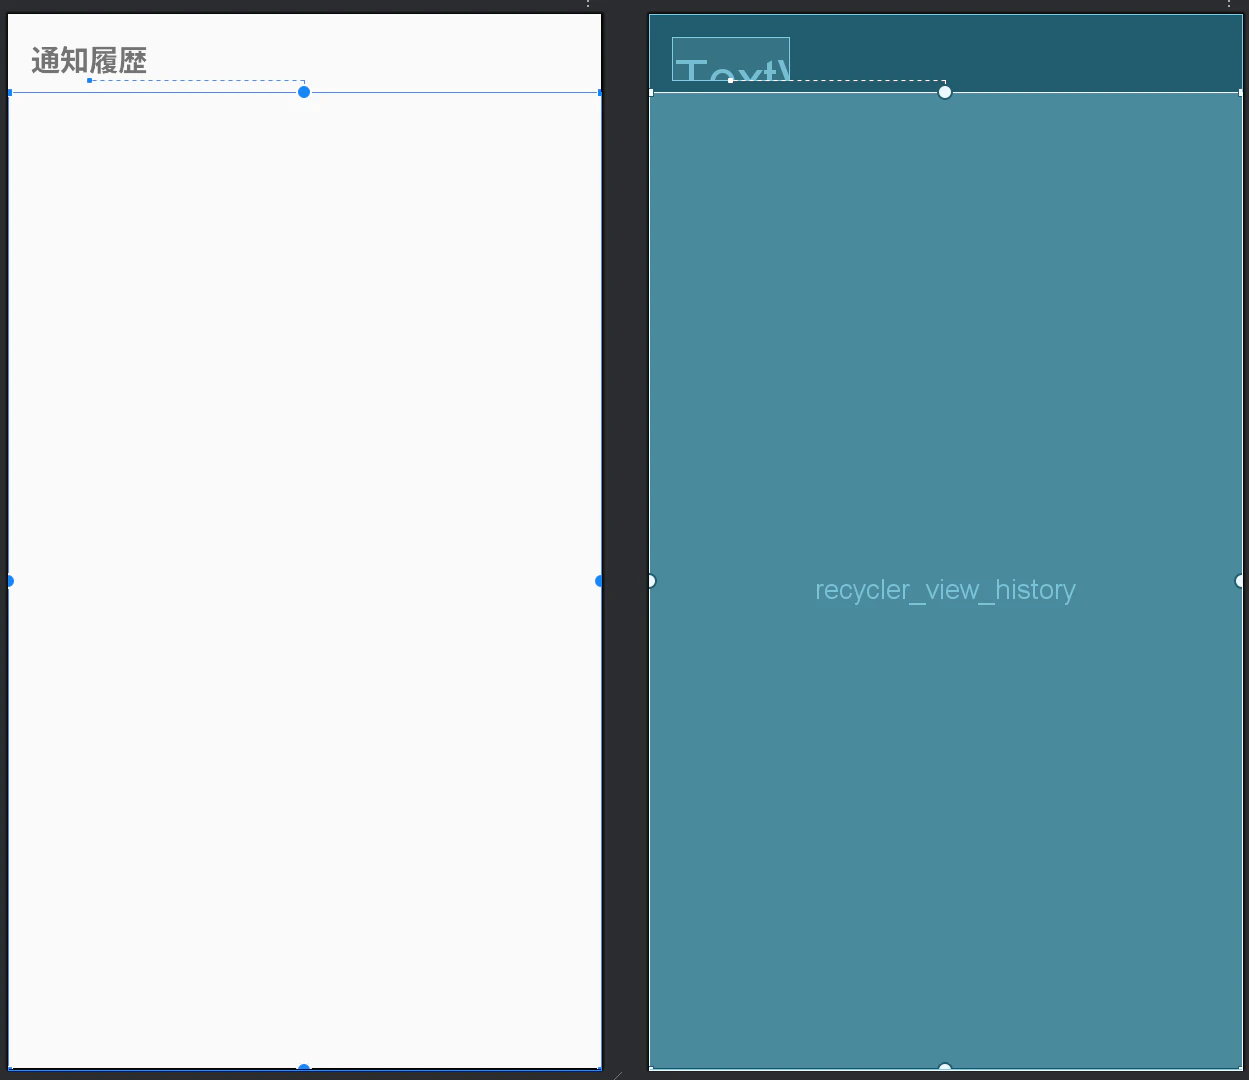
7.1.1. Layout
<?xml version="1.0" encoding="utf-8"?>
<androidx.constraintlayout.widget.ConstraintLayout xmlns:android="http://schemas.android.com/apk/res/android"
    xmlns:app="http://schemas.android.com/apk/res-auto"
    xmlns:tools="http://schemas.android.com/tools"
    android:layout_width="match_parent"
    android:layout_height="match_parent"
    tools:context=".ui.chat_history.ChatHistoryFragment"> <!--後で作成するFragmentと紐づけ-->
    <!--タイトル表示-->
    <TextView
        android:id="@+id/text_view_title"
        android:layout_width="wrap_content"
        android:layout_height="wrap_content"
        android:text="通知履歴"
        android:textSize="20sp"
        android:textStyle="bold"
        android:layout_margin="16dp"
        app:layout_constraintStart_toStartOf="parent"
        app:layout_constraintTop_toTopOf="parent" />
    <!--RecyclerViewで通知履歴を表示-->
    <androidx.recyclerview.widget.RecyclerView
        android:id="@+id/recycler_view_history"
        android:layout_width="0dp"
        android:layout_height="0dp"
        android:layout_marginTop="8dp"
        app:layout_constraintBottom_toBottomOf="parent"
        app:layout_constraintEnd_toEndOf="parent"
        app:layout_constraintStart_toStartOf="parent"
        app:layout_constraintTop_toBottomOf="@id/text_view_title"
        tools:listitem="@layout/item_notification" />
        <!--↑各行のレイアウトはitem_notification.xmlに定義-->
</androidx.constraintlayout.widget.ConstraintLayout>
各行のレイアウトは送信者、メッセージ、受信時間の順で表示
<?xml version="1.0" encoding="utf-8"?>
<LinearLayout xmlns:android="http://schemas.android.com/apk/res/android"
    android:layout_width="match_parent"
    android:layout_height="wrap_content"
    android:orientation="vertical"
    android:padding="12dp"
    android:background="?android:attr/selectableItemBackground">
    <!--送信者-->
    <TextView
        android:id="@+id/textSender"
        android:textStyle="bold"
        android:textSize="16sp"
        android:textColor="@android:color/black"
        android:layout_width="match_parent"
        android:layout_height="wrap_content" />
    <!--メッセージ-->
    <TextView
        android:id="@+id/textMessage"
        android:textSize="14sp"
        android:textColor="@android:color/darker_gray"
        android:layout_width="match_parent"
        android:layout_height="wrap_content" />
    <!--受信時間-->
    <TextView
        android:id="@+id/textTime"
        android:textSize="12sp"
        android:textColor="@android:color/holo_blue_dark"
        android:layout_width="match_parent"
        android:layout_height="wrap_content" />
</LinearLayout>
7.1.2. Adapter
先ほど作成したLayoutitem_notification.xmlと表示するデータを紐づけるAdapterを作成します。
onBindViewHolderでLayoutの要素とDatabaseのデータの紐づけをしています。
またupdateDataでDatabsaeが更新された時にRecyclerViewも再描画されるようにします。
package com.linenotifylogger.linenotifylogger.ui.chat_history

import android.view.LayoutInflater
import android.view.View
import android.view.ViewGroup
import android.widget.TextView
import androidx.recyclerview.widget.RecyclerView
import com.linenotifylogger.linenotifylogger.R
import com.linenotifylogger.linenotifylogger.db.entity.ChatHistoryEntity
import java.text.SimpleDateFormat
import java.util.Date
import java.util.Locale

class ChatHistoryAdapter(
    private var notifications: List<ChatHistoryEntity>
) : RecyclerView.Adapter<ChatHistoryAdapter.ViewHolder>() {

    class ViewHolder(itemView: View) : RecyclerView.ViewHolder(itemView) {
        val title: TextView = itemView.findViewById(R.id.textSender)
        val message: TextView = itemView.findViewById(R.id.textMessage)
        val time: TextView = itemView.findViewById(R.id.textTime)
    }

    override fun onCreateViewHolder(parent: ViewGroup, viewType: Int): ViewHolder {
        val view = LayoutInflater.from(parent.context)
            .inflate(R.layout.item_notification, parent, false)
        return ViewHolder(view)
    }

    override fun onBindViewHolder(holder: ViewHolder, position: Int) {
        val item = notifications[position]
        holder.title.text = item.sender ?: "不明な送信者"
        holder.message.text = item.message ?: ""
        holder.time.text = SimpleDateFormat(
            "MM/dd HH:mm",
            Locale.JAPAN
        ).format(Date(item.timestamp))
    }

    override fun getItemCount() = notifications.size

    fun updateData(newList: List<ChatHistoryEntity>) {
        notifications = newList
        notifyDataSetChanged()
    }
}
7.1.3. Fragment
onCreateViewでどのLayoutをこのFragmentが使用するか指定します。
また、loadNotificationsでバックグラウンドのUI処理に最適化されたスレッドプールで「LINE通知ログを保管するDB」のデータを取得し、更新があれば再描画します。
package com.linenotifylogger.linenotifylogger.ui.chat_history

import android.os.Bundle
import android.view.LayoutInflater
import android.view.View
import android.view.ViewGroup
import androidx.fragment.app.Fragment
import androidx.recyclerview.widget.LinearLayoutManager
import androidx.recyclerview.widget.RecyclerView
import com.linenotifylogger.linenotifylogger.R
import com.linenotifylogger.linenotifylogger.db.ChatHistoryDatabase
import kotlinx.coroutines.CoroutineScope
import kotlinx.coroutines.Dispatchers
import kotlinx.coroutines.launch
import kotlinx.coroutines.withContext

class ChatHistoryFragment : Fragment() {

    private lateinit var chatHistoryAdapter: ChatHistoryAdapter
    private val uiScope = CoroutineScope(Dispatchers.Main)

    override fun onCreateView(
        inflater: LayoutInflater, container: ViewGroup?,
        savedInstanceState: Bundle?
    ): View? {
        return inflater.inflate(R.layout.chat_history, container, false)  //chat_historyのレイアウトを指定
    }
    //主に初期化処理を定義
    override fun onViewCreated(view: View, savedInstanceState: Bundle?) {
        super.onViewCreated(view, savedInstanceState)

        val notificationRecyclerView = view.findViewById<RecyclerView>(R.id.recycler_view_history)
        chatHistoryAdapter = ChatHistoryAdapter(listOf()) // 空のリストで初期化
        notificationRecyclerView.layoutManager = LinearLayoutManager(requireContext())
        notificationRecyclerView.adapter = chatHistoryAdapter  //先ほど作成したAdapterを指定
    }

    override fun onResume() {
        super.onResume()
        loadNotifications()
    }
    //「LINE通知ログを保管するDB」を非同期で取得し、Fragmentを更新する
    private fun loadNotifications() {
        uiScope.launch {
            val db = ChatHistoryDatabase.getChatHistoryDatabase(requireContext())
            val data = withContext(Dispatchers.IO) {
                db.ChatHistoryDao().getAll()  //全てのチャット履歴を保存
            }
            chatHistoryAdapter.updateData(data)
        }
    }
}
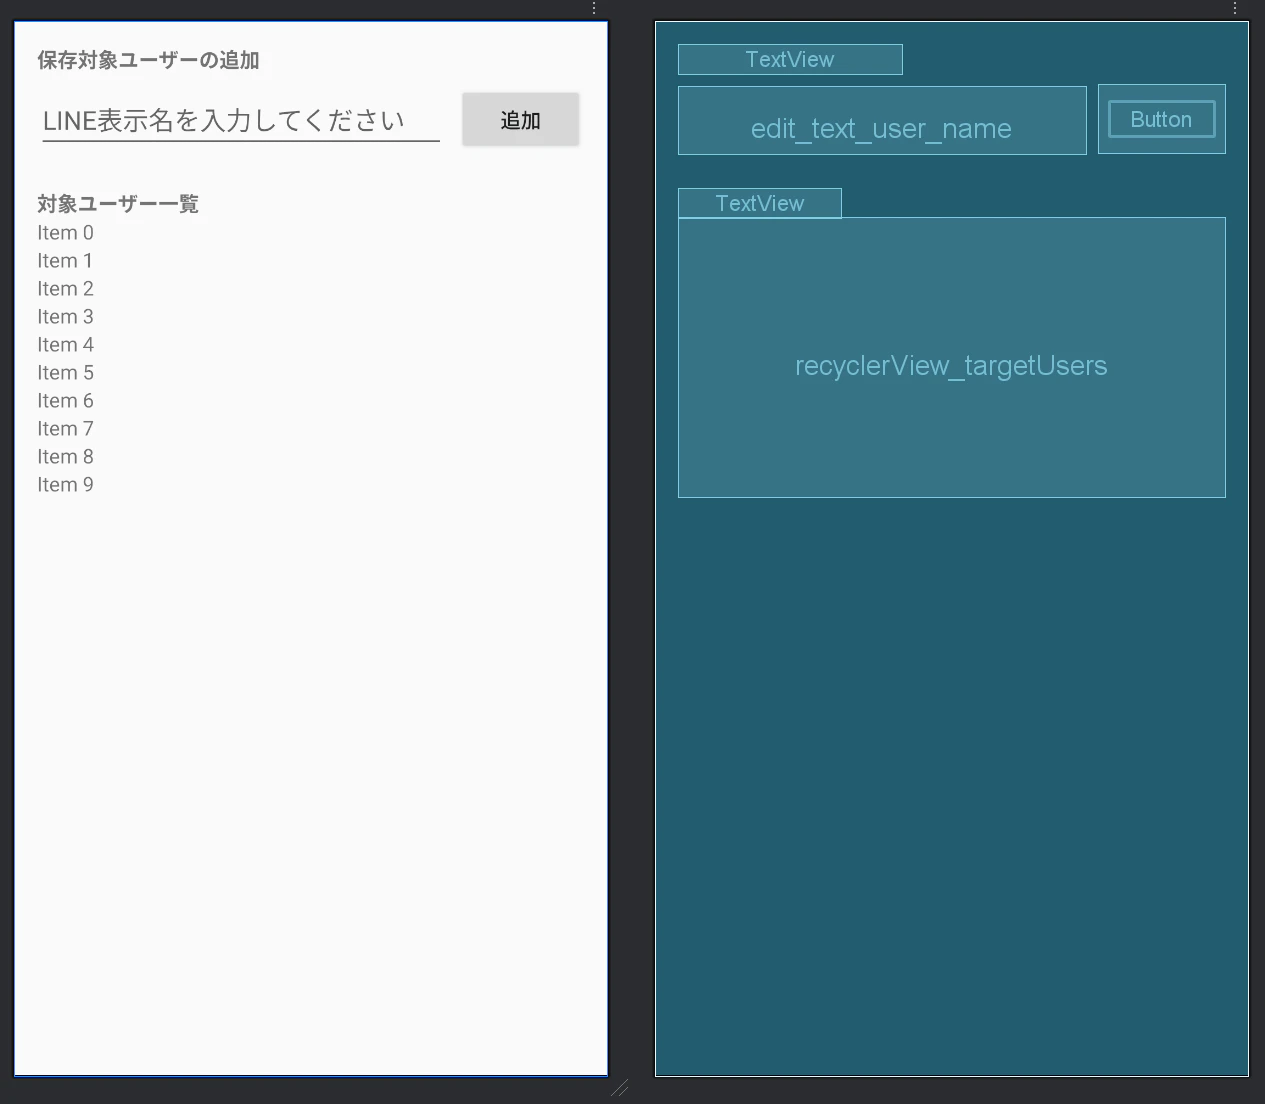
7.2. ユーザ登録画面(Fragment)
チャット履歴画面と構成は同じで、保存対象ユーザはRecyclerViewで表示します。
チャット履歴画面と違う点は、保存するユーザを登録/削除する機能があることです。
実装方法はチャット履歴画面とほぼ同じなので割愛させていただきます。
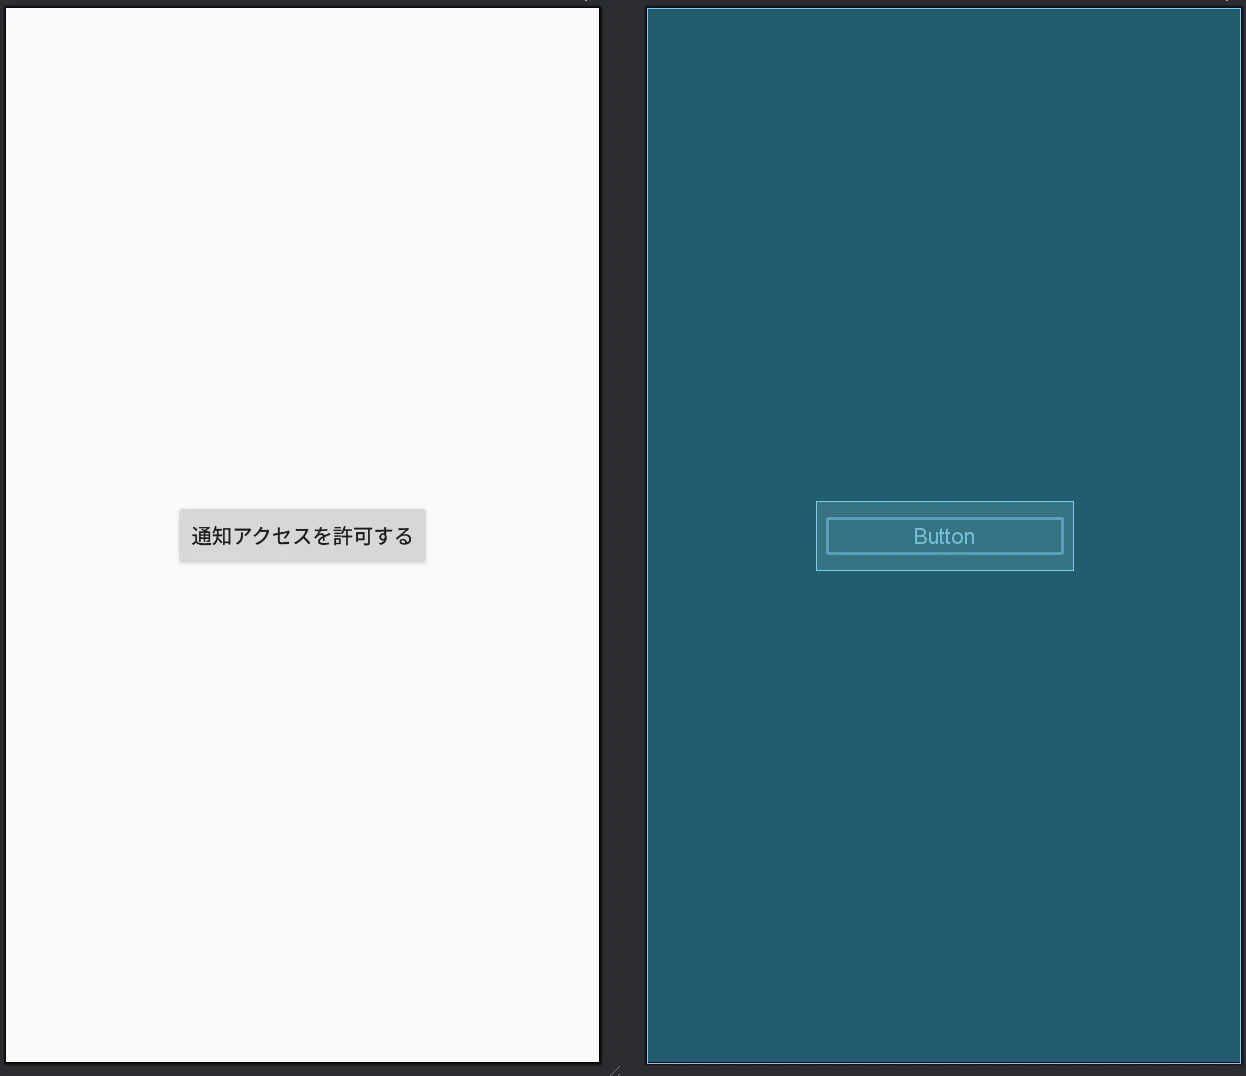
7.3. 設定画面(Fragment)
設定画面は至極単純で、「通知アクセスを許可する」ボタンが押下されると、このアプリケーションに上述の必要な権限を許可するAndroidシステム側の設定画面に遷移します。
7.3.1. Layout
Layoutには「通知アクセスを許可する」ボタンを配置します。
<?xml version="1.0" encoding="utf-8"?>
<androidx.constraintlayout.widget.ConstraintLayout xmlns:android="http://schemas.android.com/apk/res/android"
    xmlns:app="http://schemas.android.com/apk/res-auto"
    xmlns:tools="http://schemas.android.com/tools"
    android:layout_width="match_parent"
    android:layout_height="match_parent"
    tools:context=".ui.settings.SettingsFragment">

    <Button
        android:id="@+id/button_open_settings"
        android:layout_width="wrap_content"
        android:layout_height="wrap_content"
        android:text="通知アクセスを許可する"
        app:layout_constraintBottom_toBottomOf="parent"
        app:layout_constraintEnd_toEndOf="parent"
        app:layout_constraintStart_toStartOf="parent"
        app:layout_constraintTop_toTopOf="parent" />

</androidx.constraintlayout.widget.ConstraintLayout>
7.3.2. Fragment
Fragmentで「通知アクセスを許可する」ボタンが押下されると、必要な権限を許可するAndroidシステム側の設定画面に遷移させるよう設定します。
view.findViewById<Button>(R.id.button_open_settings)でLayoutに定義した「通知アクセスを許可する」ボタンを探し、そのボタンにstartActivity(Intent(ACTION_NOTIFICATION_LISTENER_SETTINGS))とすることで「Androidシステム側の設定画面の起動」と紐づけます。
package com.linenotifylogger.linenotifylogger.ui.settings

import android.content.Intent
import android.os.Bundle
import android.provider.Settings.ACTION_NOTIFICATION_LISTENER_SETTINGS
import android.view.LayoutInflater
import android.view.View
import android.view.ViewGroup
import androidx.fragment.app.Fragment
import android.widget.Button
import com.linenotifylogger.linenotifylogger.R

class SettingsFragment : Fragment() {

    override fun onCreateView(
        inflater: LayoutInflater, container: ViewGroup?,
        savedInstanceState: Bundle?
    ): View? {
        return inflater.inflate(R.layout.settings, container, false)
    }

    override fun onViewCreated(view: View, savedInstanceState: Bundle?) {
        super.onViewCreated(view, savedInstanceState)

        // 1. レイアウトからボタンを見つける
        val settingsButton = view.findViewById<Button>(R.id.button_open_settings)

        // 2. ボタンにクリックリスナーを設定する
        settingsButton.setOnClickListener {
            // 3. ボタンがクリックされたらAndroidシステム側の設定画面を起動する
            startActivity(Intent(ACTION_NOTIFICATION_LISTENER_SETTINGS))
        }
    }
}
7.4. Main画面の作成(View)
Main画面は選択されたFragmentを大きく表示して、画面下部のナビゲーションバーでFragmentを切り替えられるようにします。

7.4.1. Layout
Fragmentが表示される領域にどのFragmentを表示するかは、app:navGraph="@navigation/nav_graph"としてnav_graph.xmlで別途定義します。
ナビゲーションバーのLayoutは別途作成し、app:menu="@menu/bottom_nav_menuとして呼び出します。
<?xml version="1.0" encoding="utf-8"?>
<androidx.constraintlayout.widget.ConstraintLayout xmlns:android="http://schemas.android.com/apk/res/android"
    xmlns:app="http://schemas.android.com/apk/res-auto"
    xmlns:tools="http://schemas.android.com/tools"
    android:layout_width="match_parent"
    android:layout_height="match_parent"
    tools:context=".ui.main.MainActivity">

    <!-- 各画面(Fragment)が表示される領域 -->
    <androidx.fragment.app.FragmentContainerView
        android:id="@+id/nav_host_fragment"
        android:name="androidx.navigation.fragment.NavHostFragment"
        android:layout_width="match_parent"
        android:layout_height="0dp"
        app:defaultNavHost="true"
        app:layout_constraintBottom_toTopOf="@id/bottom_navigation_view"
        app:layout_constraintTop_toTopOf="parent"
        app:navGraph="@navigation/nav_graph" />

    <!-- 画面下部のナビゲーションバー -->
    <com.google.android.material.bottomnavigation.BottomNavigationView
        android:id="@+id/bottom_navigation_view"
        android:layout_width="match_parent"
        android:layout_height="wrap_content"
        app:layout_constraintBottom_toBottomOf="parent"
        app:menu="@menu/bottom_nav_menu"
        app:itemIconTint="@color/bottom_nav_menu_color_selector"
        app:itemTextColor="@color/bottom_nav_menu_color_selector" />


</androidx.constraintlayout.widget.ConstraintLayout>
Fragmentが表示される領域をnavigationとしてFragmentを設定します。
<?xml version="1.0" encoding="utf-8"?>
<navigation xmlns:android="http://schemas.android.com/apk/res/android"
    xmlns:app="http://schemas.android.com/apk/res-auto"
    xmlns:tools="http://schemas.android.com/tools"
    android:id="@+id/nav_graph"
    app:startDestination="@id/navigation_history"> <!-- 最初に表示する画面 -->

    <fragment
        android:id="@+id/navigation_history"
        android:name="com.linenotifylogger.linenotifylogger.ui.chat_history.ChatHistoryFragment"
        android:label="履歴"
        tools:layout="@layout/chat_history" />
    <fragment
        android:id="@+id/navigation_user_management"
        android:name="com.linenotifylogger.linenotifylogger.ui.target_user.TargetUserFragment"
        android:label="ユーザー管理"
        tools:layout="@layout/target_user" />
    <fragment
        android:id="@+id/navigation_settings"
        android:name="com.linenotifylogger.linenotifylogger.ui.settings.SettingsFragment"
        android:label="設定"
        tools:layout="@layout/settings" />

</navigation>
ナビゲーションバーのLayoutは単純にmenuとして「履歴」「ユーザ管理」「選択」が並ぶようにします。
各メニューにアイコンを設定しています。アイコンはAndroid Studio内のVector Assetから選んで利用しました。
<?xml version="1.0" encoding="utf-8"?>
<menu xmlns:android="http://schemas.android.com/apk/res/android">

    <item
        android:id="@+id/navigation_history"
        android:icon="@drawable/baseline_chat_24"
        android:title="履歴" />

    <item
        android:id="@+id/navigation_user_management"
        android:icon="@drawable/outline_account_circle_24"
        android:title="ユーザー管理" />

    <item
        android:id="@+id/navigation_settings"
        android:icon="@drawable/baseline_settings_24"
        android:title="設定" />
</menu>
7.4.2. MainActivity
先ほど作成したLayoutで実際にFragmentを切り替えられるようにします。
package com.linenotifylogger.linenotifylogger.ui.main

import android.os.Bundle
import androidx.appcompat.app.AppCompatActivity
import androidx.lifecycle.lifecycleScope
import androidx.navigation.fragment.NavHostFragment
import androidx.navigation.ui.setupWithNavController
import com.google.android.material.bottomnavigation.BottomNavigationView
import com.linenotifylogger.linenotifylogger.db.ChatHistoryDatabase
import com.linenotifylogger.linenotifylogger.R
import kotlinx.coroutines.Dispatchers
import kotlinx.coroutines.launch
import java.util.Calendar

class MainActivity : AppCompatActivity() {
    override fun onCreate(savedInstanceState: Bundle?) {
        super.onCreate(savedInstanceState)
        setContentView(R.layout.activity_main)

        //Fragment表示領域
        val navHostFragment = supportFragmentManager.findFragmentById(R.id.nav_host_fragment) as NavHostFragment
        //ナビゲーションバー
        val bottomNavigationView = findViewById<BottomNavigationView>(R.id.bottom_navigation_view)

        // Fragment表示領域のコントローラーとしてナビゲーションバーを設定
        bottomNavigationView.setupWithNavController(navHostFragment.navController)

        cleanupOldChatHistory()
    }
    private fun cleanupOldChatHistory() {

        lifecycleScope.launch(Dispatchers.IO) {
            //2週間前のタイムスタンプを計算する
            val calendar = Calendar.getInstance()
            calendar.add(Calendar.WEEK_OF_YEAR, -2)
            val twoWeeksAgoTimestamp = calendar.timeInMillis

            //データベースのインスタンスを取得し、2週間以上前の通知ログを削除
            val db = ChatHistoryDatabase.getChatHistoryDatabase(applicationContext)
            db.ChatHistoryDao().deleteOldHistory(twoWeeksAgoTimestamp)
        }
    }
}
8. 動作検証
実装が完了したので、LINEのメッセージが消されるのを待ちます。
待っている間にアプリの事前準備をしておきます。
まず「設定」からアプリに通知へのアクセスを許可します。
そして「ユーザー管理」でメッセージを保存したいユーザを登録します。
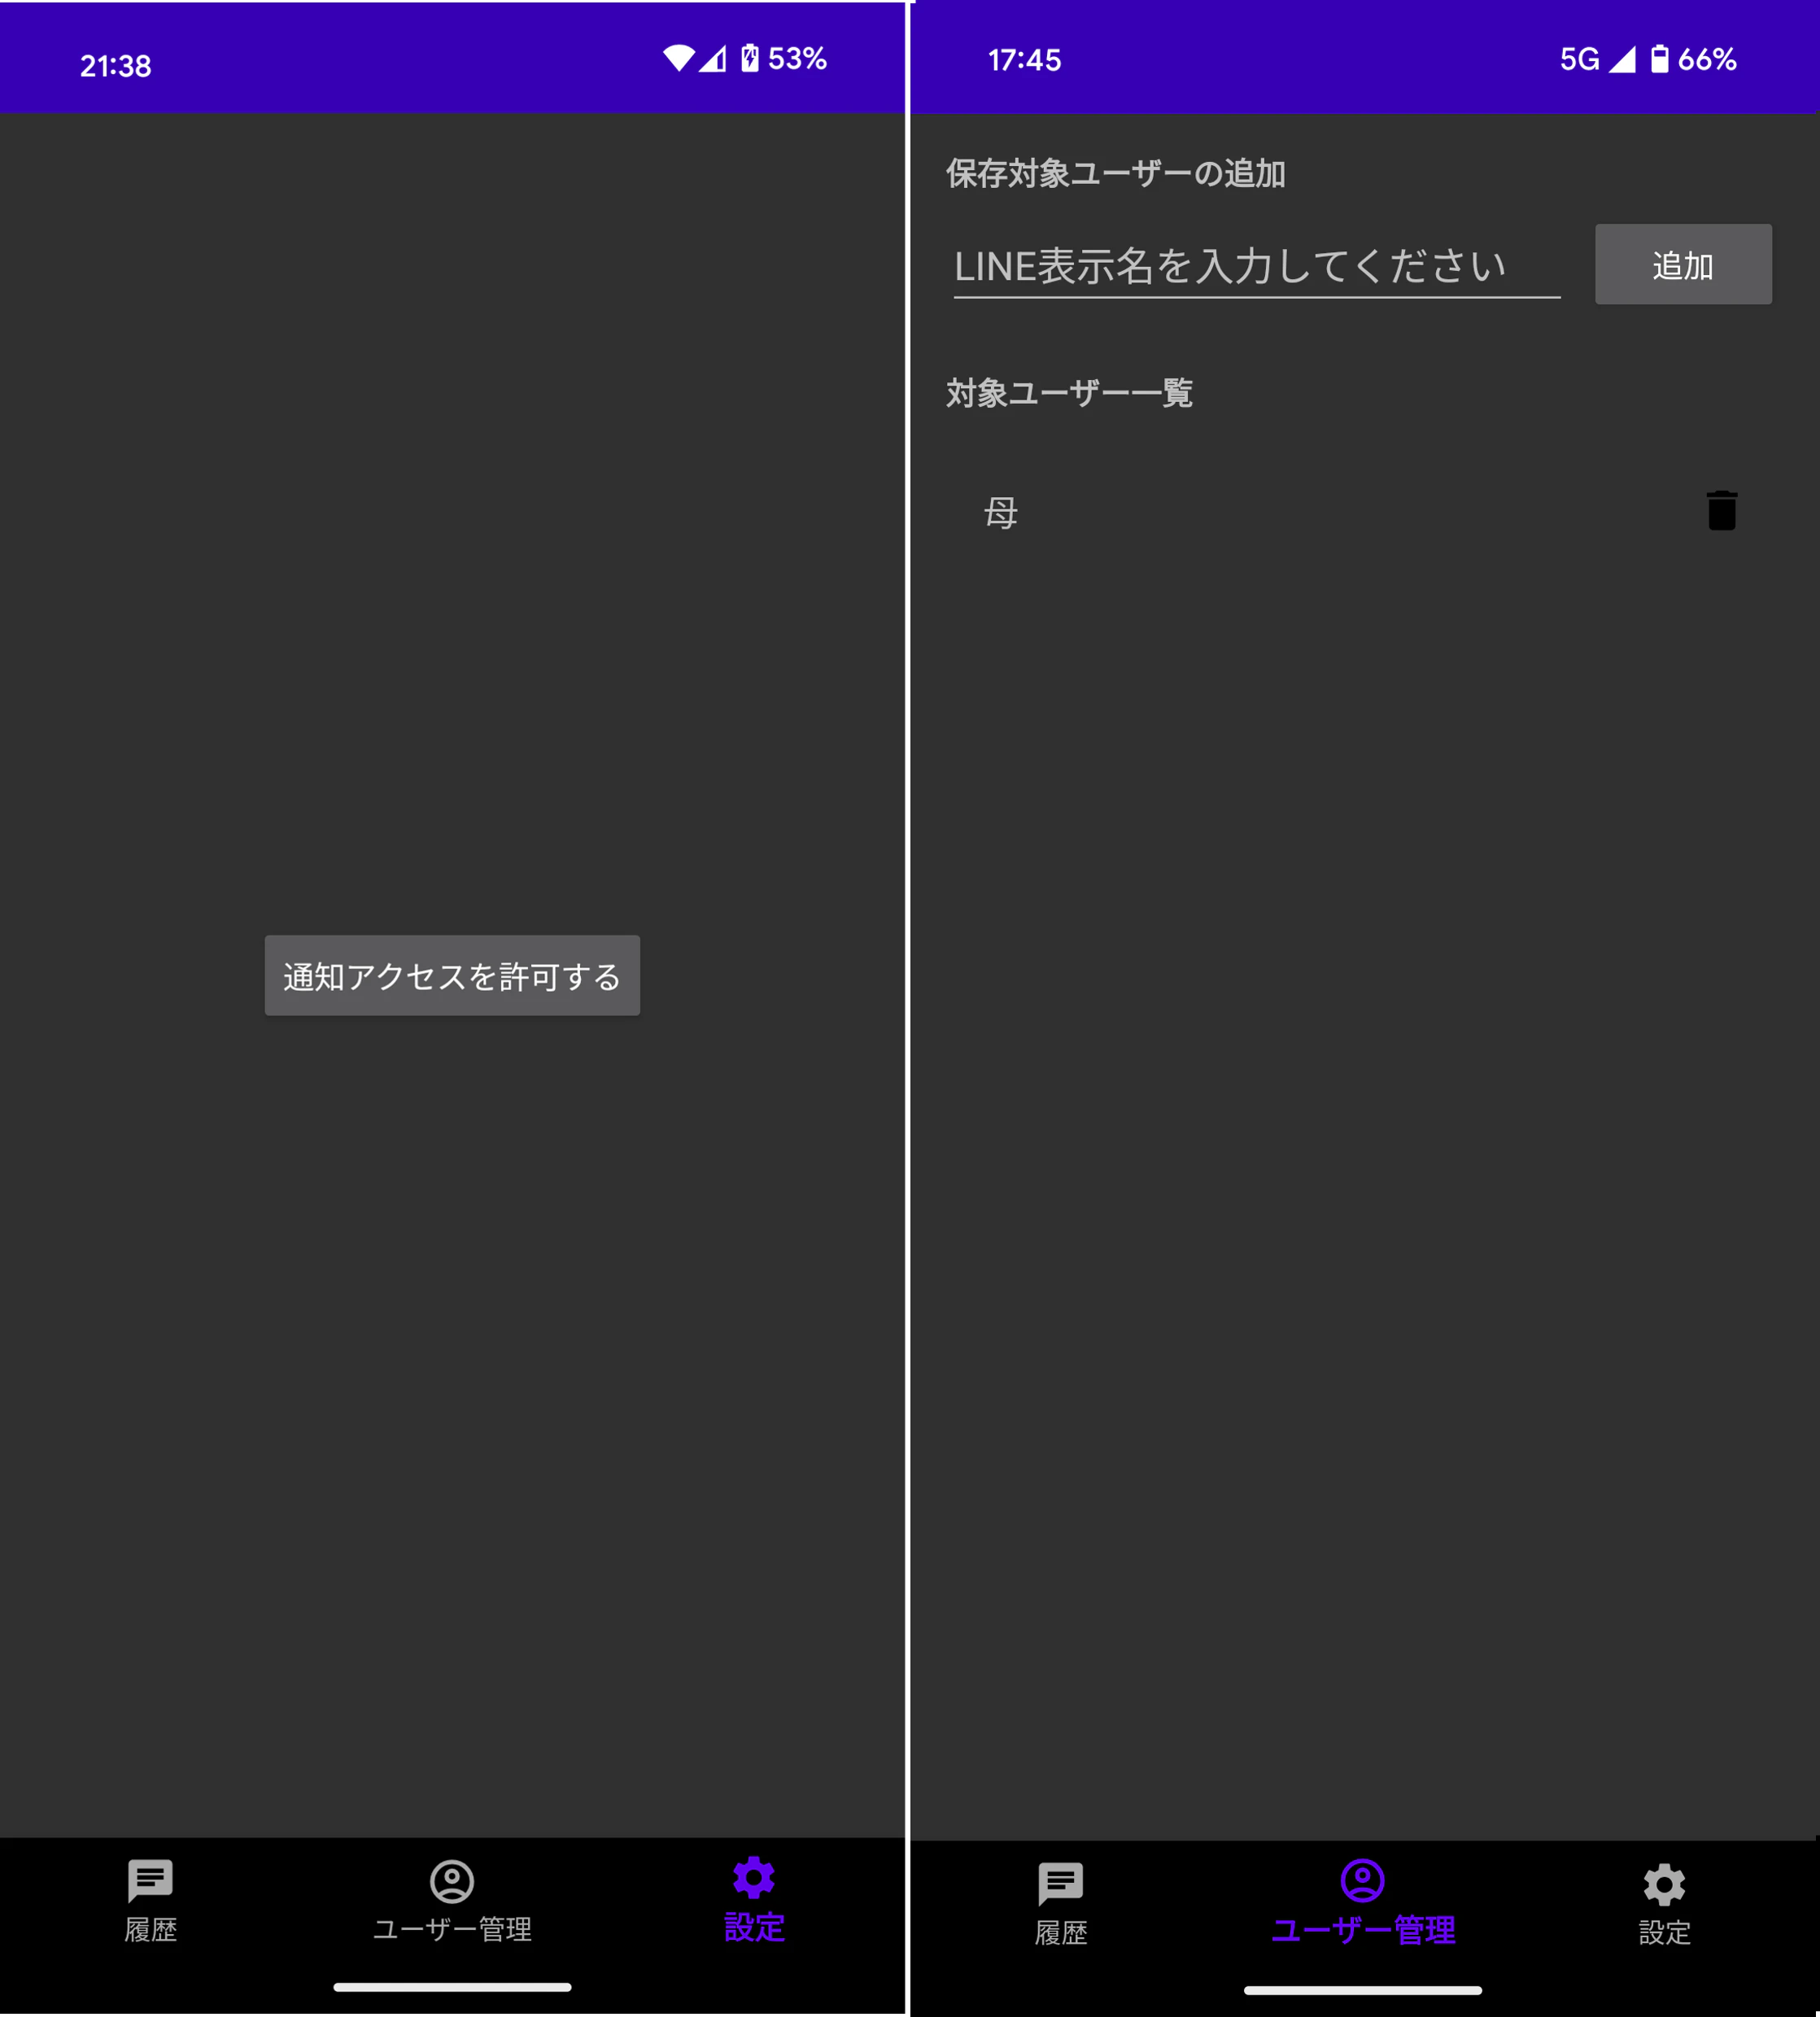
「母親のメッセージが消されててもそんな気にならんやろ」と
と自分にツッコミを入れている間に母からLINEが来ていました。
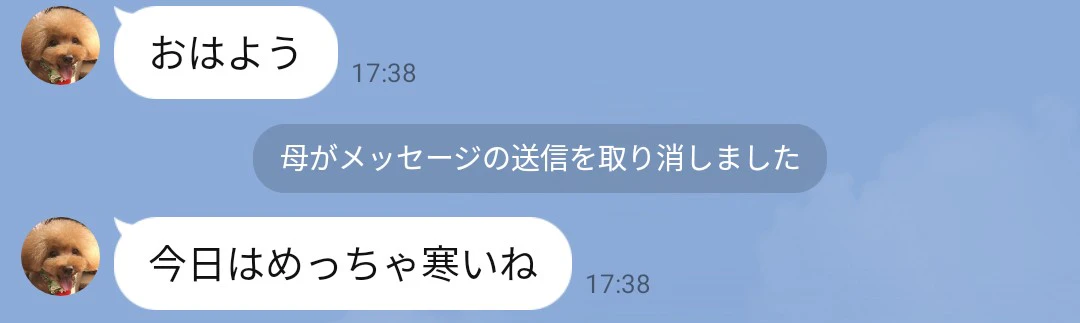
それではちゃんとアプリが削除されたメッセージを保存できているか見てみましょう!
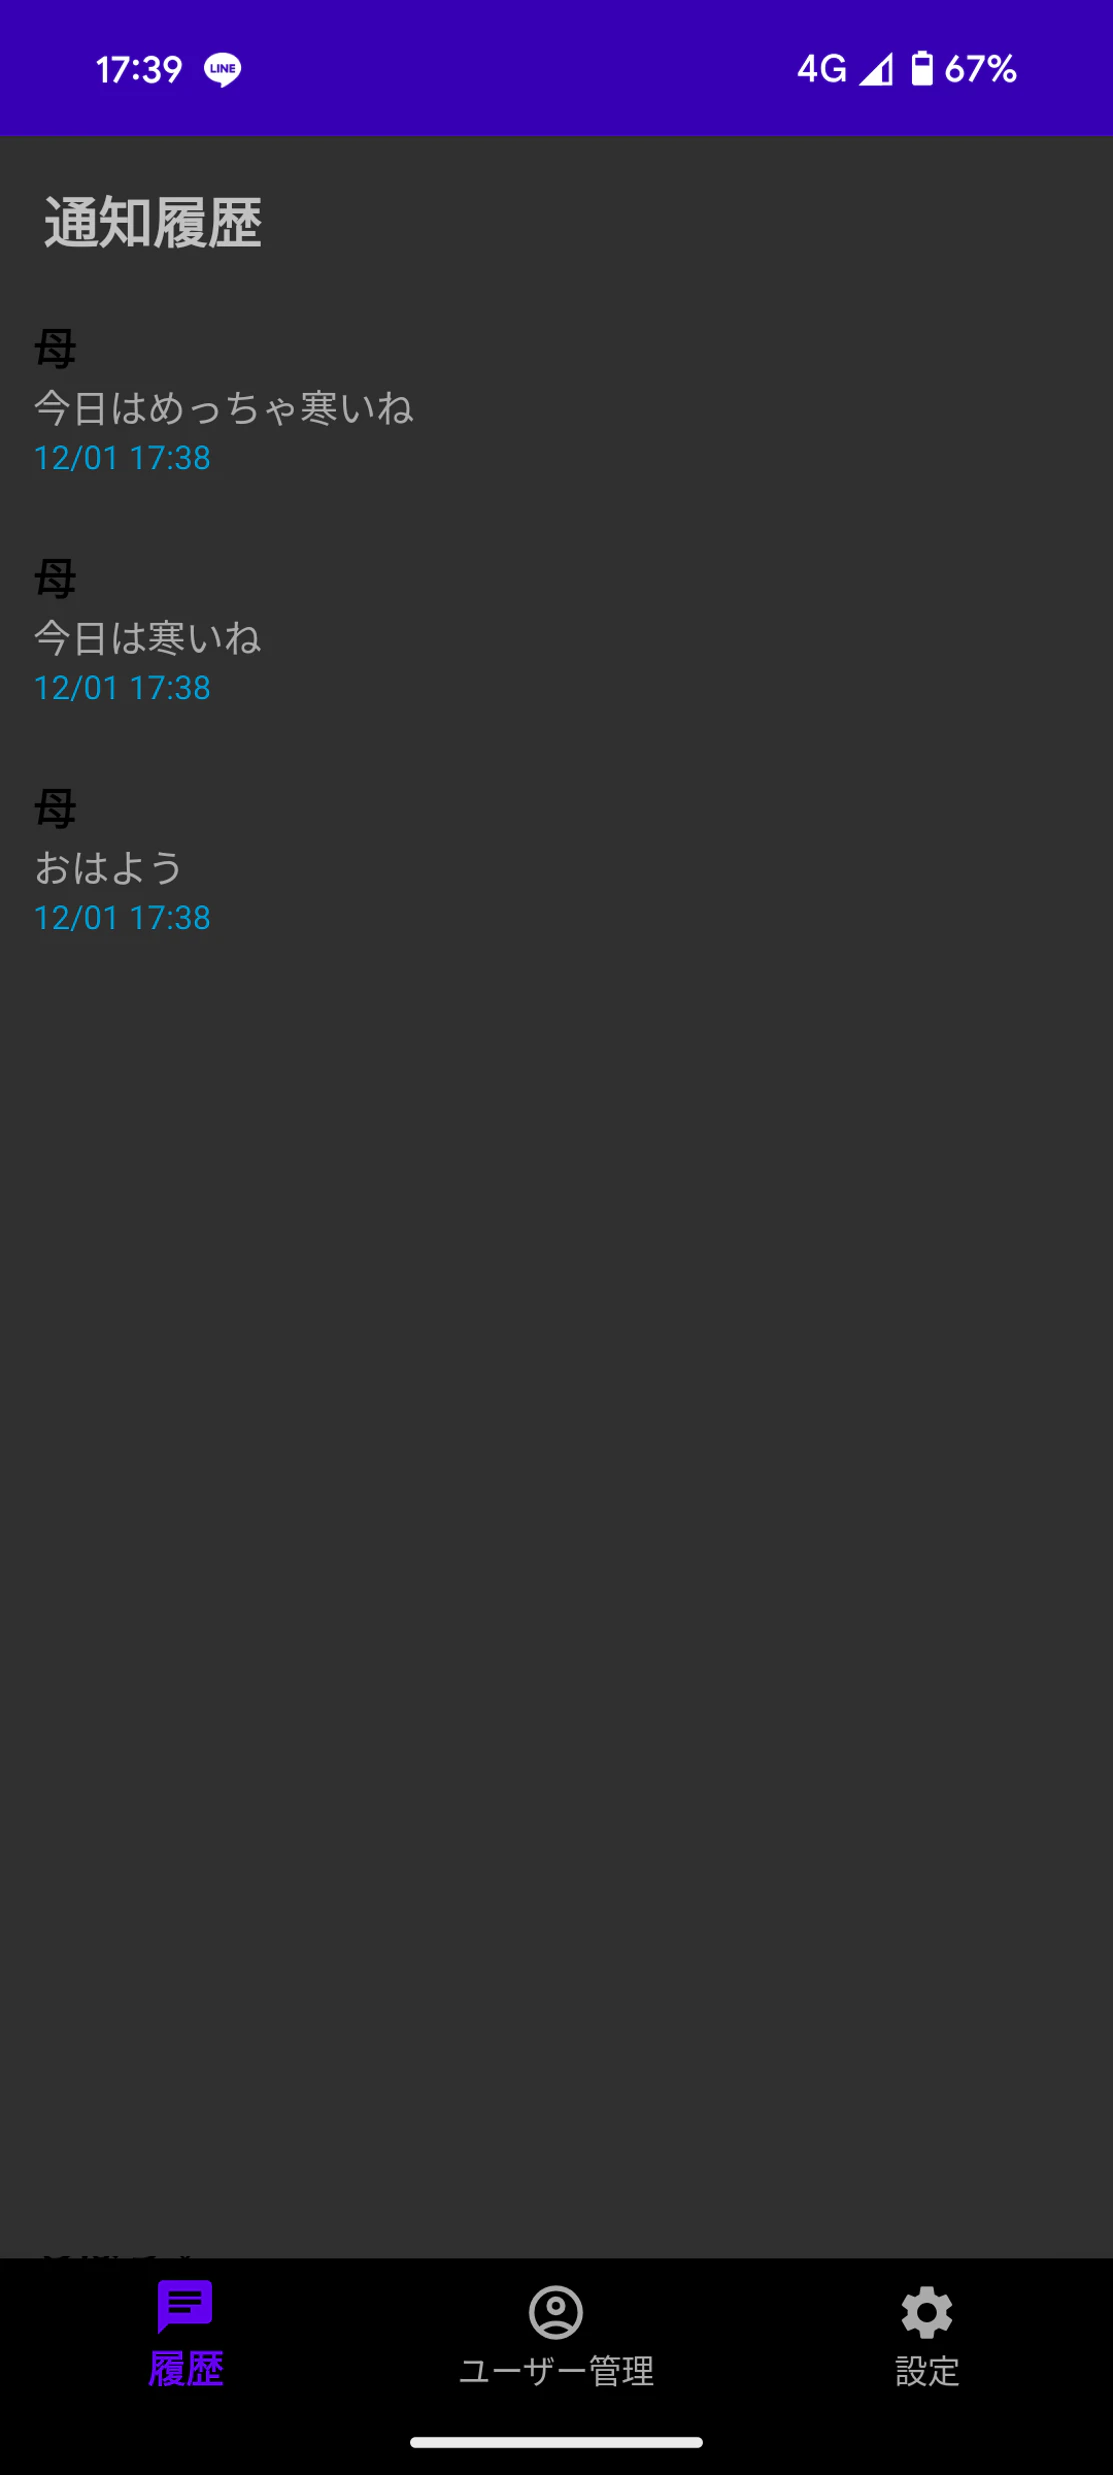
ちゃんと保存できている!!!
「めっちゃ」の有無はどうでもええやろ。。。笑
9. おわりに
久しぶりにAndroidアプリを作成したので、色々手間取りましたが目的のアプリを作成することができました。
作って何か嬉しいことがあるのか、ないのか、謎ですがしばらく使ってみようと思います笑
ちなみに性能ですが、間髪入れずに通知が飛んできても保存できており、文章の長さが寿限無4回分のメッセージでも途切れず全て保存できていました。
ただAndroidのLINEはiPhoneのように、3Dタッチで未読のまま複数のメッセージを確認するということができないので、このアプリはAndroidでもメッセージを未読のまま確認できるようになって想定外に便利でした。