Reactをコンポーネント単位でexportして、既存のページにコンポーネント単位で埋め込む方法をまとめました
はじめに
以前、Viteで作成したReactのコンポーネントを従来型Webページに埋め込む手順
でという記事で、Viteのライブラリモードを利用してビルドを行う手順をまとめました
設定も少なく簡単ですが、細かい設定ができないためrollup.jsでビルドを行う手順をまとめます
環境について
- node.jsはインストール済の想定(LTSで確認)
- bashを利用(git-bashを使ってます)
手順について
- ViteでReactの環境を作成する
- 簡単なコンポーネント(Counter)を作成する
- コンポーネントが動作することをVite環境で確認する
- rollup.jsとReactのビルドに必要なライブラリをインストールする
- rollup.jsの設定を行い、コンポーネントをビルドしてjsファイルを作成する
- WebページにReactのコンポーネントを埋め込んで、動作することを確認する
1. ViteでReactの環境を作成する
適当なディレクトリでReact+TypeScriptの環境を作成します
$ npm create vite@latest vite-react-component-lib -- --template react-swc-ts
$ cd vite-react-component-lib
$ npm install
2. 簡単なコンポーネント(Counter)を作成する
import React, { useState } from 'react';
import './Counter.css'; // Import the CSS file for styling

interface CounterProps {
  initialCount?: number;
}

const Counter: React.FC<CounterProps> = ({ initialCount = 0 }) => {
  const [count, setCount] = useState(initialCount);

  const increment = () => {
    setCount(count + 1);
  };

  return (
    <div className="counter-container">
      <p>Count: {count}</p>
      <button onClick={increment}>Increment</button>
    </div>
  );
};

export default Counter;
.counter-container {
    border: 1px solid black;
    border-radius: 8px;
    padding: 16px;
    display: inline-block;
    text-align: center;
}

button {
    margin-top: 8px;
    padding: 8px 16px;
    border: none;
    background-color: #007bff;
    color: white;
    border-radius: 4px;
    cursor: pointer;
}

button:hover {
    background-color: #0056b3;
}
3. コンポーネントが動作することをVite環境で確認する
App.tsxファイルでCounterコンポーネントを表示します
import Counter from './Counter';

function App() {
  return (
    <>
      <Counter />
    </>
  )
}

export default App;
あとsrc/main.tsxのスタイルをコメントアウトしておきます(背景色が変わってしまうので)
-import './index.css'
+//import './index.css'
Viteで開発サーバ―を起動して、Counterコンポーネントが動作することを確認します
$ npm run dev

> vite-react-component-lib@0.0.0 dev
> vite

  VITE v6.0.6  ready in 283 ms

  ➜  Local:   http://localhost:5173/
  ➜  Network: use --host to expose
  ➜  press h + enter to show help
カウンターが正常に動作することを確認します
4. rollup.jsとReactのビルドに必要なライブラリをインストールする
ライブラリとしてパッケージングするため、rollup.jsと必要なプラグインを導入します
- rollup.jsは複数のモジュールやファイルを1つのファイルにまとめてくれる、軽量で高速なバンドルツールです
npm i -D rollup rollup-plugin-delete rollup-plugin-import-css rollup-plugin-peer-deps-external tslib @rollup/plugin-typescript @rollup/plugin-commonjs @rollup/plugin-node-resolve @rollup/plugin-replace
5. ビルド用スクリプトrollup.config.jsを作成コンポーネントをビルドしてjsファイルを作成する
まず、ビルドのエントリーポイントとなるファイルsrc/lib.tsを作成し、必要なコンポーネント、ライブラリをエクスポートします
Webページに埋め込む際、Reactも必要なためexportします
export { default as React } from 'react';
export { default as ReactDOM } from 'react-dom';
export { default as ReactDOMClient } from 'react-dom/client';

// Component
export { default as Counter} from './Counter';
続いて、ビルド用のスクリプトを作成します。rollup.config.jsをプロジェクトのルートに作成し、下記の内容を記載します
import css from 'rollup-plugin-import-css';
import peerDepsExternal from 'rollup-plugin-peer-deps-external';
import resolve from '@rollup/plugin-node-resolve';
import commonjs from '@rollup/plugin-commonjs';
import replace from '@rollup/plugin-replace';
import typescript from '@rollup/plugin-typescript';
import del from 'rollup-plugin-delete';

export default {
  input: 'src/lib.ts', // ビルドのエントリーポイント
  output: [
    {
      // esmodule
      file: 'dist/bundle.esm.js', // 出力ファイル名
      format: 'esm',
      sourcemap: true,
    },
  ],
  plugins: [
    del({ targets: 'dist/*' }),
    css({ output: 'bundle.css' }),
    peerDepsExternal(),
    resolve(),
    commonjs(),
    replace({
      'process.env.NODE_ENV': JSON.stringify(process.env.NODE_ENV),
      preventAssignment: true,
    }),
    typescript({
      tsconfig: 'tsconfig.app.json',  // TypeScriptの設定(viteの設定ファイルを読み込む)
      compilerOptions: { // 上記設定ファイルから一部設定を変更する
        outDir: "dist",
        declaration: true, // 型定義ファイルを作成する
        declarationDir: "dist",
        allowImportingTsExtensions: false,
      },
      exclude : [ // 対象外ファイル
        "node_modules",
        "dist",
        "build",
        "src/main.tsx",
        "src/App.tsx",
      ]
    }),
  ],
};
rollup.jsで利用するプラグインについて
-
peerDepsExternal
package.jsonに記載されたpeerDependenciesパッケージをバンドル対象から除外して、バンドルサイズを削減する -
resolve
インポートするモジュールの依存関係の解決とファイルパスの特定を行う
-
commonjs
require()を解析してCommonJS形式の依存関係を特定する
-
replace
ビルド時に置換処理を行う。実行時にnodeの環境変数を参照する箇所がエラーとなるため、ビルド時に置換する
-
typescript
トランスパイルを行う。設定ファイルはviteの
tsconfig.app.jsonを利用するが、一部の設定を変更することができる
ビルドを行うためのスクリプトをpackage.jsonに追加します
  "scripts": {
    "build-lib": "rollup -c"
  },
ビルドを行います
$ npm run build-lib

> vite-react-component-lib@0.0.0 build-lib
> rollup -c


src/lib.ts → dist/bundle.esm.js...
created dist/bundle.esm.js in 3.1s
dist/bundle.esm.jsとdist/bundle.cssの他、型定義ファイル(~.d.ts)が生成されます
6. WebページにReactのコンポーネントを埋め込んで、動作することを確認する
動作確認のためhtmlファイルを作成します。webrootフォルダをルート直下に作成しその中に保存します
$ mkdir webroot
$ touch webroot/counter-test.html
<div id="root"></div>の部分に、Reactコンポーネント(Counter)を描画するコードを記載します
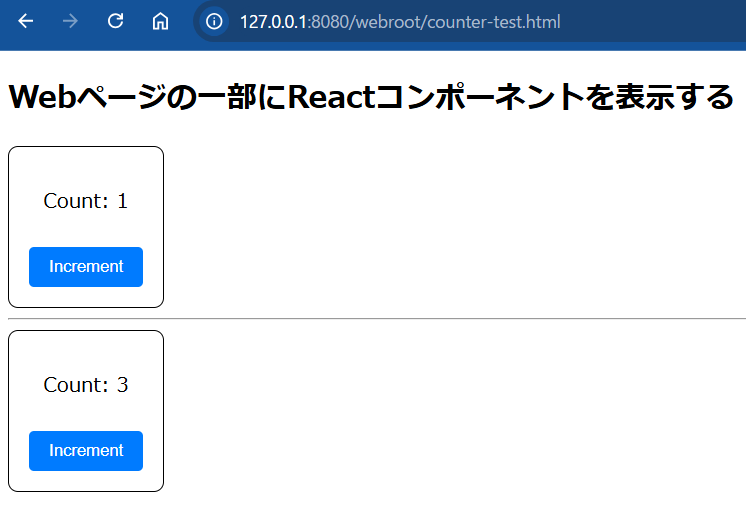
- 画面内に2つの
<Counter>コンポーネントを配置して、それぞれが独立して動くことを確認する
<!DOCTYPE html>
<html>
  <head>
    <meta charset="UTF-8" />
    <link rel="stylesheet" crossorigin href="/dist/bundle.css">
    <script type="module">
      import {ReactDOMClient, React, Counter} from '/dist/bundle.esm.js';
      const elements = document.querySelectorAll('.counter');
      for(let container of elements) {
        const root = ReactDOMClient.createRoot(container);
        root.render(React.createElement(Counter));
      }
    </script>
  </head>
  <body>
    <h2>Webページの一部にReactコンポーネントを表示する</h2>
    <div class="counter"></div>
    <hr>
    <div class="counter"></div>
  </body>
</html>
動作確認のためにWebサーバーを起動します
$ npx http-server .
/webroot/counter-test.htmlをブラウザで開くと、Counterコンポーネントが表示されていることを確認できます

