Raspberry Pi 4Bの温度を管理したい
爆熱のPi4が複数台あり夏の暑い時期CPU温度が気になって気になって仕方なく vcgencmd measure_temp ばかり叩いてた2020。「Chronograf」つかうと楽だ~よってことで教えてもらったけど手順がメンドクサイんでしょ?と放置してましたww。
いまさら「InfluxDB + Telegraf + Chronograf」それおいしいの?
InfluxDB は InfluxData が開発しているオープンソースの時系列データベースです。Telegraf + Chronograf もこの会社が開発しているので構築は割と簡単にできる。
ちなみに Telegraf は、InfluxDB専用のメトリックスコレクタ。
Chronograf は、InfluxDB専用の可視化ダッシュボードフレームワーク。
たぶんだけど、(NET-SNMP+MRTG)でやるより簡単。これおすすめ。
構成
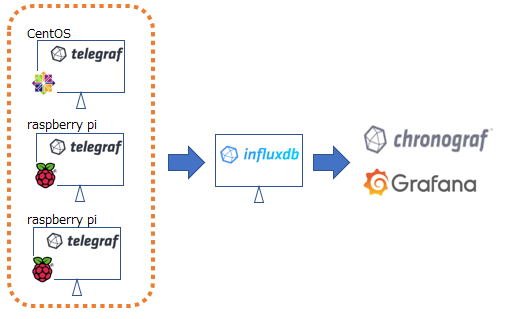
こんな感じの構成にしてみる。
CentOS8 : InfluxDB , Chronograf
Pi4B : Telegraf
InfluxDB : influxdb-1.8.3.x86_64.rpm
Chronograf : chronograf-1.8.5.x86_64.rpm
Telegraf : telegraf-1.15.3-1.x86_64.rpm / telegraf-1.15.3
図にすると下記みたいなかんじ
CentOSに InfluxDB, Chronograf をインストールする
InfluxDB は、Piだと非力かも?とか記事みたので InfluxDB, Chronograf は、ちょいとパワーのある側にインスコしてみる。
InfluxDB のインストール
rpmをダウンロードしてきてインストールもできるが、yumコマンドの方が楽なので、下記のファイルを作成する。
[influxdb]
name = InfluxDB Repository
baseurl = https://repos.influxdata.com/rhel/8/x86_64/stable/
enabled = 1
gpgcheck = 1
gpgkey = https://repos.influxdata.com/influxdb.key
yum でインストールする。これだけ。
$ sudo dnf makecache
$ sudo yum install influxdb
$ systemctl enable --now influxdb.service
influx コマンドをつかってデータベースの作成とかできるようになります。また InfluxDB は、8086 ポートを使用するるのfirewallの設定が必要です。
Chronograf のインストール
こっちはrpmパッケージからいれてみる。
Chronograf は、8888 ポートを使用するるのfirewallの設定が必要です。
$ wget https://repos.influxdata.com/rhel/8/x86_64/stable/chronograf-1.8.5.x86_64.rpm
$ sudo yum localinstall chronograf-1.8.5.x86_64.rpm
$ sudo systemctl enable --now chronograf
$ sudo systemctl status chronograf
とりあえずインストールしておいてあとから設定する。
CentOS/Pi4に Telegraf をインストールする
監視したいOSに、Telegraf エージェントをインストールする。CentOS/Pi4 と若干インスコするコマンドが違うのでメモ。
CentOSに Telegraf をインストール
設定ファイルを修正する
$ wget https://repos.influxdata.com/rhel/8/x86_64/stable/telegraf-1.15.3-1.x86_64.rpm
$ sudo yum localinstall telegraf-1.15.3-1.x86_64.rpm
$ sudo systemctl enable --now telegraf
$ sudo systemctl status telegraf
Pi4に Telegraf をインストール
$ sudo curl https://repos.influxdata.com/influxdb.key | apt-key add -
$ sudo vi /etc/apt/sources.list.d/influxdb.list

deb https://repos.influxdata.com/debian buster stable

$ sudo apt update
$ sudo apt install telegraf
$ sudo systemctl enable --now telegraf
$ systemctl status telegraf.service
telegraf.conf を修正する
telegraf.conf に対して最低限の設定をする。難しいことはないと思う。
[agent]
  urls = ["http://192.xxx.yyy.zzz:8086"]  # InfluxDBインストしたIP
  database = "telegraf"
  retention_policy = ""
  write_consistency = "any"
  timeout = "5s"
そのあと。再起動(面倒なら)する。
Chronograf を起動してみる
Chronograf を起動してみる。 8888 ポートにアクセスね。
日本語に対応していないで拒否感あるけどここは、頑張ろう。
Telegraf エージェントが動いていれば、下記のように表示されていると思う。
Raspberry pi4 の温度管理
Raspberry pi には温度センサーがついているので、CPU温度を Telegraf エージェント経由で InfluxDB に登録するコマンドを作ってみる。
敷居が高いかと思いきや割と簡単だったので色々と応用できるはず。
・【Raspberry Pi + InfluxDB + Telegraf】ラズパイのCPU温度を記録する方法
・How to measure a Raspberry Pi's temperature and CPU frequency with Telegraf
タンコピですが、こういうのは体感が必要。/usr/local/bin/rpi-temp
ってファイルを作る。
#!/bin/bash

awk '{print $1/1000}' /sys/class/thermal/thermal_zone0/temp
次、実行モードにする。叩いてみる。値がでる。これが必要。
$ cd /usr/local/bin
$ sudo chmod 755 rpi-temp
$ ./rpi-temp
44.79
この状態が確認できたら、/etc/telegraf/telegraf.conf の最後あたりに以下をいれる。
[[inputs.exec]]
  commands = ["/usr/local/bin/rpi-temp"]
  name_override = "rpi_temp"
  data_format = "value"
  data_type = "float"
いれたら、Telegraf エージェントの再起動。pi4を再起動しなくてもいいす。
$ systemctl restart telegraf.service
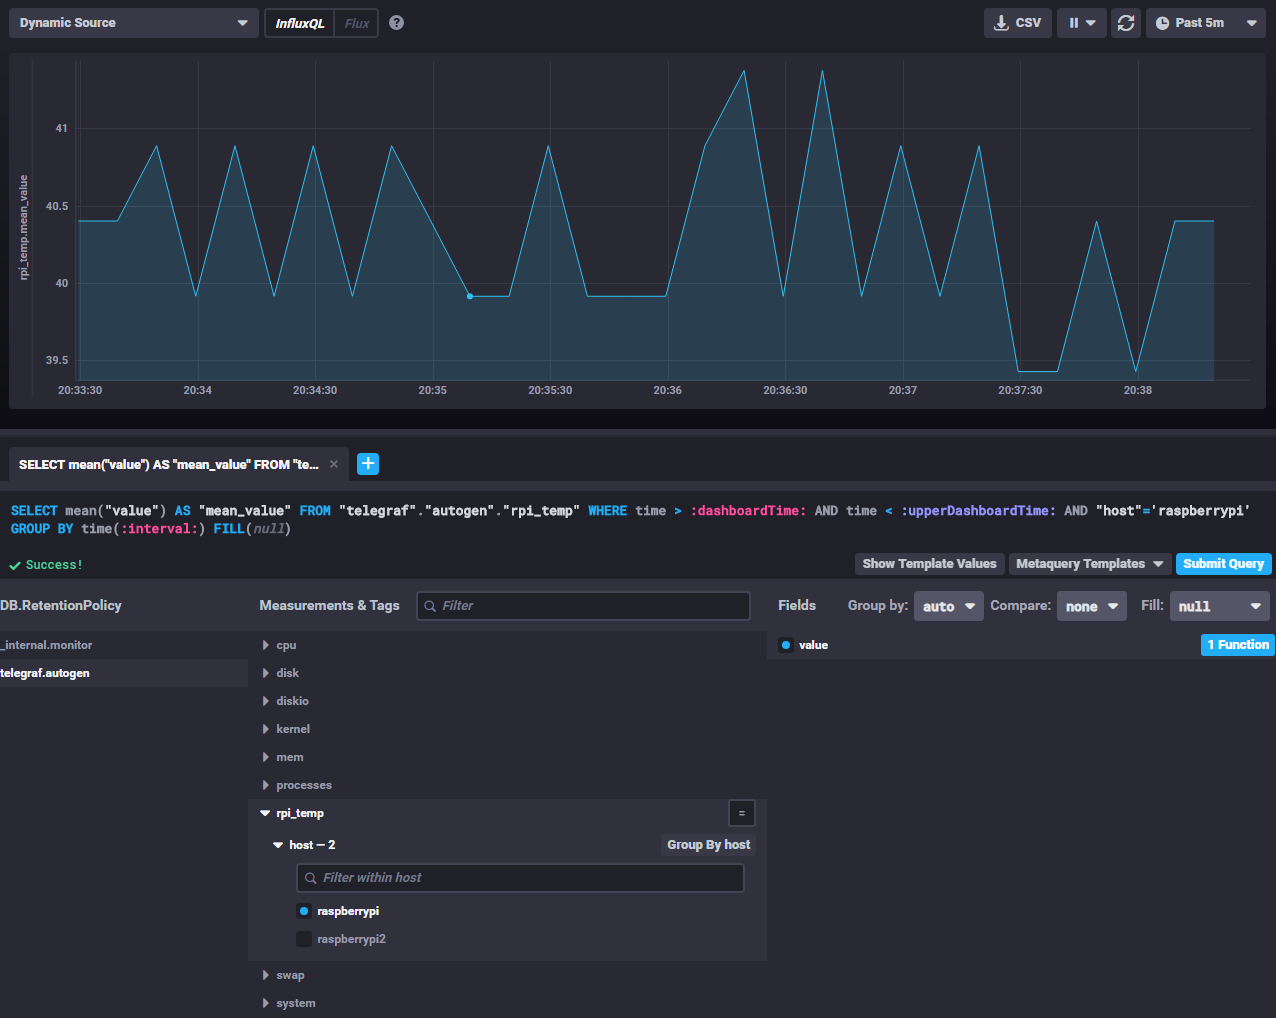
Chronograf で pi4 の温度センサー情報がきてるか 確認してみる。
すごうう、、MRTGの設定より超簡単。
Windows10 で Telegraf 使うときの注意
簡単に監視できるはずが、なぜかWindowsだけうまくいかない。下記のエラーが出まくってる。
2020-11-29T02:49:00Z W! [inputs.win_perf_counters] error while getting value for counter "\\Paging File(_Total)\\% Usage", will skip metric: データは有効ではありません。
2020-11-29T02:49:10Z W! [inputs.win_perf_counters] error while getting value for counter "\\Paging File(_Total)\\% Usage", will skip metric: データは有効ではありません。
VM上のWindowsは監視できる・・・。と思ってログをよくみると。"Paging File" とある。ページファイルを作っていなかった(切っていた)のが原因だった。
とりあえずまとめ
・How To Install InfluxDB on CentOS 8 / RHEL 8
・Telegrafでサバーリソースを取得してInfluxDBに格納する
・【比較】Grafana vs. Chronograf - 視覚化ツールを比較してみた -
・TICK stack でモニタリング環境を構築 (Telegraf + InfluxDB + Chronograf + Kapacitor)
・【Iot自宅環境下準備】センシングしたデータをラズパイで保存するデータベースInfluxDBの設定
・Spring boot metrics monitoring using TICK stack


