目的
- Vue3系の基礎を(Composition APIを中心に)覚える
はじめに
今までの実務ではVue2系のみを扱ってきたのですが、個人的な興味でVue3系を学んでみることにしました。
Vue3は2系と比べてパフォーマンスの向上がされていたり、大規模なプロジェクトでの開発に適した変更がされているそうなので、実際に使い心地を検証してみます。
さて、新しい言語/フレームワークの習得のためには、何か簡単なアプリ(TODOアプリなど)が習作の題材として適切かと思います。
しかし、ゲーム好きの自分としては何か簡単なブラウザゲームを作ってみたく、そして思いついたのが…
そう、○×ゲーム。
正式名称は三目並べというそうです(ウィキペディア調べ)。
○側と×側のプレイヤーが交互に〇/×を置いていき、三個並べ切ったプレイヤーの勝利、というシンプルなルールでありながら、
Reactのチュートリアルにも採用されている、由緒あるゲームです。
今回はこの○×ゲーム、もとい三目並べを簡単なブラウザアプリとして実装していき、Vue3の文法を学んでいきます。
実装
準備
手早く環境構築するため、vue-cliでプロジェクトを作成します。
presetはDefault (Vue3)とします。
$ vue create <project-name>
Vue CLI v4.5.15
? Please pick a preset:
  Default ([Vue 2] babel, eslint)
❯ Default (Vue 3) ([Vue 3] babel, eslint)
  Manually select features
ユーティリティライブラリとして、lodashをnpm installします。
※最終的には大して使わなかった模様
$ cd <project-name>
$ npm i lodash
そして開発サーバを起動して、準備完了です。
$ npm run serve
ソースコード
最終的な成果物は以下のようになりました。
※Vue部分のみ抜粋しています
※前述のReactチュートリアルを大いに参考にしています
<template>
  <Board />
</template>

<script>
import Board from './components/Board.vue'

export default {
  name: 'App',
  components: {
    Board,
  },
}
</script>
<template>
<div>{{ message }}</div>
<div>
<div
class="board-row"
v-for="(row, rowIndex) in squareIndexTable"
:key="rowIndex"
>
<Square
v-for="squareIndex in row"
:key="squareIndex"
:value="state.squares[squareIndex]"
@click="handleClickSquareAt(squareIndex)"
/>
</div>
</div>
</template>
<script>
import { computed, ref } from 'vue';
import _ from 'lodash';
import Square from './Square.vue'
export default {
name: 'Board',
components: {
Square,
},
props: {
size: {
type: Number,
default: 3,
},
},
setup(props) {
// data
const squareIndexTable = _.chunk([...Array(props.size * props.size).keys()], props.size);
const state = ref({
squares: Array(props.size * props.size).fill(null),
xIsNext: false,
});
// computed
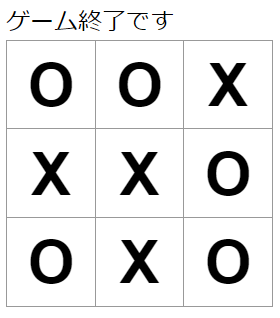
const message = computed(() => {
const emptySquares = state.value.squares.filter(value => value === null);
if (emptySquares.length === 0) {
return 'ゲーム終了です';
}
return `${next.value}の手番です`;
});
const next = computed(() => state.value.xIsNext ? 'X' : 'O');
// methods
const handleClickSquareAt = (index) => {
if (state.value.squares[index]) {
return;
}
state.value.squares[index] = next.value;
state.value.xIsNext = !state.value.xIsNext;
};
return {
squareIndexTable,
state,
message,
handleClickSquareAt,
};
},
}
</script>
<style scoped>
.board-row:after {
clear: both;
content: "";
display: table;
}
</style>
<template>
  <button
    class="square"
    @click="handleClick"
  >
    {{ value }}
 </button>
</template>

<script>
export default {
  name: 'Square',
  props: {
    value: String,
  },
  emits: ['click'],
  setup(props, context) {
    const handleClick = () => {
      context.emit('click');
    };

    return {
      handleClick,
    };
  },
}
</script>

<style scoped>
.square {
  background: #fff;
  border: 1px solid #999;
  float: left;
  font-size: 40px;
  font-weight: bold;
  line-height: 60px;
  height: 60px;
  margin-right: -1px;
  margin-top: -1px;
  padding: 0;
  text-align: center;
  width: 60px;
}
</style>
以下のようなページができます。
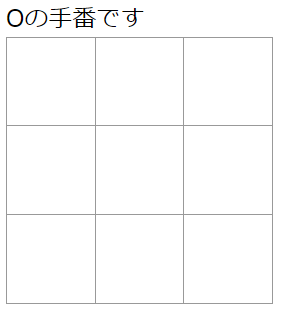
クリックすることで○/×が交互に置かれます。勝敗判定はまだ実装していません…
ざっくり解説
最上位コンポーネント
最上位のApp.vueは、vue-cliデフォルト生成されたものから、以下のように編集しています。
やっていることはBoardコンポーネントを呼び出しているだけです。
<template>
  <Board />
</template>

<script>
import Board from './components/Board.vue'

export default {
  name: 'App',
  components: {
    Board,
  },
}
</script>
Boardコンポーネント
盤面の状態を保持するBoardコンポーネントのtemplate部分では、マスを表すSquareコンポーネントを複数個呼び出しています。
<template>
<div>{{ message }}</div>
<div>
  <div
   class="board-row"
   v-for="(row, rowIndex) in squareIndexTable"
   :key="rowIndex"
  >
    <Square
      v-for="squareIndex in row"
      :key="squareIndex"
      :value="state.squares[squareIndex]"
      @click="handleClickSquareAt(squareIndex)"
    />
  </div>
</div>
</template>
template直下に要素が2つ置かれていますが、これはVue3のFragmentsという機能によるものです。
Vue2の場合はtemplate直下に1つの要素しか置くことができないため、場合によっては余計なdivでラップする必要があったのですが、それが必要なくなったということですね。
引き続きBoardコンポーネントのscript部分を見ていきます。
Vue2のOptions APIと比べて大きく変化した点は、setup()という関数の中で従来のdata, computed, methodsなどが定義されることです。
    // data
    const squareIndexTable = _.chunk([...Array(props.size * props.size).keys()], props.size);
    const state = ref({
      squares: Array(props.size * props.size).fill(null),
      xIsNext: false,
    });
従来のdataに相当する部分にて、変数stateはリアクティブ性を担保するために、refという関数で囲む必要があります。
一方でsquareIndexTableは単なる2次元配列の定義であり、不変であるためrefは使っていません。
dataの加工出力を可能にする算出プロパティ(computed)も、Vue3のComposition APIでは関数として与えられています。
refで囲まれた変数stateは、state.valueで値を参照する必要があります。
    // computed
    const message = computed(() => {
      const emptySquares = state.value.squares.filter(value => value === null);
      if (emptySquares.length === 0) {
        return 'ゲーム終了です';
      }
      return `${next.value}の手番です`;
    });
    const next = computed(() => state.value.xIsNext ? 'X' : 'O');
従来のmethods相当の部分は、単なるアロー関数で定義しています。
    // methods
    const handleClickSquareAt = (index) => {
      if (state.value.squares[index]) {
        return;
      }
      state.value.squares[index] = next.value;
      state.value.xIsNext = !state.value.xIsNext;
    };
最後に、setup()の返り値として、template内で参照したい変数/メソッドをオブジェクトの形でreturnします。
    return {
      squareIndexTable,
      state,
      message,
      handleClickSquareAt,
    };
Squareコンポーネント
マスを表すSquareコンポーネントでは○/×の表示およびclickイベントの定義のみを行い、〇/×の状態管理は親コンポーネントであるBoardに委ねています。
<template>
  <button
    class="square"
    @click="handleClick"
  >
    {{ value }}
 </button>
</template>

<script>
export default {
  name: 'Square',
  props: {
    value: String,
  },
  emits: ['click'],
  setup(props, context) {
    const handleClick = () => {
      context.emit('click');
    };

    return {
      handleClick,
    };
  },
}
</script>
Vue2のOptions APIとの違いは、emitsプロパティの追加およびcontext.emit()です。
Options APIではthis.$emit('click')でイベント発火していましたが、Conposition APIではsetup()の第二引数であるcontextからcontext.emit()する仕様となっています。
実装は以上となります。
終えての雑感
Vue3については
- Composition APIの(Vue2のOptions APIと比較した)優位性は?
- TypeScriptとの相性は?
の2点が気になりました。
今回は小規模な題材ということもあり、Composition APIの利点があまり活かされなかったように思えます。
(というか結局、Options APIで実装した場合と大して変わらない構造になってしまった感が。)
後者のTypeScriptとの相性についても、今回は素のJavaScriptで実装したため検証不十分です。
Vue2よりもTypeScript親和性は改善されたという話も聞きますが、Reactと比べてどうなのか…について調べることも今後の課題になります。