はじめに
Git初学者が実際のフローをイメージして書き起こしてみました。
間違いや認識不足等ありましたら、ご指摘頂けると助かります!
参考サイト
https://backlog.com/ja/git-tutorial/
https://qiita.com/nnahito/items/565f8755e70c51532459
環境:git version 2.20.1 (Apple Git-117)
2019/5/21追記
環境変数設定ファイルをgit管理下の対象外にする
.gitignoreにて管理しているので必要に応じて編集する。
今回は.envファイルで環境変数を管理しており、Laravelではデフォルトで.envが対象になっているので対応不要。
参考サイト
http://www-creators.com/archives/1662
ローカルリポジトリでファイルを作成〜commitまで
# ローカルの任意の場所にディレクトリを作成
$ mkdir tutorial

# 作成したディレクトリに移動
$ cd tutorial

# Git初期化
$ git init
Initialized empty Git repository in /Users/***/tutorial/.git/

# ファイルを作成(任意のテキストファイル)
$ vim sample.txt

# 状態を確認
$ git status
On branch master
No commits yet
Untracked files:
  (use "git add <file>..." to include in what will be committed)
	sample.txt
nothing added to commit but untracked files present (use "git add" to track)

# 作成したファイルをインデックスに登録する
$ git add sample.txt

# 状態を確認
$ git status
On branch master
No commits yet
Changes to be committed:
  (use "git rm --cached <file>..." to unstage)
	new file:   sample.txt

# commitする
$ git commit -m "first commit"
[master (root-commit) 0b0d8ff] first commit
 1 file changed, 1 insertion(+)
 create mode 100644 sample.txt

# 状態を確認
$ git status
On branch master
nothing to commit, working tree clean

# ログを確認
$ git log
commit 0b0d8ff22e1e5f70434a591fc7ed8603ba486408 (HEAD -> master)
Author: ryoko-i8713 <49637061+ryoko-i8713@users.noreply.github.com>
Date:   Wed May 15 11:03:08 2019 +0900
    first commit
リモートリポジトリ作成〜プッシュまで
リモートリポジトリの新規作成
1.gitログイン
2.リポジトリ画面でNewボタンをクリック
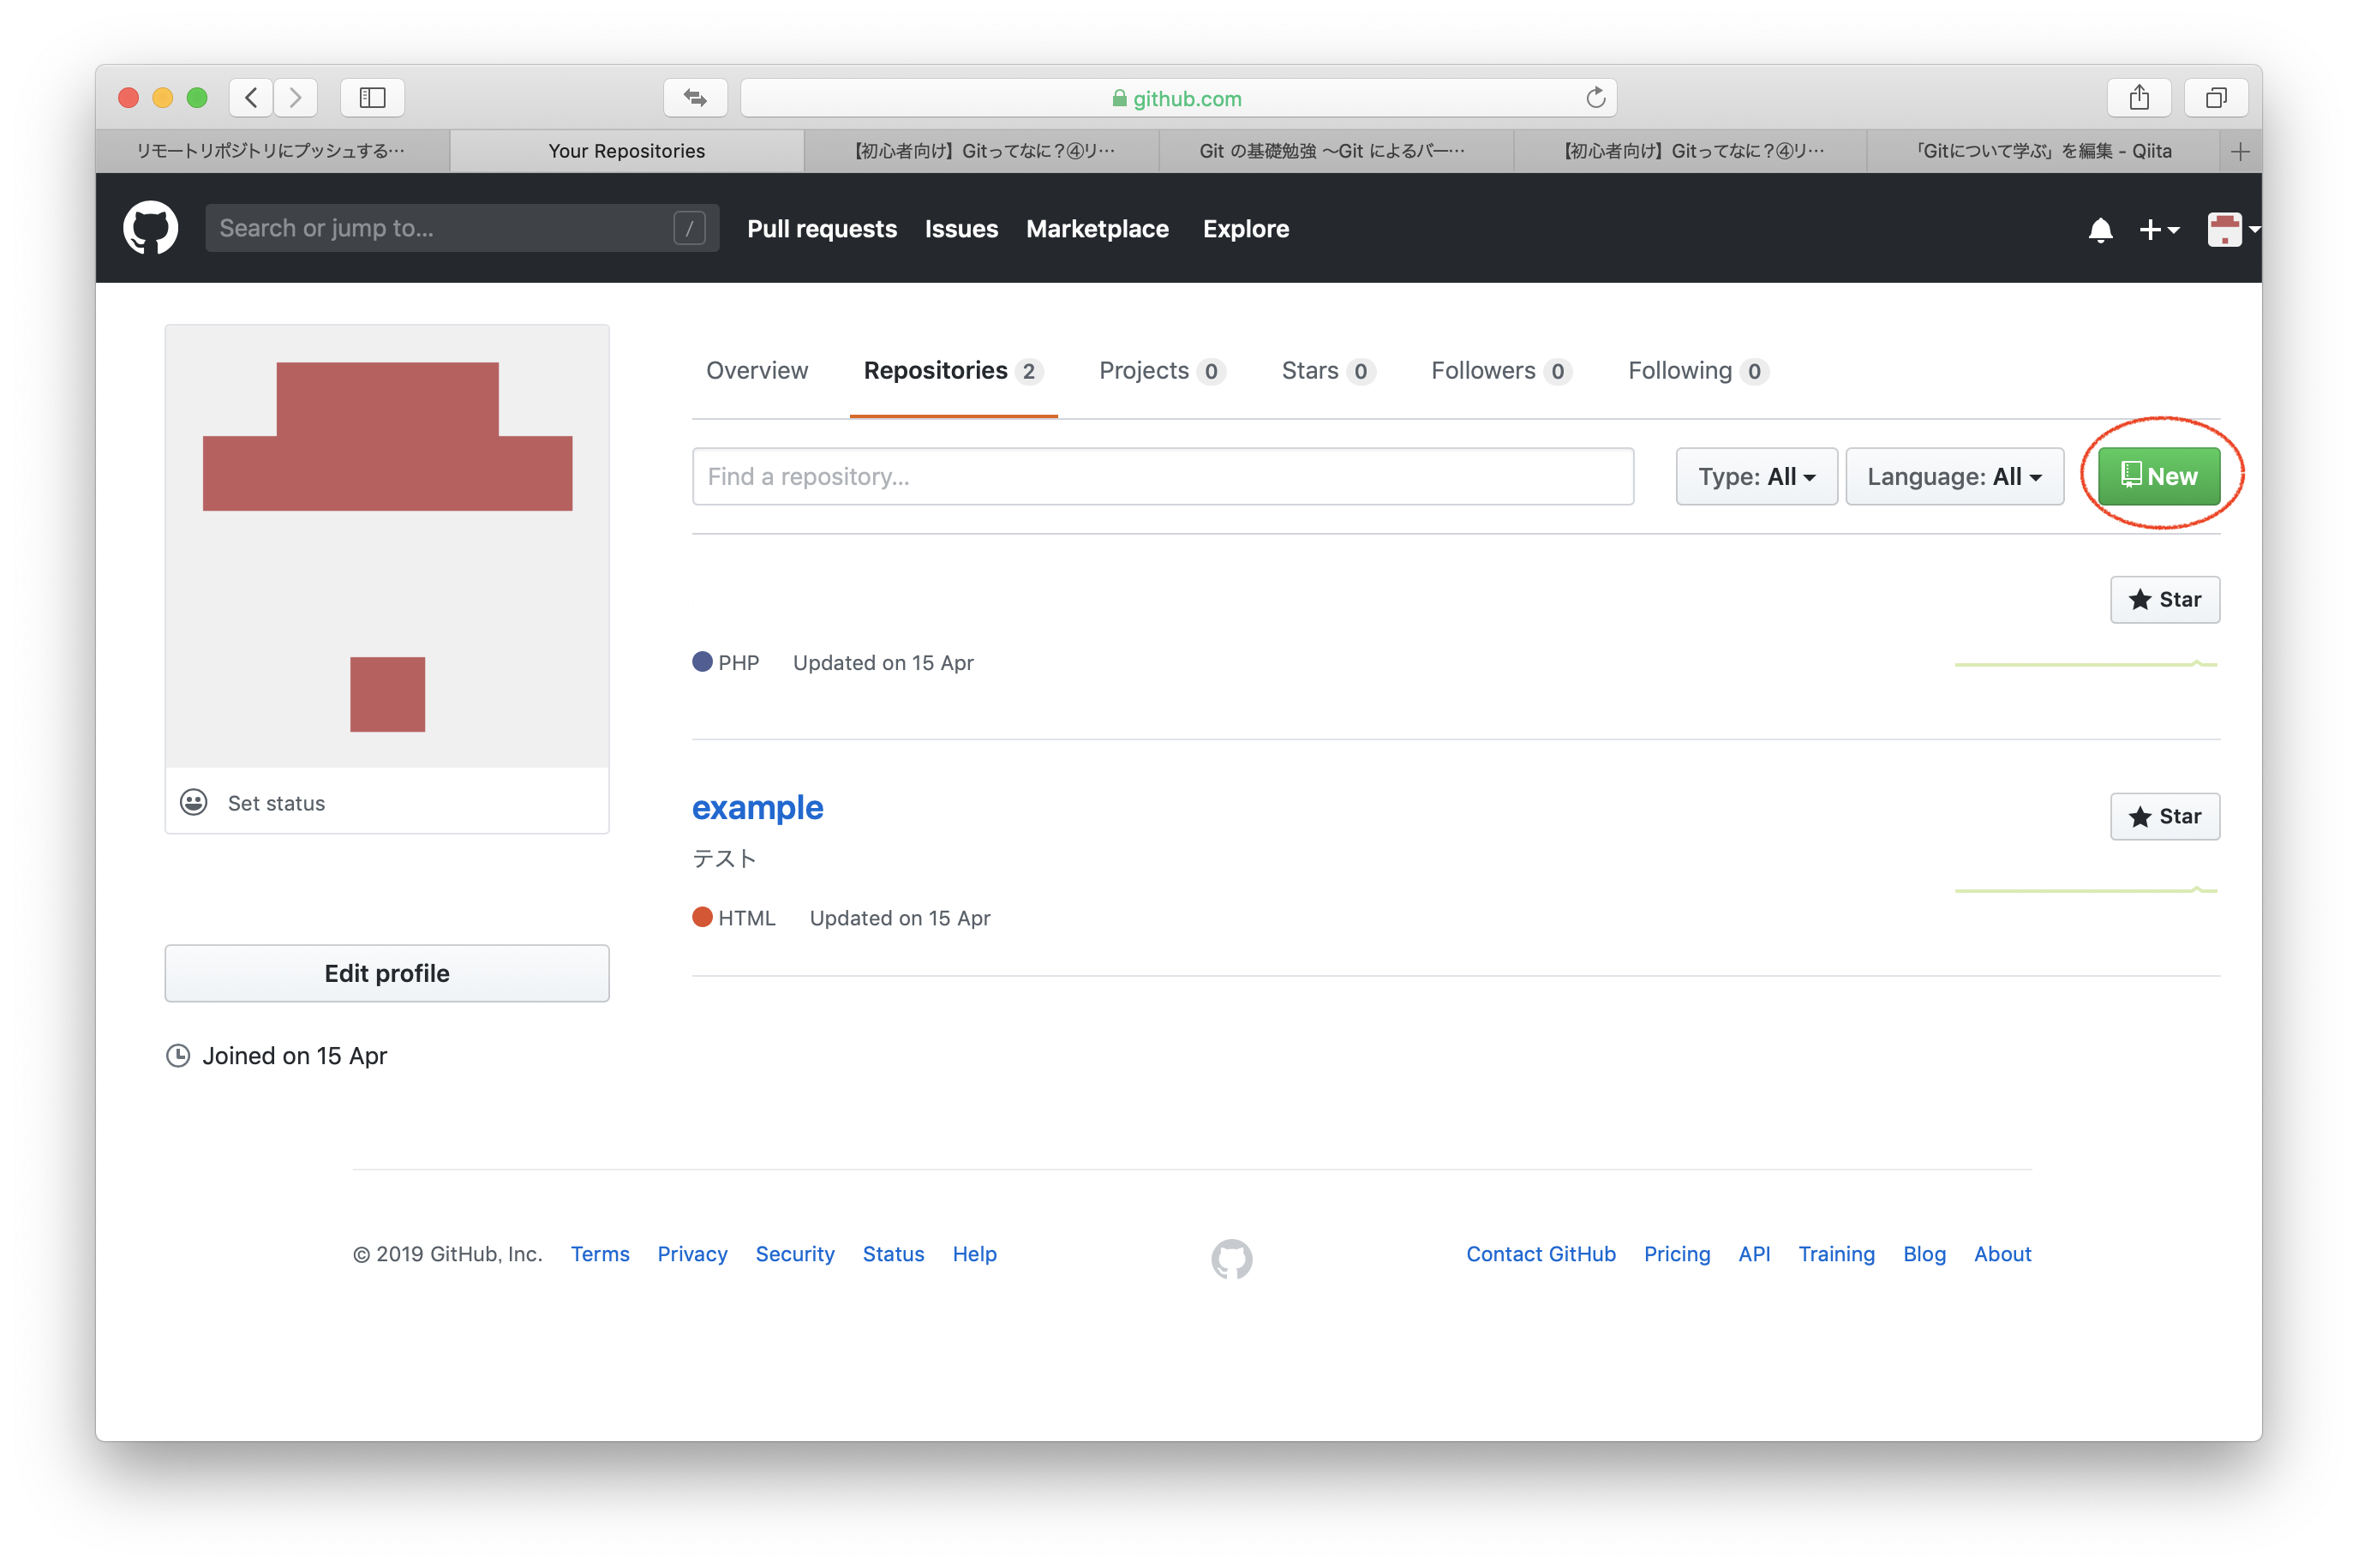
3.リポジトリ名(必須)、説明を入力しCreate Repositoryをクリック
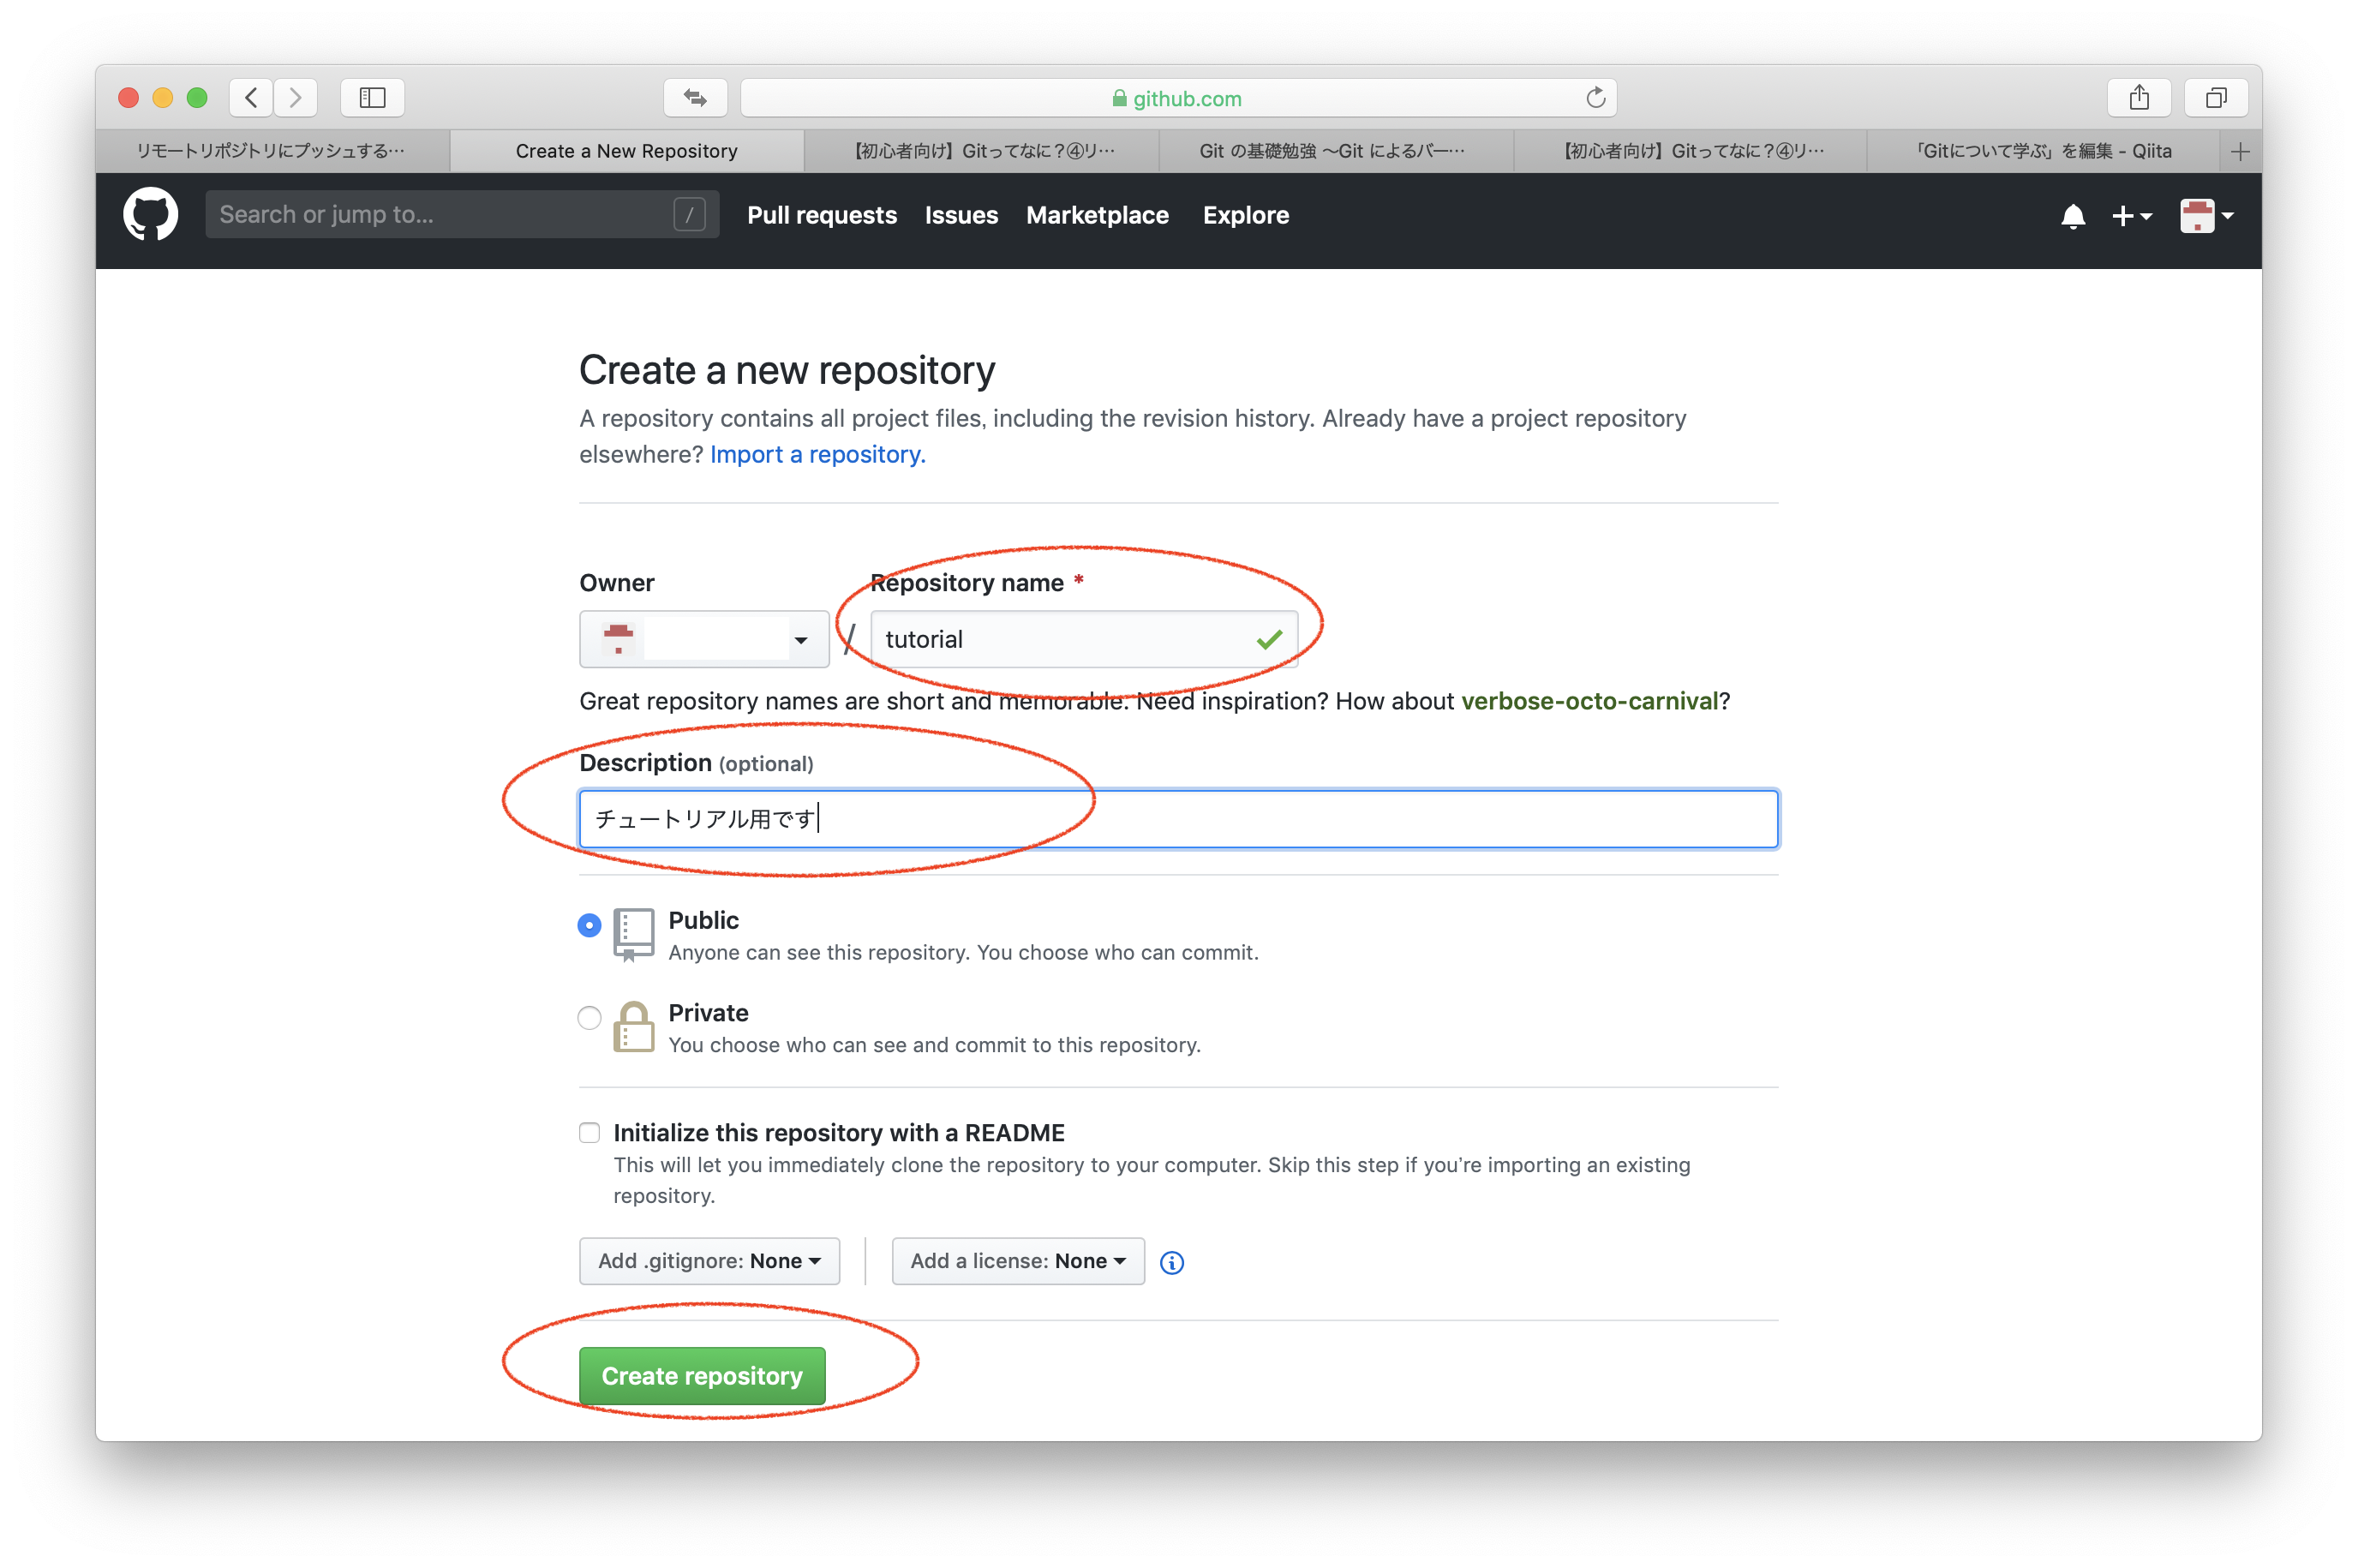
4.リポジトリが作成されていることを確認
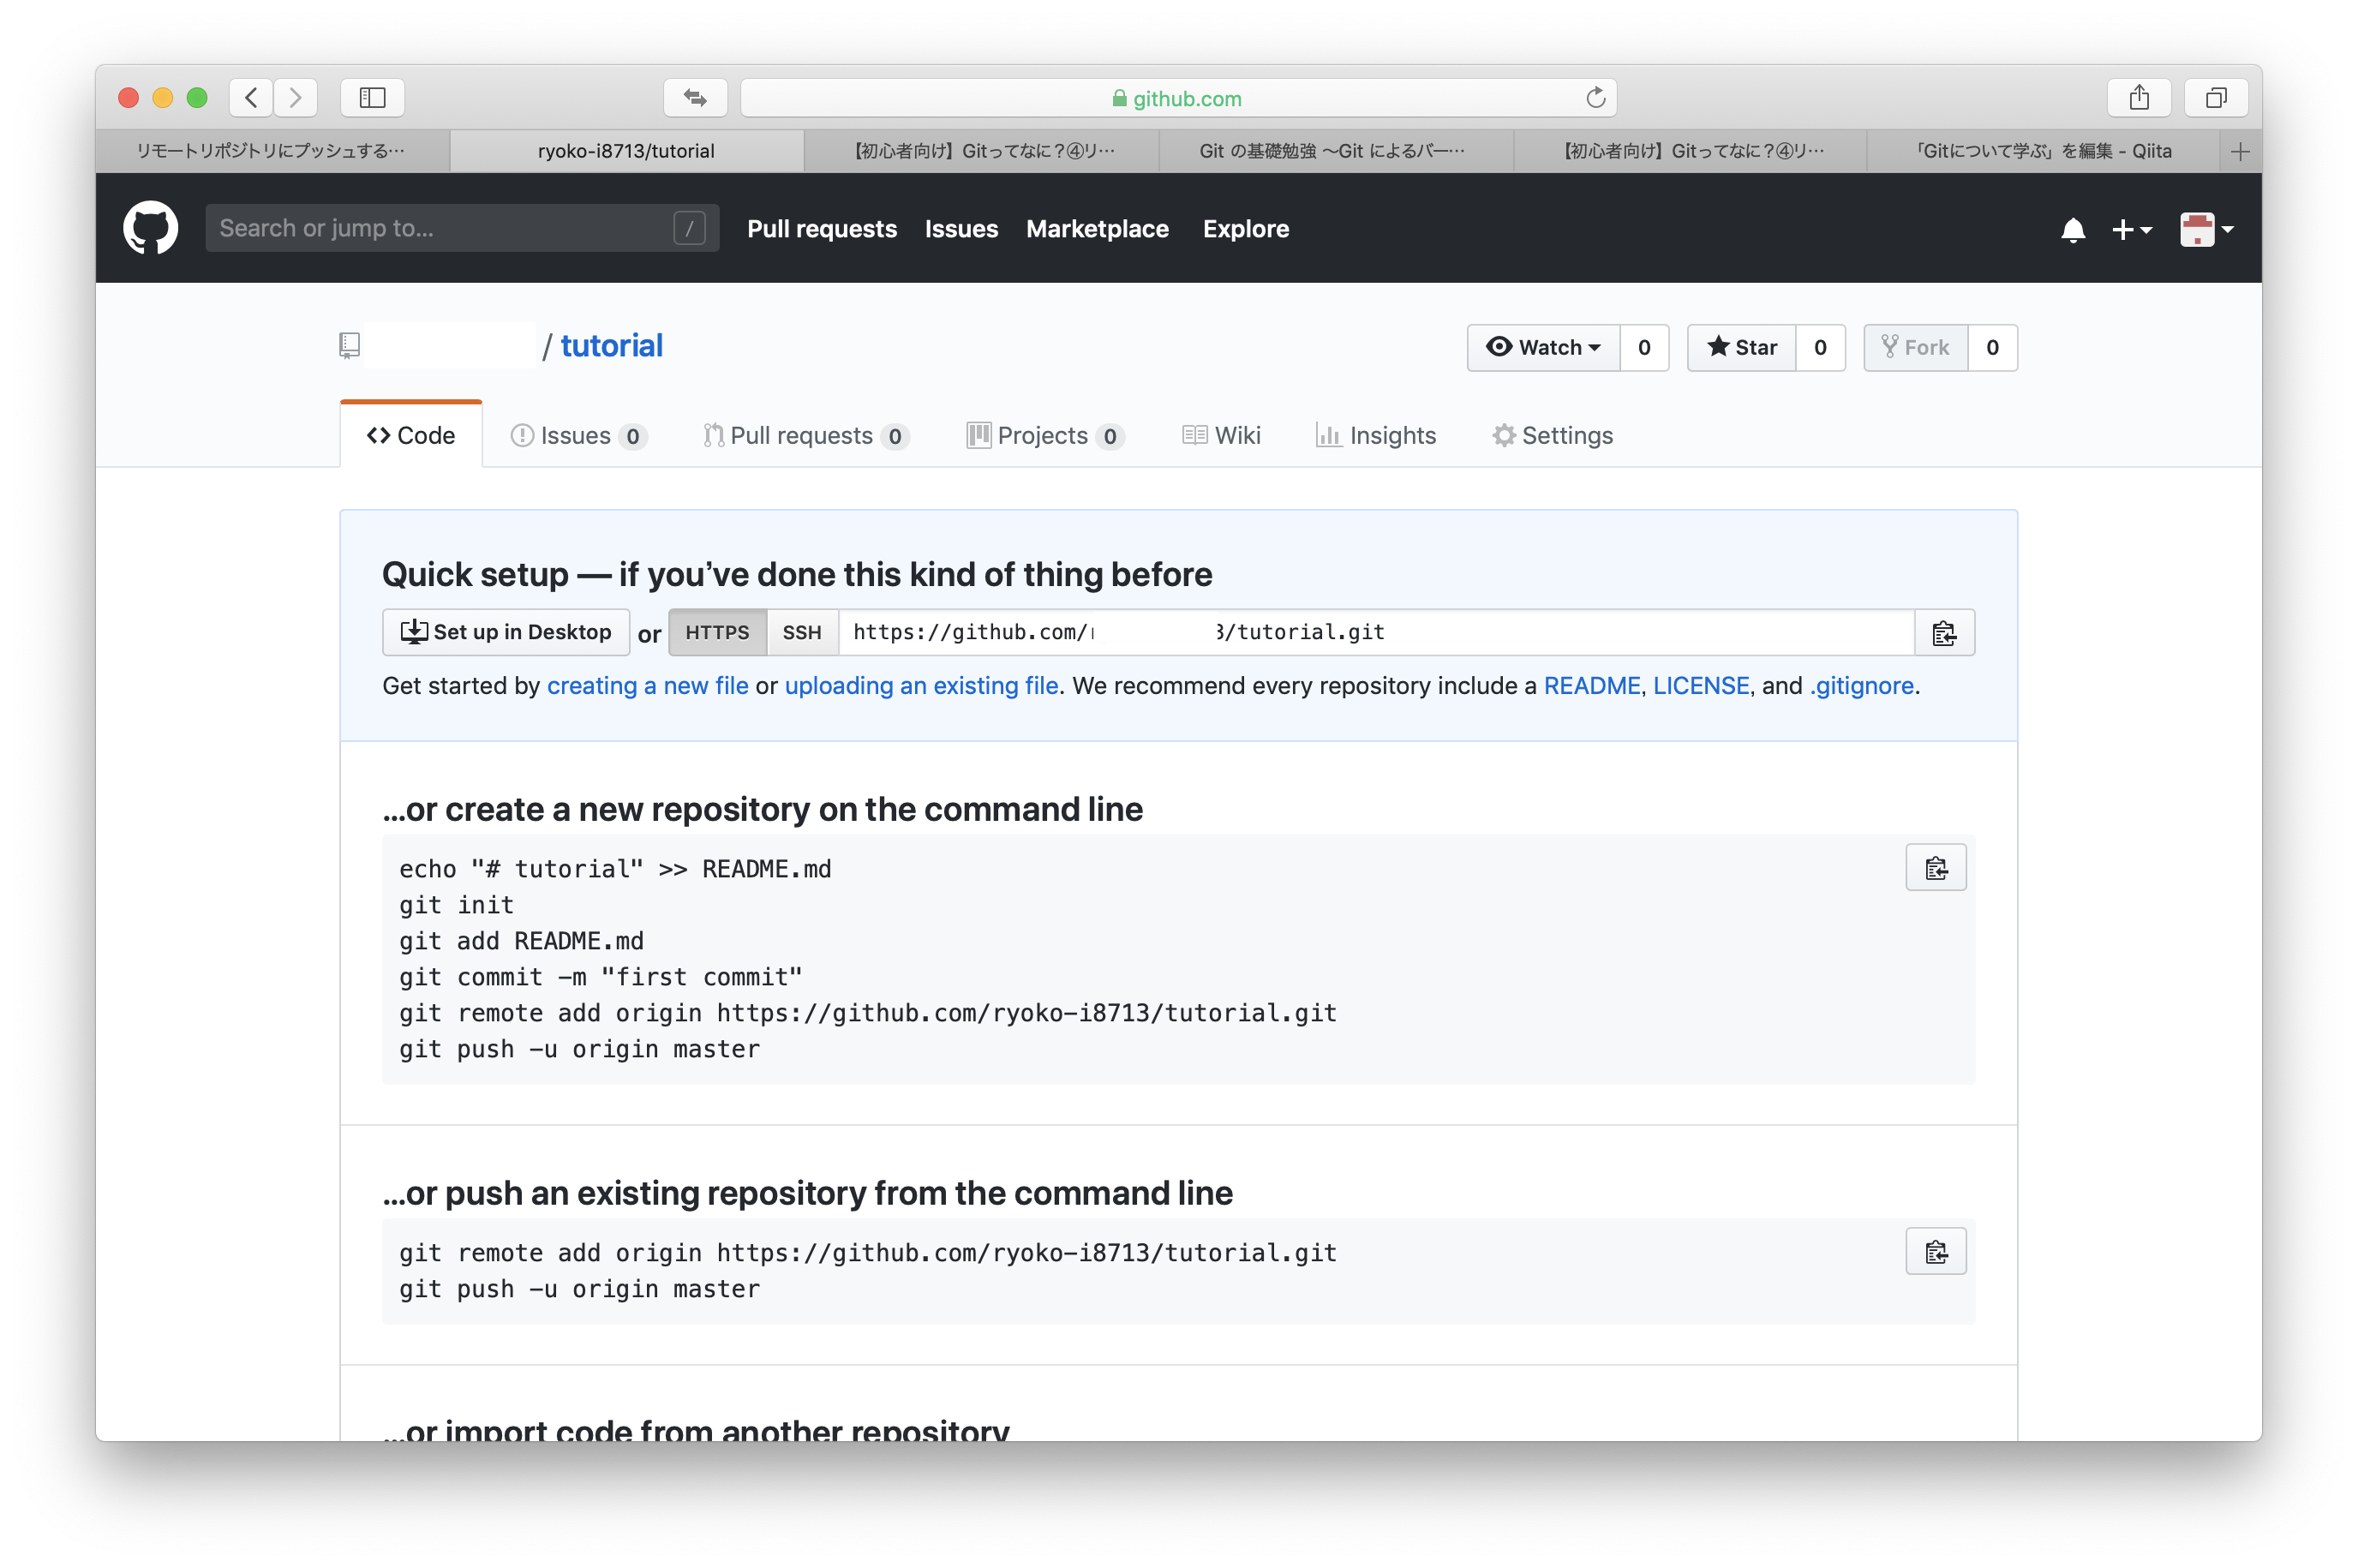
作成したリモートリポジトリの名前を登録する
リモートリポジトリを作成するとURLが発行される。
ローカルリポジトリをプッシュするときに毎回URLを指定するのは面倒なので、名前を登録しておく。
$ git remote add [名前] [リモートリポジトリ作成時に発行されたURL]

# originという名前で登録
$ git remote add origin https://github.com/***/tutorial.git
リモートリポジトリをpushする
今回はローカルリポジトリで作成したファイルを初めてプッシュするので、ブランチはmaster となる。
$ git push [送信先のリポジトリ名] [ブランチ名]

# 前項でリモートリポジトリをoriginで登録しているので、ローカルリポジトリをoriginにmasterとしてpushする。
$ git push origin master
Enumerating objects: 3, done.
Counting objects: 100% (3/3), done.
Writing objects: 100% (3/3), 264 bytes | 264.00 KiB/s, done.
Total 3 (delta 0), reused 0 (delta 0)
To /Users/ryoko/tutorial-shared
 * [new branch]      master -> master
別のユーザーとしてリモートリポジトリからcloneしてみる
プロジェクト全体をごそっとダウンロードしたい場合は、clone。
pullは、リモートリポジトリとローカルリポジトリの差分のみをダウンロード。
先ほどpushしたtutorialを第三者のつもりで、cloneしてみる。
$ git clone [リモートリポジトリURL] [ディレクトリ名]

# 第三者用のディレクトリ「tutorial2」にリモートリポジトリを複製する
$ git clone https://github.com/ryoko-i8713/tutorial.git tutorial2
Cloning into 'tutorial2'...
remote: Enumerating objects: 6, done.
remote: Counting objects: 100% (6/6), done.
remote: Compressing objects: 100% (2/2), done.
Unpacking objects: 100% (6/6), done.
remote: Total 6 (delta 1), reused 6 (delta 1), pack-reused 0

# 中身を確認
$ cd tutorial2
$ ls -a
.		..		.git		sample.txt	sample2.txt
cloneしたリポジトリ〜変更〜push
# tutorial2のsample.txtを編集する
$ vim sample.txt

# インデックスに登録する
$ git add sample.txt

# 状態を確認
$ git status
On branch master
Your branch is up to date with 'origin/master'.
Changes to be committed:
  (use "git reset HEAD <file>..." to unstage)
	modified:   sample.txt

# commit
$ git commit -m "addの説明を追加"
[master e78c86b] addの説明を追加
 1 file changed, 1 insertion(+)

# リモートリポジトリ名を忘れたので確認しておく
$ git remote -v
origin	https://github.com/ryoko-i8713/tutorial.git (fetch)
origin	https://github.com/ryoko-i8713/tutorial.git (push)

# pushしてデータを送信(リモートリポジトリ名は既にoriginとして登録されているのでgit remote addは必要ない)
$ git push origin master
Enumerating objects: 5, done.
Counting objects: 100% (5/5), done.
Delta compression using up to 4 threads
Compressing objects: 100% (3/3), done.
Writing objects: 100% (3/3), 401 bytes | 401.00 KiB/s, done.
Total 3 (delta 0), reused 0 (delta 0)
To https://github.com/ryoko-i8713/tutorial.git
   5d305d0..e78c86b  master -> master

本来の自分に戻ってリモートリポジトリからpullする
第三者が変更を加えたことにより、自分のローカルリポジトリとリモートリポジトリに差分が発生したのでリモートリポジトリからpullします。
$ git pull [リモートリポジトリ名] [ブランチ名]

# 自分のディレクトリtutorialでpull
$ git pull origin2 master
remote: Enumerating objects: 5, done.
remote: Counting objects: 100% (5/5), done.
remote: Compressing objects: 100% (3/3), done.
remote: Total 3 (delta 0), reused 3 (delta 0), pack-reused 0
Unpacking objects: 100% (3/3), done.
From https://github.com/ryoko-i8713/tutorial
 * branch            master     -> FETCH_HEAD
   5d305d0..e78c86b  master     -> origin2/master
Updating 5d305d0..e78c86b
Fast-forward
 sample.txt | 1 +
 1 file changed, 1 insertion(+)

# ログを確認してみる
$ git log
commit e78c86bfedbfaa96017e95f9da9aa43059c3d5d9 (HEAD -> master, origin2/master)
Author: ryoko-i8713 <49637061+ryoko-i8713@users.noreply.github.com>
Date:   Wed May 15 14:20:47 2019 +0900

    addの説明を追加

commit 5d305d011d87ee809e5ce58ad9042303a630a407
Author: ryoko-i8713 <49637061+ryoko-i8713@users.noreply.github.com>
Date:   Wed May 15 12:58:31 2019 +0900

    first commit no,2

commit 0b0d8ff22e1e5f70434a591fc7ed8603ba486408 (origin/master)
Author: ryoko-i8713 <49637061+ryoko-i8713@users.noreply.github.com>
Date:   Wed May 15 11:03:08 2019 +0900

    first commit

# ファイルを開いて確認
$ less sample.txt
自分がpullした後に第三者がpushしてリモートリポジトリが更新された場合
この状態で自分がpushしようとしても拒否されてしまう=競合する
この場合、マージという作業を行う必要がある。
マージを行えば基本的に自動で統合してくれるが、同じ箇所を変更していた場合は手作業で修正する必要がある。
# tutorialディレクトリでpushする
$ git push origin2 master
To https://github.com/ryoko-i8713/tutorial.git
 ! [rejected]        master -> master (fetch first)
error: failed to push some refs to 'https://github.com/ryoko-i8713/tutorial.git'
hint: Updates were rejected because the remote contains work that you do
hint: not have locally. This is usually caused by another repository pushing
hint: to the same ref. You may want to first integrate the remote changes
hint: (e.g., 'git pull ...') before pushing again.
hint: See the 'Note about fast-forwards' in 'git push --help' for details.

# tutorialディレクトリでpullしてみる
$ git pull origin2 master
remote: Enumerating objects: 5, done.
remote: Counting objects: 100% (5/5), done.
remote: Compressing objects: 100% (3/3), done.
remote: Total 3 (delta 0), reused 3 (delta 0), pack-reused 0
Unpacking objects: 100% (3/3), done.
From https://github.com/ryoko-i8713/tutorial
 * branch            master     -> FETCH_HEAD
   e78c86b..9440d34  master     -> origin2/master
Auto-merging sample.txt
CONFLICT (content): Merge conflict in sample.txt
Automatic merge failed; fix conflicts and then commit the result.

# tutorialディレクトリのsample.txtを開き、<<<<<<<と>>>>>>>で囲まれた範囲が競合した箇所なので、修正する。
$ vim sample.txt

# インデックス登録〜commitする
$ git add sample.txt
$ git commit -m "マージ"

# ログで確認
$ git log --graph --oneline
*   6564673 (HEAD -> master) マージ
|\
| * 9440d34 (origin2/master) pullの説明を追加
* | 21a1654 commitの説明を追加
|/
* e78c86b addの説明を追加
* 5d305d0 first commit no,2
* 0b0d8ff (origin/master) first commit

# 再度pushしてみる
$ git push origin2 master
ブランチ
大元(master)から複製し(ブランチ作成)、作成した作業用ブランチに対して機能追加やバグ修正を行う。
# ブランチの作成
$ git branch test branch

# ブランチ一覧(*がついているものが選択されているブランチ)
$ git branch
* master
  testbranch

# ブランチの切り替え
$ git checkout [切り替え先のブランチ名]
$ git checkout testbranch
Switched to branch 'testbranch'

# 選択しているブランチが変更された
$ git branch
  master
* testbranch

# ブランチの作成と切り替えを同時に
$ git checkout -b

# sample.txtを編集する
$ vim sample.txt

サルでもわかるGitコマンド
add 変更をインデックスに登録する
commit インデックスの状態を記録する
pull リモートリポジトリの内容を取得する
test ブランチ テスト!

# インデックスに登録
$ git add sample.txt

# commit
$ git commit -m "ブランチテストを追加"
[testbranch 2ad2455] ブランチテストを追加
 1 file changed, 1 insertion(+)

# ブランチをtestbranchで指定してpush
$ git push origin2 testbranch
Enumerating objects: 5, done.
Counting objects: 100% (5/5), done.
Delta compression using up to 4 threads
Compressing objects: 100% (3/3), done.
Writing objects: 100% (3/3), 386 bytes | 386.00 KiB/s, done.
Total 3 (delta 1), reused 0 (delta 0)
remote: Resolving deltas: 100% (1/1), completed with 1 local object.
remote:
remote: Create a pull request for 'testbranch' on GitHub by visiting:
remote:      https://github.com/ryoko-i8713/tutorial/pull/new/testbranch
remote:
To https://github.com/ryoko-i8713/tutorial.git
 * [new branch]      testbranch -> testbranch
リモートリポジトリを確認

作成したブランチを大元のmasterに統合する
# ブランチを結合先のブランチに切り替える
$ git checkout master
Switched to branch 'master'

# 確認
$ git branch
* master
  testbranch

# ブランチを結合する
$ git merge [結合したいブランチ名]
$ git merge testbranch
Updating 6564673..2ad2455
Fast-forward
 sample.txt | 1 +
 1 file changed, 1 insertion(+)

# 結合したmasterブランチをリモートリポジトリにpushする
$ git push origin2 master
Total 0 (delta 0), reused 0 (delta 0)
To https://github.com/ryoko-i8713/tutorial.git
   6564673..2ad2455  master -> master
リモートリポジトリを確認

ブランチの削除
統合が完了したブランチを削除
$ git branch -d [ブランチ名]

# testbranchを削除する
$ git branch -d testbranch
Deleted branch testbranch (was 2ad2455).

# 確認
$ git branch
* master
ブランチの運用方法について
gitの初歩的な操作は学んだものの、どのタイミングでブランチを切るのかイメージが掴みにくかったところ、こちらの記事がとてもわかりやすかったので参考にさせて頂きました。
Gitのブランチモデルについて
https://qiita.com/okuderap/items/0b57830d2f56d1d51692