初めに
nerfstudioをRTX5080で動作させる機会がありましたが、そのままでは動作させることができなかったので、動作させるまでの備忘録になります。
nerfstudioは執筆時点でRTX40シリーズまでのサポートとなっています。
環境準備
Ubuntu 22.04 をインストール
・Ubuntuのインストール手順はたくさん存在するので割愛します。
※RTX50シリーズで起こった現象
USBからのインストール時にTry Ubuntu Installを選択以降黒い画面のまま進行しない問題が発生。
対処方法はオンボード側の画面出力を一時的に使用し、Ubuntuインストール後にNvidia Driverをインストールすることで解決。
参考 : https://qiita.com/chiral/items/a0d71d2971dece3199d1
Nvidia Driverをインストール
・執筆時点でRecommendのnvidia-driver-580を選択します。
・インストール完了後に再起動します。
・nvidia-smiコマンドを実行し表示がされることを確認します。
ubuntu–drivers devices
sudo ubuntu–drivers autoinstall
sudo reboot
nvidia-smi
NVIDIA Container Toolkitのインストール
・dockerからGPUを使えるようにします。
sudo apt-get install -y nvidia-container-toolkit
dockerのインストール
・dockerのインストール手順はたくさん存在するので割愛します。
docker --version
nerfstudioの構築
nerfstudioのリポジトリクローン
・nerfstudioを任意の場所でリポジトリからクローンします。
・今回使用したのは執筆時点最新のver1.1.5です。
git clone https://github.com/nerfstudio-project/nerfstudio.git
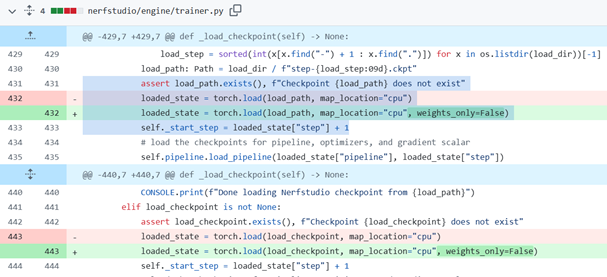
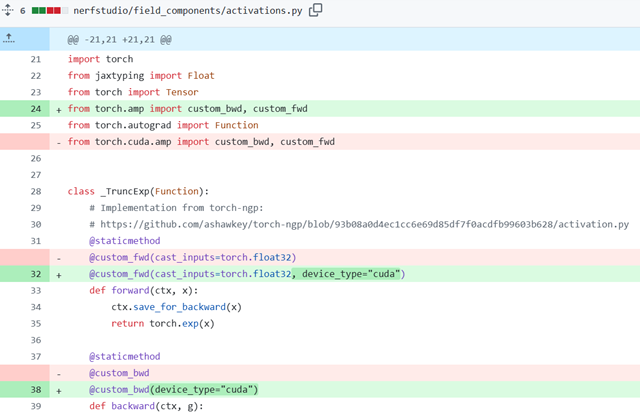
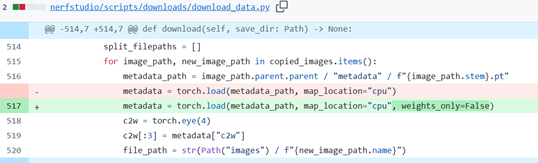
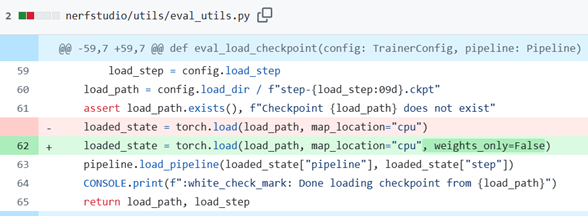
nerfstudioのプログラムを修正
・参考 https://github.com/nerfstudio-project/nerfstudio/pull/3653/
Dockerfileを修正
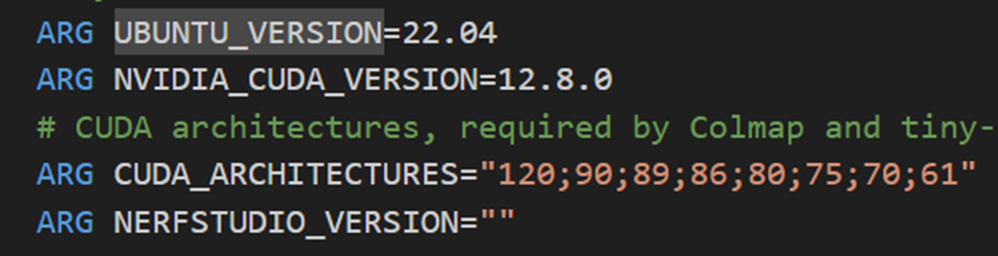
・以下項目を修正
ARG NVIDIA_CUDA_VERSION=12.8.0
ARG CUDA_ARCHITECTURESに120を追加
・63行目付近を以下に修正
RUN pip install --no-cache-dir --upgrade pip==23.0.1 'setuptools<70.0.0' && \
    pip install --no-cache-dir torch==2.9.0+cu128 torchvision==0.24.0+cu128 'numpy<2.0.0' --extra-index-url https://download.pytorch.org/whl/cu128 && \
    git clone --branch master --recursive https://github.com/cvg/Hierarchical-Localization.git /opt/hloc && \
    cd /opt/hloc && git checkout v1.4 && python3.10 -m pip install --no-build-isolation  --no-cache-dir -e . && cd ~ && \
    TCNN_CUDA_ARCHITECTURES="${CUDA_ARCHITECTURES}" pip install --no-cache-dir "git+https://github.com/NVlabs/tiny-cuda-nn.git@b3473c81396fe927293bdfd5a6be32df8769927c#subdirectory=bindings/torch" && \
    pip install --no-cache-dir pycolmap==0.6.1 pyceres==2.1 omegaconf==2.3.0

・77行目付近を以下に修正
RUN export TORCH_CUDA_ARCH_LIST="12.0" && \
    export MAX_JOBS=4 && \
    GSPLAT_VERSION="$(sed -n 's/.*gsplat==\s*\([^," '"'"']*\).*/\1/p' /tmp/nerfstudio/pyproject.toml)" && \
    pip install --no-build-isolation --no-cache-dir git+https://github.com/nerfstudio-project/gsplat.git@v${GSPLAT_VERSION} && \
    pip install --no-cache-dir /tmp/nerfstudio 'numpy<2.0.0' && \
    rm -rf /tmp/nerfstudio

nerfstudioをdockerビルド
・ターミナルでnerfstudio/まで移動します。
・dockerビルドします。(数十分そこそこ時間かかります)
docker build -t nerfstudio .
nerfstudioのサンプルを実行
・dockerイメージを起動します。
・サンプル用データをダウンロードします。
・学習を実行します。
・点群plyを作成します。
・イメージを起動してコンテナに入ります。
docker run --gpus all -it --rm -p 7007:7007 -v $(pwd)/data:/data nerfstudio

・サンプルデモをダウンロードし学習を実行します。
ns-download-data nerfstudio --capture-name=poster
ns-train splatfacto --data data/nerfstudio/poster --output_dir data/nerfstudio --viewer.quit_on_train_completion True --timestamp default-timestamp
※ログが流れ始めれば実行されています。
http://localhost:7007
にアクセスすると画像のように学習が進行している様子をみることができます。

・作成された点群データをplyファイルとして保存します。
ns-export gaussian-splat --load-config data/nerfstudio/poster/splatfacto/default-timestamp/config.yml --output-dir data/nerfstudio/poster/splatfacto/default-timestamp
実行結果
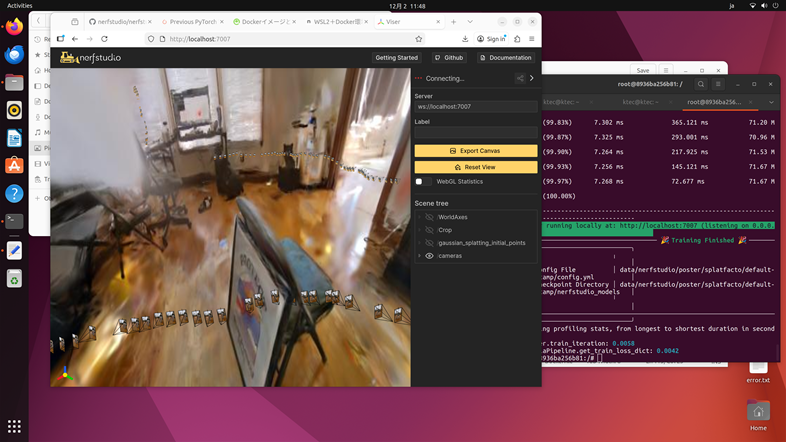
nerfstudioをRTX5080で動作させることができました。