はじめに
kintoneのカスタマイズで「この処理、実行前にユーザーへ確認を取りたい」と感じたことはありませんか?
実際、kintoneアプリでは「画面上の操作だけでは把握しきれない処理」や
「一括登録・一括削除・ステータス変更など、取り消せない処理」を実装することがあります。
こうした処理では、実行前にユーザーへ確認を取ることがUX設計として重要です。
確認ダイアログを表示することで、処理の内容をユーザーの同意を得たうえで実行でき、誤操作のリスクを抑えられます。
2025年9月〜2026年3月にかけて、kintone JavaScript APIでは
createDialog()、showConfirmDialog()、showNotification()、showLoading()、
createBottomSheet()、showConfirmBottomSheet()
といったダイアログ・通知バナー系のAPIが新たに追加されました。
本記事ではこれらのAPIを使って、ユーザーに確認・進捗・結果を伝えながら、
処理を進める「ユーザー対話型カスタマイズ」の実装方法を解説します。
まずは、最もシンプルに確認ダイアログを導入できる方法から見ていきましょう。
showConfirmDialog() : 確認ダイアログを表示する
「OK/キャンセル」で確認するだけなら、 showConfirmDialog() が適しています。
使用場面の例
- ステータス変更前に確認がしたい。
- 重要なアクションを実行する前に確認がしたい。
- シンプルにテキストのみの確認がしたい。
実装例:ステータス変更前の確認
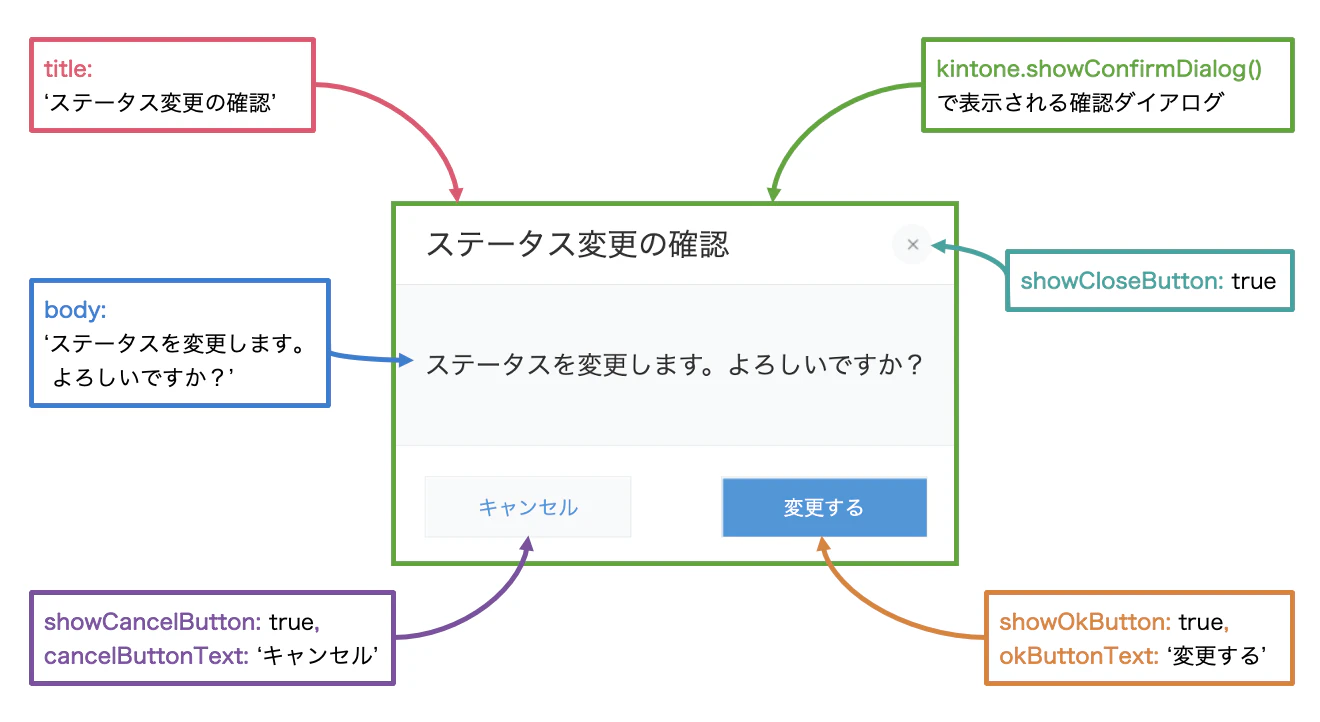
次のコードは、プロセス管理のステータス変更前に確認ダイアログを表示する例です。
(() => {
  'use strict';

  kintone.events.on('app.record.detail.process.proceed', async (event) => {
    const result = await kintone.showConfirmDialog({
      title: 'ステータス変更の確認',
      body: 'ステータスを変更します。よろしいですか?',
      showOkButton: true,
      okButtonText: '変更する',
      showCancelButton: true,
      cancelButtonText: 'キャンセル',
      showCloseButton: true
    });

    if (result !== 'OK') {
      event.error = 'ステータス変更がキャンセルされました。';
    }
    return event;
  });
})();
モバイル対応
モバイル版では kintone.mobile.showConfirmBottomSheet() を使います。
引数・戻り値の仕様は showConfirmDialog() と同様で、モバイルデバイスの画面の下端に配置されるボトムシートと呼ばれるUIが提供されています。
createDialog() : 入力フォーム付きのダイアログを作る
テキストエリアやセレクトボックスなど、テキスト要素以外の独自のHTML要素を含むダイアログを作る場合は createDialog() を使います。
使用場面の例
- 入力フォームを含むダイアログを表示したい。
- 閉じる前にバリデーションしたい。
- カスタマイズや細かい制御がしたい。
実装例:利用規約に同意するダイアログ
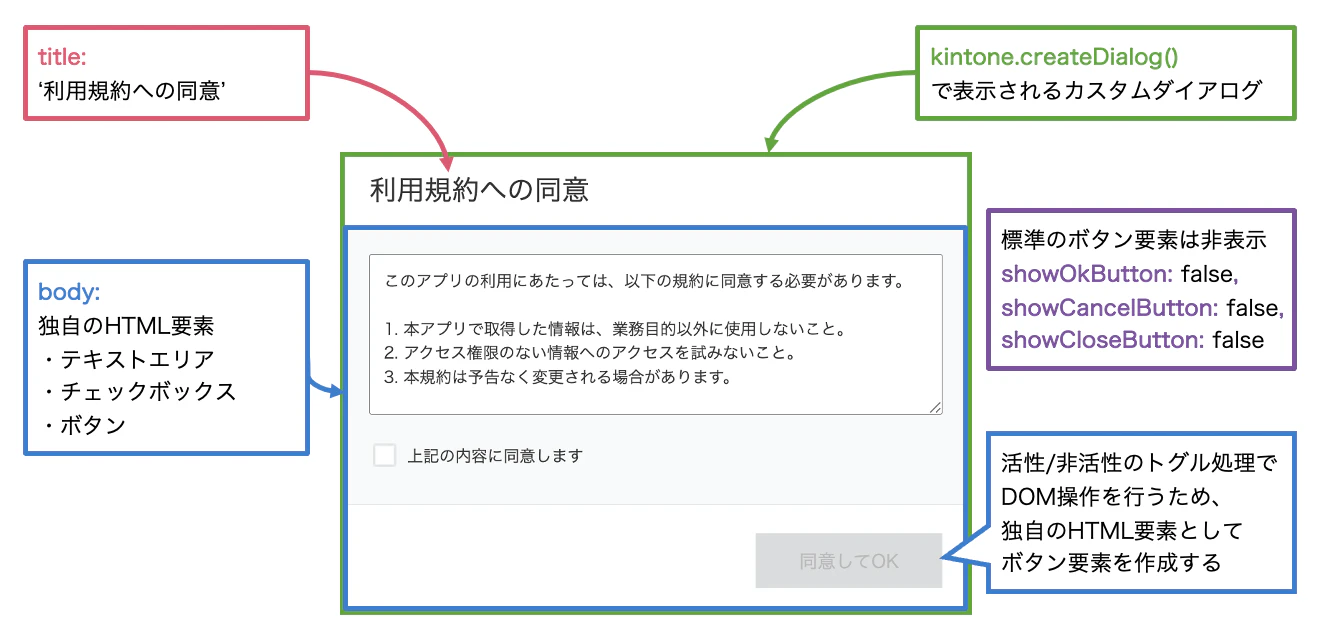
次のコードは、レコード一覧画面を開いたときに利用規約の同意ダイアログを表示する例です。
チェックボックスにチェックを入れるまでOKボタンを無効にし、未確認のまま操作できないようにしています。
また、ボタンとチェックボックスの見た目の調整に 51-modern-default.css を使用しています。
(() => {
  'use strict';

  kintone.events.on('app.record.index.show', async (event) => {
    // ダイアログに配置するコンテンツを作成する
    const container = document.createElement('div');
    const bodyContainer = document.createElement('div');
    bodyContainer.style.cssText = 'min-width:500px;padding:24px;';
    bodyContainer.innerHTML = `
      <textarea id="terms-text" readonly style="box-sizing:border-box;width:100%;height:140px;margin-bottom:16px;padding:12px;font-size:14px;"></textarea>
      <div class="kintoneplugin-input-checkbox">
        <span class="kintoneplugin-input-checkbox-item">
          <input type="checkbox" id="agree-check">
          <label for="agree-check">上記の内容に同意します</label>
        </span>
      </div>
    `;
    const termsTextarea = bodyContainer.querySelector('#terms-text');
    termsTextarea.value =
      'このアプリの利用にあたっては、以下の規約に同意する必要があります。\n\n' +
      '1. 本アプリで取得した情報は、業務目的以外に使用しないこと。\n' +
      '2. アクセス権限のない情報へのアクセスを試みないこと。\n' +
      '3. 本規約は予告なく変更される場合があります。';
    const agreeCheck = bodyContainer.querySelector('#agree-check');

    // ダイアログボタンを直接取得する方法は非推奨のDOM操作を伴うため、以下の処理はコメントアウトする
    // const okButton = container.closest('[role="dialog"]')?.querySelector('button[name="ok"]');

    // 代わりにカスタムボタンを設置(51-modern-default.cssに準拠)
    const footerContainer = document.createElement('div');
    footerContainer.style.cssText = 'display:flex;justify-content:flex-end;background-color:#fff;border-top:1px solid #e3e7e8;padding:24px;';
    const okButton = document.createElement('button');
    okButton.textContent = '同意してOK';
    okButton.disabled = true;
    okButton.className = 'kintoneplugin-button-disabled';
    agreeCheck.addEventListener('change', () => {
      const agreed = agreeCheck.checked;
      okButton.disabled = !agreed;
      okButton.className = agreed
        ? 'kintoneplugin-button-dialog-ok'
        : 'kintoneplugin-button-disabled';
    });
    footerContainer.append(okButton);

    container.append(bodyContainer, footerContainer);

    const dialog = await kintone.createDialog({
      title: '利用規約への同意',
      body: container,
      showOkButton: false,
      showCancelButton: false,
      showCloseButton: false
    });

    await new Promise((resolve) => {
      okButton.addEventListener('click', () => {
        dialog.close();
        resolve('OK');
      });
      dialog.show();
    });

    return event;
  });
})();
モバイル対応
モバイル版では kintone.mobile.createBottomSheet() を使います。
引数・戻り値の仕様は createDialog() と同様で、モバイルデバイスの画面の下端に配置されるボトムシートと呼ばれるUIが提供されています。
PC版とモバイル版でダイアログとボトムシートを出し分ける
PCでは showConfirmDialog() 、モバイルでは showConfirmBottomSheet() を使うように切り替えると、
同じ確認フローをデバイスに最適化したUIで提供できます。
実装例:デバイスに応じて確認ダイアログを出し分ける
次のコードは、PC版とモバイル版で確認ダイアログを出し分けるユーティリティ関数の例です。
async function showConfirmation(title, message) {
  if (kintone.isMobilePage()) {
    return kintone.mobile.showConfirmBottomSheet({
      title: title,
      body: message,
      showOkButton: true,
      okButtonText: 'OK',
      showCancelButton: true,
      cancelButtonText: 'キャンセル'
    });
  }

  return kintone.showConfirmDialog({
    title: title,
    body: message,
    showOkButton: true,
    okButtonText: 'OK',
    showCancelButton: true,
    cancelButtonText: 'キャンセル'
  });
}
kintone.isMobilePage() でモバイル版かどうかを判定し、 showConfirmBottomSheet() を呼び出します。
showNotification() / showLoading() : 進捗を伝える
時間がかかる処理ではローディングアニメーションを表示することで、
ユーザーが「処理が止まってしまった」と誤解するのを防げます。
実装例:処理中はローディングを表示し、完了後に通知バナーを表示する
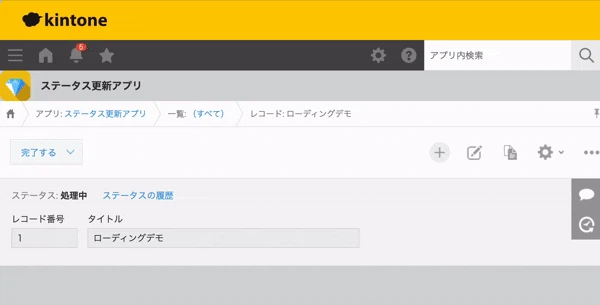
次のコードは、プロセス変更時にローディングを表示し、完了後に通知バナーを出す例です。
(() => {
  'use strict';

  kintone.events.on('app.record.detail.process.proceed', async (event) => {
    try {
      kintone.showLoading('VISIBLE');
      // 時間のかかる処理(例: REST APIの呼び出し)
      await runLongProcess();
      kintone.showNotification('SUCCESS', `ステータスが「${event.status.value}」から「${event.nextStatus.value}」に更新されました。`);
    } catch (error) {
      kintone.showNotification('ERROR', '更新中にエラーが発生しました。');
      console.error('更新エラー:', error);
    } finally {
      kintone.showLoading('HIDDEN');
    }
    return event;
  });

  async function runLongProcess() {
    // 時間のかかる処理の実装
  }
})();
kintone.showLoading('VISIBLE')でローディングを表示し、処理完了後にkintone.showLoading('HIDDEN')で非表示にします。
finallyブロックで非表示にすることで、エラーが発生した場合もローディング表示が残り続けるのを防げます。
3ステップのAPIを組み合わせた実装例
ここまで紹介したAPIを組み合わせると、「確認→進捗→結果」の流れを1つの操作体験として実装できます。
実装例:確認→進捗→結果の3ステップを使ったAI質問箱アプリ

質問箱アプリの編集画面で「AIで回答する」ボタンを押すと、
確認ダイアログを表示し、OKならAI(時間がかかる処理)を呼び出して回答欄を更新する例です。
(() => {
  'use strict';

  kintone.events.on('app.record.edit.show', (event) => {
    const spaceElement = kintone.app.record.getSpaceElement('answerButton');
    if (!spaceElement) return event;

    const answerButton = document.createElement('button');
    answerButton.textContent = 'AIで回答を生成する';
    answerButton.className = 'kintoneplugin-button-normal';
    answerButton.style.cssText = 'margin:8px;';
    answerButton.onclick = async () => {
      const record = kintone.app.record.get();
      const question = record.record['質問内容'].value;

      const result = await kintone.showConfirmDialog({
        title: 'AIで回答を生成',
        body: '質問の回答をAIで生成します。よろしいですか?',
        showOkButton: true,
        okButtonText: '生成する',
        showCancelButton: true,
        cancelButtonText: 'キャンセル'
      });

      if (result !== 'OK') return;

      try {
        kintone.showLoading('VISIBLE');
        await generateAnswer(question, record);
        kintone.showNotification('SUCCESS', '回答を生成しました。内容を確認して保存してください。');
      } catch (error) {
        kintone.showNotification('ERROR', '回答の生成中にエラーが発生しました。');
        console.error(error);
      } finally {
        kintone.showLoading('HIDDEN');
      }
    };
    spaceElement.appendChild(answerButton);

    return event;
  });

  async function generateAnswer(question, record) {
    // AIへのリクエスト処理
    const [body] = await kintone.proxy(
      'https://ai.example.com/generate',
      'POST',
      { 'Content-Type': 'application/json' },
      JSON.stringify({ question: question })
    );
    const { answer } = JSON.parse(body); // AIから取得した回答を入れる
    record.record['回答欄'].value = answer;
    kintone.app.record.set(record);
  }
})();
確認ダイアログで実行可否を確認し、進捗中はローディングを表示し、最後に結果を通知バナーに表示することで、ユーザーにとって分かりやすい操作フローを作れます。
まとめ
本記事では、確認ダイアログと通知バナーAPIを使った「確認→進捗→結果」の3ステップ設計を紹介しました。
最後に、用途ごとの使い分けをフローで整理します。

ダイアログAPIの使い分けについては、次の記事も参考にしてください。
おわりに
確認ダイアログや通知バナーAPIを組み合わせるだけでも、カスタマイズの使い勝手は大きく変わります。
まとめのフロー図を参考に「ユーザー対話型カスタマイズ」を意識して、
ご自身のkintoneカスタマイズにも活用してみてください。
この記事は、2026年4月版kintoneで動作を確認しています。