これはなに?
GraphQLクライアントであるURQLを使って認証付きリクエストを送る部分を実装したので記事にしてみました。
※この記事は以下の記事の続きになっているので併せて読むと理解が深まるかと思います
前回までの記事
この記事のゴール
この記事では以下の理解を得ることをゴールとします
- GraphQLクライアントのURQLを使って認証付きリクエストを送れるようになること
https://github.com/mu-suke/monorepo_sample_app
前提
以前の記事同様に以下の技術要件で進めていきます。
| ツール・ライブラリ | 用途 | バージョン |
|---|---|---|
| Next.js | フロントエンドとして利用 | 12.1.0 |
| NestJS | サーバーサイドとして利用 | 8.0.0 |
| GraphQL Code Generator | コード自動生成ツール | 2.6.2 |
| URQL | GraphQL Clientのライブラリ | 2.2.0 |
| Firebase | 認証機能として利用 | 9.6.9 |
| node.js | フロント、サーバーサイドの実行環境 | v16.14.0 |
手順
1. @urql/exchange-authパッケージの導入
| ライブラリ | バージョン |
|---|---|
| @urql/exchange-auth | 0.1.7 |
exchange-authというプラグインを使います。
ドキュメントはここら辺が参考になりました。
2. 各設定
導入が完了したら既に利用しているURQLのexchangeを以下のように変更します。
import { authExchange } from '@urql/exchange-auth'
import { cacheExchange, createClient, dedupExchange, fetchExchange } from 'urql'
import { authConfig } from '@/utils/urql-exchange-auth'

export const urqlClient = createClient({
  url: 'http://localhost:8000/graphql',
  suspense: false,
  exchanges: [
    dedupExchange,
    cacheExchange,
    authExchange(authConfig),
    fetchExchange,
  ],
})
後述しますが、exchangeの指定は上記の順番通り指定しないと正常に動作しない可能性があります。
また、authConfigでは以下のような設定をしています。
import { IdTokenResult } from '@firebase/auth'
import { AuthConfig } from '@urql/exchange-auth'
import { makeOperation } from 'urql'
import { auth } from '@/utils/firebase'

type AuthState = {
  token: string
  result: IdTokenResult
}

export const authConfig: AuthConfig<AuthState> = {
  getAuth: async () => {
    const tokenResult = await auth.currentUser?.getIdTokenResult()
    return tokenResult
      ? { token: tokenResult.token, result: tokenResult }
      : null
  },
  willAuthError: ({ authState }) => {
    if (authState?.result?.expirationTime) {
      const expirationDate = new Date(authState.result.expirationTime)
      console.log('⚠️ expirationDate: ', expirationDate)
      return expirationDate < new Date()
    }

    return !authState || !authState.token
  },
  addAuthToOperation: ({ authState, operation }) => {
    if (!authState || !authState.token) {
      return operation
    }

    const fetchOptions =
      typeof operation.context.fetchOptions === 'function'
        ? operation.context.fetchOptions()
        : operation.context.fetchOptions || {}

    return makeOperation(operation.kind, operation, {
      ...operation.context,
      fetchOptions: {
        ...fetchOptions,
        headers: {
          ...fetchOptions.headers,
          Authorization: 'Bearer ' + authState.token,
        },
      },
    })
  },
}
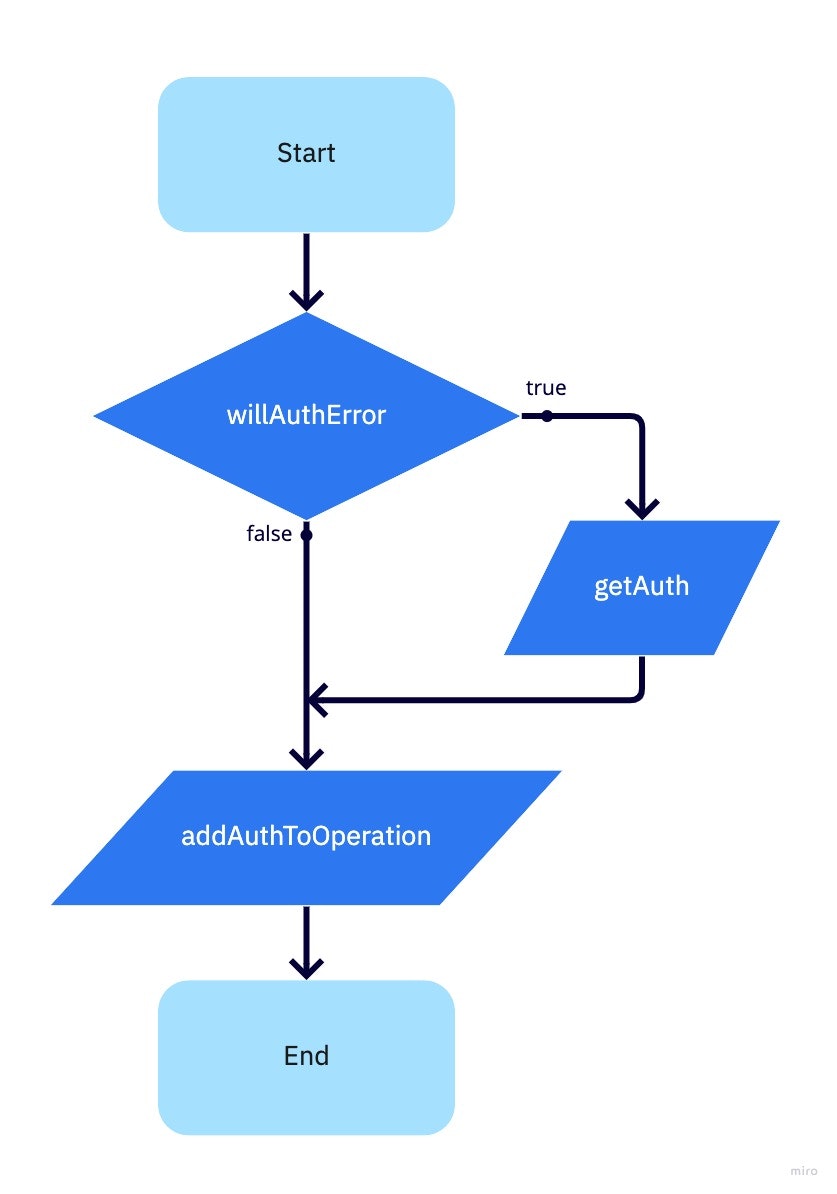
各メソッドの意味は以下にまとめてみました。
getAuth
任意のプラットフォームでtokenを取得する役割を担っています。
今回のケースだとauth.currentUser?.getIdTokenResult()でtokenを取得するようにしています。
willAuthError
APIを呼ぶ前にtokenが有効なものか、期限が切れていないか等を確認する役割を担っています。
trueの場合はgetAuthの処理を経てからaddAuthToOperationが実行されるようになります。
今回のケースでは取得したtokenの有効期限が切れていないかをチェックしています。
addAuthToOperation
リクエストヘッダにauthStateの値を書き加える処理を担っています。
今回のケースではAuthorizationヘッダにBearer ${token}を追記しています。
処理の流れとしては以下のようになっています。
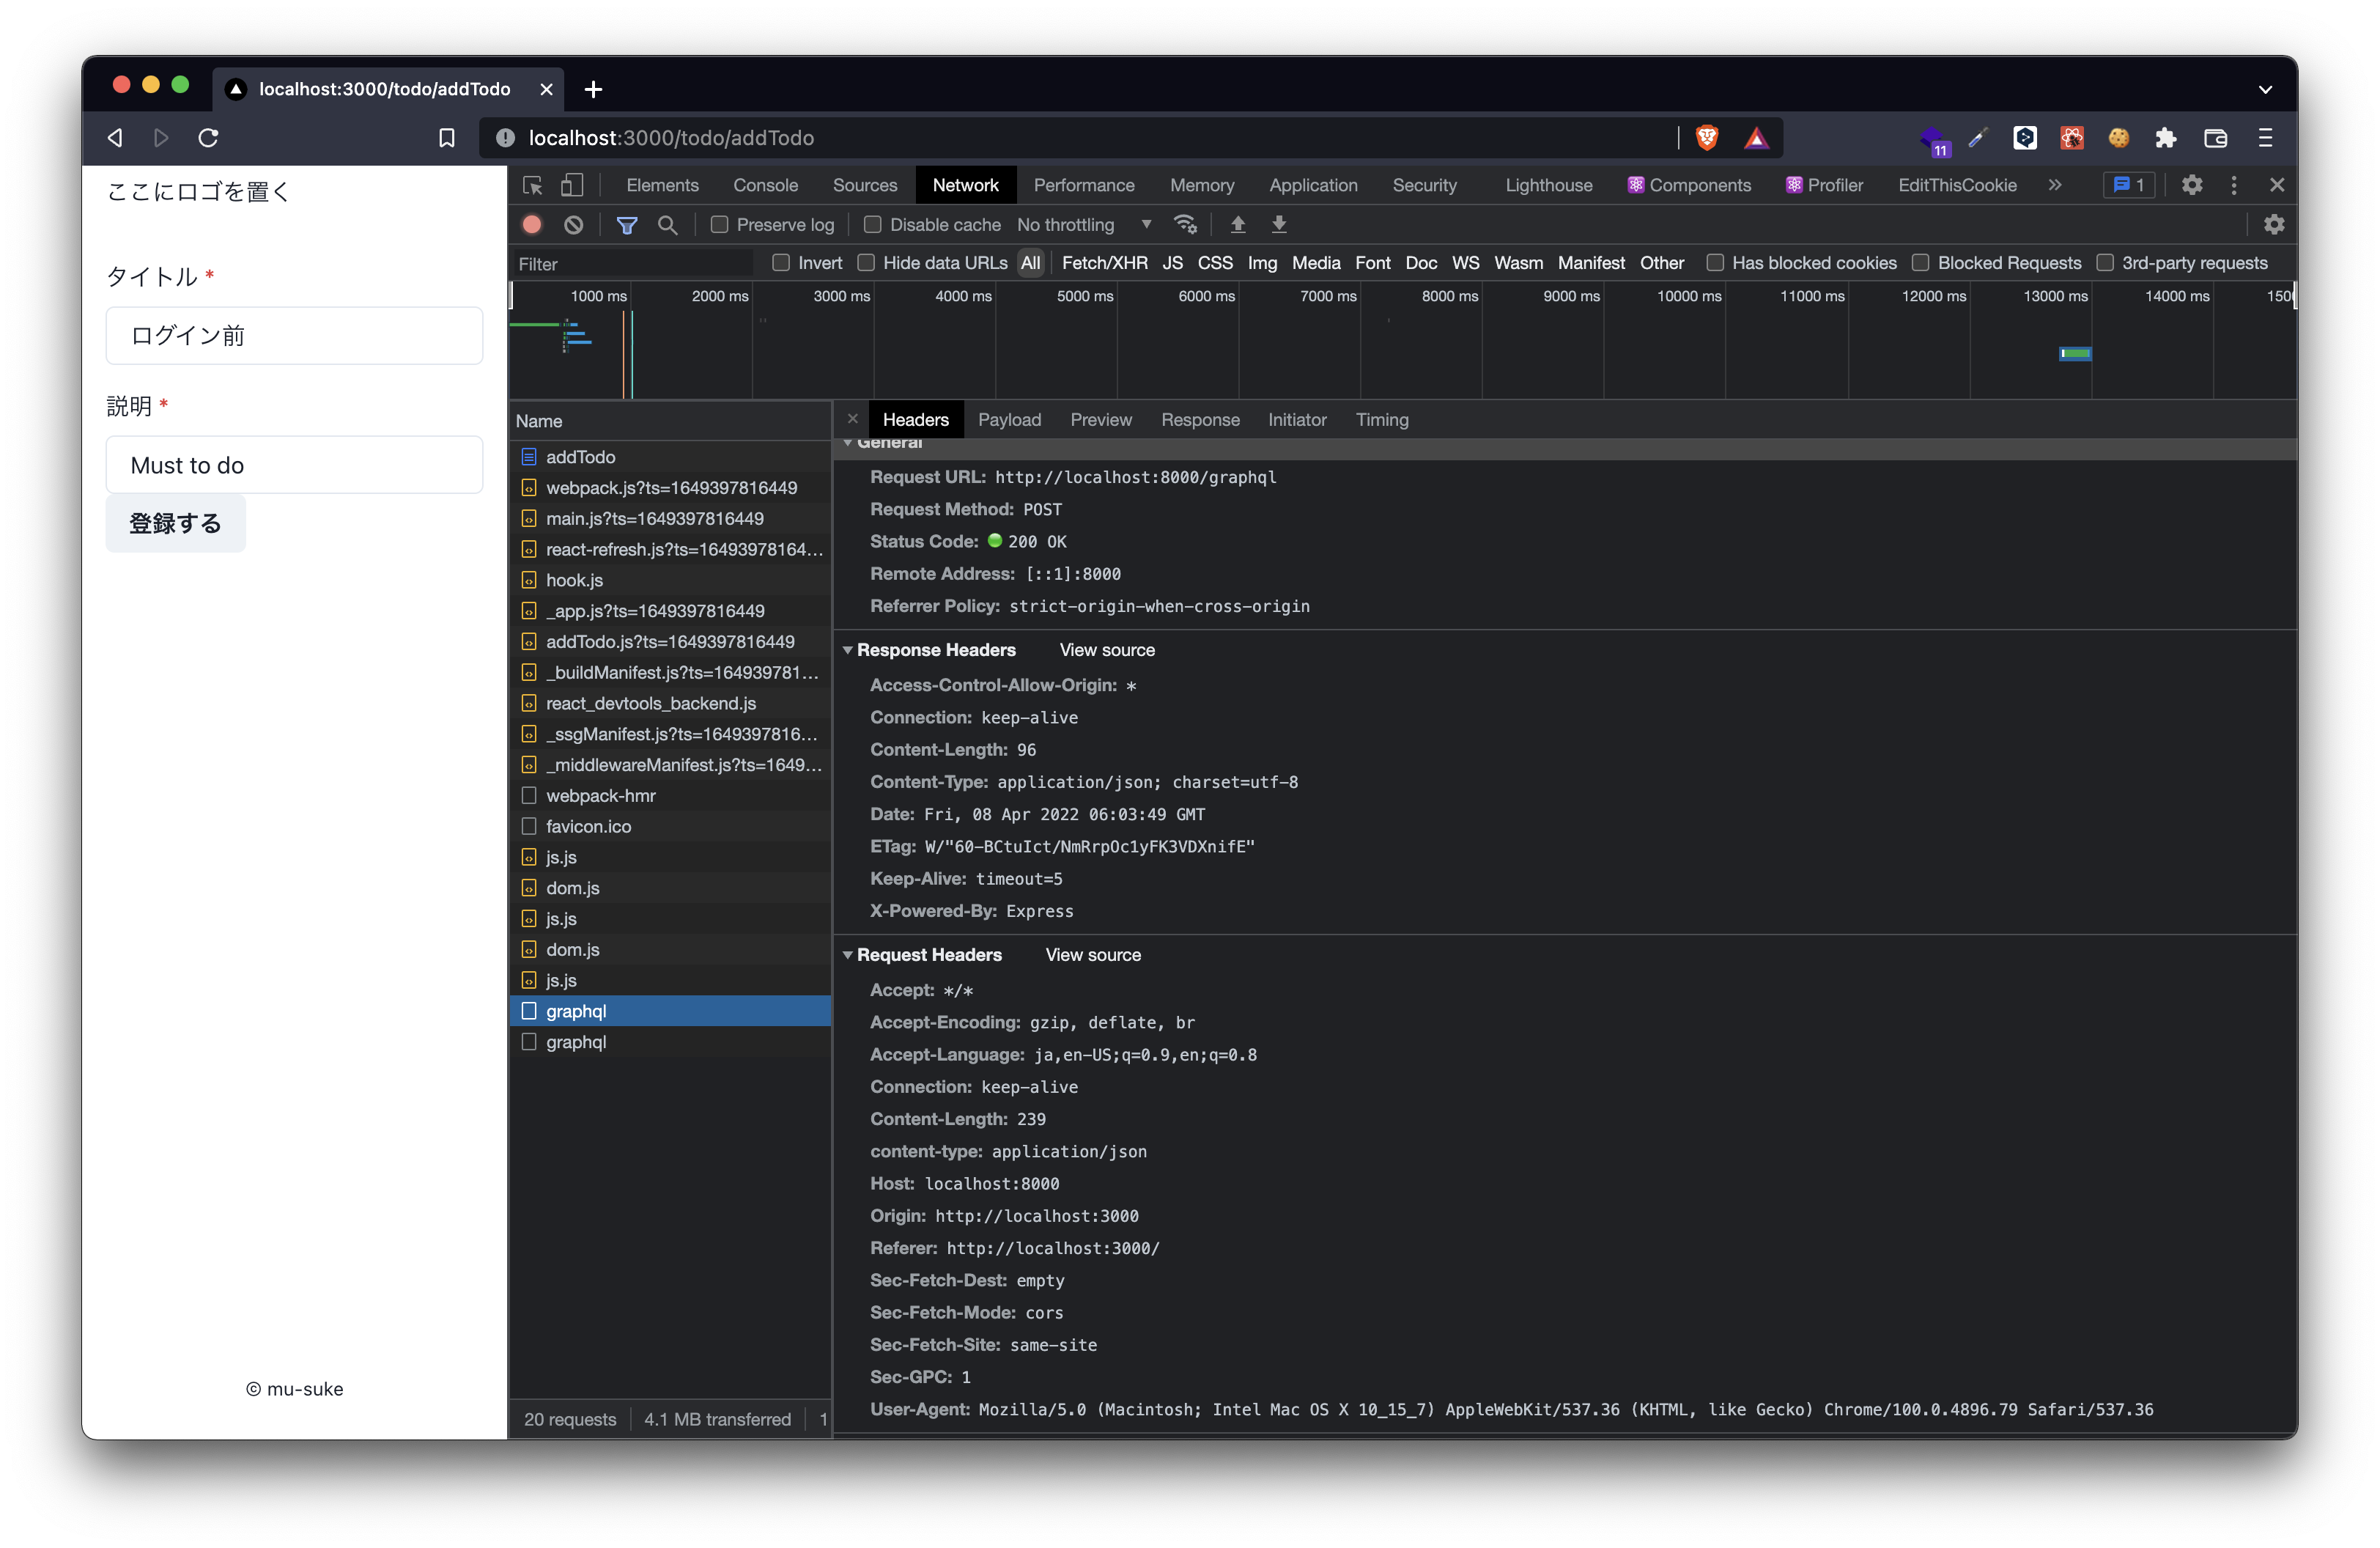
3. Chrome上で確認
肝となる部分のコードは書き終わったので実際にヘッダに追記されているのか確認していきましょう。
確認方法としては以下になります。
- firebase authの
signInWithEmailAndPasswordでログインする前とログイン後でリクエストヘッダに変化があるか
| ログイン前 | ログイン中 |
|---|---|
 |
 |
無事ログイン後のリクエストからAuthorizationにtoken情報が付与されるようになりました!
注意点
export const urqlClient = createClient({
  url: 'http://localhost:8000/graphql',
  suspense: false,
  exchanges: [
    dedupExchange,
    cacheExchange,
    authExchange({
      addAuthToOperation,
      getAuth,
      didAuthError,
    }),
    fetchExchange,
  ],
})
公式をきちんと読むと書いてあるのですがexchangesの指定の際に書いてある順序通りExchangeを指定しないと以下のような警告が出るので注意してください。
No exchange has handled operations of type "undefined". Check whether you've added an exchange responsible for these operations.
筆者の場合だとauthExchange以外のExchangeを記載せずに実行したところ上記の警告が表示されました
You'll then need to add the
authExchange, that this package exposes to yourClient. TheauthExchangeis an asynchronous exchange, so it must be placed in front of allfetchExchanges but after all other synchronous exchanges, like thecacheExchange.
公式ではこちらに書いてありました。
英語に臆せずきちんと読むことが大事ですね。
余談
これで認証機能のサーバーサイドからフロントまで実装できるようになったのでできることが広がりました!
引き続きこの技術を使って開発していこうと思います。
ではまた!
参考記事