はじめに
この記事では、下記を解説していきます.
- RailsのAPIモードと
devise_token_authgemを使って、トークンベースで認証を実装する - confirmableを有効化
- Gメールアカウント + Action mailerでメール送信
前提条件
- Rubyバージョン 2.5.1
- Rails 6.0
- PostgreSQL
APIモードでRailsプロジェクトを作成
まずはAPIモードで新規プロジェクトを作成します。コマンドは、rails new <アプリ名> -T -d postgresql --api です。
$ rails new rails_app -T -d postgresql --api
オプションコマンドの説明
-
-T→ デフォルトのテスト用ライブラリのインストールをスキップする為のオプションコマンド (Rspecなどを使う際はこのオプションコマンドを使ってください) -
-d postgresql→ デフォルトのデータベースをpostgresqlに指定するためのオプションコマンド(指定しない場合は、sqliteになる) -
--api→ APIモードでRailsアプリを作成するためのオプションコマンド
Railsのバージョンを6に変更
Rails newした時点では、バージョン5でRuby on Railsアプリが作られています。今回はRails6に手動でバージョン変更します。
gem 'rails', '~> 6.0.0'
必要なgemを追加
今回はdevise、devise_token_auth、rack-corsの3つを使っていきます。下記3つをGemfileに追加しましょう。
gem 'devise'
gem 'devise_token_auth'
gem 'rack-cors'
インストール
bundle installしましょう。 インストールが完了した後に、Gemfile.lockをみてRails6になっているか確認すると安心です。
$ bundle install --path vendor/bundle
データベースを作成
gemのインストールが完了したら、データベースを作成しておきましょう。
rails db:create
deviseをインストール
devise_token_authを設定していく前に、deviseをインストールしておきます。手順が逆になるとエラーが出る可能性があるので気をつけてください。
$ rails g devise:install
上のコマンドを実行すると下記のような、表示が返ってきます。
      create  config/initializers/devise.rb
      create  config/locales/devise.en.yml
===============================================================================

Some setup you must do manually if you haven't yet:

  1. Ensure you have defined default url options in your environments files. Here
     is an example of default_url_options appropriate for a development environment
     in config/environments/development.rb:

       config.action_mailer.default_url_options = { host: 'localhost', port: 3000 }

     In production, :host should be set to the actual host of your application.

  2. Ensure you have defined root_url to *something* in your config/routes.rb.
     For example:

       root to: "home#index"

  3. Ensure you have flash messages in app/views/layouts/application.html.erb.
     For example:

       <p class="notice"><%= notice %></p>
       <p class="alert"><%= alert %></p>

  4. You can copy Devise views (for customization) to your app by running:

       rails g devise:views

===============================================================================
devise_token_authをインストール&Useモデルの作成
今度はdevise_token_authのインストールを実施します。繰り返しますが、deviseのインストールと順番を間違えるとエラーが出る可能性があるため、必ずdeviseインストール→devise_token_authのインストールの順で実施して下さい。
$ rails g devise_token_auth:install User auth
実行が成功すると、下記のような表示が返ってきます。
      create  config/initializers/devise_token_auth.rb
      insert  app/controllers/application_controller.rb
        gsub  config/routes.rb
      create  db/migrate/20200610084840_devise_token_auth_create_users.rb
      create  app/models/user.rb
rails g devise_token_auth:install User authコマンドで作成されたdevise_token_auth_create_users.rbファイルを開きます。これからusersテーブルを作成します。
class DeviseTokenAuthCreateUsers < ActiveRecord::Migration[6.0]
  def change

    create_table(:users) do |t|
      ## Required
      t.string :provider, :null => false, :default => "email"
      t.string :uid, :null => false, :default => ""

      ## Database authenticatable
      t.string :encrypted_password, :null => false, :default => ""

      ## Recoverable
      t.string   :reset_password_token
      t.datetime :reset_password_sent_at
      t.boolean  :allow_password_change, :default => false

      ## Rememberable
      t.datetime :remember_created_at

      ## Confirmable
      t.string   :confirmation_token
      t.datetime :confirmed_at
      t.datetime :confirmation_sent_at
      t.string   :unconfirmed_email # Only if using reconfirmable

      ## Lockable
      # t.integer  :failed_attempts, :default => 0, :null => false # Only if lock strategy is :failed_attempts
      # t.string   :unlock_token # Only if unlock strategy is :email or :both
      # t.datetime :locked_at

      ## User Info
      t.string :name
      t.string :nickname
      t.string :image
      t.string :email

      ## Tokens
      t.json :tokens

      t.timestamps
    end

    add_index :users, :email,                unique: true
    add_index :users, [:uid, :provider],     unique: true
    add_index :users, :reset_password_token, unique: true
    add_index :users, :confirmation_token,   unique: true # コメントアウト
    # add_index :users, :unlock_token,       unique: true
  end
end
migrateコマンドで、usersテーブルを作成します。
$ rails db:migrate
下記のような表示がされたら成功です。
== 20200509111809 DeviseTokenAuthCreateUsers: migrating =======================
-- create_table(:users)
   -> 0.0229s
-- add_index(:users, :email, {:unique=>true})
   -> 0.0156s
-- add_index(:users, [:uid, :provider], {:unique=>true})
   -> 0.0051s
-- add_index(:users, :reset_password_token, {:unique=>true})
   -> 0.0070s
== 20200509111809 DeviseTokenAuthCreateUsers: migrated (0.0509s) ==============
設定を変更
これから、devise_token_authが使える様に設定を変更していきます。
1.devise_token_auth.rbの設定
まずはdevise_token_auth.rbを開き、下記の設定を変更します。
config.change_headers_on_each_request = false # コメントを外してtrueからfalseに変更する

config.token_lifespan = 2.weeks # コメントをはずす

# コメントを外す
config.headers_names = {:'access-token' => 'access-token',
                        :'client' => 'client',
                        :'expiry' => 'expiry',
                        :'uid' => 'uid',
                        :'token-type' => 'token-type' }
-
config.change_headers_on_each_request→trueの場合、リクエストごとにtokenを新しくする必要がある、という設定になります。毎回、毎回、トークンが変更されるという動きは今回は期待していないので、falseに変更します。 -
token_lifespan→ 名前の通り、tokenの有効期間ですね。今回は、2週間に設定しておきます。 -
headers_names→ 認証用ヘッダーの名前の定義です。必要でない限り、変更する必要はないでしょう。
2.application_controller.rbの設定
次に、application_controller.rbに設定を追加していきます。この一文をすることでSetUserByTokenという拡張機能を使える様になります。CookieやCORSの設定ですね。
class ApplicationController < ActionController::API
  # 下記一行を追加
  include DeviseTokenAuth::Concerns::SetUserByToken
end
3.application.rbの設定
最後にapplication.rbの設定です。# ここからコピペするから# ここまでまでコピーペーストしてください。
require_relative 'boot'

require "rails"
# Pick the frameworks you want:
require "active_model/railtie"
require "active_job/railtie"
require "active_record/railtie"
require "active_storage/engine"
require "action_controller/railtie"
require "action_mailer/railtie"
require "action_view/railtie"
require "action_cable/engine"
# require "sprockets/railtie"
# require "rails/test_unit/railtie"

# Require the gems listed in Gemfile, including any gems
# you've limited to :test, :development, or :production.
Bundler.require(*Rails.groups)

module DeviseTokenAuthTwitter
  class Application < Rails::Application
    # Initialize configuration defaults for originally generated Rails version.
    config.load_defaults 5.2

    # Settings in config/environments/* take precedence over those specified here.
    # Application configuration can go into files in config/initializers
    # -- all .rb files in that directory are automatically loaded after loading
    # the framework and any gems in your application.

    # Only loads a smaller set of middleware suitable for API only apps.
    # Middleware like session, flash, cookies can be added back manually.
    # Skip views, helpers and assets when generating a new resource.
    config.api_only = true

    # ここからコピペする
    config.session_store :cookie_store, key: '_interslice_session'
    config.middleware.use ActionDispatch::Cookies # Required for all session management
    config.middleware.use ActionDispatch::Session::CookieStore, config.session_options
    config.middleware.use ActionDispatch::Flash
    config.middleware.insert_before 0, Rack::Cors do
      allow do
        origins '*'
        resource '*',
                 :headers => :any,
                 :expose => ['access-token', 'expiry', 'token-type', 'uid', 'client'],
                 :methods => [:get, :post, :options, :delete, :put]
      end
    end
    # ここまで
  end
end
ルートの設定
今度はルートを変更していきます。mount_devise_token_auth_for以降をroutes.rbにコピーペーストしてください。
Rails.application.routes.draw do
  mount_devise_token_auth_for 'User', at: 'auth', controllers: {
    registrations: 'auth/registrations'
  }
end
Controllerを作成
registrationsコントローラーを上書きする必要があるため、railsコマンドを実行してコントローラーを作成します。
$ rails g controller auth/registrations
auth/registrations_controller.rbに下記をコピーペーストしてください。。
class Auth::RegistrationsController < DeviseTokenAuth::RegistrationsController

  private

  def sign_up_params
    params.permit(:name, :email, :password, :password_confirmation)
  end
end
今回は、Userを登録する時にnameも登録させたいため、strong_parameterにnameも追加しています。
動くかテスト!
動くかテストしていきます。サーバーを起動します。
$ rails s
今回はpostmanを使ってHTTPリクエストを送信します。
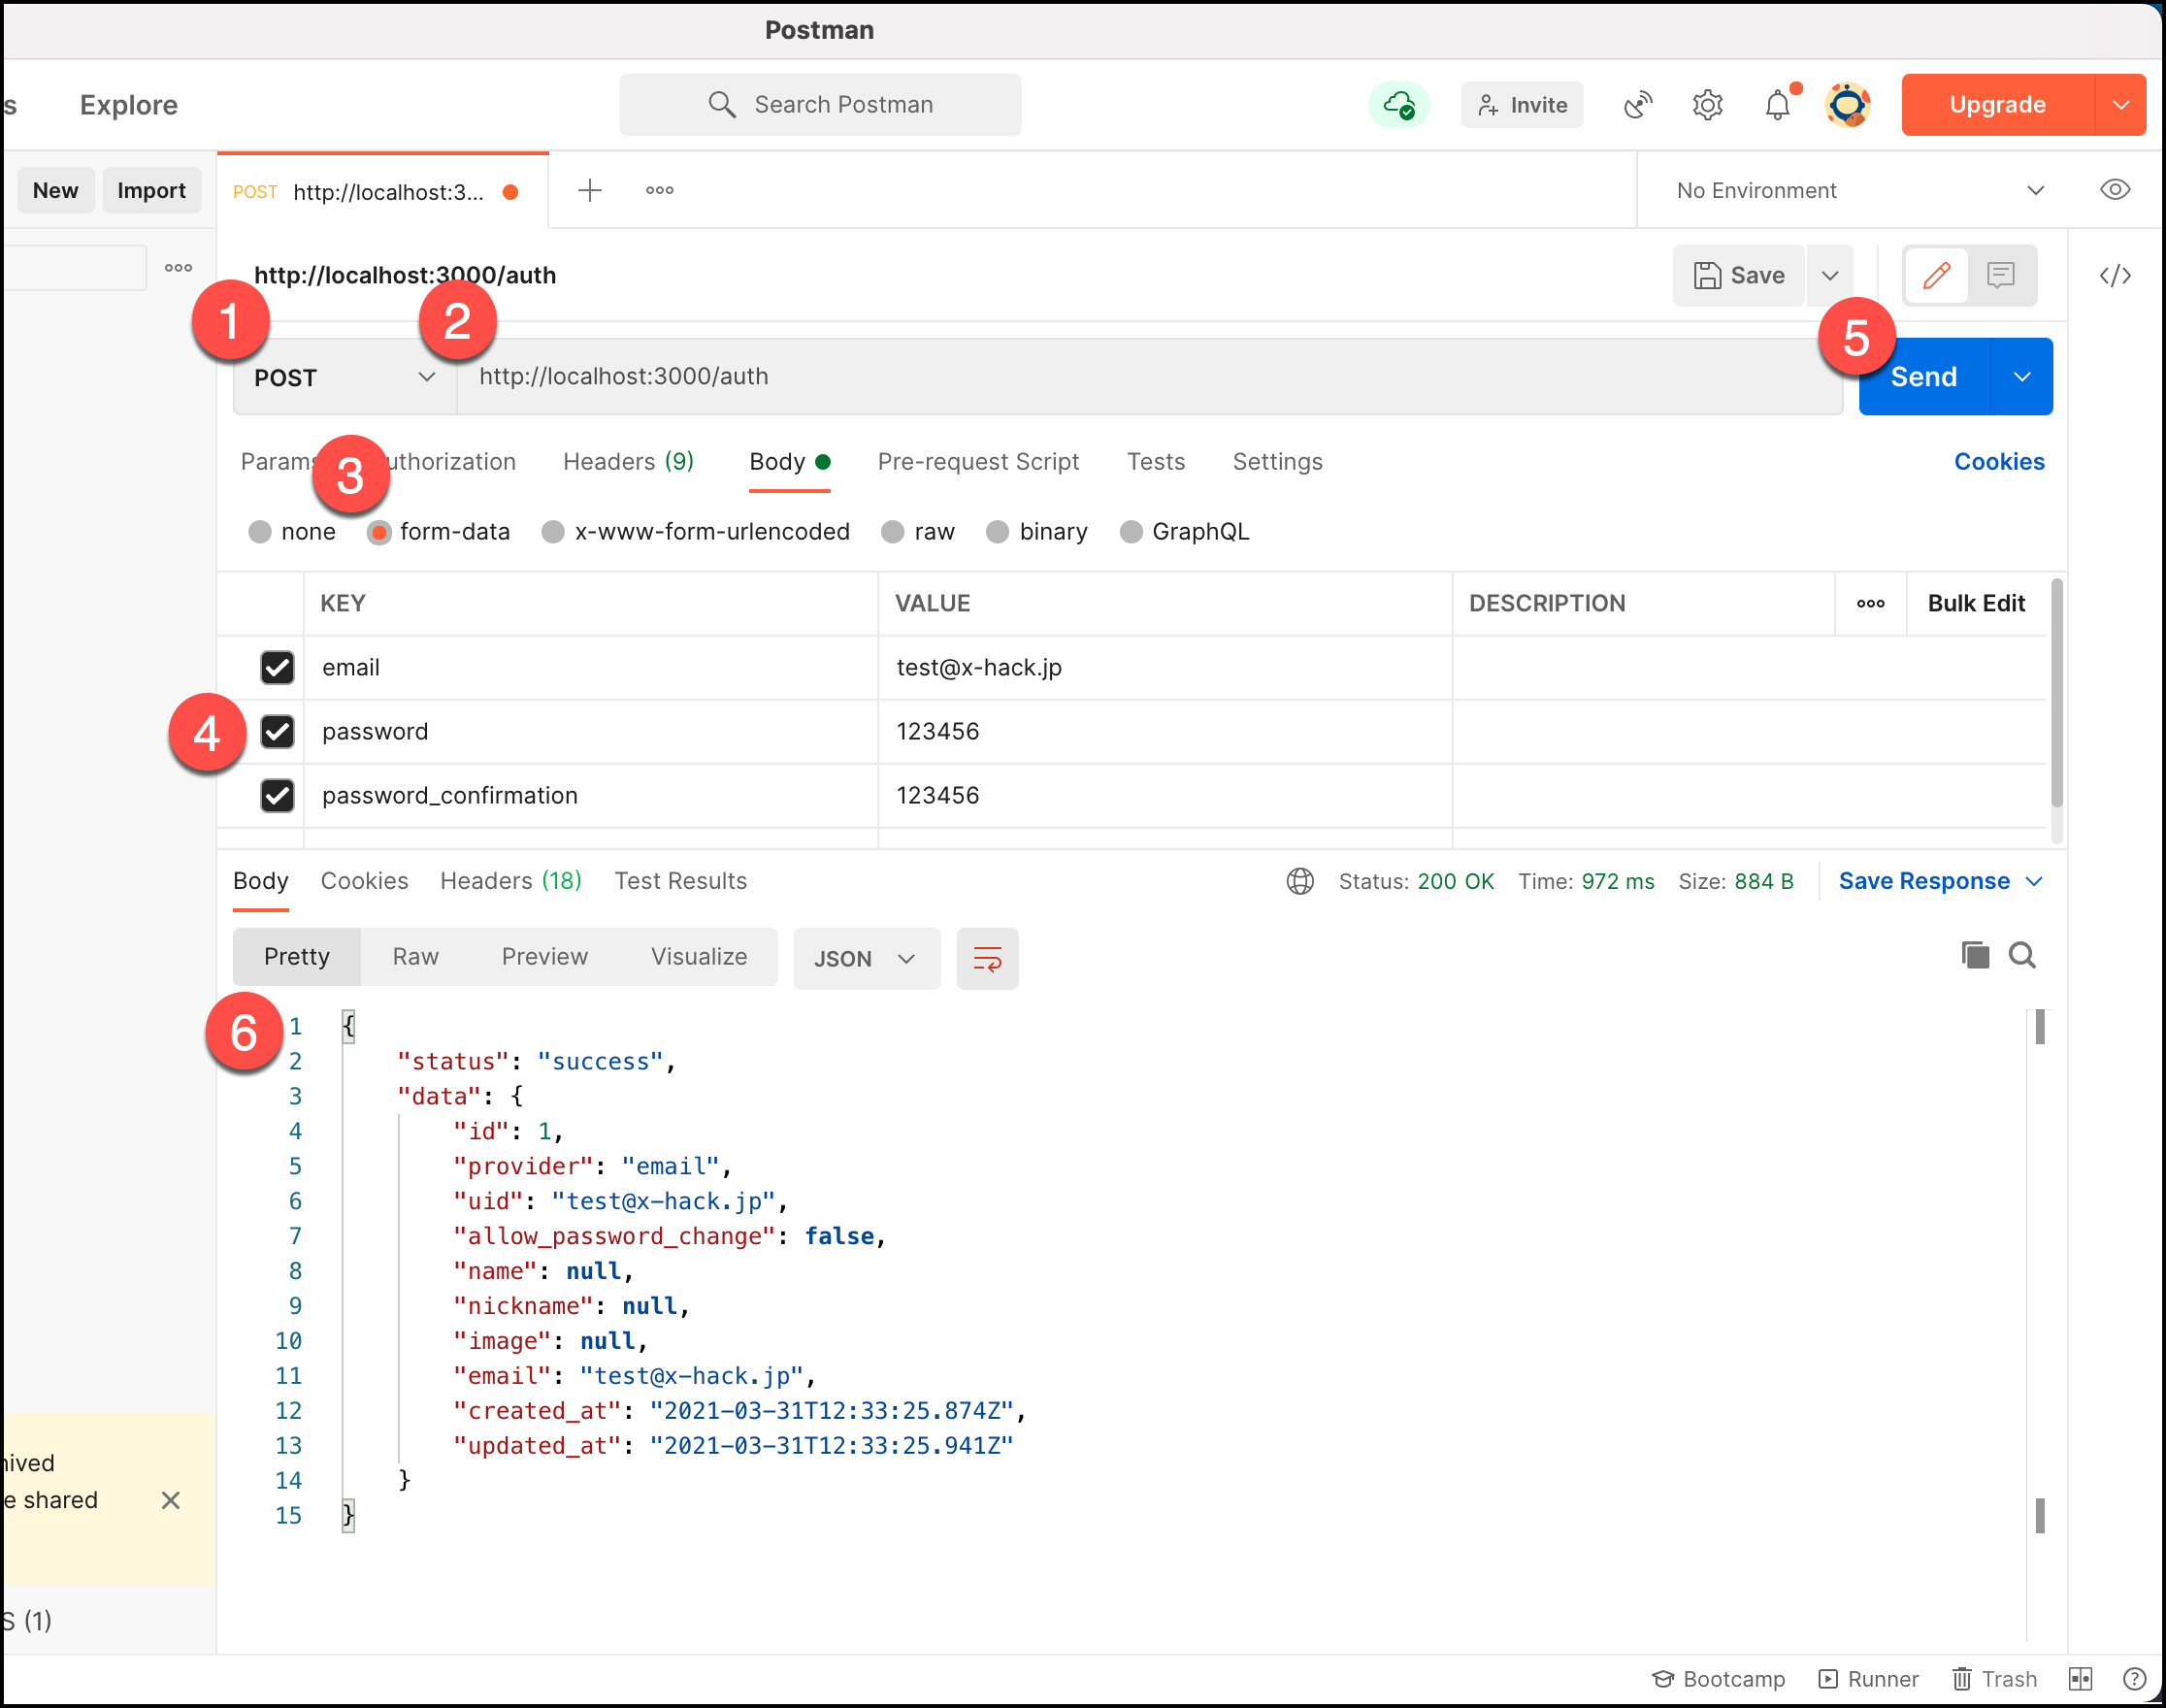
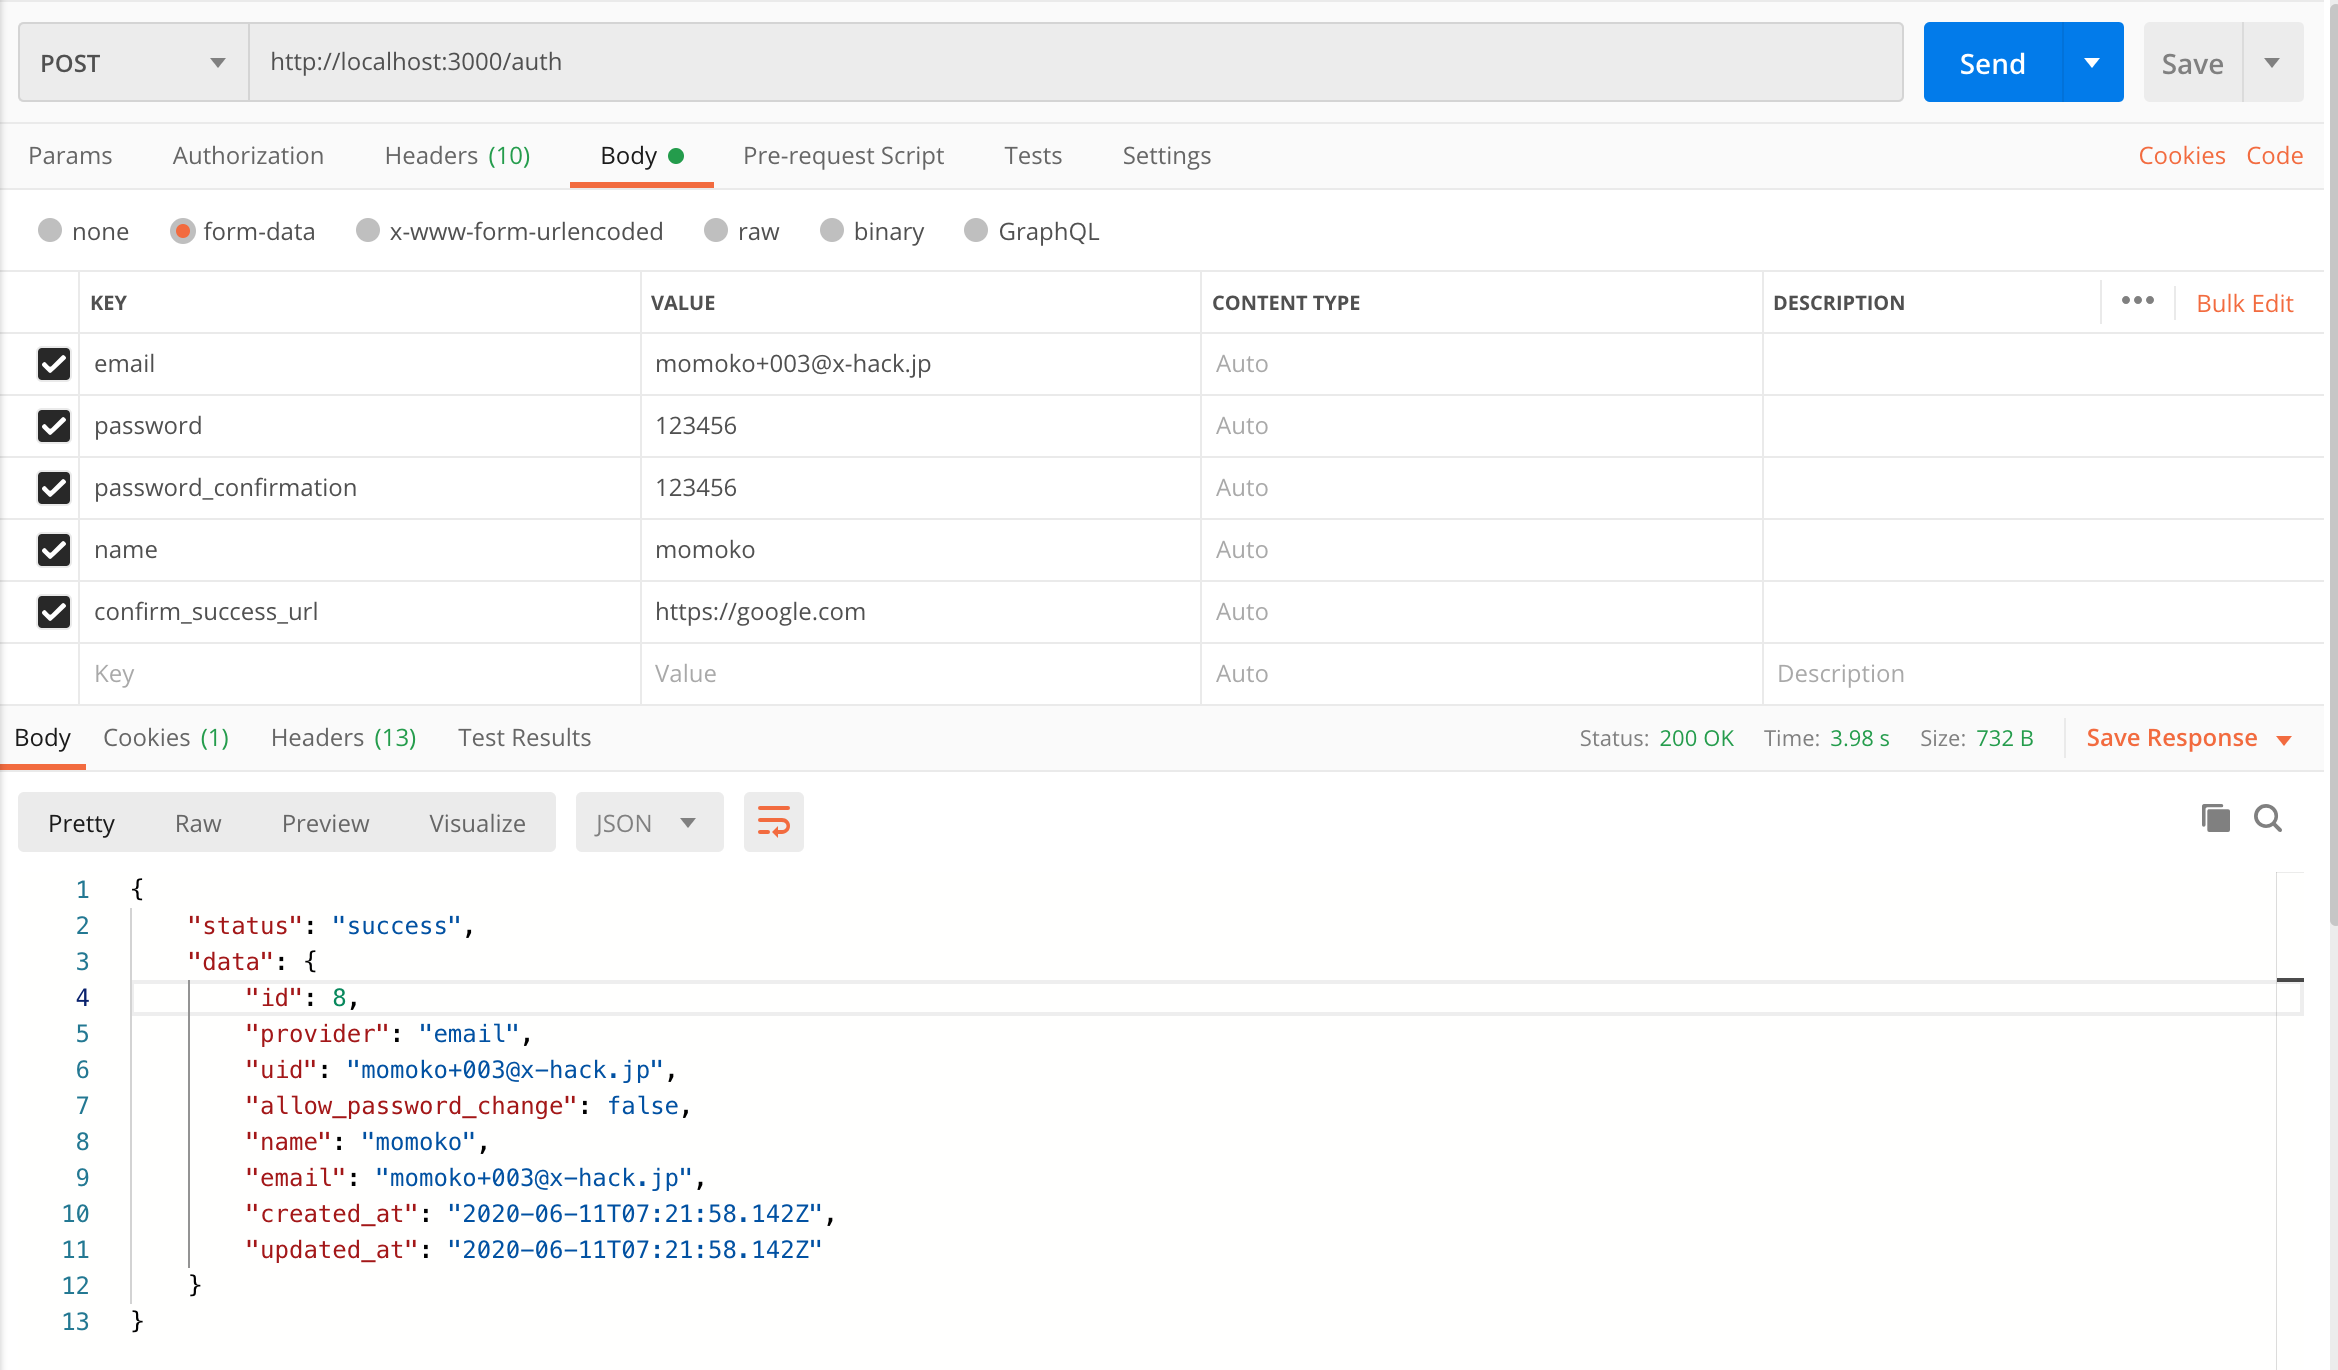
1.ユーザ新規登録
ユーザ新規登録のURLはPOSTのauthです。
- postmanのメソッドを
POSTに変更する - URLに
http://localhost:3000/authを入力する -
Bodyタブでform-dataを選択する -
email、password、password_confirmationとそれぞれの値を入力する - Sendボタンを押下する
- レスポンスが返ってくる
すると、レスポンスのBodyにsuccessと表示されます。これが表示されたら、アカウント登録は成功です。
2. ログインと認証用データの取得
今度は先ほど作成したアカウントで、ログインを試してみます。ログインはPOSTのauth/sign_inです。先ほど登録したemailとpasswordをBodyに付与して送信します。
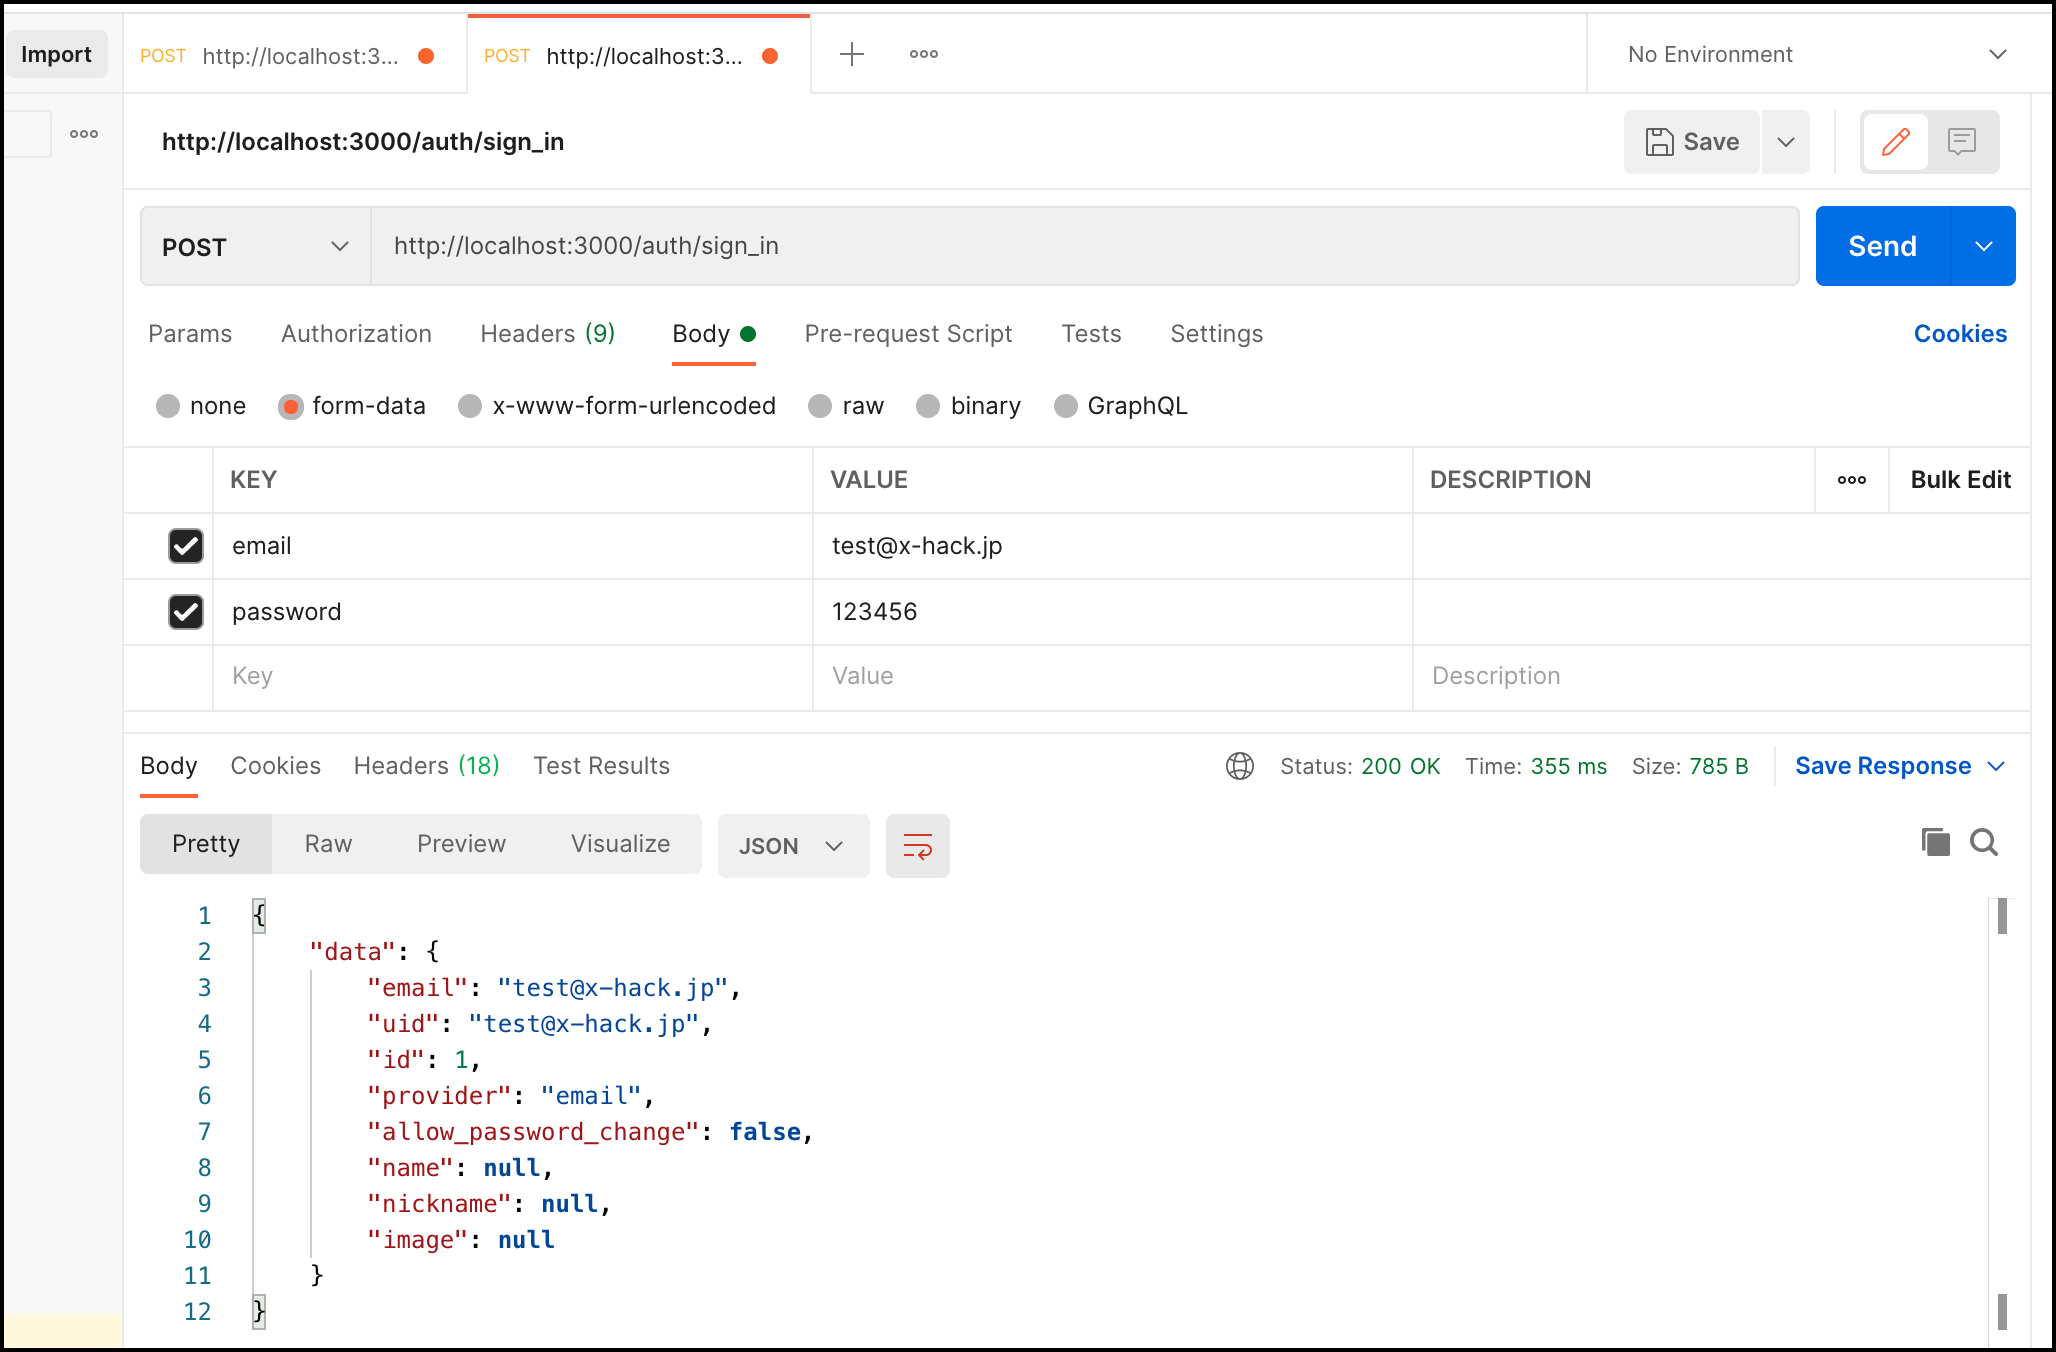
ログインが成功したらレスポンスのBodyは⬆️のように返ってきます。ここで注目してもらいたいのが、レスポンスのHeadersです。ログインが成功すると、レスポンスのHeadersにaccess-token、client、uidの3つの情報が入って返ってきます。
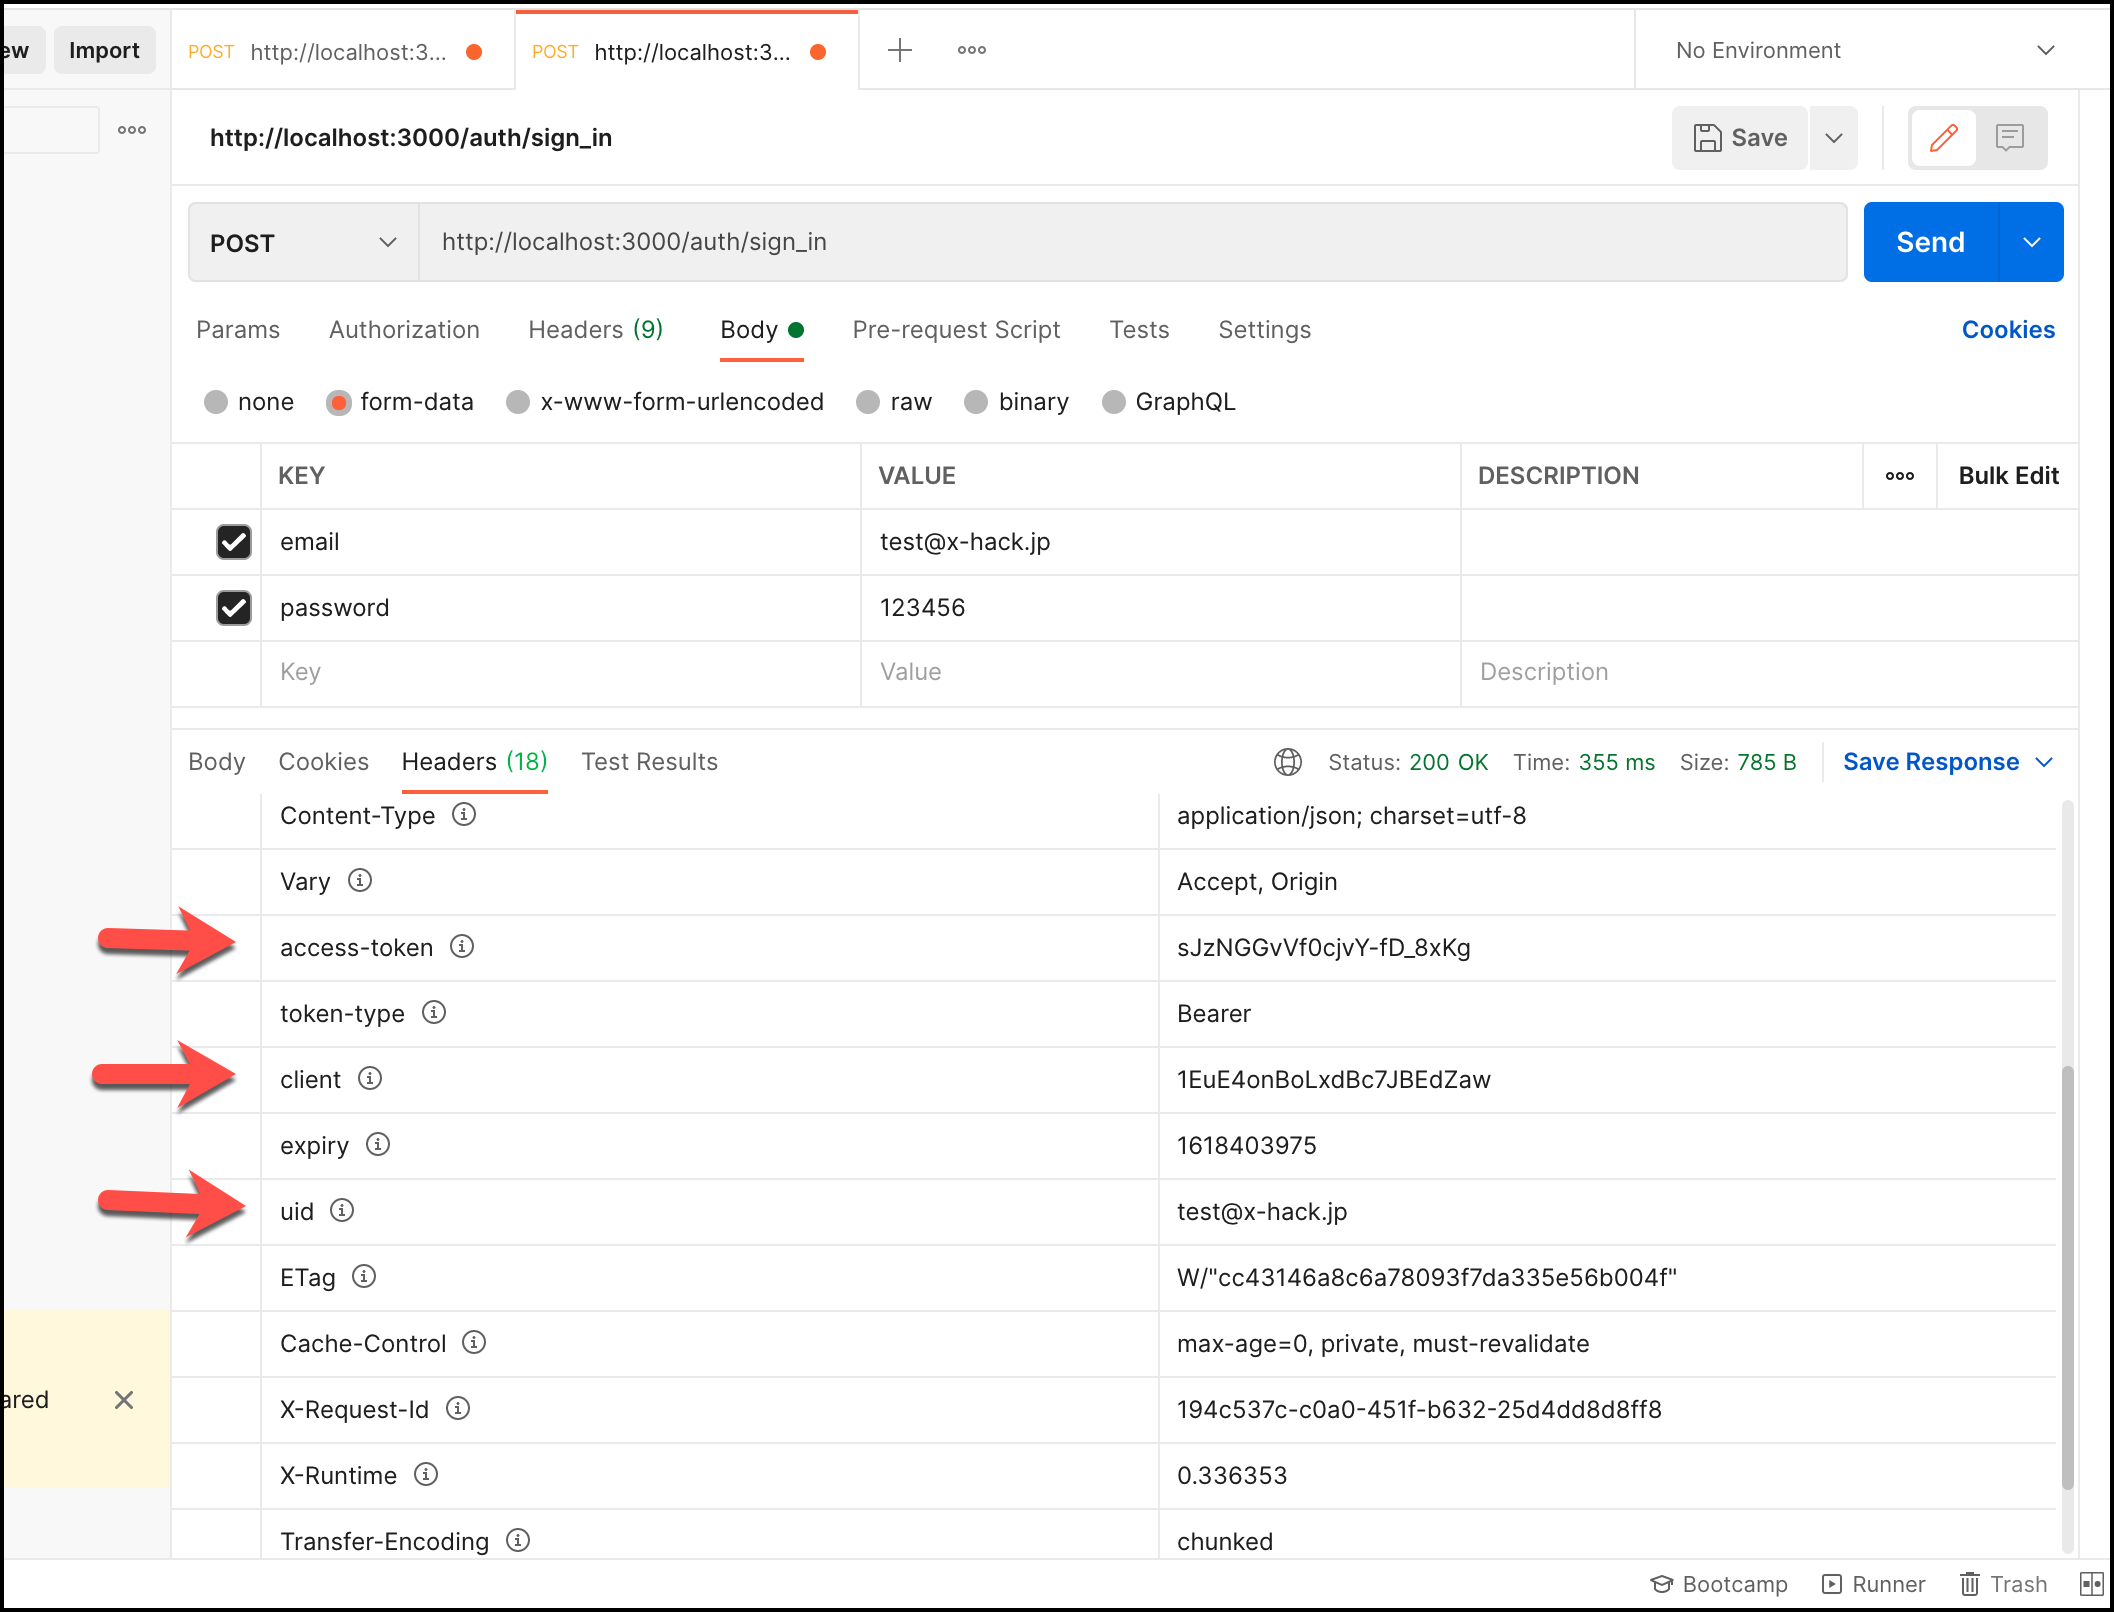
この3つの情報をリクエストの度にリクエストヘッダーに付与することで認証を行います。言い換えると、リクエストを送信する度にリクエストヘッダーにこの3つを付与することで、「これがログイン情報だよ、すでに私はログイン済みだよ」とRailsアプリに教えてあげます。
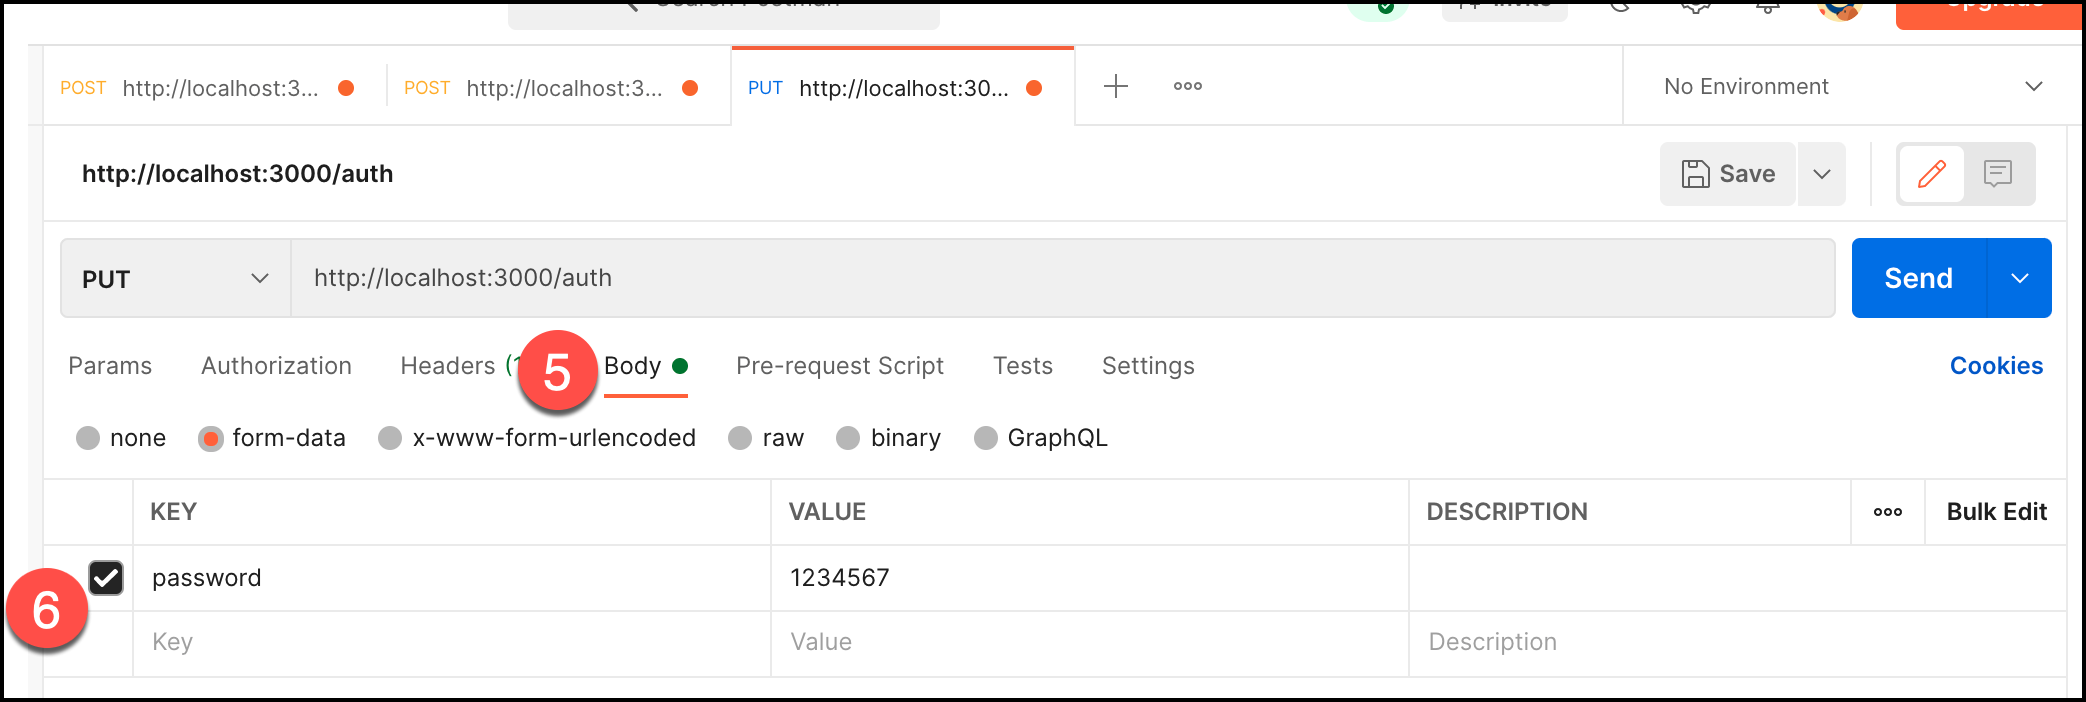
3. パスワード変更
さてここで、認証されていない(ログインしていない)とできないものを試してみましょう。パスワード変更です。パスワード変更はログインしている必要があります。言い換えると、リクエストヘッダーにaccess-token、client、uidを付与する必要があります。
- メソッドを
PUTに変更する - URL欄に
http://localhost:3000/authを入力する - Headersタブを選択する
- ログイン時のレスポンスで返ってきた
access-token、client、uidと値を入力する - Bodyタブを選択する
- 新しいパスワードを入力する
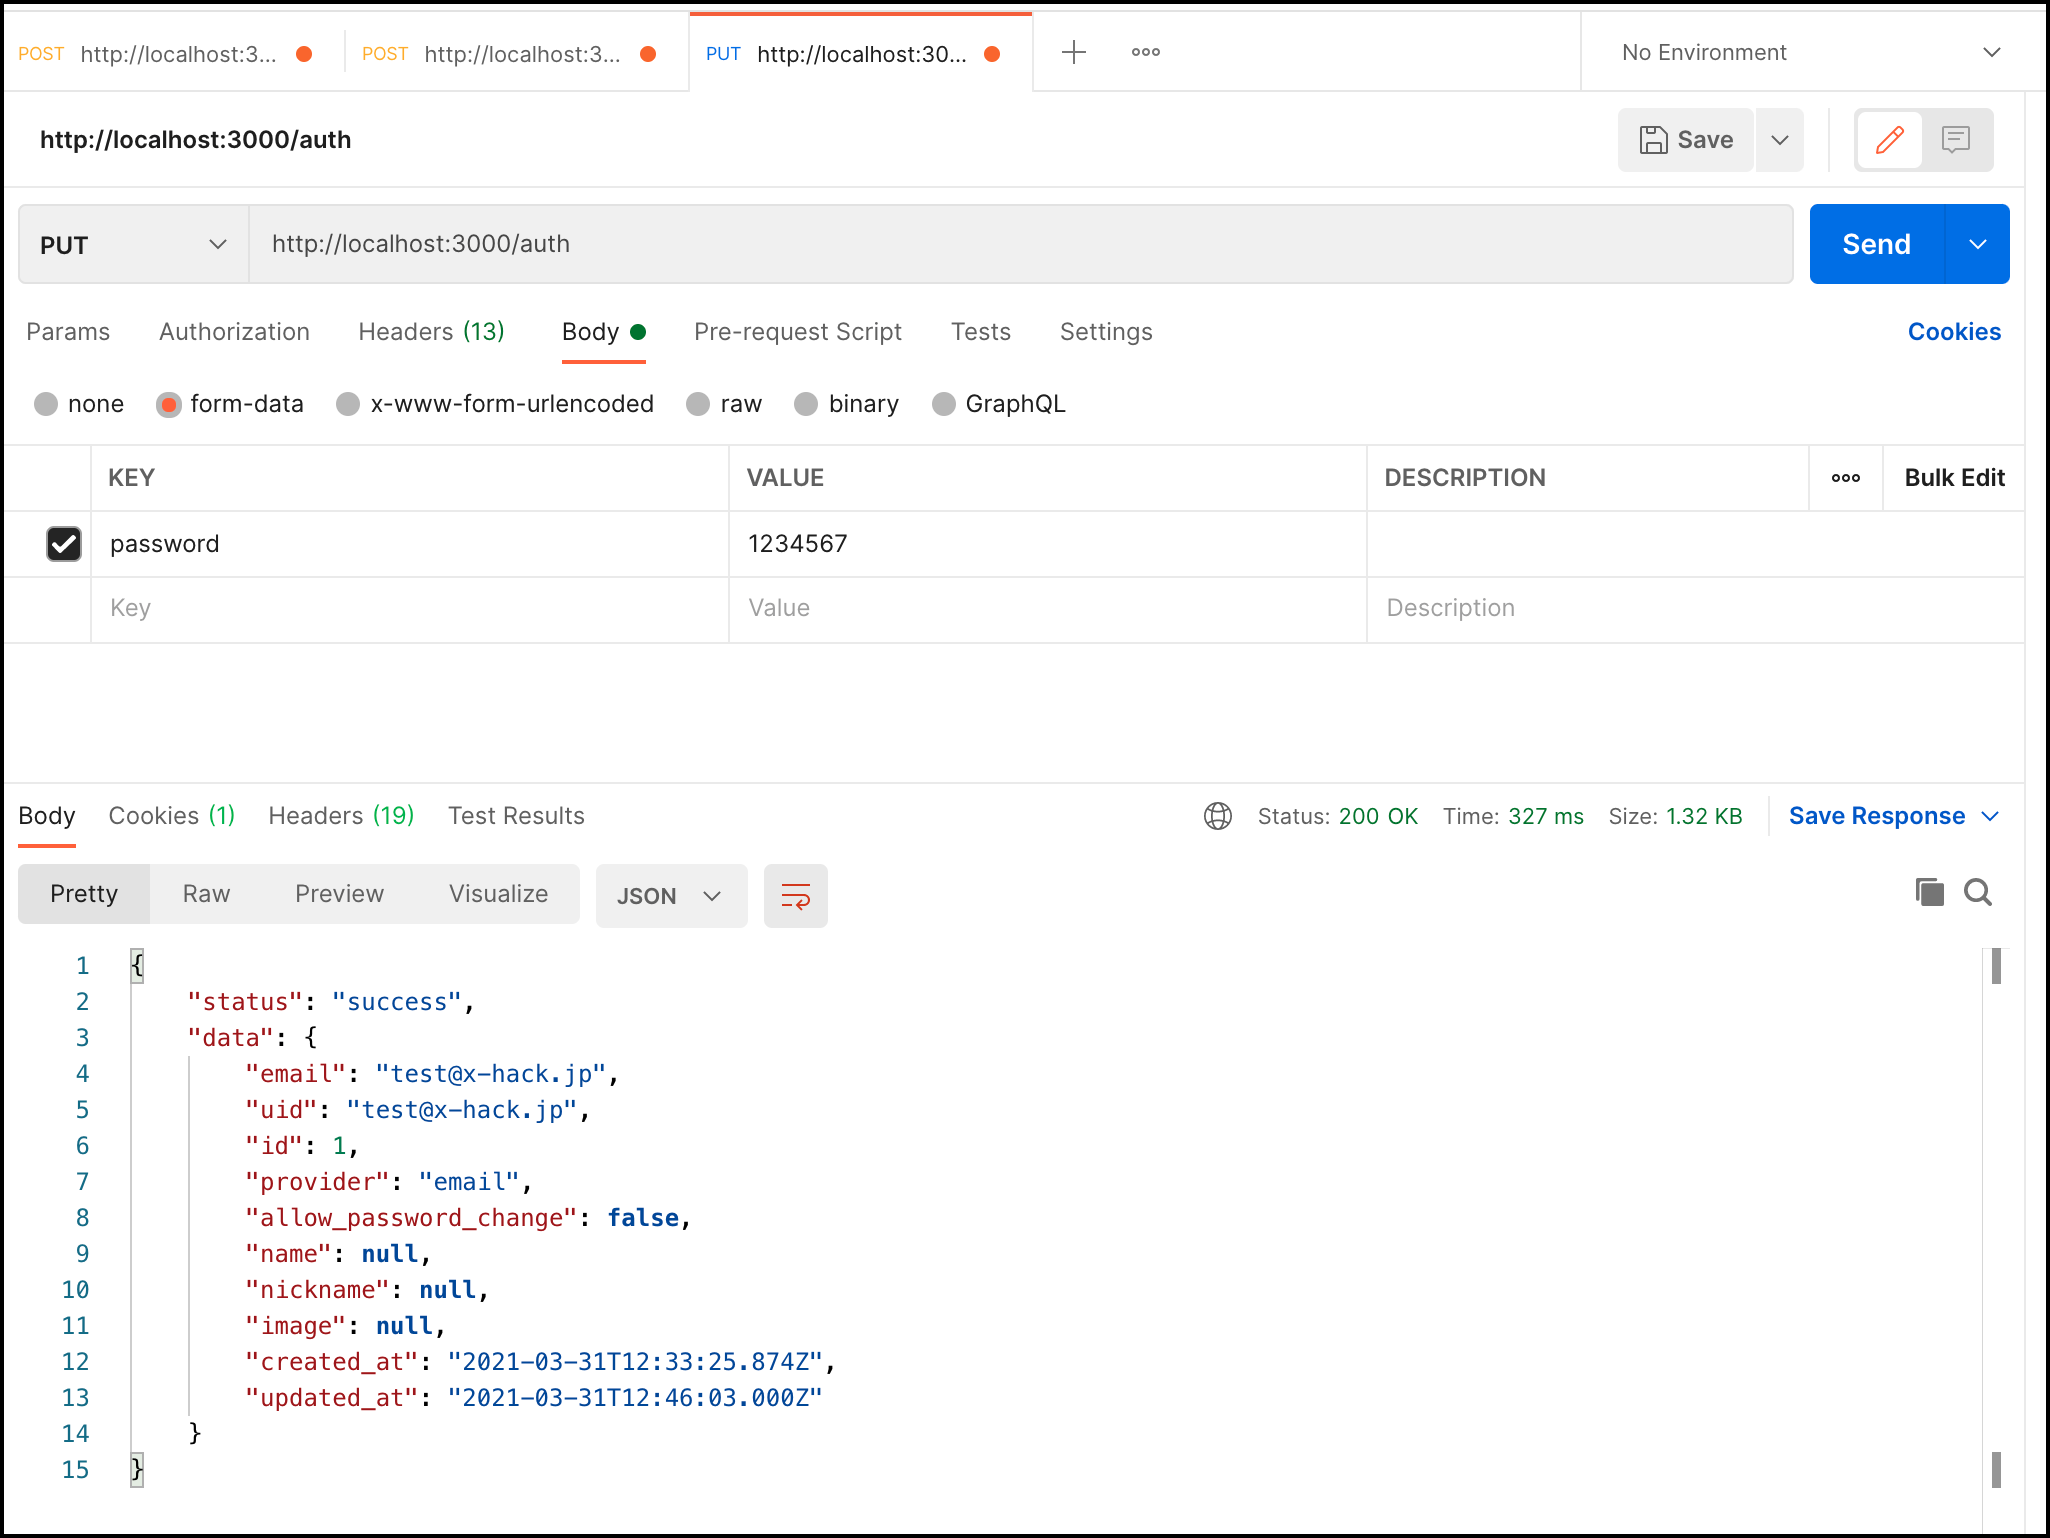
- Sendボタンを押下する
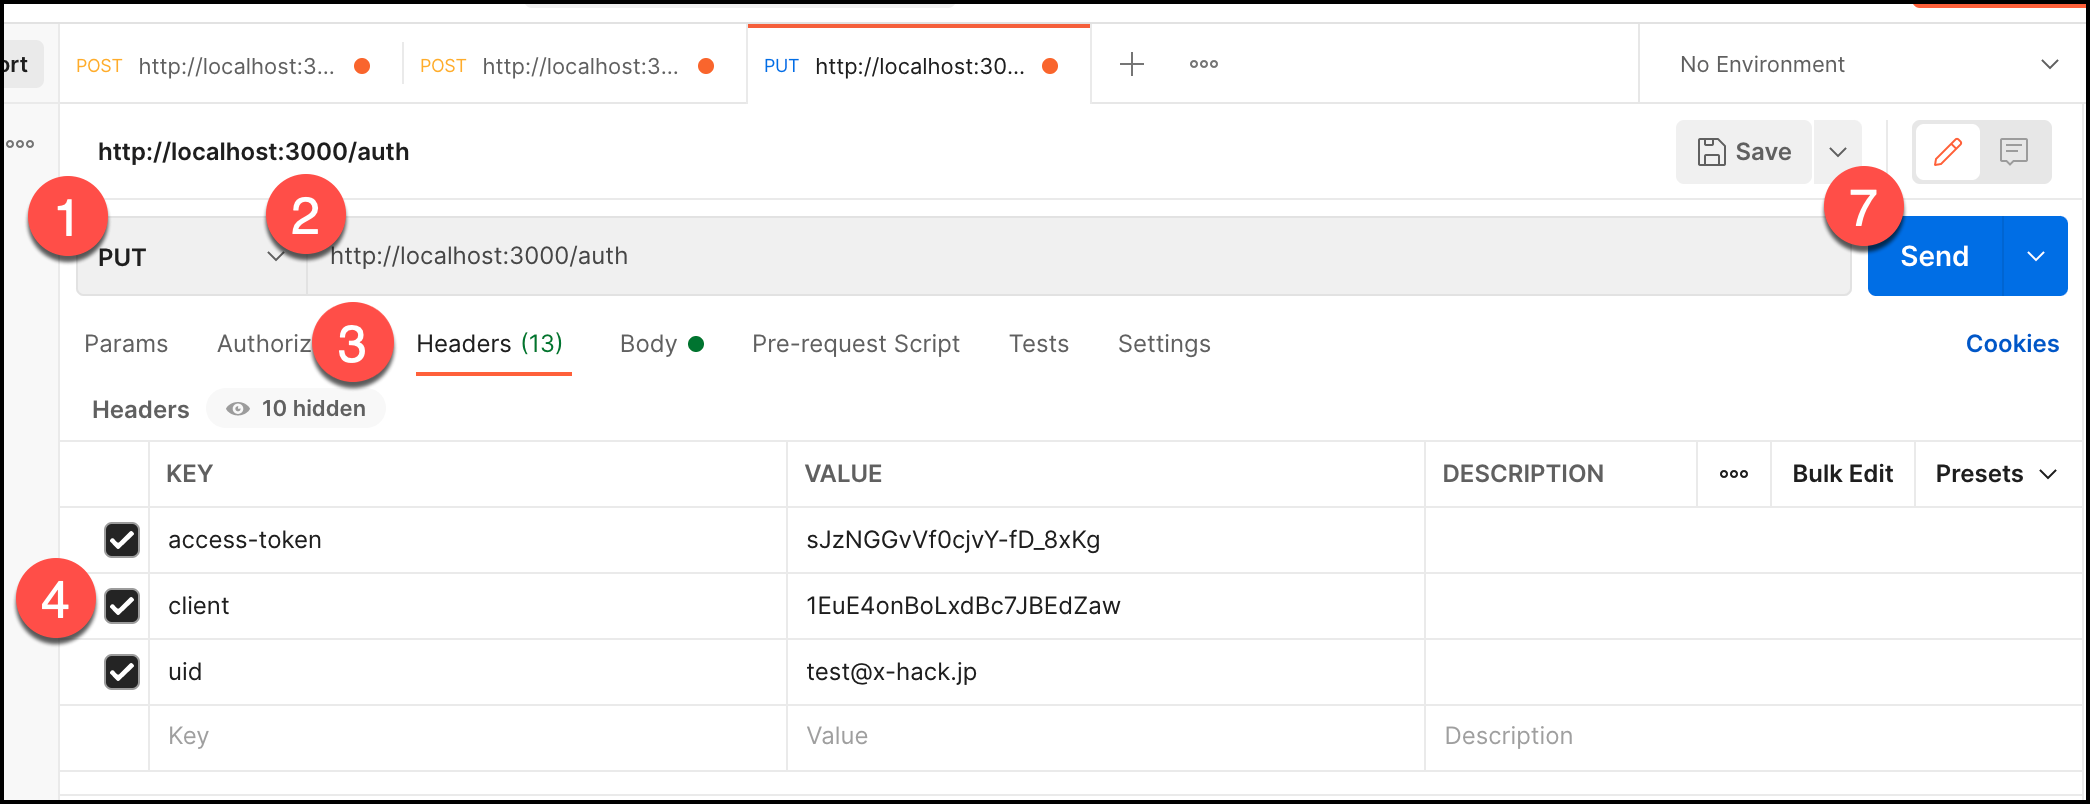
すると、successのレスポンスが返ってきます。devise_token_authの基本設定はここまでになります。
Confirmableの設定
ここからはConfirmableの設定と、action mailerを使ってアカウント確認用メールを送信する方法になります。
confirmableを設定すると、ユーザが新たにアカウント登録すると、登録したメールアドレスにメールが送信され、そのメール内の「アカウント確認」を押すまで本登録が完了しない様にできます。
confirmableを有効にする
Userテーブルでconfirmableを有効にします。
class User < ActiveRecord::Base
  devise :database_authenticatable, :registerable,
         :recoverable, :rememberable, :validatable, :confirmable # ← confirmableを追加する
  include DeviseTokenAuth::Concerns::User

end
Action Mailerの実装
ここからは、メール送信用のaction mailerを設定していきます。今回はGメールを使うので、Gメール使用での設定になります。
1.envの準備
.envを使うのでdotenv-railsGemを導入し、bundle installます。
group :development, :test do
  # Call 'byebug' anywhere in the code to stop execution and get a debugger console
  gem 'byebug', platforms: [:mri, :mingw, :x64_mingw]
  gem 'dotenv-rails' # 追加する
end
$ bundle install
.envファイルを作成しましょう。
$ touch .env
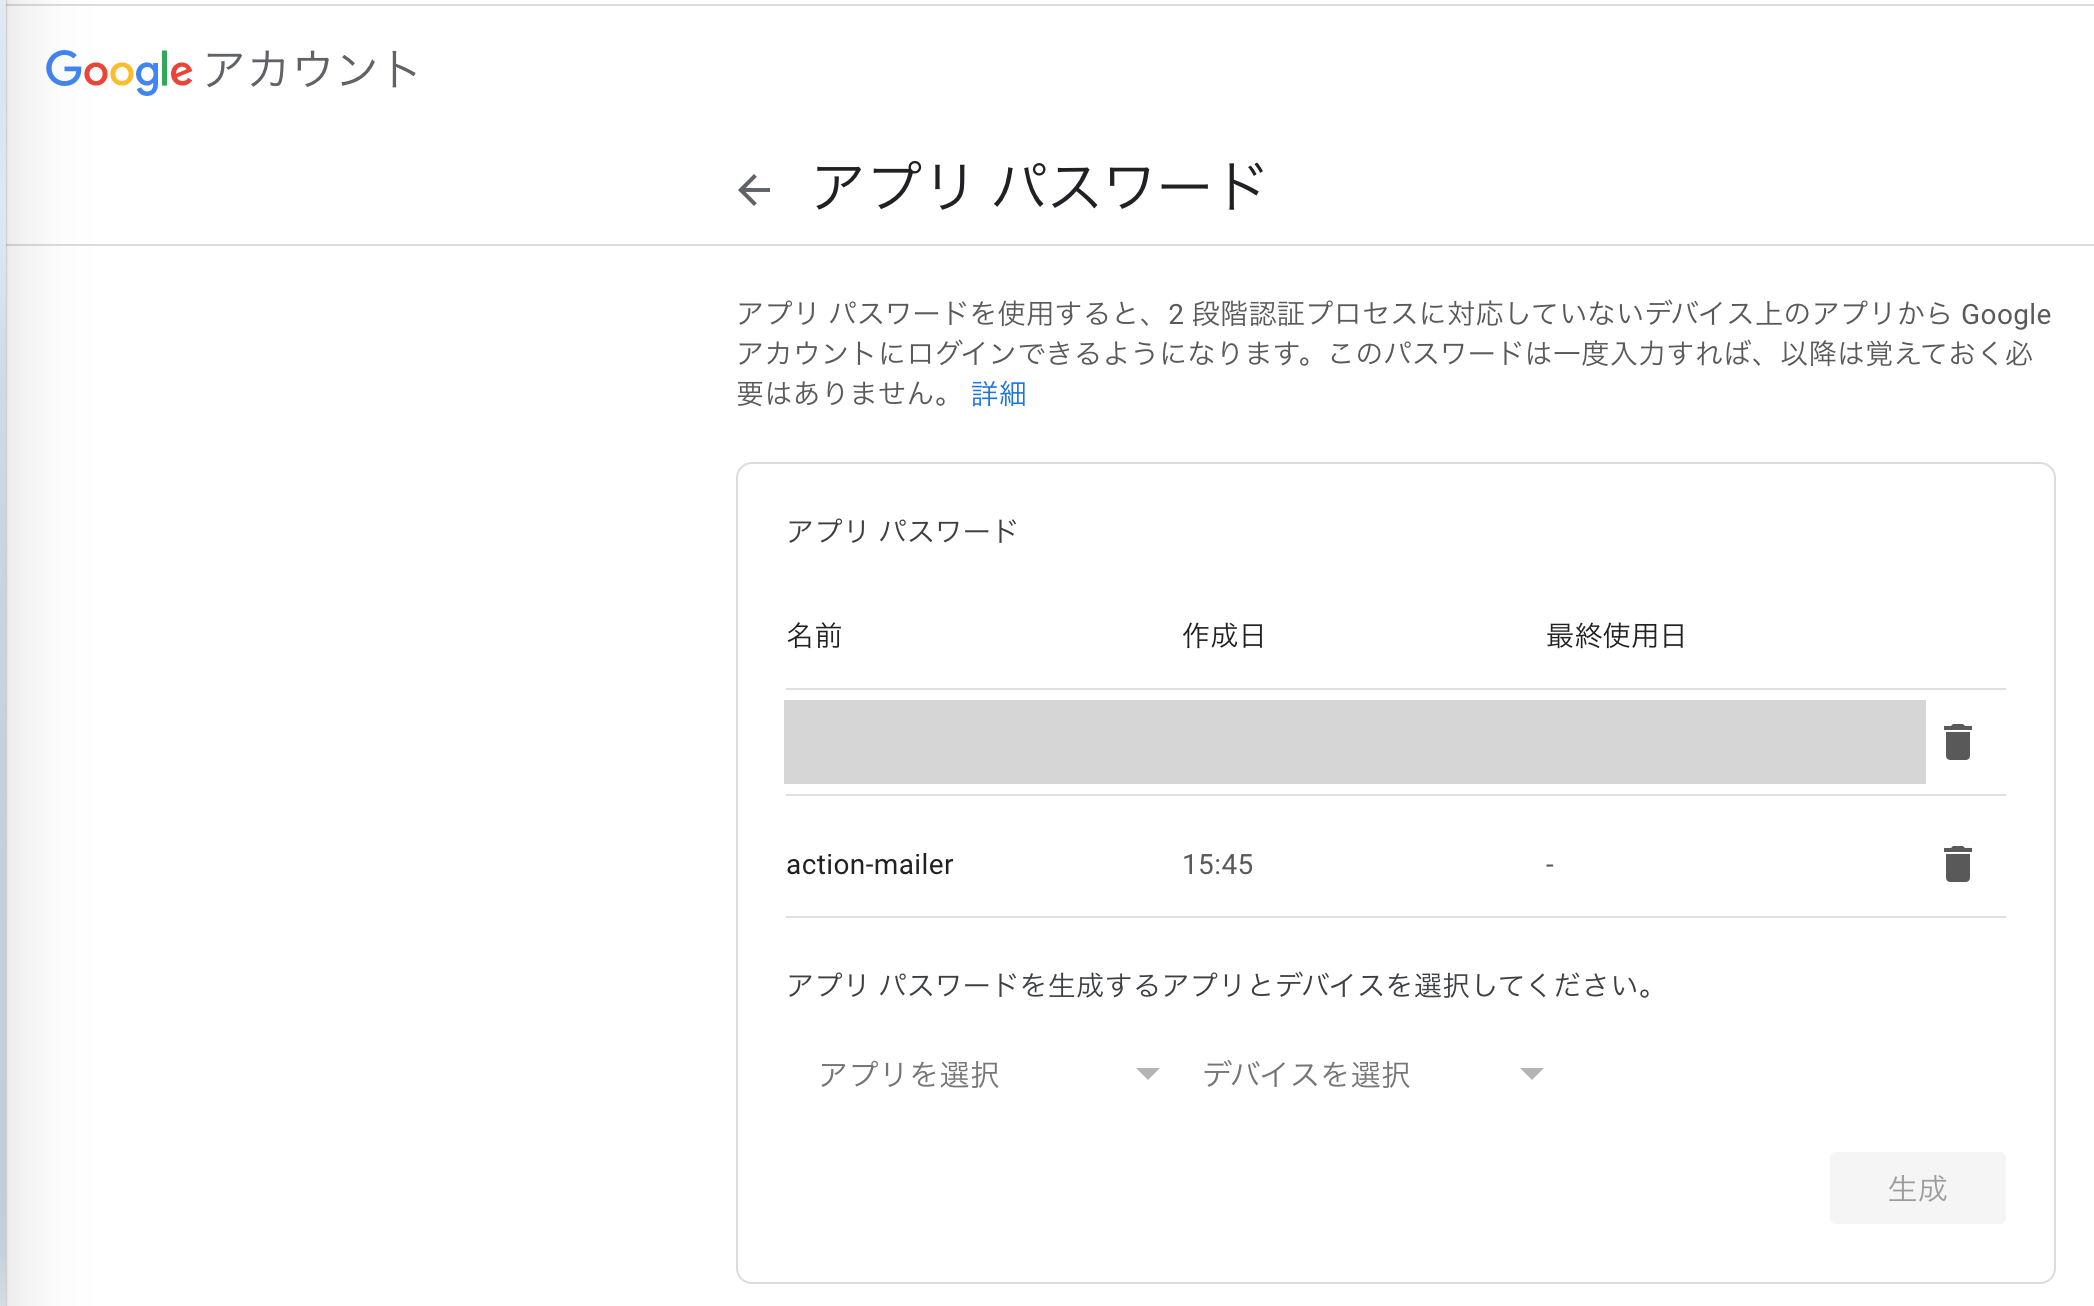
2.メールのアプリパスワードを取得
Action MailerでGメールを利用するには、アプリパスワードを取得する必要があります。
Gmailで2段階認証をオンにし、アプリパスワードを取得してください。
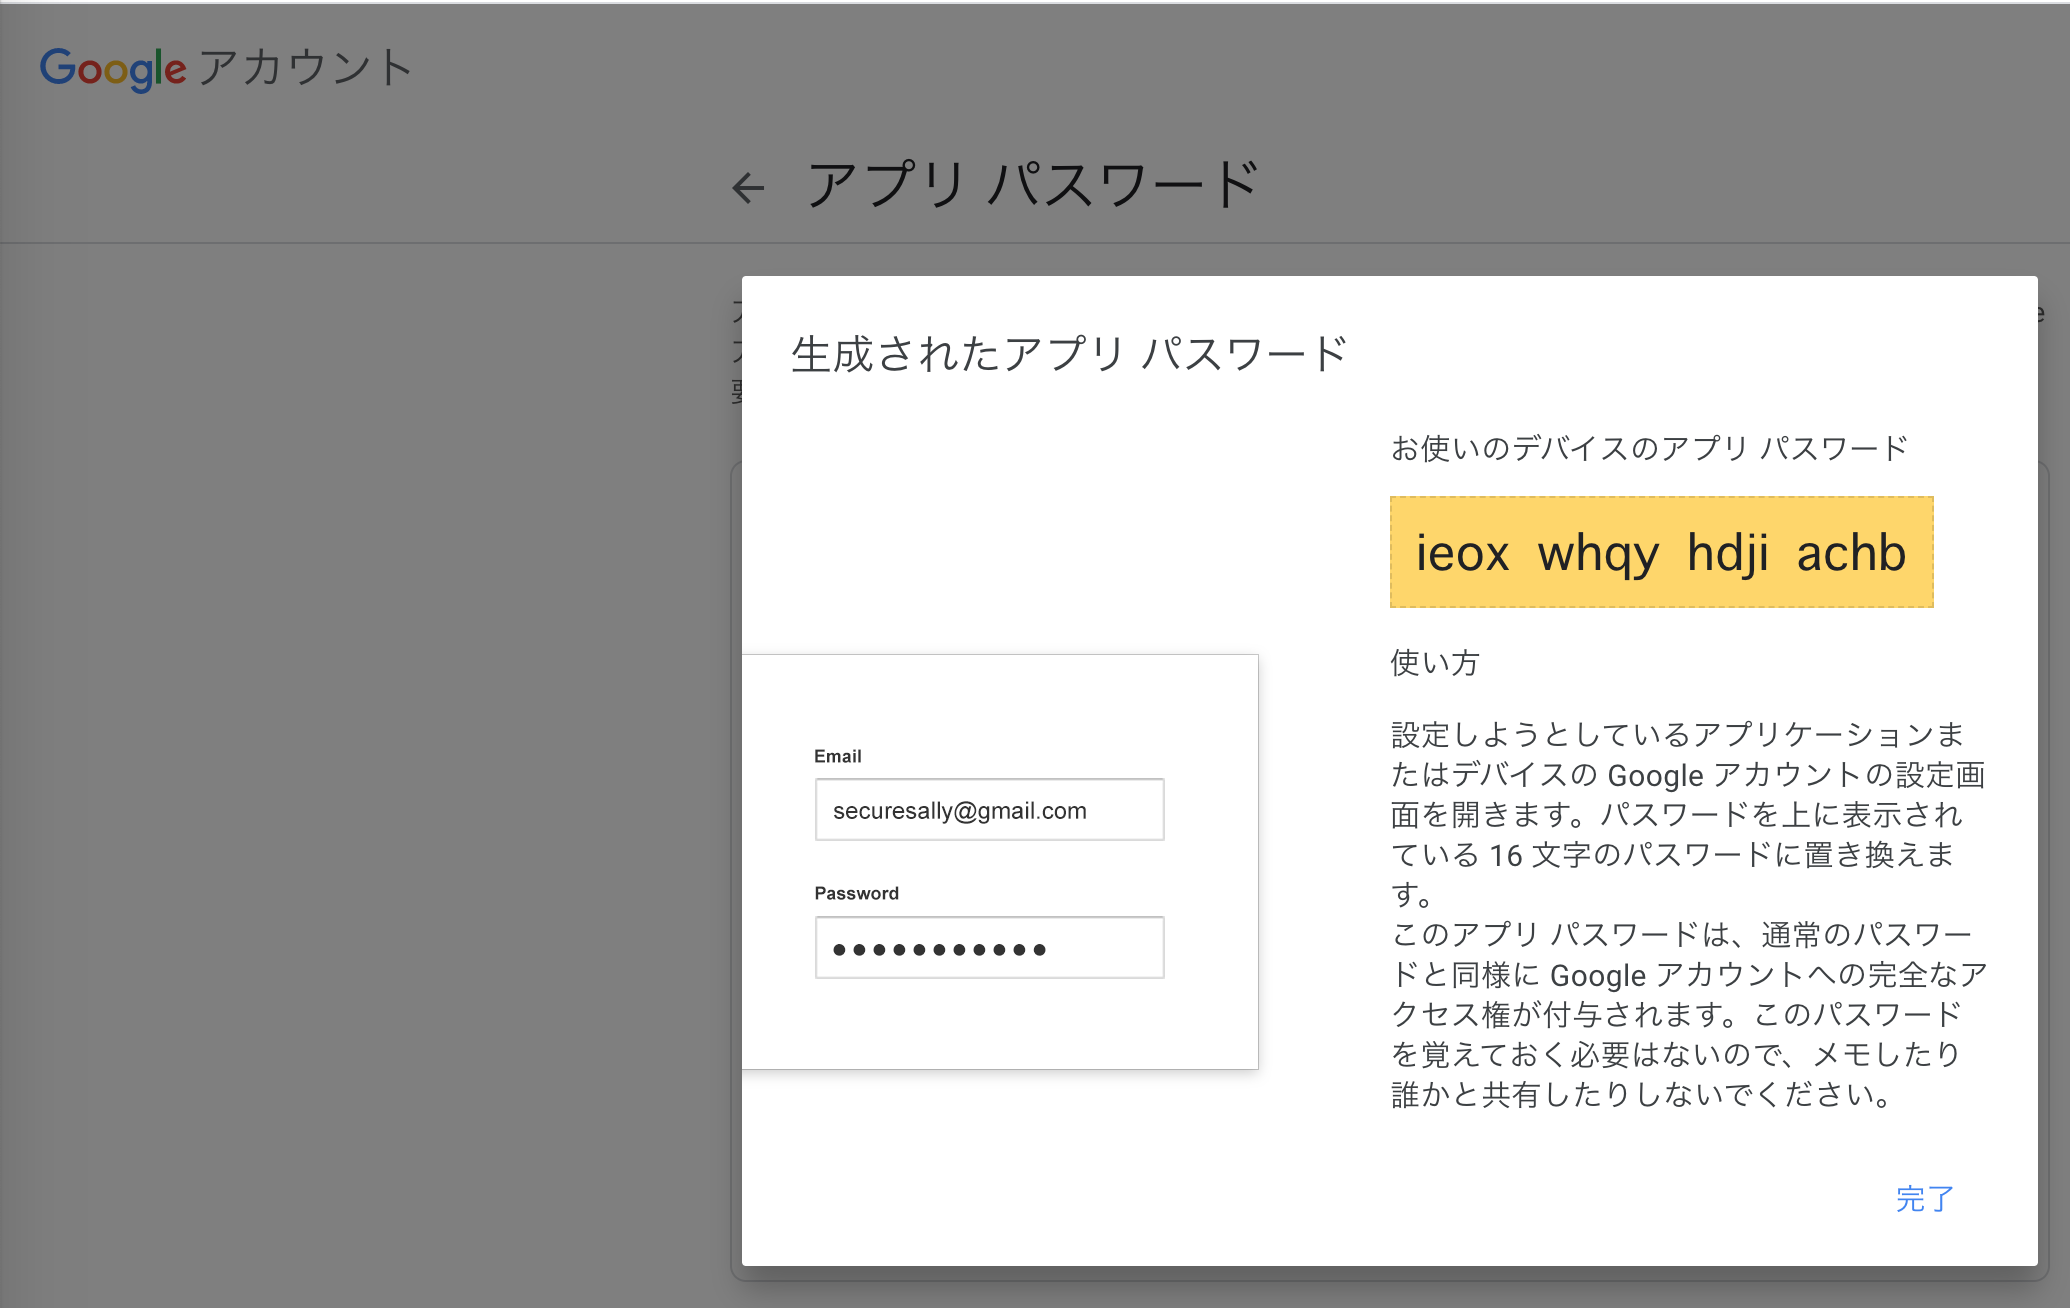
.envに上で取得したアプリパスワードとGメールアドレスを入れます。
EMAIL_ADDRESS=test@gmail.com
EMAIL_PASSWORD=<生成されたアプリのパスワード>
3.メールの設定を追加
devise.rbにmailerの設定を追加します。
Devise.setup do |config|
  config.mailer_sender = ENV['EMAIL_ADDRESS'] # コメントアウトをはずして変更
  config.mailer = 'Devise::Mailer' # コメントアウトを外す
end
次に、development.rbに下記の設定を追加します。
Rails.application.configure do
  # 下記を追加
  config.action_mailer.default_options = { from: ENV['EMAIL_ADDRESS'] }
  config.action_mailer.default_url_options = { host: 'localhost:3000' }
  config.action_mailer.delivery_method = :smtp
  config.action_mailer.smtp_settings = {
    address: 'smtp.gmail.com',
    port: 587,
    domain: 'gmail.com',
    user_name: ENV['EMAIL_ADDRESS'],
    password: ENV['EMAIL_PASSWORD'],
    authentication: 'plain',
    enable_starttls_auto: true
  }
end
4.動くかチェック!
さてここで、confirmableが動くかチェックします。
POSTのauthにリクエストを送信しますが、confirmableを設定すると、リクエストパラメターにconfirm_success_urlを追加する必要があります。
登録のメールアドレス宛にメールがきて「アカウント確認」ボタンを押した後、どこにユーザをリダイレクトさせるかを定義するためのパラメターです。
メールがきました!!
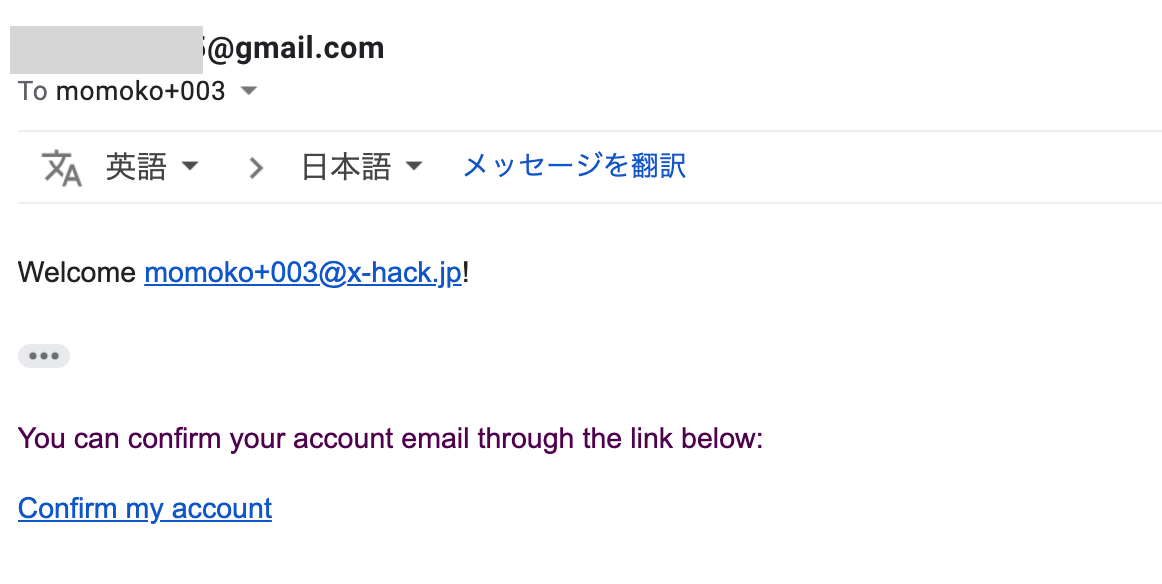
流れは下記です。
- 「Confirm my account」を押す
- urlのパラメターに入っているconfirmation_tokenとDBのconfirmation_tokenが一致しているかチェック
- 一致していればそのユーザーのconfirmed_atカラムにその時の日付が入る&urlのパラメターのredirect_urlにリダイレクトする
日本語化
さて、メールが英語だといろいろと不便なので、i18nを追加して日本語対応させましょう。
1.Gemファイルに追加
Gemファイルに下記を追加し、bundle installします。
gem 'devise-i18n'
gem 'devise-i18n-views'
$ bundle install
2.日本語訳用ファイルの作成
日本語訳用ファイルを作成します。
rails g devise:views:locale ja

      create  config/locales/devise.views.ja.yml
ja:
  activerecord:
    attributes:
      user:
        current_password: "現在のパスワード"
        email: "メールアドレス"
        password: "パスワード"
        password_confirmation: "確認用パスワード"
        remember_me: "ログインを記憶"
    models:
      user: "ユーザ"
  devise:
    confirmations:
      new:
        resend_confirmation_instructions: "アカウント確認メール再送"
    mailer:
      confirmation_instructions:
        action: "アカウント確認"
        greeting: "ようこそ、%{recipient}さん!"
        instruction: "次のリンクでメールアドレスの確認が完了します:"
      reset_password_instructions:
        action: "パスワード変更"
        greeting: "こんにちは、%{recipient}さん!"
        instruction: "誰かがパスワードの再設定を希望しました。次のリンクでパスワードの再設定が出来ます。"
        instruction_2: "あなたが希望したのではないのなら、このメールは無視してください。"
        instruction_3: "上のリンクにアクセスして新しいパスワードを設定するまで、パスワードは変更されません。"
      unlock_instructions:
        action: "アカウントのロック解除"
        greeting: "こんにちは、%{recipient}さん!"
        instruction: "アカウントのロックを解除するには下のリンクをクリックしてください。"
        message: "ログイン失敗が繰り返されたため、アカウントはロックされています。"
    passwords:
      edit:
        change_my_password: "パスワードを変更する"
        change_your_password: "パスワードを変更"
        confirm_new_password: "確認用新しいパスワード"
        new_password: "新しいパスワード"
      new:
        forgot_your_password: "パスワードを忘れましたか?"
        send_me_reset_password_instructions: "パスワードの再設定方法を送信する"
    registrations:
      edit:
        are_you_sure: "本当に良いですか?"
        cancel_my_account: "アカウント削除"
        currently_waiting_confirmation_for_email: "%{email} の確認待ち"
        leave_blank_if_you_don_t_want_to_change_it: "空欄のままなら変更しません"
        title: "%{resource}編集"
        unhappy: "気に入りません"
        update: "更新"
        we_need_your_current_password_to_confirm_your_changes: "変更を反映するには現在のパスワードを入力してください"
      new:
        sign_up: "アカウント登録"
    sessions:
      new:
        sign_in: "ログイン"
    shared:
      links:
        back: "戻る"
        didn_t_receive_confirmation_instructions: "アカウント確認のメールを受け取っていませんか?"
        didn_t_receive_unlock_instructions: "アカウントの凍結解除方法のメールを受け取っていませんか?"
        forgot_your_password: "パスワードを忘れましたか?"
        sign_in: "ログイン"
        sign_in_with_provider: "%{provider}でログイン"
        sign_up: "アカウント登録"
    unlocks:
      new:
        resend_unlock_instructions: "アカウントの凍結解除方法を再送する"
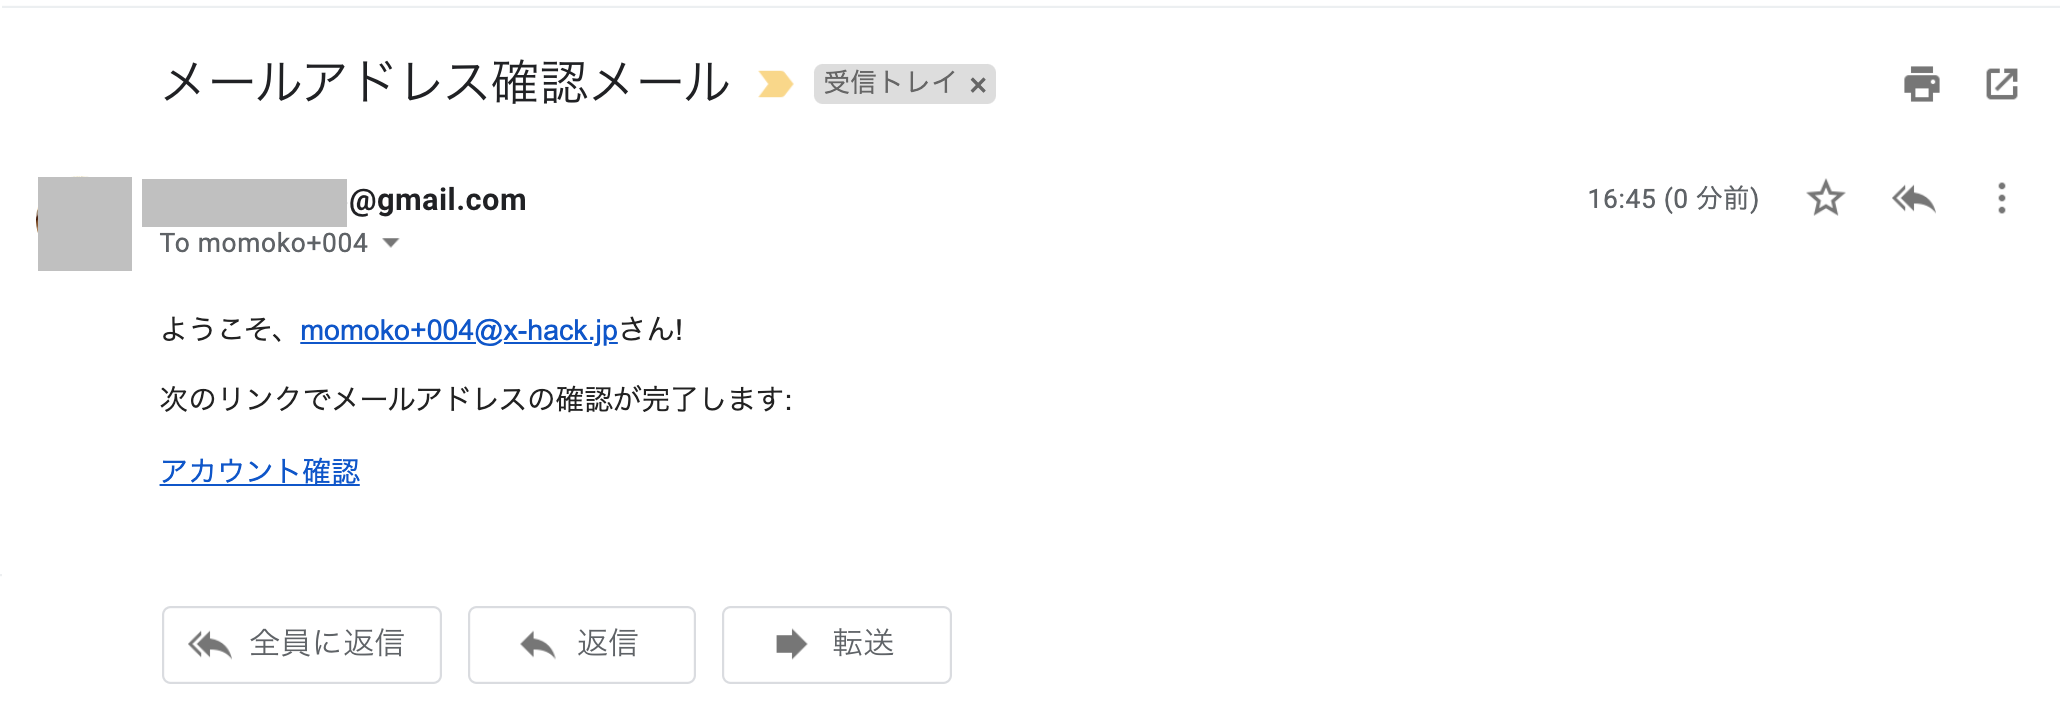
3.動くかチェック
さてここで、メールが日本語化されるかチェックしましょう。・・・・日本語化されてる!!
4.だがしかしまだだ
メール本文の「アカウント登録」を押すと、リダイレクトされず、下記画像の様な「ArgumentError in DeviseTokenAuth::ConfirmationsController#show」「bad argument (expected URI object or URI string)」というエラーが表示される様になってしまいました。
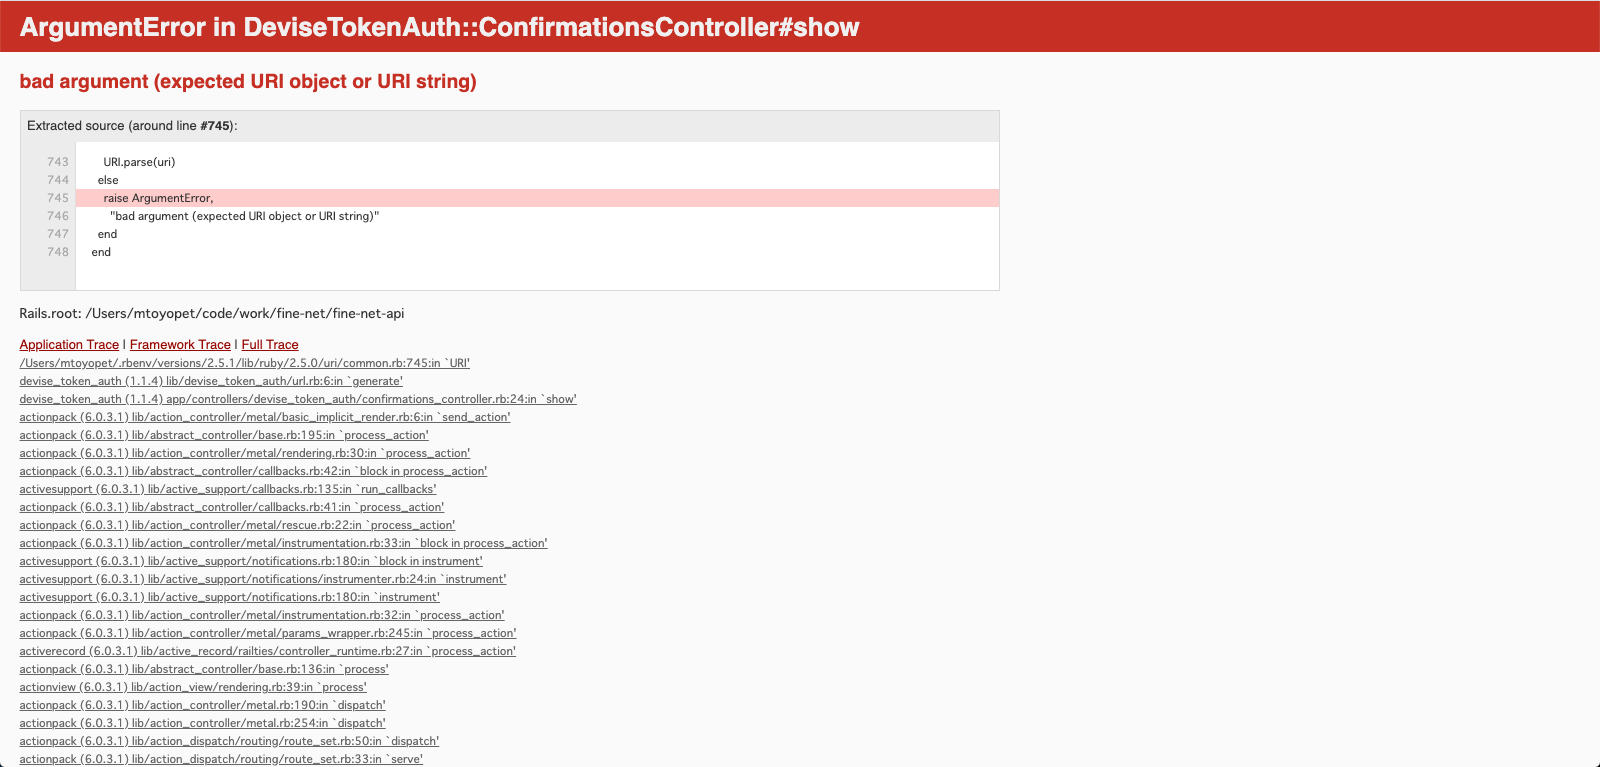
これは、parameterで送信したconfirm_success_urlが「アカウント確認」のURLに設定されていないためです。
- アカウント確認を押す
- URLのparamterについているconfirmation_tokenとデータベース上に保存されているconfirmatioin_tokenが一致する確認
- 一致すればparameterについているconfirm_success_urlにリダイレクトさせる
- アカウント登録完了
という流れになりますが、i18nを設定した際に、ここの設定がおかしくなる様です・・・、confirmation時のメールを上書きする必要があります。
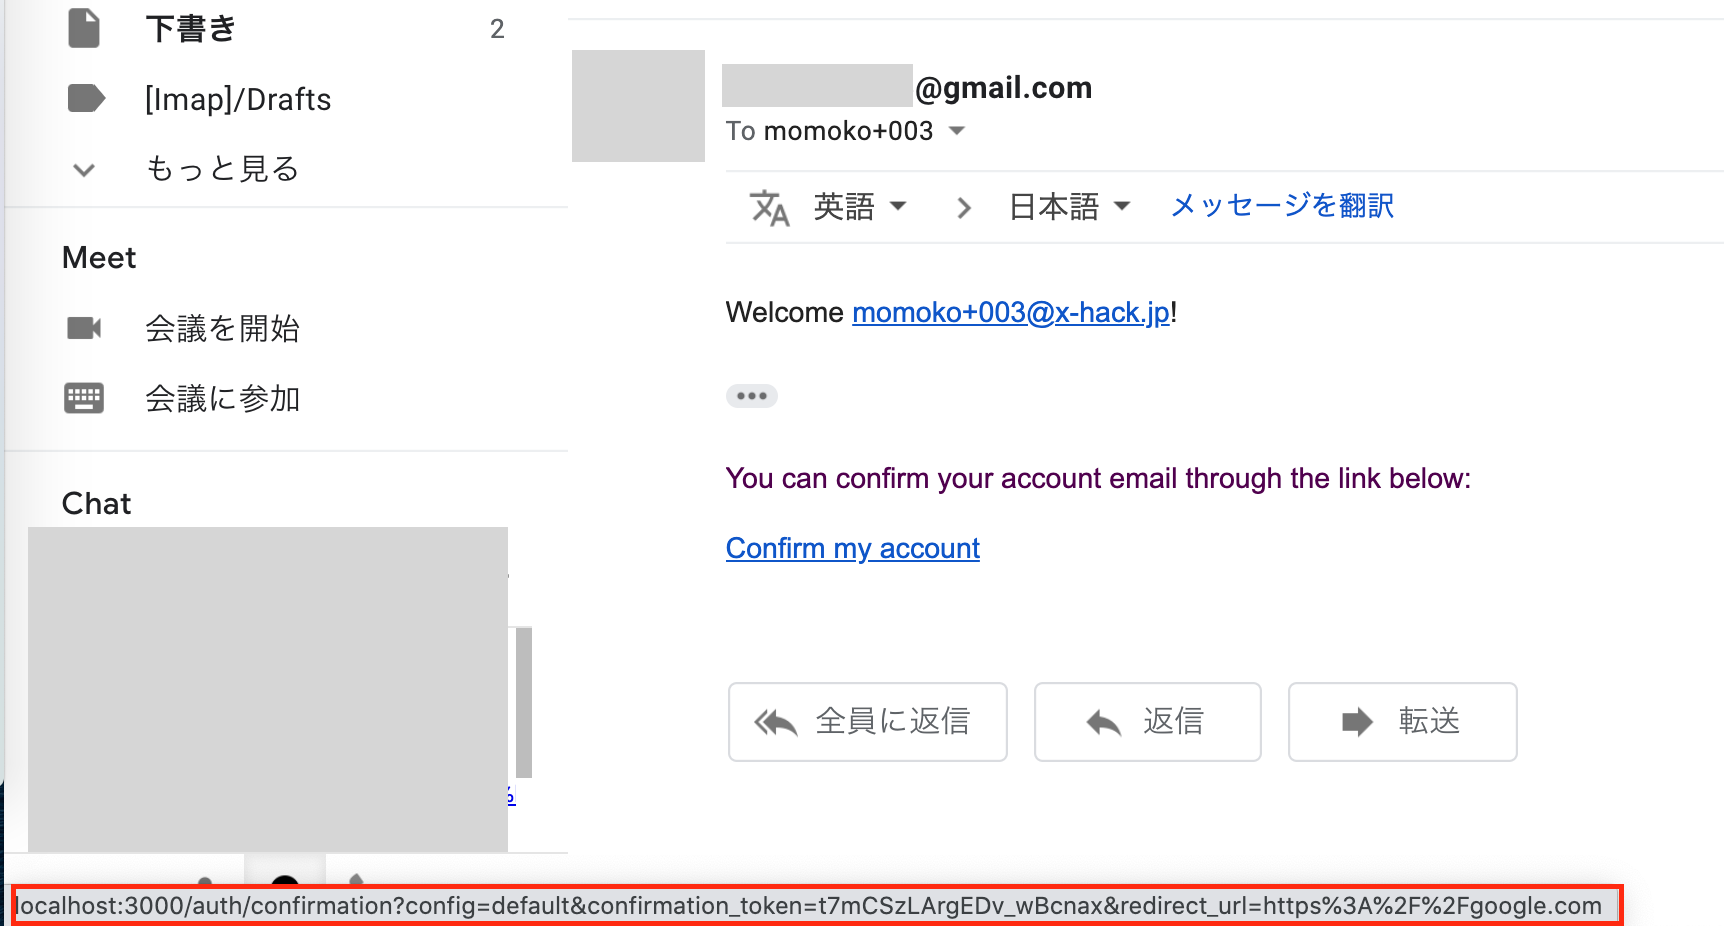
証拠に、「アカウント確認」のURLをみてみると、http://localhost:3000/auth/confirmation?config=default&confirmation_token=yVjqfL7Rrr57CqDqU62vといった感じになっているはず。
本来であれば、http://localhost:3000/auth/confirmation?config=default&confirmation_token=yVjqfL7Rrr57CqDqU62v&redirect_url=https%3A%2F%2Ftestapp.comの様に、redirect_urlパラメターが付与されている必要があります。
**「i18nをインストールする時点でメールも上書きしてくれよ・・・」**という不満が声に出そうになるのをぐっと抑えて設定していきます。
5.viewsファイルを作成
下記コマンドを実行して、メール送信用のviewファイルを作成します。
$ rails generate devise:views
6.confirmation_instructinosを修正する
/app/views/deviseディレクトリが作成されています。アカウント確認時に使用されるconfirmation_instructinos.html.erbを修正していきます。
<p><%= t(:welcome).capitalize + ' ' + @email %>!</p>

<p><%= t '.instruction' %> </p>

<%=# 下記の様に書かれているはずなので %>
<%# <p><%= link_to t('.action'), confirmation_url(@resource, {confirmation_token: @token, config: message['client-config'].to_s}).html_safe</p> %> %>

<%=# こちらにいれかえる %>
<%=# redirect_url: message['redirect-url'] が最後にたされている %>
<p><%= link_to t('.action'), confirmation_url(@resource, {confirmation_token: @token, config: message['client-config'].to_s, redirect_url: message['redirect-url']}).html_safe %></p>
7.今度こそ!
改めて試すと、うまくいくはずです!!!
宣伝: Railsアプリの作り方を学べる教材を公開しています!!
Techpit様にて、Ruby on RailsとVue.jsでリアルタイムチャットアプリを作る教材を公開しています。
本記事で紹介した認証はもちろんのこと、HTTP通信やAction Cableを使用したWebsocket通信についても詳しく説明しています。Rails APIモードでアプリケーションを作って見たい方はぜひ購入してください!
参考
- Rails5 + devise token authで作る 認証API
- [【Rails5】Devise-i18nで日本語化する] (https://remonote.jp/rails-devise-i18n-locale-ja)