概要
TypeScriptのフレームワークであるHonoを用いたAPI開発プロジェクトにおいて、ZodとOpenAPIを用いた開発の体験が良かったので、ご紹介致します。
採用したライブラリ類
- Hono
-
Zod OpenAPI Hono
- OpenAPIをサポートしているHonoの拡張クラス。
- Zodでバリデーションのチェックをしながら、OpenAPI Swaggerドキュメントを生成することができます。
今回の記事で説明する内容
- 開発プロジェクトで採用したディレクトリ・パッケージ構成
- Zod OpenAPIを用いた開発のメリット
今回の記事で説明しない内容
- Honoの導入方法や、基本的な使い方
開発プロジェクトで採用したディレクトリ・パッケージ構成
今回、紹介するプロジェクトは、複数のフロントエンドのプロジェクトと、1つのバックエンドの構成をとっています。
このような構成を取る場合、ZodでSchemaを定義し、API側およびクライアント側でそれぞれこのスキーマを用いて開発することで、バックエンドとフロントエンドの共通認識を持って開発することができます。
このような構成を取る場合、スキーマはバックエンド・フロントエンドそれぞれから依存することになるので、sharedというパッケージを作成します。
依存関係としては以下のようなイメージです。
sharedというパッケージにバックエンド・フロントエンドで用いるスキーマを定義します。
スキーマ定義
以下のようなAPIエンドポイントを想定します。
- POST /users ユーザーの作成
- GET /uses ユーザー一覧の取得
エンドポイントの実装に用いるスキーマを以下のように定義します。
// shared/schema.ts
import { z } from '@hono/zod-openapi';

// ユーザー情報のスキーマ
export const UserSchema = z.object({
  id: z.string().openapi({ example: 'user_123' }),
  name: z.string().openapi({ example: '山田太郎' }),
  email: z.string().email().openapi({ example: 'yamada@example.com' }),
  createdAt: z.string().datetime().openapi({ example: '2025-01-01T00:00:00Z' }),
});

// ユーザー作成のリクエストスキーマ
export const CreateUserRequestSchema = z.object({
  name: z.string().min(1).max(100).openapi({ example: '山田太郎' }),
  email: z.string().email().openapi({ example: 'yamada@example.com' }),
});

// ユーザー作成のレスポンススキーマ
export const CreateUserResponseSchema = z.object({
  success: z.boolean().openapi({ example: true }),
  data: UserSchema,
});

// ユーザー一覧取得のクエリパラメータスキーマ
export const GetUsersQuerySchema = z.object({
  page: z.string().optional().openapi({ example: '1' }),
  limit: z.string().optional().openapi({ example: '20' }),
});

// ユーザー一覧取得のレスポンススキーマ
export const GetUsersResponseSchema = z.object({
  success: z.boolean().openapi({ example: true }),
  data: z.array(UserSchema),
  pagination: z.object({
    page: z.number().openapi({ example: 1 }),
    limit: z.number().openapi({ example: 20 }),
    total: z.number().openapi({ example: 100 }),
  }),
});

// エラーレスポンススキーマ
export const ErrorResponseSchema = z.object({
  success: z.boolean().openapi({ example: false }),
  error: z.object({
    code: z.string().openapi({ example: 'VALIDATION_ERROR' }),
    message: z.string().openapi({ example: 'バリデーションエラーが発生しました' }),
  }),
});
定義したスキーマについては、Zodのz.infer メソッドを使うことで、TypeScriptの型に変換することができます。
// shared/schema.ts
import { z } from '@hono/zod-openapi';

// ... スキーマ定義 ...

// TypeScript型への変換
export type User = z.infer<typeof UserSchema>;
export type CreateUserRequest = z.infer<typeof CreateUserRequestSchema>;
export type CreateUserResponse = z.infer<typeof CreateUserResponseSchema>;
export type GetUsersQuery = z.infer<typeof GetUsersQuerySchema>;
export type GetUsersResponse = z.infer<typeof GetUsersResponseSchema>;
export type ErrorResponse = z.infer<typeof ErrorResponseSchema>;
これにより、スキーマから生成された型をバックエンドとフロントエンドの両方で使用できるようになります。
例えば、フロントエンドでAPIレスポンスの型を指定する際に利用できます。
APIエンドポイントの実装
次に、定義したスキーマを使用してAPIエンドポイントバックエンドにを実装します。
// backend/route/user.ts

import { createRoute, OpenAPIHono, type RouteHandler } from "@hono/zod-openapi";
import {
  CreateUserRequestSchema,
  CreateUserResponseSchema,
  ErrorResponseSchema,
  GetUsersQuerySchema,
  GetUsersResponseSchema,
} from "@shared/schema"; // sharedパッケージからインポート

const app = new OpenAPIHono();

// ユーザー作成エンドポイントのルート定義
const createUserRoute = createRoute({
  method: "post",
  path: "/users",
  request: {
    body: {
      content: {
        "application/json": {
          schema: CreateUserRequestSchema,
        },
      },
    },
  },
  responses: {
    200: {
      content: {
        "application/json": {
          schema: CreateUserResponseSchema,
        },
      },
      description: "ユーザーの作成に成功しました",
    },
    400: {
      content: {
        "application/json": {
          schema: ErrorResponseSchema,
        },
      },
      description: "バリデーションエラー",
    },
  },
  tags: ["Users"],
  summary: "ユーザーを作成",
  description: "新しいユーザーを作成します",
});

// ユーザー作成エンドポイントのハンドラー
const createUsersHandler: RouteHandler<typeof createUserRoute> = async (c) => {
  const body = c.req.valid("json");

  // ここでデータベースへの保存処理などを行う
  const newUser = {
    id: `user_${Date.now()}`,
    name: body.name,
    email: body.email,
    createdAt: new Date().toISOString(),
  };

  return c.json(
    {
      success: true,
      data: newUser,
    },
    200
  );
};

// ユーザー一覧取得エンドポイントのルート定義
const getUsersRoute = createRoute({
  method: "get",
  path: "/users",
  request: {
    query: GetUsersQuerySchema,
  },
  responses: {
    200: {
      content: {
        "application/json": {
          schema: GetUsersResponseSchema,
        },
      },
      description: "ユーザー一覧の取得に成功しました",
    },
  },
  tags: ["Users"],
  summary: "ユーザー一覧を取得",
  description: "ユーザーの一覧を取得します",
});

// ユーザー一覧取得エンドポイントのハンドラー
const getUsersHandler: RouteHandler<typeof getUsersRoute> = async (c) => {
  const query = c.req.valid("query");
  const page = parseInt(query.page || "1");
  const limit = parseInt(query.limit || "20");

  // ここでデータベースからユーザー情報を取得する処理を行う
  const users = [
    {
      id: "user_123",
      name: "山田太郎",
      email: "yamada@example.com",
      createdAt: "2025-01-01T00:00:00Z",
    },
    {
      id: "user_456",
      name: "佐藤花子",
      email: "sato@example.com",
      createdAt: "2025-01-02T00:00:00Z",
    },
  ];

  return c.json({
    success: true,
    data: users,
    pagination: {
      page,
      limit,
      total: 100,
    },
  });
};

// ルートとハンドラーの登録
const routes = app.openapi(getUsersRoute, getUsersHandler).openapi(createUserRoute, createUsersHandler);

export { routes as usersApp };
上記の実装内の
// ルートとハンドラーの登録
const routes = app
  .openapi(getUsersRoute, getUsersHandler)
  .openapi(createUserRoute, createUsersHandler);
について、定義したappに対し、openapiメソッドで使うルートとハンドラーを対応させるメソッドチェーンを作り、openapiメソッドの戻り値をroutesという変数に格納します。
最終的に、このroutesという変数をexportして用いることで、フロントエンドでAPIクライアントを用いる際に型推論を効かせることができます。
他にも、フロントエンドで型推論を効かせながらAPIクライアントを実装する際は、Hono RPCの実装を用います。
Zod-OpenAPIもHono RPCの実装をサポートしています。
(GitHub)
ルーティング定義
exportしたusersApp を用いて、以下のようにbackend/index.tsでルート定義を行います。
// backend/index.ts

import { OpenAPIHono } from '@hono/zod-openapi';
import { swaggerUI } from '@hono/swagger-ui';
import { usersApp } from './route/user';

const app = new OpenAPIHono();

// ユーザー関連のルートを登録
app.route('/api', usersApp);

// OpenAPI仕様書のエンドポイント
app.doc('/doc', {
  openapi: '3.0.0',
  info: {
    version: '1.0.0',
    title: 'API Documentation',
    description: 'Hono + Zod-OpenAPIを使用したAPI',
  },
});

// Swagger UIのエンドポイント
app.get('/doc/ui', swaggerUI({ url: '/doc' }));

export default app;
export type AppType = typeof usersApp;
上記の実装により、以下のエンドポイントが利用可能になります。
-
/api/users- ユーザー関連のAPIエンドポイント -
/doc- OpenAPI仕様書(JSON形式) -
/doc/ui- Swagger UIでAPIドキュメントを確認
最後の行でAppTypeをexportすることで、フロントエンド側でHono RPCを使用する際に型情報を利用できるようになります。
Swaggerドキュメント
これで準備ができたので、動作確認していきたいと思います。
Swagger ドキュメント が表示されるか http://localhost:5173api/doc/ui にブラウザでアクセスしてみます。
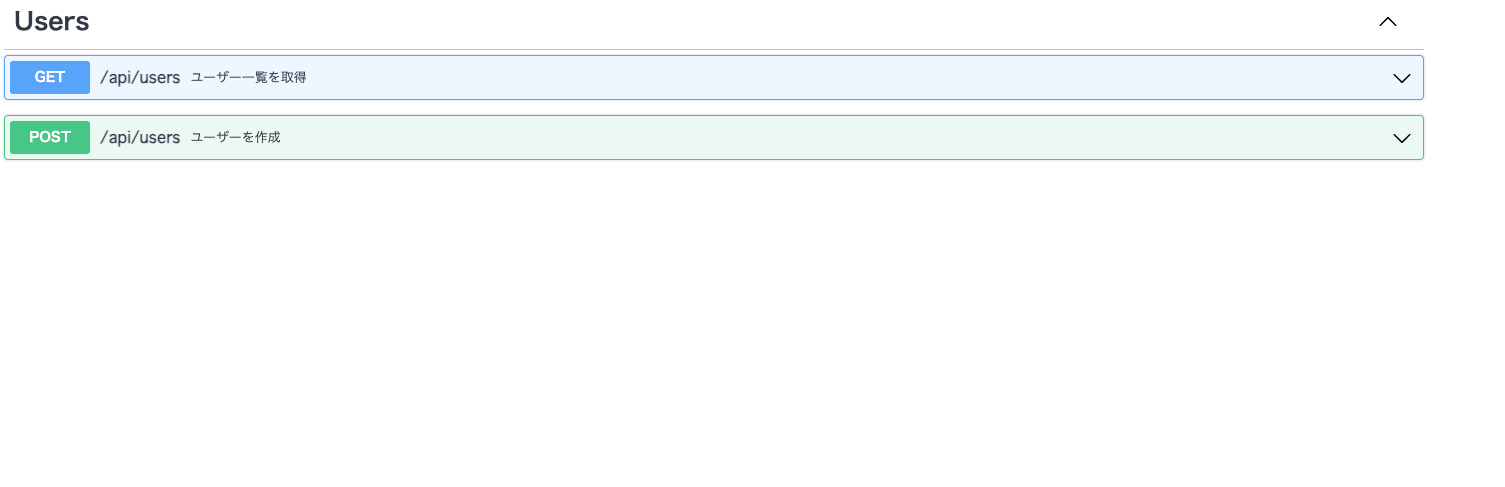
このように、定義したAPIエンドポイントのドキュメントを表示することができました。
APIクライアントの実装
Hono RPCおよび、Zodのスキーマからz.inferで変換した型を用いることで、以下のようにAPIクライアントを実装することができます。
// frontend/src/api/client.ts

import { hc } from "hono/client";
import type { AppType } from "@backend";
import type {
  GetUsersQuery,
  GetUsersResponse,
  CreateUserRequest,
  CreateUserResponse,
  ErrorResponse,
} from "@shared/schema";

// Hono RPCクライアントの作成
const client = hc<AppType>("http://localhost:5173/api");

// ユーザー一覧を取得する関数
export const getUsers = async (query?: GetUsersQuery): Promise<GetUsersResponse> => {
  const response = await client.users.$get({
    query: {
      page: query?.page || "1",
      limit: query?.limit || "20",
    },
  });

  if (!response.ok) {
    throw new Error("ユーザー一覧の取得に失敗しました");
  }

  return await response.json();
};

// ユーザーを作成する関数
export const createUser = async (data: CreateUserRequest): Promise<CreateUserResponse> => {
  const response = await client.users.$post({
    json: data,
  });

  if (!response.ok) {
    const error: ErrorResponse = await response.json();
    throw new Error(error.message || "ユーザーの作成に失敗しました");
  }

  return await response.json();
};
// frontend/src/components/UserList.tsx

import { useEffect, useState } from "react";
import { getUsers, createUser } from "../api/client";
import type { GetUsersResponse } from "@shared/schema";

export const UserList = () => {
  const [users, setUsers] = useState<GetUsersResponse | null>(null);
  const [loading, setLoading] = useState(false);
  const [error, setError] = useState<string | null>(null);

  // ユーザー一覧を取得
  useEffect(() => {
    const fetchUsers = async () => {
      setLoading(true);
      try {
        const data = await getUsers({ page: "1", limit: "20" });
        setUsers(data);
      } catch (err) {
        setError(err instanceof Error ? err.message : "エラーが発生しました");
      } finally {
        setLoading(false);
      }
    };

    fetchUsers();
  }, []);

  // ユーザーを作成
  const handleCreateUser = async () => {
    try {
      const newUser = await createUser({
        name: "新規ユーザー",
        email: "newuser@example.com",
      });
      console.log("作成されたユーザー:", newUser);

      // ユーザー一覧を再取得
      const data = await getUsers({ page: "1", limit: "20" });
      setUsers(data);
    } catch (err) {
      setError(err instanceof Error ? err.message : "エラーが発生しました");
    }
  };

  if (loading) return <div>読み込み中...</div>;
  if (error) return <div>エラー: {error}</div>;
  if (!users) return null;

  return (
    <div>
      <h2>ユーザー一覧</h2>
      <button onClick={handleCreateUser}>ユーザーを作成</button>
      <ul>
        {users.data.map((user) => (
          <li key={user.id}>
            {user.name} ({user.email})
          </li>
        ))}
      </ul>
      <p>
        ページ: {users.pagination.page} / 全{users.pagination.total}件
      </p>
    </div>
  );
};
このように、共有したスキーマとHono RPCを使用することで以下のメリットが得られます。
-
型安全性
- バックエンドで定義したルートの型情報がフロントエンドでも利用でき、APIのパスやパラメータの型チェックが行われます。
-
自動補完
- VScodeなどで
client.users.$get()のようにメソッドの自動補完が効きます。
- VScodeなどで
-
型推論
- レスポンスの型が自動的に推論されるため、
response.json()の結果も型安全に扱えます。
- レスポンスの型が自動的に推論されるため、
-
リファクタリングの容易さ
- バックエンドでAPIの仕様を変更した場合、フロントエンド側で型エラーとして検出されるため、変更漏れを防げます。
まとめ
スキーマを定義し、次にAPIのエンドポイント設計、バックエンドの実装、フロントエンドの実装と自然な流れで進められました。
特に、スキーマの型変換によって、型の二重管理を防げたり、スキーマ駆動で開発できたりするのがとても便利だと感じました。
schemaを最初にsharedパッケージで定義することでバックエンドとフロントエンドの開発チームが分かれていても、依存関係なく開発が進められるため、とても良い開発体験だと感じました。