オープンソースのDSO-150ファームウェアプロジェクトOpen-DSO-150をビルドする
概要
-
@tomboyboyさんの"2千円台オシロスコープ DSO150のレビュー"の記事をみて、ポチっと... 忘れた頃に届きました。
-
JYETech製ではなかったぽいので、最新のファームウェアを入れてしまうと、This board is FAKE !とでてきて、次の起動以降、白画面のままになってしまうらしい.
-
https://github.com/michar71/Open-DSO-150 で、オープンソースのDSO-150ファームウェアプロジェクト(Open DSO-150)があったので、これをビルドしてみる。
-
VirtualBoxに Vagrant使用して、Ubuntu 18.04をいれて、TrueSTUDIOをインストールする。
-
もちろん、Windowsでは、Windows版のTrueSTUDIOでやるのがラクです...
環境
-
ホスト機: Windows 10 64bit
-
VirtualBox: 5.2.12.r122591(Qt5.6.2)
-
Vagrant: 2.1.1
-
Xserver: SmarTTYのポータブル版。(v3.1)
- 7zを解凍して、
SmarTTY.exeを実行。Linux側にsshでログインするだけで、簡単にXを使用できる.
- 7zを解凍して、
-
TrueSTUDIO linux版 :
Atollic_TrueSTUDIO_for_STM32_linux_x86_64_v9.0.1_20180420-1214.tar.gz
https://atollic.com/resources/download より、Linux installersから。以下を入力- Country
- What best describes you? (Non-commercial/Contractor/Small business/Large businessから一つ選ぶ)
- I confirm that I would like to receive e-mails from Atollic/ST にチェックを入れるので、DMが来るかも?
手順
-
vagrant, virtualbox, git for windowsをインストールする。
-
適当なフォルダを作成して(例:C:\Vagrant\u1804-TrueSTUDIO)、この中に
-
TrueSTUDIO linux版のインストーラ(
Atollic_TrueSTUDIO_for_STM32_linux_x86_64_v9.0.1_20180420-1214.tar.gz)と、↓のVagrantfileとを置くVagrantfileVM_NAME="u1804-TrueSTUDIO" VM_MEMORY=2048 VM_CORES=3 Vagrant.configure("2") do |config| config.vm.box = "ubuntu/bionic64" config.vbguest.auto_update = false #config.vm.network "public_network" config.vm.network "forwarded_port", guest: 22, host: 2222, id: "ssh" config.vm.provider "virtualbox" do |vb| vb.name = VM_NAME vb.cpus = VM_CORES vb.memory = VM_MEMORY end config.vm.provision "shell", inline: <<-SHELL # Allow ssh with PasswordAuthentication sed -i -e 's/PasswordAuthentication no/PasswordAuthentication yes/g' /etc/ssh/sshd_config # apt-cache-server #echo 'Acquire::http::Proxy "http://apt-cache-server:3142";' | tee /etc/apt/apt.conf.d/02proxy # export DEBIAN_FRONTEND=noninteractive apt-get update && apt-get upgrade -y apt-get install -y git # # Install TrueStudio to /opt/TrueSTUDIO cd /tmp echo 'Extracting - TrueSTUDIO' tar xf /vagrant/Atollic_TrueSTUDIO_for_STM32_linux_x86_64_v9.0.1_20180420-1214.tar.gz echo 'Installing - TrueSTUDIO' echo -e "1\\n3\\n/opt/TrueSTUDIO\\n1\\n1\\n1\\n1\\n" | /tmp/Atollic_TrueSTUDIO_for_STM32_9.0.1_installer/install.sh SHELL config.vm.provision "shell", privileged: false, inline: <<-SHELL cd ${HOME} git clone https://github.com/michar71/Open-DSO-150.git cd Open-DSO-150 # Headless Build TS_WORKSPACE=${HOME}/Atollic/TrueSTUDIO/STM32_workspace_9.0/ /opt/TrueSTUDIO/ide/TrueSTUDIO --launcher.suppressErrors -nosplash -application org.eclipse.cdt.managedbuilder.core.headlessbuild \ -data ${TS_WORKSPACE} \ -import ${HOME}/Open-DSO-150 \ -build dso_150/Debug SHELL end -
git bashをひらいて、
vagrant up && vagrant reload -
/opt/TrueSTUDIO/ide/TrueSTUDIOにて起動 -
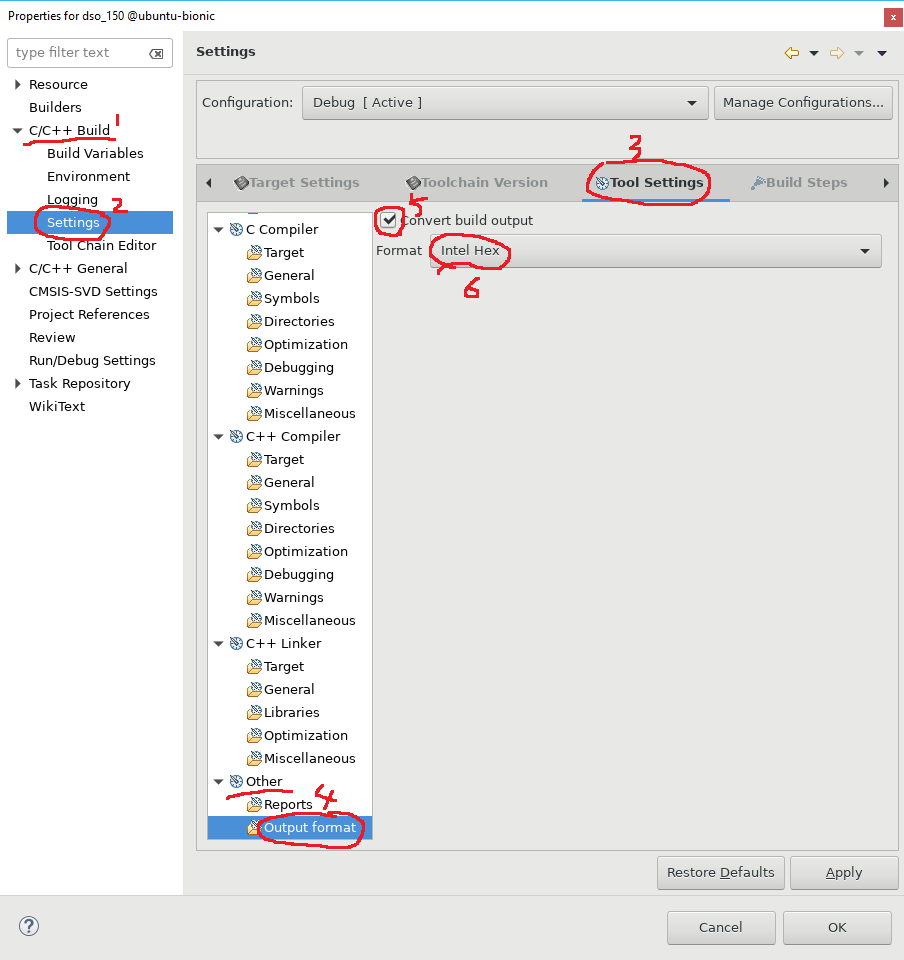
.hexファイルを生成するオプションの設定