Phoenix + AngularJS で Markdown 同時編集ツールを作ってみます。
イメージとしては HackMD のようなものを目指します。
ことの始まり
ElixirConf 2015 のタイムラインを眺めていたら、
I'm collaboratively editing a doc with 60 of my closest @ElixirConf friends. #phoenixframework pic.twitter.com/PlVexa3Anx
— David Raffauf (@draffauf) 2015, 10月 1
Phoenix で同時編集ツールを作っている人がいて、「こういうのって自分でも作れるのかな」と漠然に思ったのがことの始まり。
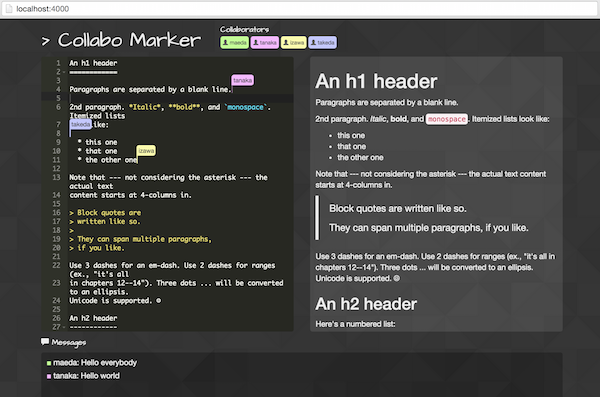
完成イメージ
結論、こういうツールができました。
GitHub で公開しています。
collabo_marker : https://github.com/mserizawa/collabo_marker
主に使うもの
-
Phoenix
- version 1.0.3
- ユーザーの操作を送受信する WebSocket サーバとして
-
AngularJS
- version 1.4.7
- DOM のレンダリングを簡略化するため
-
Ace
- version 1.2.0
- Markdown のエディタとして
-
marked.js
- version 0.3.5
- Markdown のパーサとして
Phoenix アプリケーションをセットアップする
ツールの名前は Collabo Marker にしました。
この名前で Phoenix アプリケーションを作成します。
$ mix phoenix.new collabo_marker
各種 JS を組み込む
今回は bower などは使わず、DL してきたものを web/static/vendor/ 配下に置いて利用します。
...
└── web
    ├── static
    │   └── vendor
    │       ├── ace.js
    │       ├── angular.min.js
    │       ├── marked.min.js
    │       ├── mode-markdown.js
    │       ├── randomColor.js
    │       └── theme-monokai.js
    ├── ...
...
mode-markdown.js と theme-monokai.ks は Ace 用のライブラリで、markdown を扱えるようにするものと、配色を monokai(ダーク系)にするためのものです。
randomColor.js は、参加しているユーザに適当な色を割り振りために使います。
これらの JS をまとめて vendor.js として読み込めるように、brunch-config.js をいじります。
exports.config = {
  // See http://brunch.io/#documentation for docs.
  files: {
    javascripts: {
      // joinTo のコメントアウトを外します
      joinTo: {
       "js/app.js": /^(web\/static\/js)/,
       "js/vendor.js": /^(web\/static\/vendor)|(deps)/
      },
      // order の指定で、ace.js と angular.min.js が最初にマージされるようにします
      order: {
        before: [
          "web/static/vendor/ace.js",
          "web/static/vendor/angular.min.js"
        ]
      }
    },
    ...
  },
...
次に web/templates/layout/app.html.eex を書き換えます。
<!DOCTYPE html>
<html lang="en" ng-app="collaboMarkerApp">
  <head>
    <meta charset="utf-8">
    <meta http-equiv="X-UA-Compatible" content="IE=edge">
    <meta name="viewport" content="width=device-width, initial-scale=1">
    <meta name="description" content="">
    <meta name="author" content="">

    <title>Collabo Marker</title>
    <link rel="stylesheet" href="<%= static_path(@conn, "/css/app.css") %>">
  </head>

  <body>
    <div class="container" role="main" ng-controller="CollaboMarkerController as cm">

      <%= @inner %>

    </div> <!-- /container -->

    <script src="<%= static_path(@conn, "/js/vendor.js") %>"></script>
    <script src="<%= static_path(@conn, "/js/app.js") %>"></script>

  </body>
</html>
html タグと メインコンテナの div タグに AngularJS の設定を入れて、最後に vendor.js と app.js を読み込ませれば ok です。
index.html.eex にエディタ要素とプレビュー要素を用意します。
<div class="row">
  <div id="editor" class="col-xs-6" style="height: 500px;">
  </div>
  <div id="preview" class="col-xs-6" style="height: 500px;">
  </div>
</div>
最後に app.js に AngularJS と Ace の初期化処理を書いておきます。
import "deps/phoenix_html/web/static/js/phoenix_html"
import {Socket} from "deps/phoenix/web/static/js/phoenix/"

angular.module("collaboMarkerApp", [])
    .controller("CollaboMarkerController", ["$scope", function($scope) {

        var editor = ace.edit("editor");
        // API 経由で内容を変更した際のアラートを黙らせます
        editor.$blockScrolling = Infinity;
        editor.setTheme("ace/theme/monokai");
        editor.getSession().setMode("ace/mode/markdown");

    }]);
ちなみに Inject の部分(5行目の ...["$scope", function...)はこのようにダブルクオーテーションを使った書き方にしておかないと、brunch で minify したときにうまく動きません。
ドキュメントの変更を共有する
Ace は API が完璧に整備されている かなり秀逸なライブラリで、この API を駆使して「同時編集」を実現していきます。
ドキュメントの変更は Editor オブジェクトの change イベントで拾えて、以下のような変更情報のオブジェクトが送られてきます。
{
    "start": {
        "row": 0,
        "column": 0
    },
    "end": {
        "row": 3,
        "column": 0
    },
    "action": "insert",
    "lines": [
        "* ham",
        "* spam",
        "* egg",
        ""
    ]
}
これを WebSocket で共有して、受け取り手が Document オブジェクトの insertMergedLines 関数と remove 関数に渡すことで、そっくりと変更内容を反映させるというわけです。
// 自身の情報をランダムに作っておく
var myself = {
    name: Math.random().toString(36).slice(-8),
    color: randomColor({luminosity: "light"})
};
// API 経由で発火する change イベントを、このフラグで制御します
var isFromMe = false;
// WebSocket への接続
var socket = new Socket("/socket");
socket.connect();
var channel = socket.channel("editor:lobby", {});
channel.join();

editor.on("input", function() {
    isFromMe = true;
});

editor.on("change", function(e) {
    if (isFromMe) {
        // 変更者(自身)の情報を添えて push
        channel.push("edit", { user: myself, event: e });
    }
    // Markdown のパース
    document.getElementById("preview").innerHTML = marked(editor.getValue());
});

channel.on("edit", function(dt) {
    if (dt.user.name === myself.name) {
        return;
    }
    isFromMe = false;
    var doc = editor.getSession().getDocument();
    var event = dt.event;
    var action = event.action;
    if (action === "insert") {
        // "追加" の反映
        doc.insertMergedLines(event.start, event.lines);
    } else if (action === "remove") {
        // "削除" の反映
        doc.remove(event);
    }
});
サーバ側はこのような感じです。
(WebSocket 利用の準備についてはコチラをご参照ください)
defmodule CollaboMarker.EditorChannel do
  use Phoenix.Channel
  # ログイン
  def join("editor:lobby", _auth_msg, socket) do
    {:ok, socket}
  end
  def join("editor:" <> _private_room_id, _auth_msg, socket) do
    {:error, %{reason: "unauthorized"}}
  end
  # 変更の送受信
  def handle_in("edit", %{"event" => event, "user" => user}, socket) do
    broadcast! socket, "edit", %{event: event, user: user}
    {:noreply, socket}
  end

end
これで接続しているユーザの変更がお互いに反映されるようになります。
カーソルの位置を共有する
カーソルの位置は Editor オブジェクトの getCursorPosition 関数で取得できます。が、これで返却されるのは「行と列」の情報で、ちょっとレンダリング向きではありません。(列番号から正確な x 座標を割り出すのは結構大変)
なので、ちょっと乱暴ですが、画面上にカーソルとしてレンダリングされている textarea.ace_text-input というオブジェクトから x, y の相対座標を取得し、それを共有します。
var aceTextInputElement = document.getElementsByClassName("ace_text-input")[0];
editor.getSession().getSelection().on("changeCursor", function(e) {
    // ace_text-input に座標が反映されるのにラグがあるため、100ms 待ちます
    setTimeout(function() {
        var style = window.getComputedStyle(aceTextInputElement),
            top = style.getPropertyValue("top"),
            left = style.getPropertyValue("left"),
            // スクロールしている分も考慮します
            scrollTop = editor.getSession().getScrollTop();
        top = Number(top.substring(0, top.length - 2));
        left = Number(left.substring(0, left.length - 2));
        // 自身の情報を添えて push(ここで送信される座標は「エディタ要素内での相対座標」)
        channel.push("move", { user: myself, position: {left: left, top: top, scrollTop: scrollTop} });
    }, 100);
});
// スクロールするとズレるので、計算しなおします
editor.session.on("changeScrollTop", function() {
    calculateCursorScreenPosition();
});

// (自身を除く)ユーザ一覧を格納する配列
$scope.users = [];
channel.on("move", function(dt) {
    if (dt.user.name === myself.name) {
        return;
    }
    var user = null;
    $scope.users.some(function(elem) {
        if (elem.name === dt.user.name) {
            user = elem;
        }
    });
    // 無い場合はこのタイミングで生成します
    if (!user) {
        user = dt.user;
        user.cursor = {};
        $scope.users.push(user);
    }
    user.cursor.left = dt.position.left;
    user.cursor.top = dt.position.top;
    user.cursor.scrollTop = dt.position.scrollTop;

    calculateCursorScreenPosition();
});

var editorElement = document.getElementById("editor");
function calculateCursorScreenPosition() {
    $scope.users.forEach(function(user) {
        // pageOffset を加味して「ウィンドウ内での絶対座標」に変換します
        var de = document.documentElement,
            box = editorElement.getBoundingClientRect(),
            offsetTop = box.top + window.pageYOffset - de.clientTop,
            offsetLeft = box.left + window.pageXOffset - de.clientLeft;

        var top = user.cursor.top + user.cursor.scrollTop - editor.getSession().getScrollTop() + 4;
        // 現在のエディタの表示位置より外側にいる場合は非表示にします
        user.cursor.hidden = (top < 0 || top > 500);

        user.cursor.screenLeft = user.cursor.left + offsetLeft + "px";
        user.cursor.screenTop = top + offsetTop + "px";
    });
    // AngularJS 監視外での変更なので、明示的に反映させます
    $scope.$apply();
}
ビュー側も作ります。
ここでやっと AngularJS の力が発揮されます。$scope.users に貯められたユーザのカーソル情報を ng-repeat を使ってレンダリングします。かなりシンプルに書けますね。
<div class="cursor" ng-repeat="user in users" ng-if="!user.cursor.hidden"
       ng-style="{left: user.cursor.screenLeft, top: user.cursor.screenTop}">
    <div class="cursor-caret"
            ng-style="{'background-color': user.color}">
    </div>
    <span class="cursor-name" ng-style="{'background-color': user.color}">
        {{ user.name }}
    </span>
</div>
スタイルシートで位置と見た目を整えます。
.cursor {
    position: absolute;
}
.cursor-caret {
    height: 1em;
    width: 2px;
}
.cursor-name {
    position: relative;
    color: #555;
    font-size: 0.8em;
    padding: 3px;
    top: -3em;
    z-index: 100;
}
最後にサーバ側を作ります。
defmodule CollaboMarker.EditorChannel do
  use Phoenix.Channel
  ...
  # カーソル移動の送受信
  def handle_in("move", %{"position" => position, "user" => user}, socket) do
    broadcast! socket, "move", %{position: position, user: user}
    {:noreply, socket}
  end

end
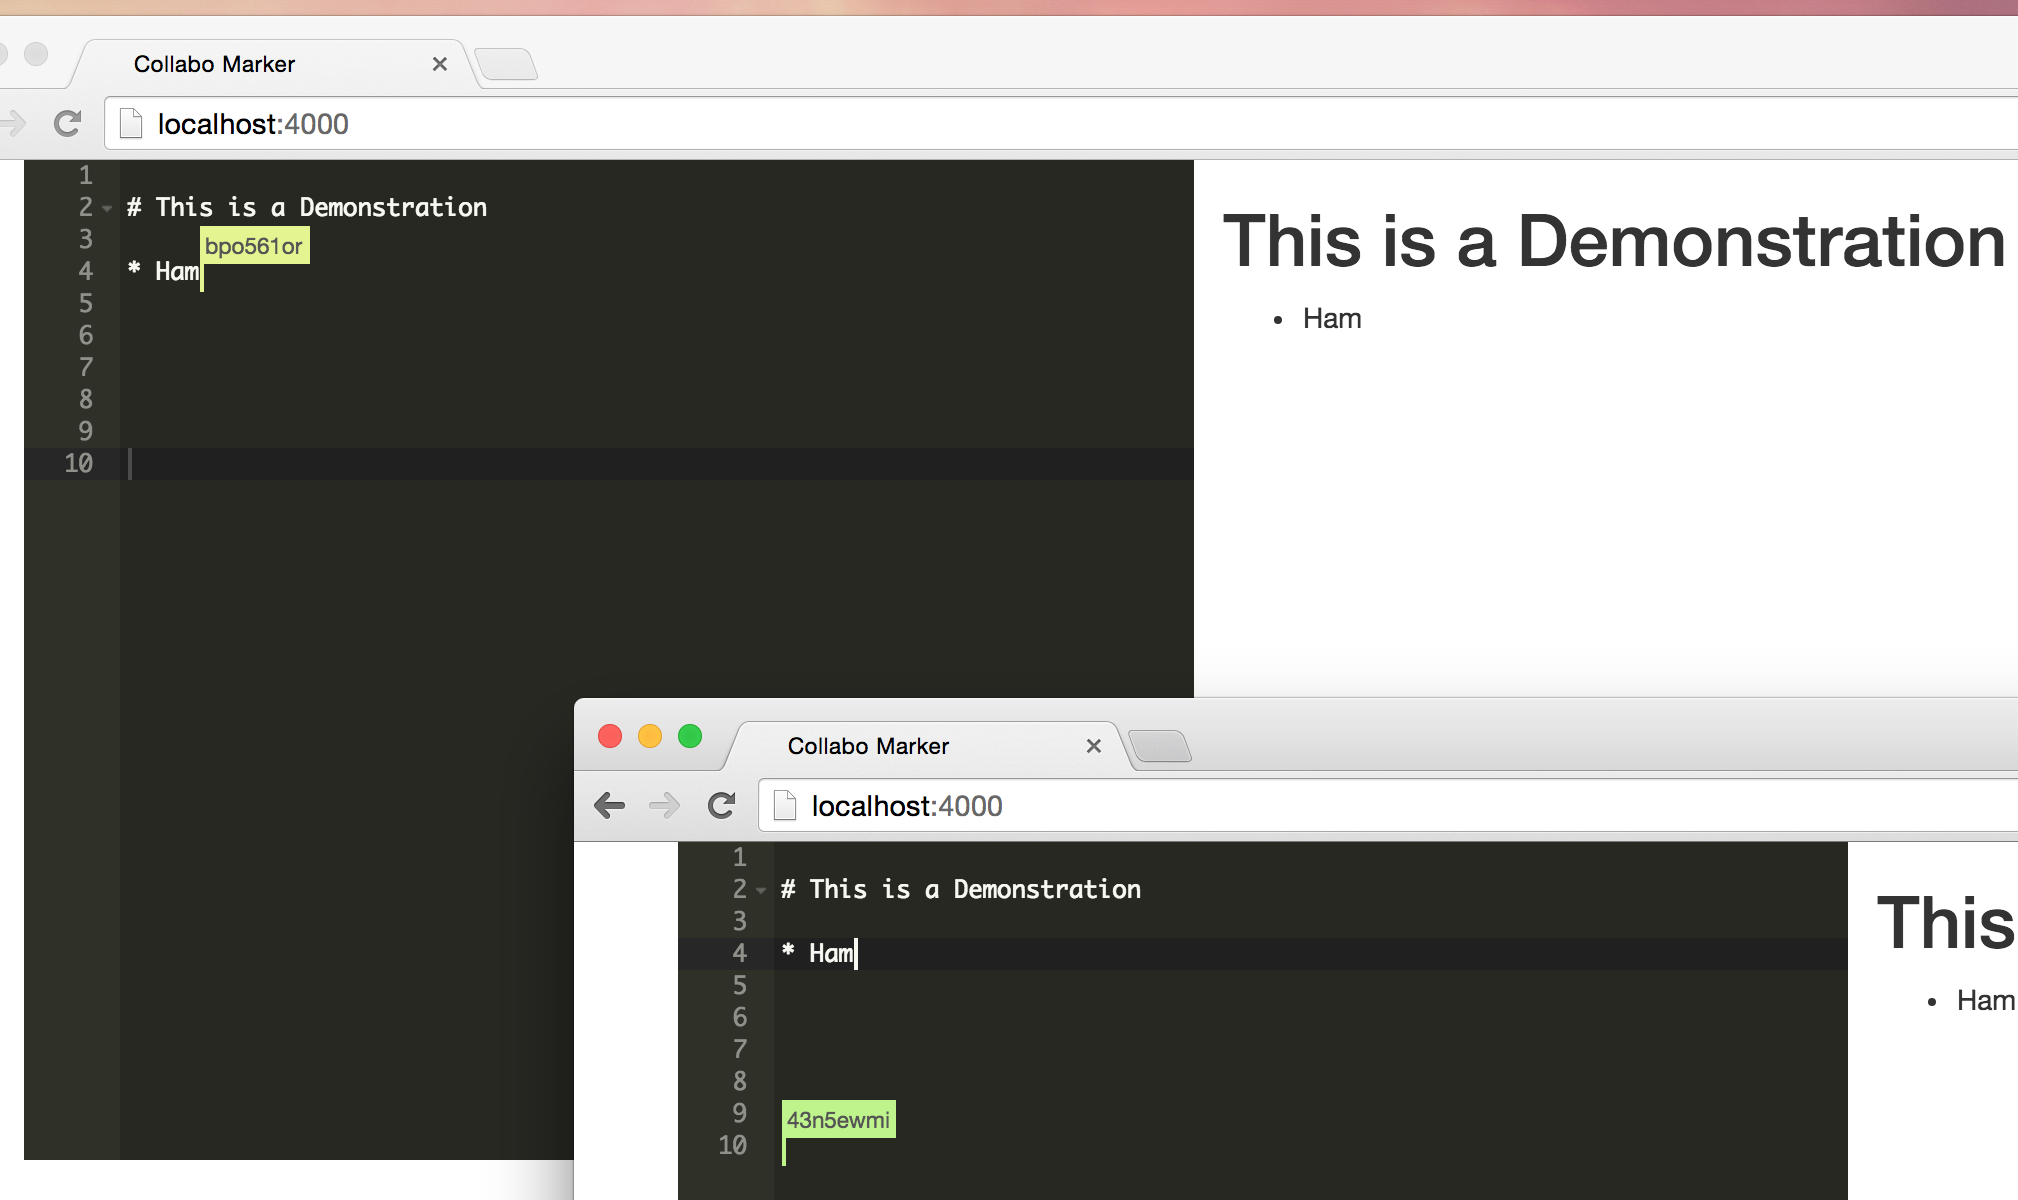
ここまで実装すると、だいぶそれっぽくなります。
それから
以上でコアな部分の説明はおわりです。
そのほか、Collabo Marker でやってみたことをサクっと書いてみます。
- ユーザ一覧、編集内容をサーバ側で保持
- 新規接続したユーザに共有するため
- ConCache を使ってシンプルに実装しました
- ユーザのログアウトも監視しています
- ログイン機能を実装
- 名前を入力して参加できるように
- ドキュメント同期まわりをチューニング
- 変更内容の欠落(後述)を最小限にする苦肉の策など...
- エディタとプレビューのスクロールトップ同期を実装
- 細かな気遣い
- チャット機能を実装
- オマケ
- 見た目の整備
- 大事
ご興味がありましたら、GitHub リポジトリを覗いてみてください。
上記実装における限界
バグが結構あります。
- 大量に同時入力が走るといくつかの変更がロストする
- 変更の反映がスレッドセーフじゃないからかも
- 結構致命的...
- IME 入力中に他ユーザの入力を受け付けるとカーソル位置がズレる
- おそらく Ace エディタの限界
- IME ってやっかいですね...
感想
- Phoenix でも AngularJS でもなく、生の JS がメインだった
- リアルタイムアプリケーションって作るのが思いの外難しい
- 冪等性を担保して、バグなく安全に使えるものにするためには結構な労力が必要な予感
- もっとサーバサイドに重きを置く必要がありそう
- ゲームのプログラミングとかをみて同期のテクニックを勉強したい
- Google ドキュメントはやはり凄い
- こちらは kix という独自のエディタを使っている模様

