Bot Framework Composer で簡単に作成できる Web Chat ボットに、WebXR を使って 3D モデルを表示する機能を追加する方法を紹介します。
Bot Framework Web Chat の標準機能では、まだ 3D モデルを扱えないため、ボットから Attachment として glTF/GLB フォーマットのデータを返却し、Web Chat 側で React Component を追加してハンドルします。3D モデルの表示と AR/VR 出力部分は <model-viewer> と Babylon.js を使います。
よかったらデモ動画をご覧ください。また、https://edgewatcher.azurewebsites.net/webxrbot.htm で実際に試せます。
#WebXRTech で使用したデモ動画を紹介します。雰囲気だけでもぜひ。壺 (本当はたぶん花瓶) はスミソニアン博物館から、キズナアイさんのモデルは公式サイトからお借りしています。
— ユスキィ (Yusuke Hara) (@ms_yuhara) July 5, 2020
スミソニアン素敵: https://t.co/8PYpcoAzU9 🎉
キズナアイさん可愛い: https://t.co/wF6hVOHoYF 😊
©︎ #KizunaAI pic.twitter.com/pC3TDVl4b7
前準備
以下を利用できるように準備します。Azure のアカウントをお持ちでない方は、Azure 無料アカウント作成から試用できます。
- Azure Bot Service
- Bot Framework Composer (公式ドキュメント)
- 3D モデル (glTF/GLB フォーマット)
Azure Bot Service については、@chomado さんの完全無料でボットを作る記事、Composer の導入や使い方については、@kenakamu さんのボット開発の記事がわかりやすいです。また、私が作成した Composer の解説動画もあるので、よかったらこちらもどうぞ。
マイクロソフトのサポート エンジニアが贈る 10 分サプリ動画を更新しました: https://t.co/SXw98apdlT
— ユスキィ (Yusuke Hara) (@ms_yuhara) June 15, 2020
Bot Framework Composer でノー コーディングなボット開発を始めよう。導入方法からランダムに犬の写真を返すボットを作るまでを説明します。
続編も予定 😊 #BotFramework #MSBuild pic.twitter.com/lpTaz5sSZA
ボットのダイアログ
Composer でボットのプロジェクトを作成したら、ボットの応答 (Bot Responses) に以下のテンプレートを追加します。
# WebXRCard(mode, url, alturl, description)
[Activity
    Attachments = ${ActivityAttachment(json('{
      "mode": "' + mode + '",
      "url": "' + url + '",
      "alturl": "' + alturl + '",
      "description": "' + description + '"
    }'), 'model/gltf-binary')}
]
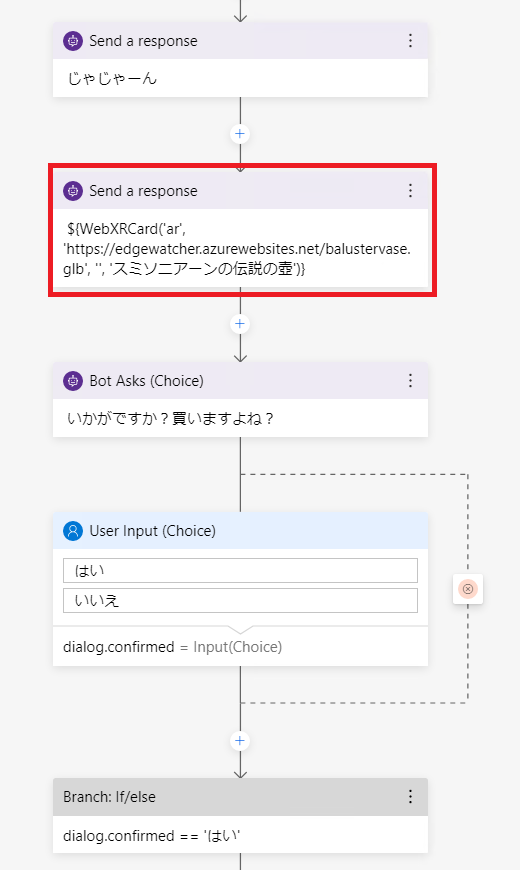
続いて、ボットの応答で 3D モデルを返却したい部分で、以下のように記述します。第 1 引数で 'ar' もしくは 'vr' を指定します。第 2 引数で glTF/GLB フォーマットのファイルを指定します。iOS での AR 出力に対応したい場合は、第 3 引数に USDZ フォーマットのファイルも用意して指定します。
- ${WebXRCard('ar', 'https://edgewatcher.azurewebsites.net/balustervase.glb', 'https://edgewatcher.azurewebsites.net/balustervase.usdz', 'スミソニアーンの伝説の壺')}
ボットの実行と Direct Line チャネルの登録
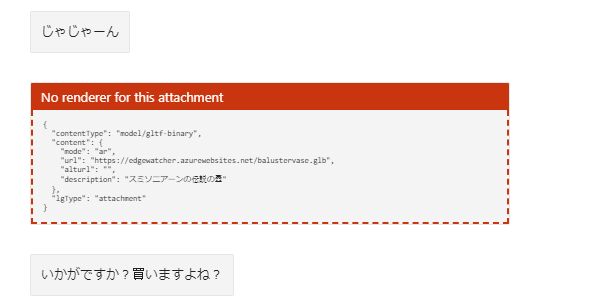
作成したボットをローカルで実行して Bot Framework Emulator でテストすると、3D モデルの応答部分で以下のように表示されるはずですが、問題ありません。エミュレーターでは扱えないフォーマットであるためです。
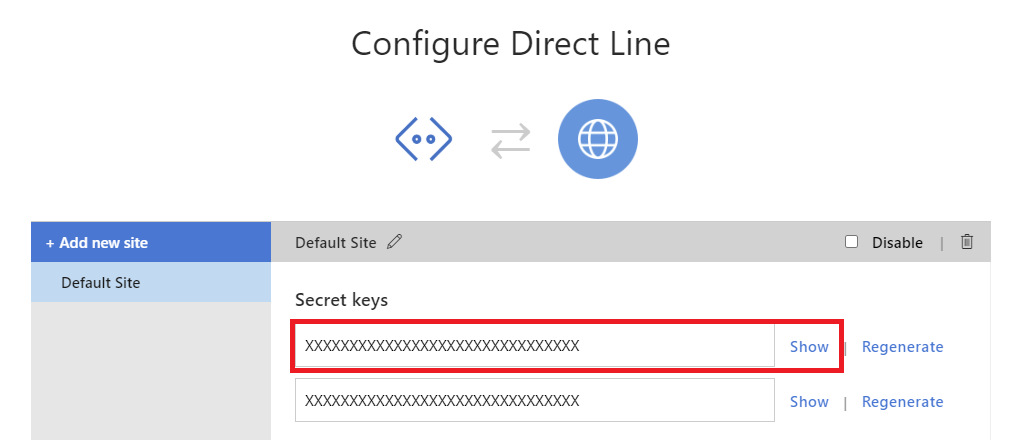
このボットを Web Chat (Direct Line) で接続できるようにするために、Azure Bot Service に公開します。Composer から直接 Azure にデプロイしてもよいのですが、Azure にホストせず、ローカルで実行しているボットを ngrok を使用して一時的に Bot Channels Registration で公開することも可能です。いずれかの方法でボットを公開し、Direct Line チャネルを登録してシークレットをメモしておきます。
Web Chat ページの作成
Bot Framework Web Chat コンポーネントは、高度なカスタマイズが可能な、Web ベースの Bot クライアントです。React ベースで開発されており、自分でビルドすることもできますが、CDN でビルド済みの JavaScript を公開しているので、ビルド環境を用意しなくても使えます。
3D モデルの Attachment をハンドルする部分を React で拡張するため、このサンプルをベースにカスタマイズします。初めに、3D モデルの表示に必要な <model-viewer> と Babylon.js を <head> タグ内でインポートしておきます。
    <!-- model-viewer -->
    <script src="https://unpkg.com/@webcomponents/webcomponentsjs@2.1.3/webcomponents-loader.js"></script>
    <script src="https://unpkg.com/intersection-observer@0.5.1/intersection-observer.js"></script>
    <script src="https://unpkg.com/resize-observer-polyfill@1.5.0/dist/ResizeObserver.js"></script>
    <script src="https://unpkg.com/fullscreen-polyfill@1.0.2/dist/fullscreen.polyfill.js"></script>
    <script src="https://unpkg.com/@magicleap/prismatic/prismatic.min.js"></script>
    <script src="https://unpkg.com/focus-visible@5.0.2/dist/focus-visible.js" defer></script>

    <script type="module" src="https://unpkg.com/@google/model-viewer/dist/model-viewer.js"></script>
    <script nomodule src="https://unpkg.com/@google/model-viewer/dist/model-viewer-legacy.js"></script>

    <!-- Babylon.js -->
    <script src="https://code.jquery.com/pep/0.4.2/pep.min.js"></script>
    <script src="https://cdnjs.cloudflare.com/ajax/libs/dat-gui/0.6.2/dat.gui.min.js"></script>
    <script src="https://cdn.babylonjs.com/ammo.js"></script>
    <script src="https://cdn.babylonjs.com/cannon.js"></script>
    <script src="https://cdn.babylonjs.com/Oimo.js"></script>
    <script src="https://cdn.babylonjs.com/libktx.js"></script>
    <script src="https://cdn.babylonjs.com/earcut.min.js"></script>
    <script src="https://cdn.babylonjs.com/babylon.js"></script>
    <script src="https://cdn.babylonjs.com/inspector/babylon.inspector.bundle.js"></script>
    <script src="https://cdn.babylonjs.com/materialsLibrary/babylonjs.materials.min.js"></script>
    <script src="https://cdn.babylonjs.com/proceduralTexturesLibrary/babylonjs.proceduralTextures.min.js"></script>
    <script src="https://cdn.babylonjs.com/postProcessesLibrary/babylonjs.postProcess.min.js"></script>
    <script src="https://cdn.babylonjs.com/loaders/babylonjs.loaders.js"></script>
    <script src="https://cdn.babylonjs.com/serializers/babylonjs.serializers.min.js"></script>
    <script src="https://cdn.babylonjs.com/gui/babylon.gui.min.js"></script>
これから作成する React Component 部分は、別ファイルに分けた方がわかりやすいため、同じく <head> タグ内で以下のように定義します。
<script type="text/babel" src="webxrcard.js"></script>
続いて、ボットの応答をインターセプトし、'model/gltf-binary' の Attachment として返却されたデータをハンドルします。サンプルの async function() の部分に以下のコードを追加します。<WebXRCard> の部分を React Component として webxrcard.js に実装します。
    <script type="text/babel" data-presets="es2015, react, stage-3">
      (async function() {

        const attachmentMiddleware = () => next => card => {
          switch (card.attachment.contentType) {
            case 'model/gltf-binary':
              return (
                <WebXRCard mode={card.attachment.content.mode} src={card.attachment.content.url} ios-src={card.attachment.content.alturl} alt={card.attachment.content.description} />
              );

            default:
              return next(card);
          }
        };
<ReactWebChat> コンポーネントに、追加した attachmentMiddleware を指定します。また、公式のサンプルでは、Direct Line のトークンを Web サービスから取得する実装になっていますが、テスト目的であれば、先ほどチャネル登録時にメモした Direct Line のシークレットを直接指定できます。直接シークレットを指定する場合は、以下のように変更します。'YOUR_DIRECT_LINE_TOKEN' の部分をメモした文字列に置き換えます。
        window.ReactDOM.render(
          <ReactWebChat
            attachmentMiddleware={attachmentMiddleware}
            directLine={window.WebChat.createDirectLine({ token: 'YOUR_DIRECT_LINE_TOKEN' })}
          />,
          document.getElementById('webchat')
        );
また、トークンを取得する部分の処理は削除しておきます。
/*
        const res = await fetch('https://webchat-mockbot.azurewebsites.net/directline/token', { method: 'POST' });
        const { token } = await res.json();
*/
WebXRCard コンポーネントの実装
別ファイルに分けた webxrcard.js に、コンポーネント部分を実装します。今回は AR の場合は <model-viewer> を、VR の場合は Babylon.js を使用しています。3D モデルを表示するだけであれば、チュートリアルで解説されているレベルのシンプルなコードで実現できます。コード全体を掲載します。
function getUniqueStr(myStrong) {
    var strong = 1000;
    if (myStrong) strong = myStrong;
    return new Date().getTime().toString(16) + Math.floor(strong * Math.random()).toString(16);
}

function prepareBabylonCanvas(id, src) {
    if ((id == null) || (src == null)) { return; }

    var canvas = document.getElementById(id);

    var engine = null;
    var scene = null;
    var sceneToRender = null;
    var createDefaultEngine = function () { return new BABYLON.Engine(canvas, true, { preserveDrawingBuffer: true, stencil: true }); };

    var delayCreateScene = function () {
        // Create a scene
        var scene = new BABYLON.Scene(engine);
        scene.createDefaultCameraOrLight();

        // Append glTF model to scene
        Promise.all([
            BABYLON.SceneLoader.AppendAsync(src)
        ]).then(function () {
            scene.createDefaultCamera(true, true, true);

            // The default camera looks at the back of the asset
            // Rotate the camera by 180 degrees to the front of the asset
            scene.activeCamera.alpha += Math.PI;

            const env = scene.createDefaultEnvironment();

            // Here we add XR support
            const xr = scene.createDefaultXRExperienceAsync({
                floorMeshes: [env.ground]
            });
        });

        return scene;
    };

    var engine;

    try {
        engine = createDefaultEngine();
    } catch (e) {
        console.log("the available createEngine function failed. Creating the default engine instead");
        engine = createDefaultEngine();
    }

    if (!engine) throw 'engine should not be null.';

    scene = delayCreateScene();
    sceneToRender = scene;

    engine.runRenderLoop(function () {
        if (sceneToRender) {
            sceneToRender.render();
        }
    });

    // Resize
    window.addEventListener("resize", function () {
        engine.resize();
    });
}

function WebXRCard(props) {
    if (props.mode == "ar") {
        return <model-viewer {...props} auto-rotate autoplay camera-controls ar magic-leap></model-viewer>;
    } else if (props.mode == "vr") {
        const id = "renderCanvas-" + getUniqueStr();
        setTimeout(() => prepareBabylonCanvas(id, props.src), 1000);
        return <canvas id={id} className="renderCanvas" title={props.alt}></canvas>;
    }

    return <div aria-hidden="true" className="markdown css-1b7yvbl"><p>Invalid mode!</p></div>;
}
作成した Web Chat ページのテスト
以上で完成です。作成した index.html と webxrcard.js を適当な Web サーバーに配置して、ブラウザーからアクセスします。ローカル ファイルのままでは、React による動的なスクリプトの参照や、3D モデルのデータ取得ができないため、Web サーバーに配置して試す必要があります。
