前回を行ったこと
Docker上にデータベース構築とSpringの構築
今回行うこと
Ras Pi側でセンサからのデータを取得してdocker内のデータベースにデータを登録する。
Ras Piにセンサを搭載する
搭載するとこんな感じ
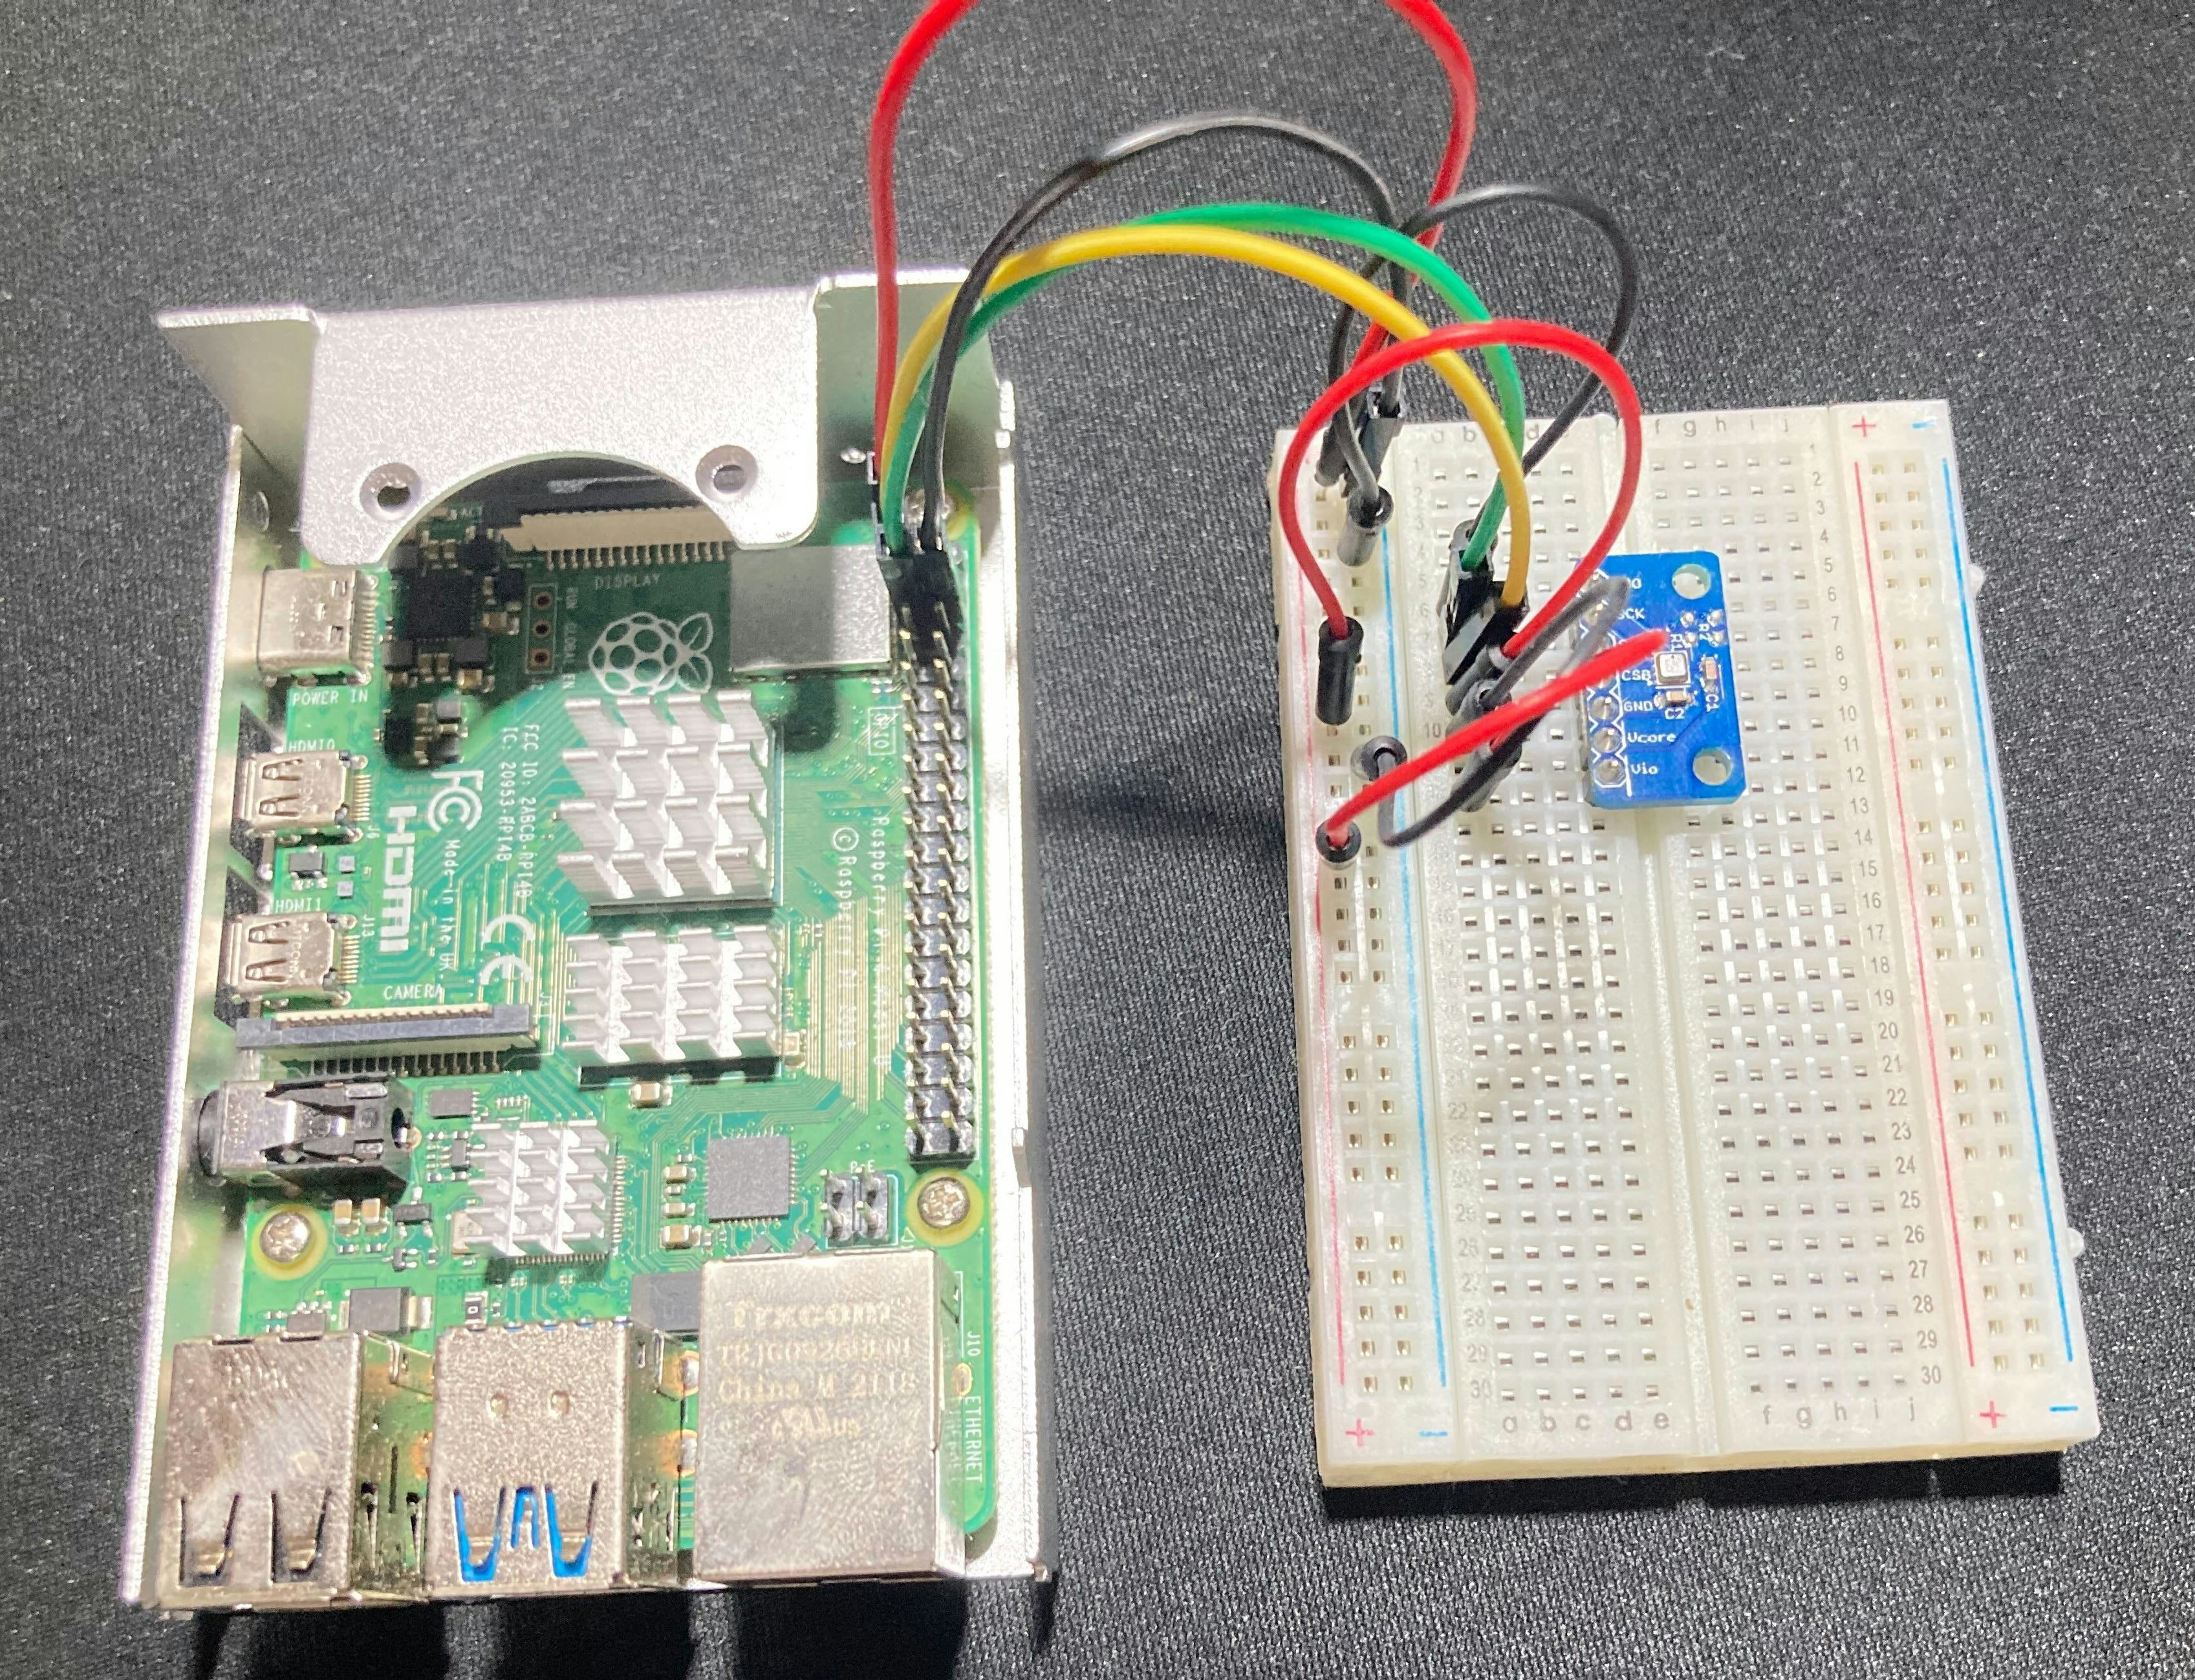
| Raspberry Pi | 説明 |
|---|---|
| 3V3 power(PIN1) | 電源 |
| SDA(GPIO2/PIN3) | BME280のSDIと接続 |
| SCL(GPIO3/PIN5) | BME280のSCKと接続 |
| Ground(PIN6) | 接地、グラウンド |
| BME280 | 説明 |
|---|---|
| SDO | 接地、グラウンド |
| SCK | RasPiのSCL(GPIO3/PIN5) |
| SDI | RasPiのSDA(GPIO2/PIN3) |
| CSB | 電源 |
| GND | 接地、グラウンド |
| Vcore | 接続なし |
| Vio | 電源 |
BME280 Combined humidity and pressure sensor
センサが壊れていないか確認
BME280 Combined humidity and pressure sensorによると気温25℃で誤差±0.5℃らしい
BME280活用のサンプルプログラムを参考に公開されているMITライセンスのプログラムがあるのでそれを利用させて頂きます。
#!/usr/bin/env python

# MIT License
#
# Copyright (c) 2020 H.Saido <saido.nv@gmail.com>
# Copyright (c) 2018 Switch Science
#
# Permission is hereby granted, free of charge, to any person obtaining a copy
# of this software and associated documentation files (the "Software"), to deal
# in the Software without restriction, including without limitation the rights
# to use, copy, modify, merge, publish, distribute, sublicense, and/or sell
# copies of the Software, and to permit persons to whom the Software is
# furnished to do so, subject to the following conditions:
#
# The above copyright notice and this permission notice shall be included in all
# copies or substantial portions of the Software.
#
# THE SOFTWARE IS PROVIDED "AS IS", WITHOUT WARRANTY OF ANY KIND, EXPRESS OR
# IMPLIED, INCLUDING BUT NOT LIMITED TO THE WARRANTIES OF MERCHANTABILITY,
# FITNESS FOR A PARTICULAR PURPOSE AND NONINFRINGEMENT. IN NO EVENT SHALL THE
# AUTHORS OR COPYRIGHT HOLDERS BE LIABLE FOR ANY CLAIM, DAMAGES OR OTHER
# LIABILITY, WHETHER IN AN ACTION OF CONTRACT, TORT OR OTHERWISE, ARISING FROM,
# OUT OF OR IN CONNECTION WITH THE SOFTWARE OR THE USE OR OTHER DEALINGS IN THE
# SOFTWARE.

from smbus2 import SMBus

class BME280:
    """BME280: Combined humidity and pressure sensor
    https://cdn.sparkfun.com/assets/learn_tutorials/4/1/9/BST-BME280_DS001-10.pdf

    Settings and performance for indoor navigation

    Suggested settings for indoor navigation
    Sensor mode:           normal mode, tstandby = 0.5 ms
    Oversampling settings: pressure ×16, temperature ×2, humidity ×1
    IIR filter settings:    filter coefficient 16

    Performance for suggested settings
    Current consumption: 633 µA
    RMS Noise:           0.2 Pa / 1.7 cm
    Data output rate:    25Hz
    Filter bandwidth:    0.53 Hz
    Response time (75%): 0.9 s

    refer: https://github.com/SWITCHSCIENCE/samplecodes/blob/master/BME280/Python27/bme280_sample.py
    """
    def __init__(self, bus_num=1, i2c_address=0x76):
        self.i2c = SMBus(bus_num)
        self.i2c_address = i2c_address
        self.t_fine = 0.0
        self.pressure = 0.0
        self.temperature = 0.0
        self.humidity = 0.0

        # Fixed settings
        osrs_t = 2 # Temperature oversampling x2
        osrs_p = 5 # Pressure oversampling x16
        osrs_h = 1 # Humidity oversampling x1
        mode = 3 # Normal mode
        t_sb = 0 # tstandby 0.5 ms
        filter = 4 # Filter x16

        self.i2c.write_byte_data(self.i2c_address, 0xF2, osrs_h)
        self.i2c.write_byte_data(self.i2c_address, 0xF4, (osrs_t << 5) | (osrs_p << 2) | mode)
        self.i2c.write_byte_data(self.i2c_address, 0xF5, (t_sb << 5) | (filter << 2))

        self._get_calib_param()


    def _get_calib_param(self):
        calib = []
        # Update by every call
        self.digT = []
        self.digP = []
        self.digH = []

        for i in range (0x88, 0x88+24):
            calib.append(self.i2c.read_byte_data(self.i2c_address, i))
        calib.append(self.i2c.read_byte_data(self.i2c_address, 0xA1))
        for i in range (0xE1, 0xE1+7):
            calib.append(self.i2c.read_byte_data(self.i2c_address, i))

        self.digT.append((calib[1] << 8) | calib[0])
        self.digT.append((calib[3] << 8) | calib[2])
        self.digT.append((calib[5] << 8) | calib[4])
        self.digP.append((calib[7] << 8) | calib[6])
        self.digP.append((calib[9] << 8) | calib[8])
        self.digP.append((calib[11]<< 8) | calib[10])
        self.digP.append((calib[13]<< 8) | calib[12])
        self.digP.append((calib[15]<< 8) | calib[14])
        self.digP.append((calib[17]<< 8) | calib[16])
        self.digP.append((calib[19]<< 8) | calib[18])
        self.digP.append((calib[21]<< 8) | calib[20])
        self.digP.append((calib[23]<< 8) | calib[22])
        self.digH.append( calib[24] )
        self.digH.append((calib[26]<< 8) | calib[25])
        self.digH.append( calib[27] )
        self.digH.append((calib[28]<< 4) | (0x0F & calib[29]))
        self.digH.append((calib[30]<< 4) | ((calib[29] >> 4) & 0x0F))
        self.digH.append( calib[31] )

        for i in range(1,2):
            if self.digT[i] & 0x8000:
                self.digT[i] = (-self.digT[i] ^ 0xFFFF) + 1

        for i in range(1,8):
            if self.digP[i] & 0x8000:
                self.digP[i] = (-self.digP[i] ^ 0xFFFF) + 1

        for i in range(0,6):
            if self.digH[i] & 0x8000:
                self.digH[i] = (-self.digH[i] ^ 0xFFFF) + 1


    def get(self):
        """Get pressure, temperature, humidity
        pressure: hPa (float)
        temperature: Celsius degree (float)
        humidity: % (float)
        """
        data = [self.i2c.read_byte_data(self.i2c_address, a) for a in range(0xF7, 0xF7+8)]
        pres_raw = (data[0] << 12) | (data[1] << 4) | (data[2] >> 4)
        temp_raw = (data[3] << 12) | (data[4] << 4) | (data[5] >> 4)
        hum_raw  = (data[6] << 8)  |  data[7]

        self.temperature = self._compensate_T(temp_raw) # update t_fine first
        if pres_raw < 0x80000:
            # Sometimes get strange value
            self.pressure = self._compensate_P(pres_raw)
        self.humidity = self._compensate_H(hum_raw)

        return self.pressure, self.temperature, self.humidity


    def _compensate_P(self, adc_P):
        """Return compensated hPa value
        param: raw pressure ADC data (int)
        return: hPa (float)
        """
        v1 = (self.t_fine / 2.0) - 64000.0
        v2 = (((v1 / 4.0) * (v1 / 4.0)) / 2048) * self.digP[5]
        v2 = v2 + ((v1 * self.digP[4]) * 2.0)
        v2 = (v2 / 4.0) + (self.digP[3] * 65536.0)
        v1 = (((self.digP[2] * (((v1 / 4.0) * (v1 / 4.0)) / 8192)) / 8)  + ((self.digP[1] * v1) / 2.0)) / 262144
        v1 = ((32768 + v1) * self.digP[0]) / 32768

        if v1 == 0:
            return 0
        pressure = ((1048576 - adc_P) - (v2 / 4096)) * 3125
        if pressure < 0x80000000:
            pressure = (pressure * 2.0) / v1
        else:
            pressure = (pressure / v1) * 2
        v1 = (self.digP[8] * (((pressure / 8.0) * (pressure / 8.0)) / 8192.0)) / 4096
        v2 = ((pressure / 4.0) * self.digP[7]) / 8192.0
        pressure = pressure + ((v1 + v2 + self.digP[6]) / 16.0)

        # return hPa
        return pressure/100


    def _compensate_T(self, adc_T):
        """Return compensated temperature value
        param: raw temperature ADC data (int)
        return: Celsius degree temperature (float)
        """
        v1 = (adc_T / 16384.0 - self.digT[0] / 1024.0) * self.digT[1]
        v2 = (adc_T / 131072.0 - self.digT[0] / 8192.0) * (adc_T / 131072.0 - self.digT[0] / 8192.0) * self.digT[2]
        self.t_fine = v1 + v2
        temperature = self.t_fine / 5120.0

        return temperature


    def _compensate_H(self, adc_H):
        """Return compensated humidity value
        param: raw humidity ADC data (int)
        return: humidity % (float)
        """
        humidity = self.t_fine - 76800.0
        if humidity != 0:
            humidity = (adc_H - (self.digH[3] * 64.0 + self.digH[4]/16384.0 * humidity)) * (self.digH[1] / 65536.0 * (1.0 + self.digH[5] / 67108864.0 * humidity * (1.0 + self.digH[2] / 67108864.0 * humidity)))
        else:
            return 0

        humidity = humidity * (1.0 - self.digH[0] * humidity / 524288.0)

        if humidity > 100.0:
            humidity = 100.0
        elif humidity < 0.0:
            humidity = 0.0

        return humidity


if __name__ == '__main__':
    bme280 = BME280()
    p, t, h = bme280.get()
    print(f"{p:7.2f} hPa, {t:6.2f} C, {h:5.2f} %")
自分が持っているBME280が壊れていないか確認する。
確認方法:BME280から取得した気温と、気温計で測った気温を比較して誤差がどれくらいか調べる。
今回はセンサの選定、検証には重きを置かないため測定は一度で済ませる。


両方で測った結果、、センサでは29.15℃、気温計だと28.80~28.90℃なので壊れてないことは確認できた。
Ras Pi(python)とpostgreの接続を行う
postgre接続参考サイト:PythonからPostgreSQLにpsycopg2を使って接続する方法をもとにpsycopg2をRasPi内に導入する。
接続とデータの登録を行う
ディレクトリ構造
/CmftCon $ tree -L 2
.
├── __init__.py
├── InsertInfo.py
└── UnitTest
    ├── bmeTest.py
    ├── ConnectTest.py
    ├── InsertDataTest.py
    ├── InsertTest.py
    └── __pycache__
-
__init__.pyでUnitTestをimportする -
bmeTest.pyは先程のプログラムを利用する
接続テストプログラム
import psycopg2
constr = "host='*******' port=5432 dbname=dev user=root password='root'"
conn = psycopg2.connect(constr)

cur = conn.cursor()

cur.execute('select * from weather')

data = cur.fetchall()
print(data)
cur.close()
conn.close()
出力
[Running] python -u "/home/pi/CmftCon/UnitTest/ConnectTest.py"
[(1, 0, 0, 0, 0, False, True, datetime.datetime(2023, 3, 1, 0, 0))]

[Done] exited with code=0 in 0.284 seconds
接続テストが完了し、テストデータを取得することができた。
データ登録テストプログラム1
固定値がpostgreに登録できるかどうか
import psycopg2
constr = "host='*******' port=5432 dbname=dev user=root password='root'"
conn = psycopg2.connect(constr)

cur = conn.cursor()

cur.execute("INSERT INTO weather (temp,humid,pressure,comfort,deal_flg,del_flg,date) values ( 30,56,1090,80,'false','false','2023-04-01');")
cur.execute('select * from weather')
conn.commit()
data = cur.fetchall()
print(data)
cur.close()
conn.close()
conn.commit()がないとINSERTした結果がデータベースに変更が保存されない。(ここに意外と躓いた、、)
出力
[Running] python -u "/home/pi/CmftCon/UnitTest/InsertTest.py"
[(1, 0, 0, 0, 0, False, True, datetime.datetime(2023, 3, 1, 0, 0)), (2, 30, 56, 1090, 80, False, False, datetime.datetime(2023, 4, 1, 0, 0))]

[Done] exited with code=0 in 0.274 seconds
データ登録テストプログラム2
postgreに日付型データが登録できるかどうか
import datetime
import psycopg2

def InsertInit():
    dt_now = datetime.datetime.now()
    stringdt = str(dt_now.strftime('%Y-%m-%d %H:%M:%S'))
    constr = "host='*******' port=5432 dbname=dev user=root password='root'"
    connect = psycopg2.connect(constr)
    cursor = connect.cursor()

    return stringdt, cursor, connect

def Insert(que):
    str_dt, cur, conn = InsertInit()
    value = (str_dt,)
    cur.execute(que, value)
    conn.commit()
    cur.execute('select * from weather')
    data = cur.fetchall()
    print(data)
    cur.close()
    conn.close()

if __name__ == '__main__':
    que = "INSERT INTO weather (temp,humid,pressure,comfort,deal_flg,del_flg,date) values ( 30,56,1090,80,'false','false',%s);"
    Insert(que)
出力
[Running] python -u "/home/pi/CmftCon/UnitTest/InsertDataTest.py"
[(1, 0, 0, 0, 0, False, True, datetime.datetime(2023, 3, 1, 0, 0)), (3, 30, 56, 1090, 80, False, False, datetime.datetime(2023, 9, 22, 10, 21))]

[Done] exited with code=0 in 0.322 seconds
本番用プログラムの作成
それぞれ必要な機能が上手く動作することがわかったので本番用のプログラムを作成する。
import UnitTest.bmeTest
import UnitTest.InsertDataTest
import datetime
import math
import schedule
import time

#インスタンス生成
bme280 = UnitTest.bmeTest.BME280()
insert = UnitTest.InsertDataTest

#気温、湿度、気圧を取得
def getWeather():
    p_raw, t_raw, h_raw = bme280.get()
    p = f"{p_raw:7.2f}"
    t = f"{t_raw:7.2f}"
    h = f"{h_raw:7.2f}"
    print(p,t,h)

    #不快指数 https://keisan.casio.jp/exec/system/1202883065
    comfort_raw = 0.81*float(t)+0.01*float(h)*(0.99*float(t)-14.3)+46.3

    print(comfort_raw)
    c = math.ceil(comfort_raw)
    print(c)

    dt_now = datetime.datetime.now()
    d = dt_now.strftime('%Y-%m-%d %H:%M:%S')
    value = (float(t),float(h),float(p),c,d,)

    return value


import psycopg2

#データベース接続処理
def InsertInit():
    constr = "host='*******' port=5432 dbname=dev user=root password='root'"
    connect = psycopg2.connect(constr)
    cursor = connect.cursor()

    return cursor, connect

#データ登録処理
def Insert(que):
    cur, conn = InsertInit()
    cur.execute(que, getWeather())
    conn.commit()
    cur.execute('select * from weather')
    data = cur.fetchall()
    print(data)
    cur.close()
    conn.close()

if __name__ == '__main__':
    #実行SQL
    que = "INSERT INTO weather (temp,humid,pressure,comfort,deal_flg,del_flg,date) values (%s,%s,%s,%s,'false','false',%s);"
    #初回実行
    Insert(que)
    schedule.every(30).minutes.do(Insert, que)
    while True:
        schedule.run_pending()
        time.sleep(1)
気温、湿度、気圧、日付を30分毎に取得するためにscheduleライブラリを利用して定期実行を設定する。
出力
[Running] python -u "/home/pi/CmftCon/InsertInfo.py"
1002.34   29.77   68.97
80.87803531
81
[(1, 0, 0, 0, 0, False, True, datetime.datetime(2023, 3, 1, 0, 0)), (3, 30, 56, 1090, 80, False, False, datetime.datetime(2023, 9, 22, 10, 21)), (4, 30, 69, 1002, 81, False, False, datetime.datetime(2023, 9, 22, 10, 28, 53))]
データが登録されていることが確認できた!
以上で「Spring × Ras Piでセンサから取得したデータを表示する」が完了しました!!
ただ、、ローカルでdocker立て続けるのはちょっと面倒なのでAWSでやりたいですね、、
第1弾(Spring編)はこちら
第3弾(AWS編)はこちら
問題解決編(デーモン化)はこちら
おまけと今後の展望
- mysql-driverだと自動でトランザクション処理を行ってくれたが今回扱った接続ライブラリだと
commitしないと反映されないことに最初気が付かず苦戦した。- ロールバック処理もできるみたいなのでデータベースとしての強さは上がったっぽい
- Ras Piとサーバサイドの通信方法を考えたい
- Python(サーバ)とPython(クライアント)でのソケット通信はやったことあるけど、javaとPythonでもやってみたい
- AWSEC2でdocker-compose、dockerを構築した後、最大限に費用を抑えながら楽をする方法が気になる