はじめに
本記事では、Android jetpackで作成されたアプリにAmazon Cognitoの機能を埋め込み、簡単にログイン機能・二要素機能を実装する方法を解説する。
以下が、筆者の環境。
- OS:macOS
- Android Studio:Android Studio Narwhal 4 Feature Drop | 2025.1.4
- Kotlin:2.20.0
- Gradle:8.13
Amazon Cognito
Amazon Cognitoは、ユーザー認証・認可をマネージドで提供するAWSのサービス。モバイル/ウェブアプリにサインアップ・サインイン・認可を簡単に組み込むことができる。
- ユーザープール:
アプリのユーザーディレクトリ。メール/パスワードやSNS(Google/Apple等)、SAML/OIDC連携、MFA、パスワードポリシー、ホスト型ログインUI、JWT(ID/Access/Refresh)発行を提供。 - アイデンティティプール:
認証済みユーザーに一時的なAWS認証情報を払い出し、S3・API Gateway等のAWSリソースへ直接アクセスさせる仕組み。
Cognitoの準備
1. Amazon Cognito→ユーザープールからユーザープールを作成をクリック

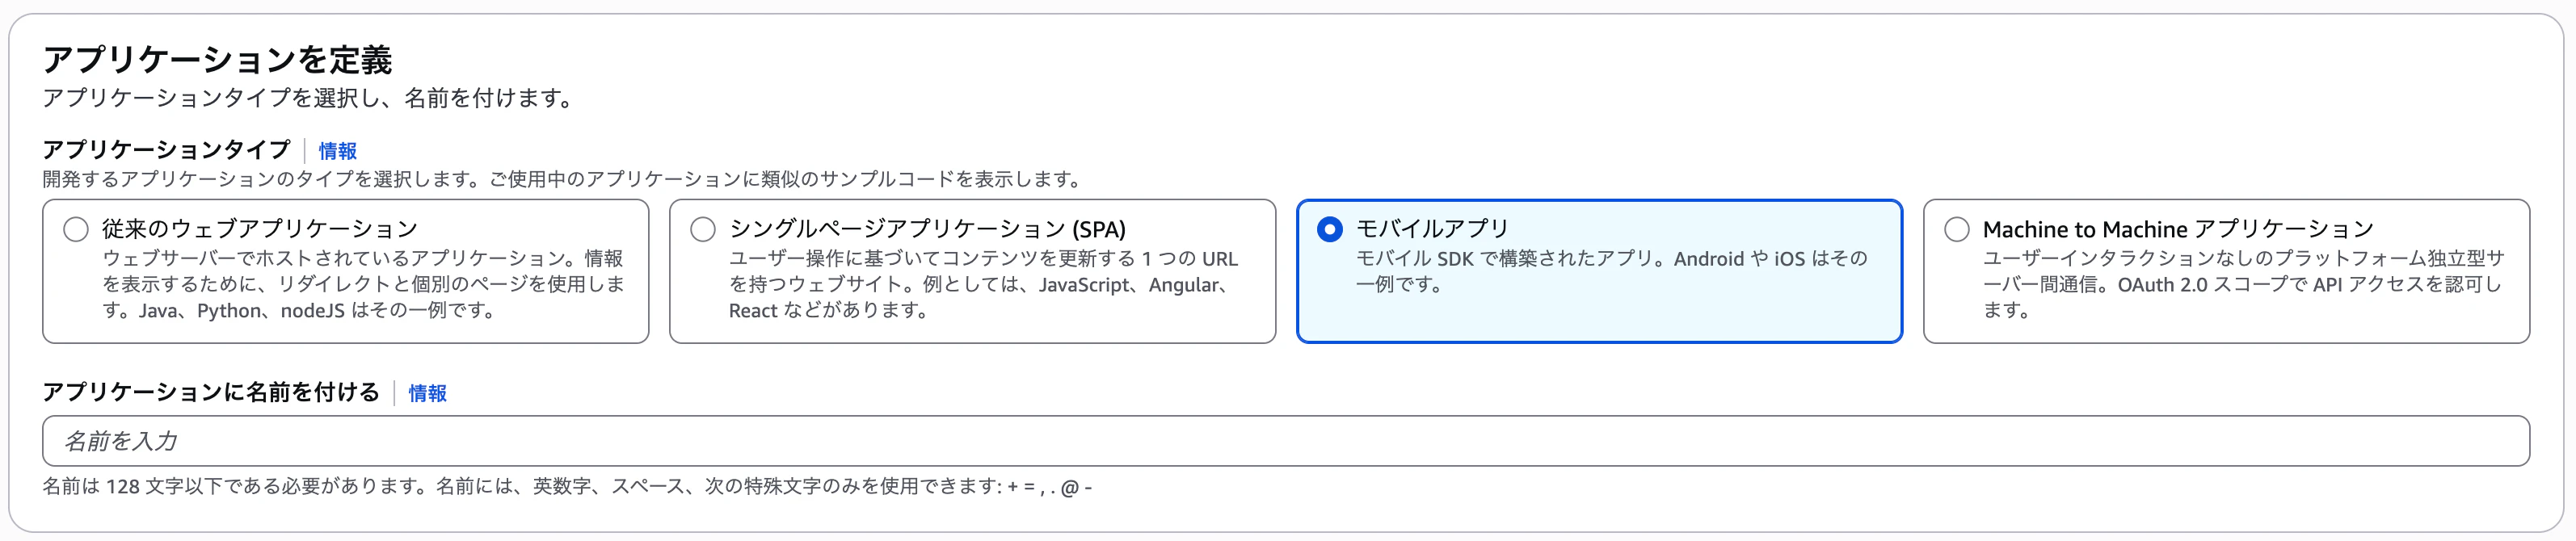
2. アプリケーションを定義でモバイルアプリを選択し、アプリケーションに名前をつける
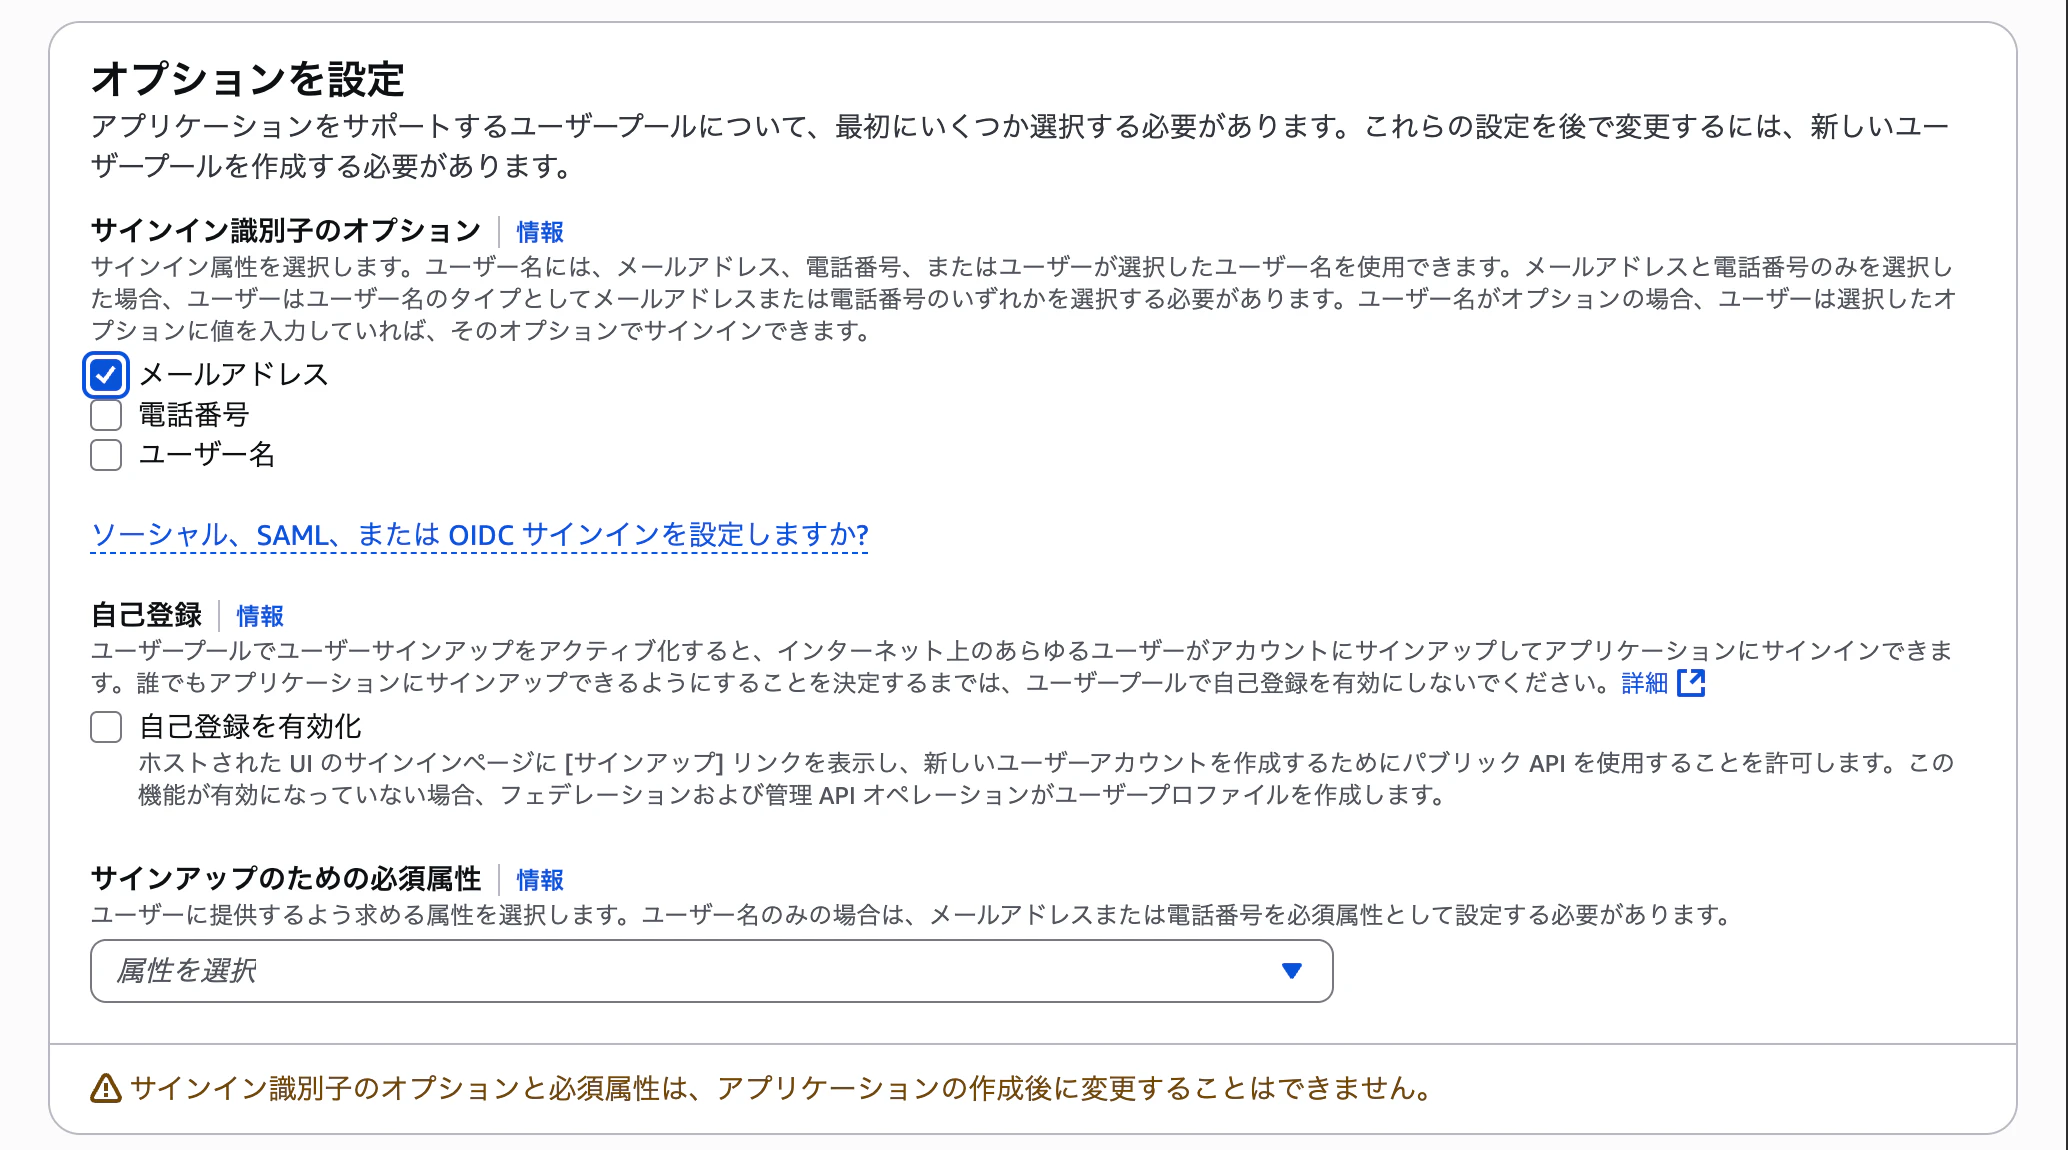
3. オプションを設定では以下のように設定
- サインイン識別子のオプション:メールアドレス
- 自己登録:無効化(有効化すると、誰でもアプリケーションからサインアップできてしまうので、一旦無効化に設定)
4. 以下のようにサインインページを確認と出たら成功

モバイルアプリ連動用設定
モバイルアプリ側に組み込む設定ファイル(json)で必要な以下項目を確認または設定する
1. 確認項目
- ドメイン:your-domain.auth.ap-northeast-1.amazoncognito.com
- ユーザープール→ユーザープール名→ブランディング→ドメインから確認
- 余裕がある方はACMを使用してカスタムドメインを作成することもできる
- クライアントID:大小英数字混合25桁
- ユーザープール→ユーザープール名→アプリケーション→アプリケーションクライアントから確認
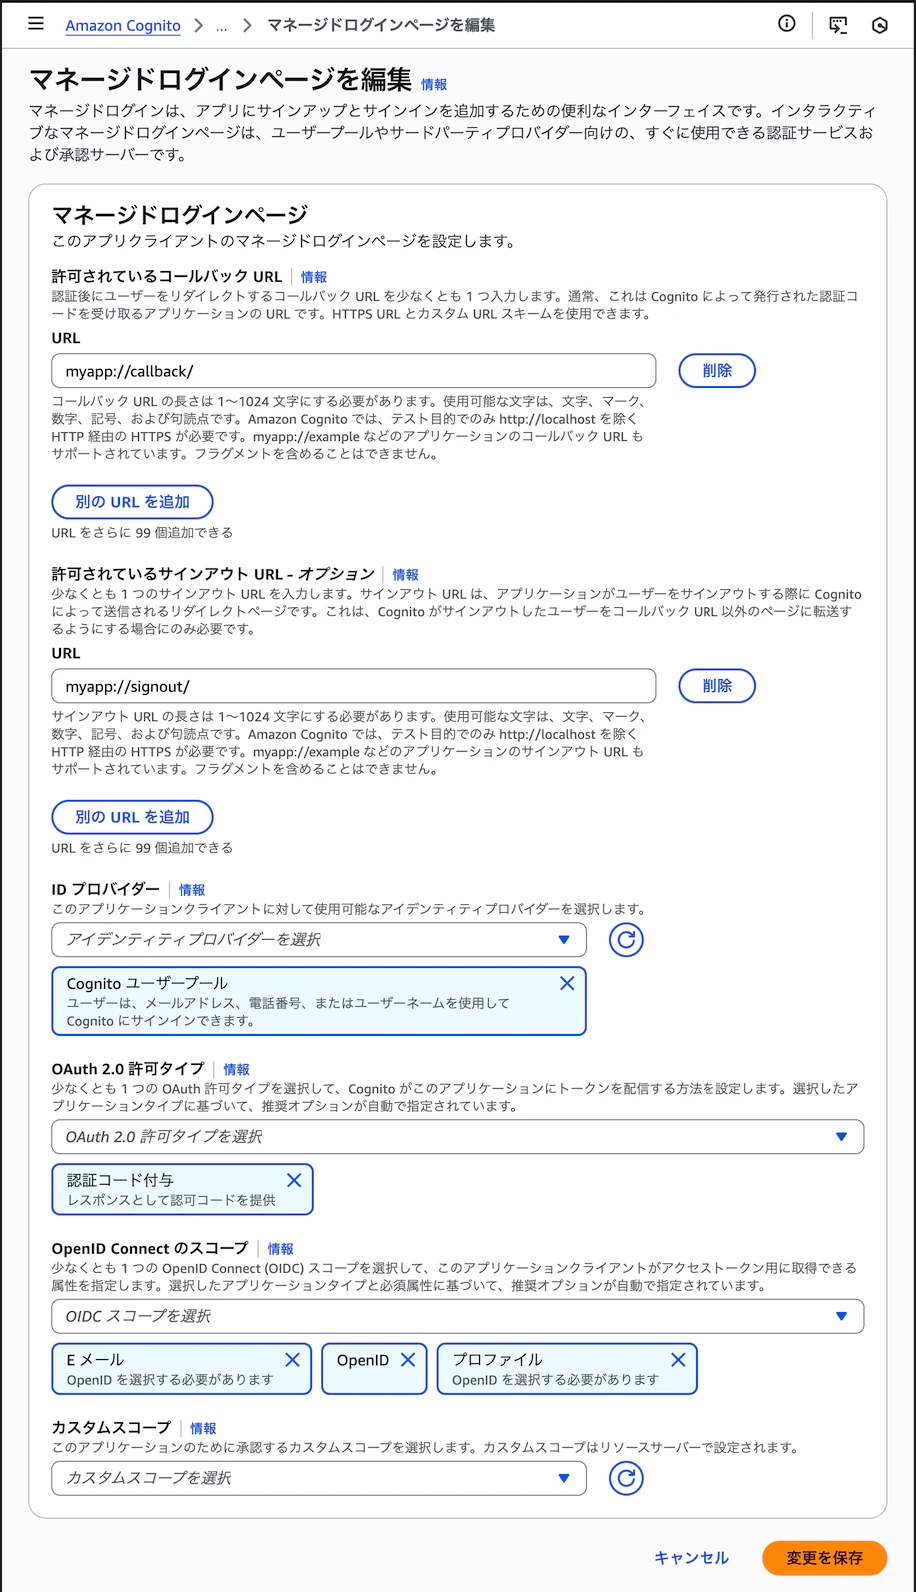
2. 設定項目
- ユーザープール→ユーザープール名→アプリケーション→アプリケーションクライアントから以下のように設定
- 許可されているコールバックURL:myqpp//callback
- 許可されているサインアウトURL:myqpp//signout
- OpenID Connectのスコープ
- Eメール
- OpenID
- プロファイル
ログインユーザーの準備
1. Amazon Coginto→ユーザー管理→ユーザーを開き、ユーザーを作成をクリック
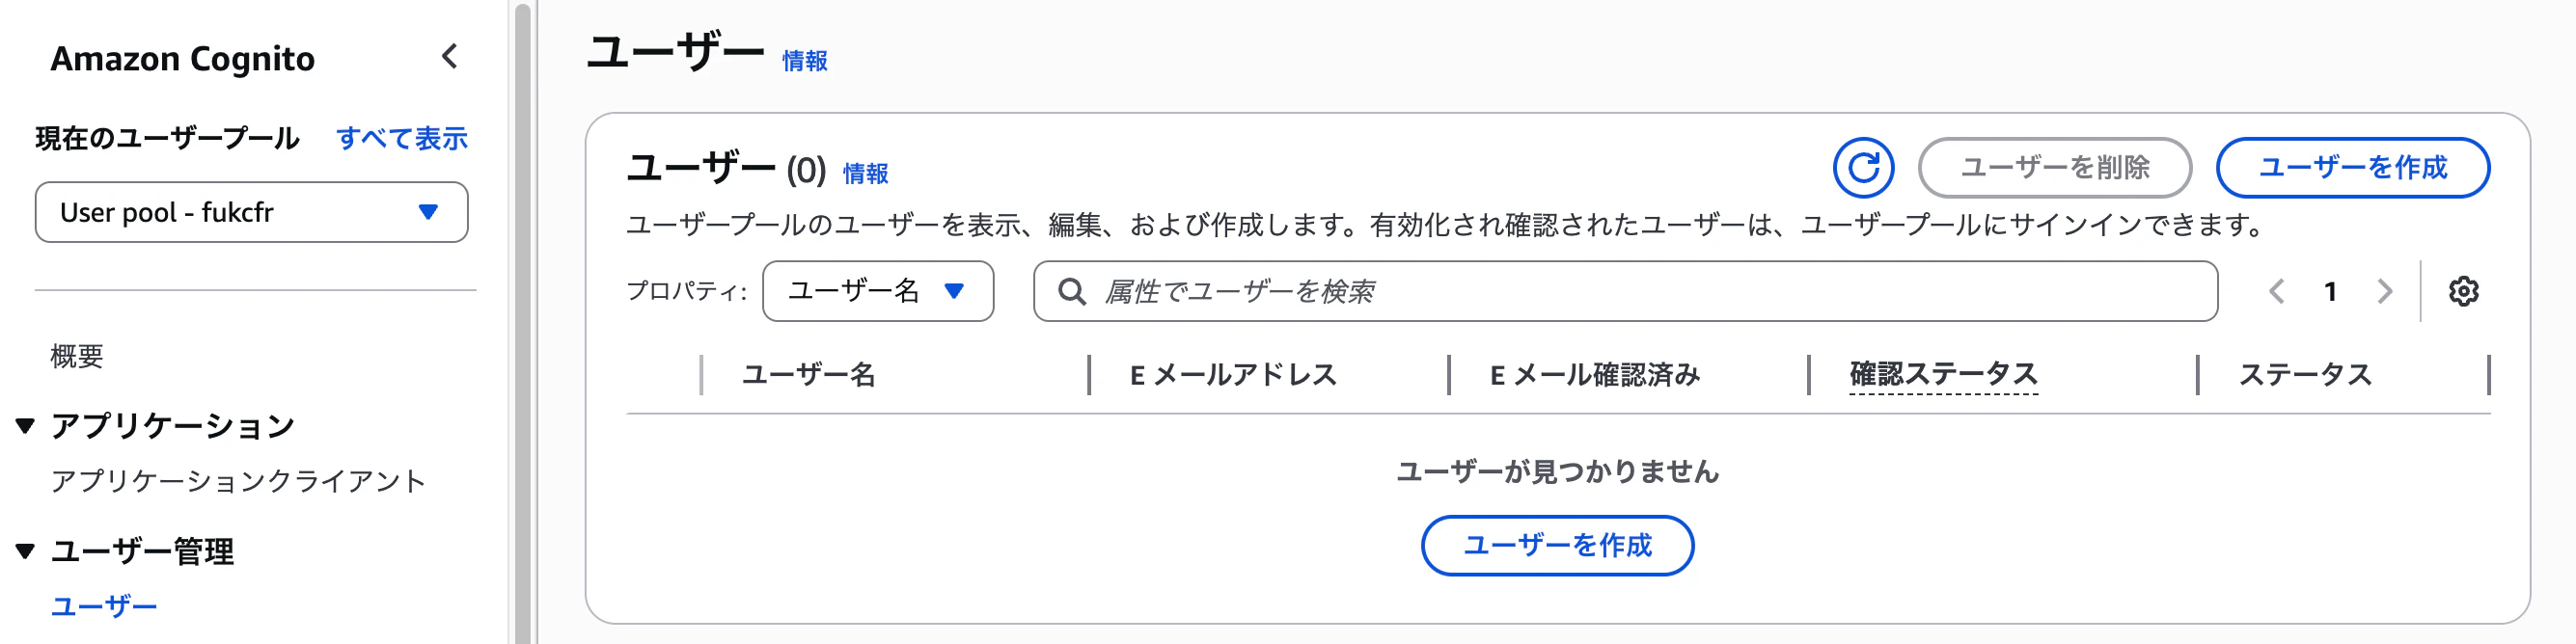
2. ユーザー情報を以下のように設定
- 招待メッセージ:Eメールで招待を送信
- Eメールアドレス:任意のアドレスを入力
- 仮パスワード:パスワードの生成
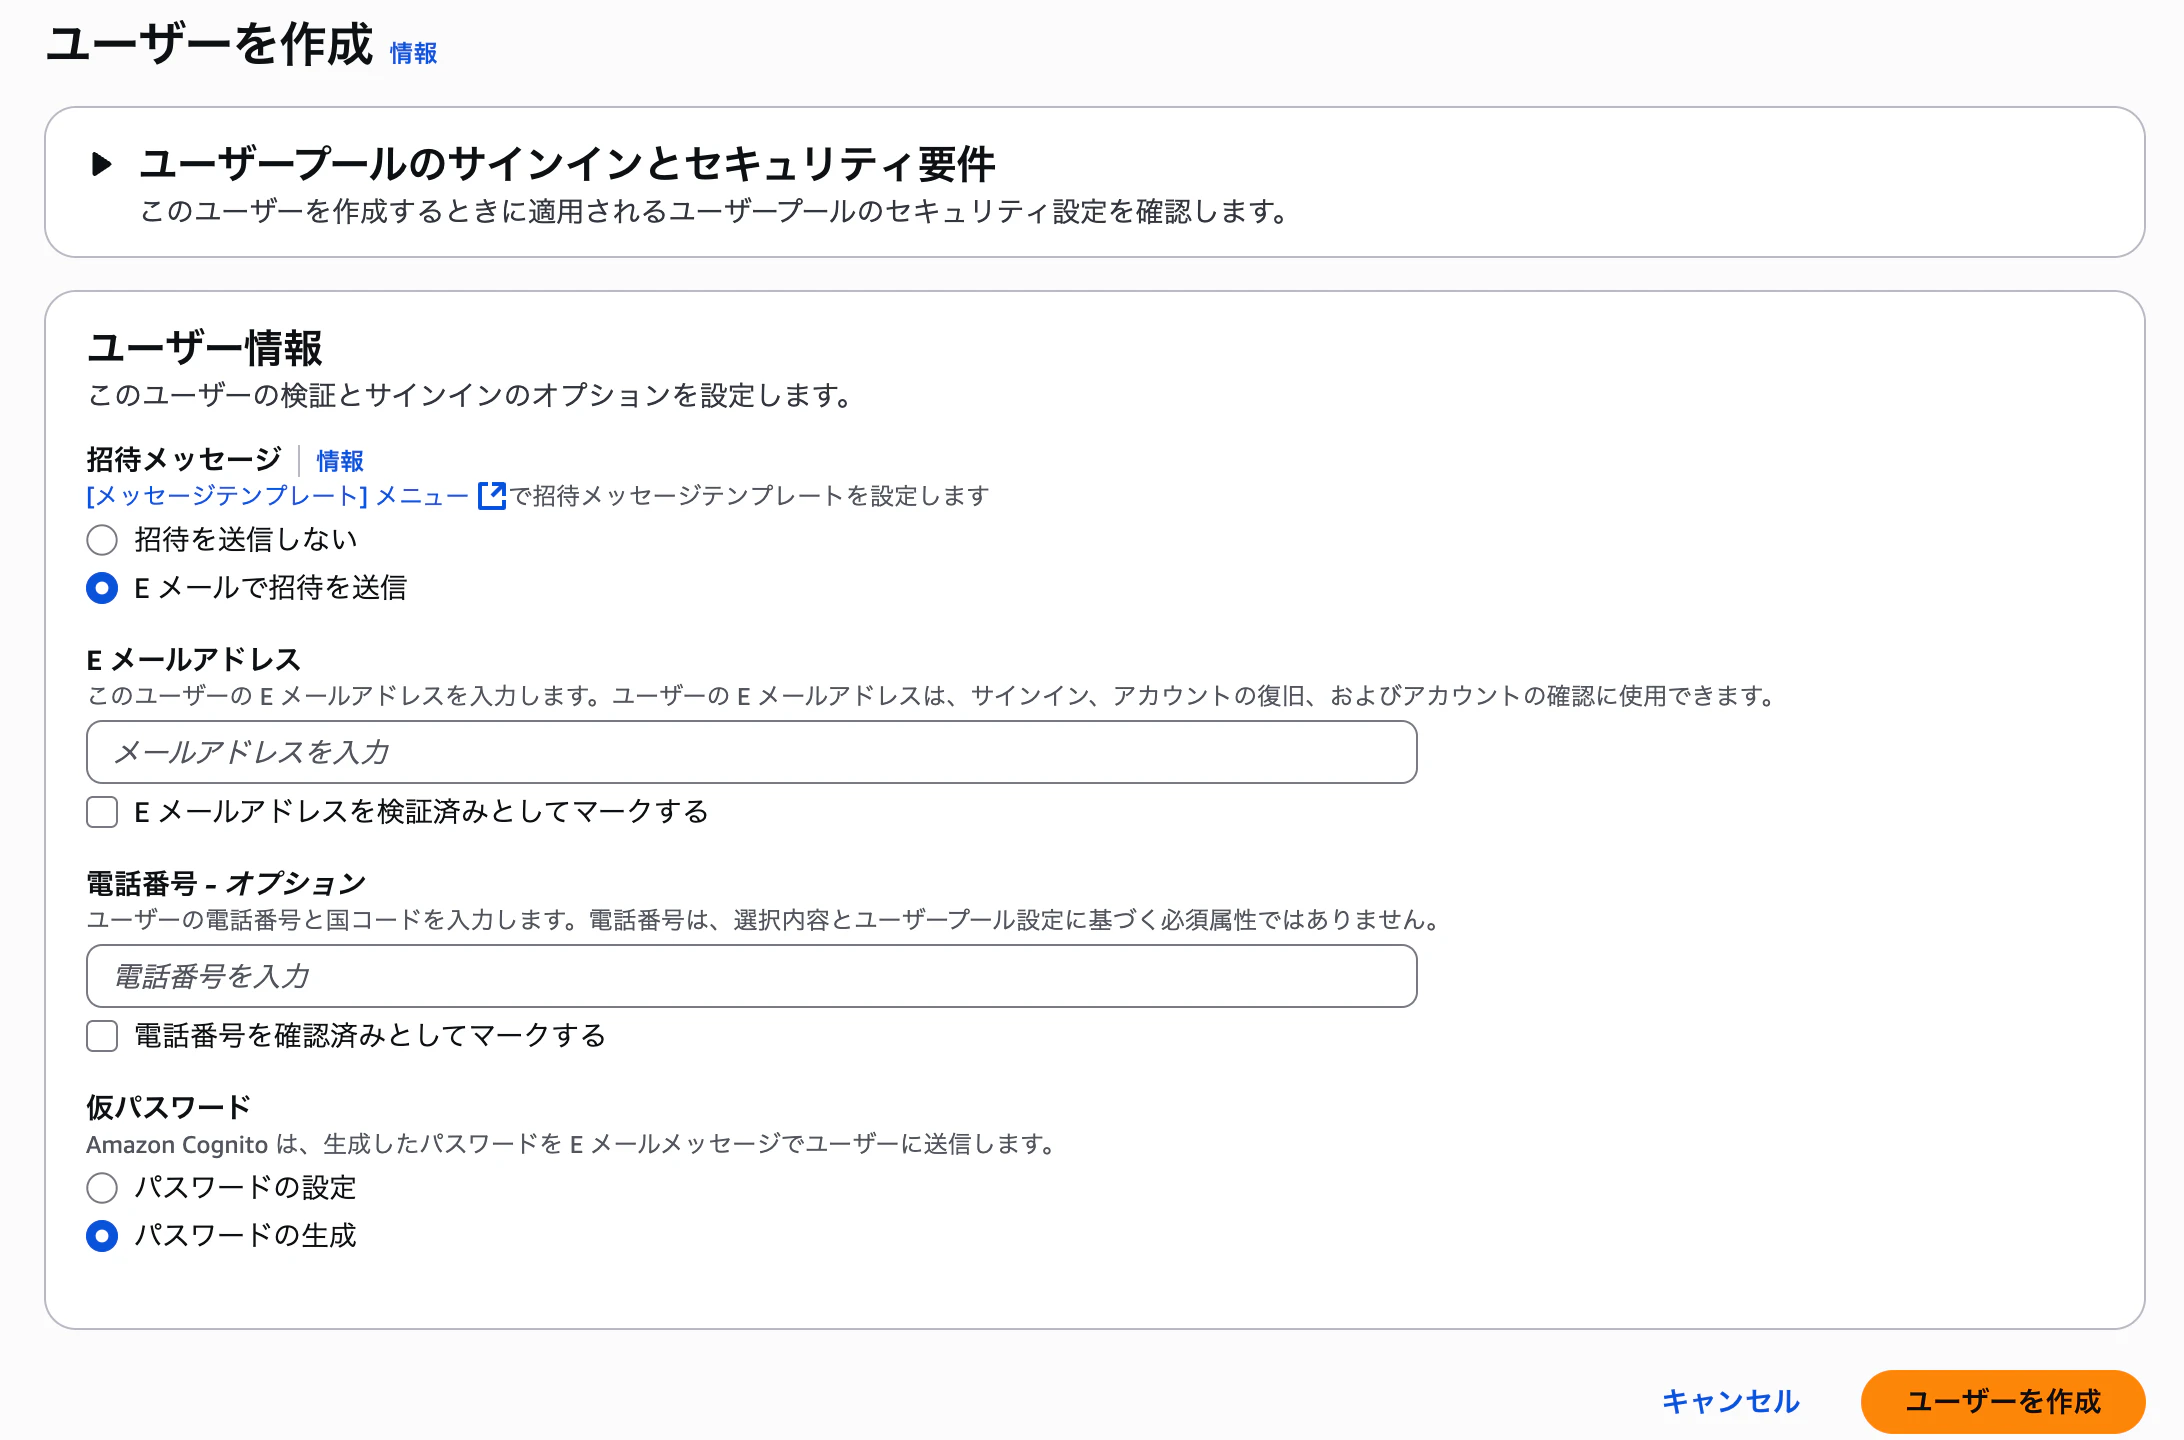
作成すると、Eメールアドレスに仮パスワードが送られる。
AndroidアプリへのAmazon Cognito組み込み
1. build.gradle.ktsに以下の依存関係を組み込む
dependencies {
    coreLibraryDesugaring("com.android.tools:desugar_jdk_libs:2.0.4")
    implementation("com.amplifyframework:core:2.30.1")
    implementation("com.amplifyframework:aws-auth-cognito:2.30.1")
}
2. app/src/main/res/raw配下に、AmplifyConfiguration.jsonを作成
設定する値はモバイルアプリ連動用設定で確認・設定した値を設定する
※本記事では全てダミーの値を設定する
{
  "auth": {
    "plugins": {
      "awsCognitoAuthPlugin": {
        "CognitoUserPool": {
          "Default": {
            "PoolId": "ap-northeast-1_123456789",
            "AppClientId": "abcdefgh1234567890ABCDEFGH",
            "Region": "ap-northeast-1"
          }
        },
        "Auth": {
          "Default": {
            "authenticationFlowType": "USER_SRP_AUTH",
            "OAuth": {
              "WebDomain": "ap-northeast-123456789.auth.ap-northeast-1.amazoncognito.com",
              "AppClientId": "abcdefgh1234567890ABCDEFGH",
              "SignInRedirectURI": "myapp://callback/",
              "SignOutRedirectURI": "myapp://signout/",
              "Scopes": ["openid", "email", "profile"]
            }
          }
        }
      }
    }
  }
}
3. AndroidMainfestの更新
以下、重要な部分のみ抜粋
- applicationタグのApplicationクラスをカスタムアプリケーションに変更
- activityタグにサインインURL・サインアウトURLのディープリンク用Activityを設定
<manifest xmlns:android="http://schemas.android.com/apk/res/android"
    xmlns:tools="http://schemas.android.com/tools">
    <uses-permission android:name="android.permission.INTERNET"/>
    <application
        android:name=".MyApplication">
        <activity
            android:name="com.amplifyframework.auth.cognito.activities.HostedUIRedirectActivity"
            android:exported="true">
            <!-- サインインURL と一致 -->
            <intent-filter>
                <action android:name="android.intent.action.VIEW"/>
                <category android:name="android.intent.category.DEFAULT"/>
                <category android:name="android.intent.category.BROWSABLE"/>
                <data android:scheme="myapp" android:host="callback" android:path="/"/>
            </intent-filter>
            <!-- サインアウトURL と一致 -->
            <intent-filter>
                <action android:name="android.intent.action.VIEW"/>
                <category android:name="android.intent.category.DEFAULT"/>
                <category android:name="android.intent.category.BROWSABLE"/>
                <data android:scheme="myapp" android:host="signout" android:path="/"/>
            </intent-filter>
        </activity>
    </application>
</manifest>
4. カスタムApplicationの作成
カスタムApplicationクラスを作成して、Cognitoプラグインの登録やAmplify設定の読み込みを行う
import android.app.Application
import com.amplifyframework.AmplifyException
import com.amplifyframework.auth.cognito.AWSCognitoAuthPlugin
import com.amplifyframework.core.Amplify

// カスタムApplicationクラス
class MyApplication : Application() {
    override fun onCreate() {
        super.onCreate()
        try {
            // Cognito認証機能プラグイン登録
            Amplify.addPlugin(AWSCognitoAuthPlugin())
            // AmplifyConfiguration.jsonの読み込み
            Amplify.configure(applicationContext)
        } catch (e: AmplifyException) {
            e.printStackTrace()
        }
    }
}
5. Screen.kt
@Composable
fun CognitoAuthScreen(modifier: Modifier = Modifier) {
    val ctx = LocalContext.current
    val activity = remember { ctx.findActivity() }
    var isSignedIn by remember { mutableStateOf(false) }
    var status by remember { mutableStateOf("Checking session...") }

    // 重複ロジックを集約するため、セッション状態を一括更新
    val updateSession: () -> Unit = remember {
        {
            Amplify.Auth.fetchAuthSession(
                { s ->
                    isSignedIn = s.isSignedIn
                    status = if (s.isSignedIn) "Signed in" else "Not signed in"
                },
                { e -> status = "Session error: ${e.localizedMessage}" }
            )
        }
    }

    // 起動時に一度だけ現在のセッションを確認
    LaunchedEffect(Unit) { updateSession() }

    Column(modifier.padding(16.dp), verticalArrangement = Arrangement.spacedBy(12.dp)) {
        Text(status, style = MaterialTheme.typography.titleMedium)

        Button(
            onClick = {
                val act = activity ?: return@Button
                // ホステッドUIでログイン → 本アプリにリダイレクト後にセッション再取得
                Amplify.Auth.signInWithWebUI(
                    act,
                    { updateSession() },
                    { e -> status = "Sign-in failed: ${e.localizedMessage}" }
                )
            },
            enabled = !isSignedIn
        ) { Text("Sign in") }

        Button(
            onClick = {
                Amplify.Auth.signOut(
                    {
                        isSignedIn = false
                        status = "Signed out"
                    },
                    { e -> status = "Sign-out failed: ${e.localizedMessage}" }
                )
            },
            enabled = isSignedIn
        ) { Text("Sign out") }
    }
}

/** ContextからActivityを取得 */
private tailrec fun Context.findActivity(): Activity? = when (this) {
    is Activity -> this
    is ContextWrapper -> baseContext.findActivity()
    else -> null
}
実際のアプリの動き
Amazon Cognitoの設定とAndroidの実装をしてみた結果
以下、主な動きです。
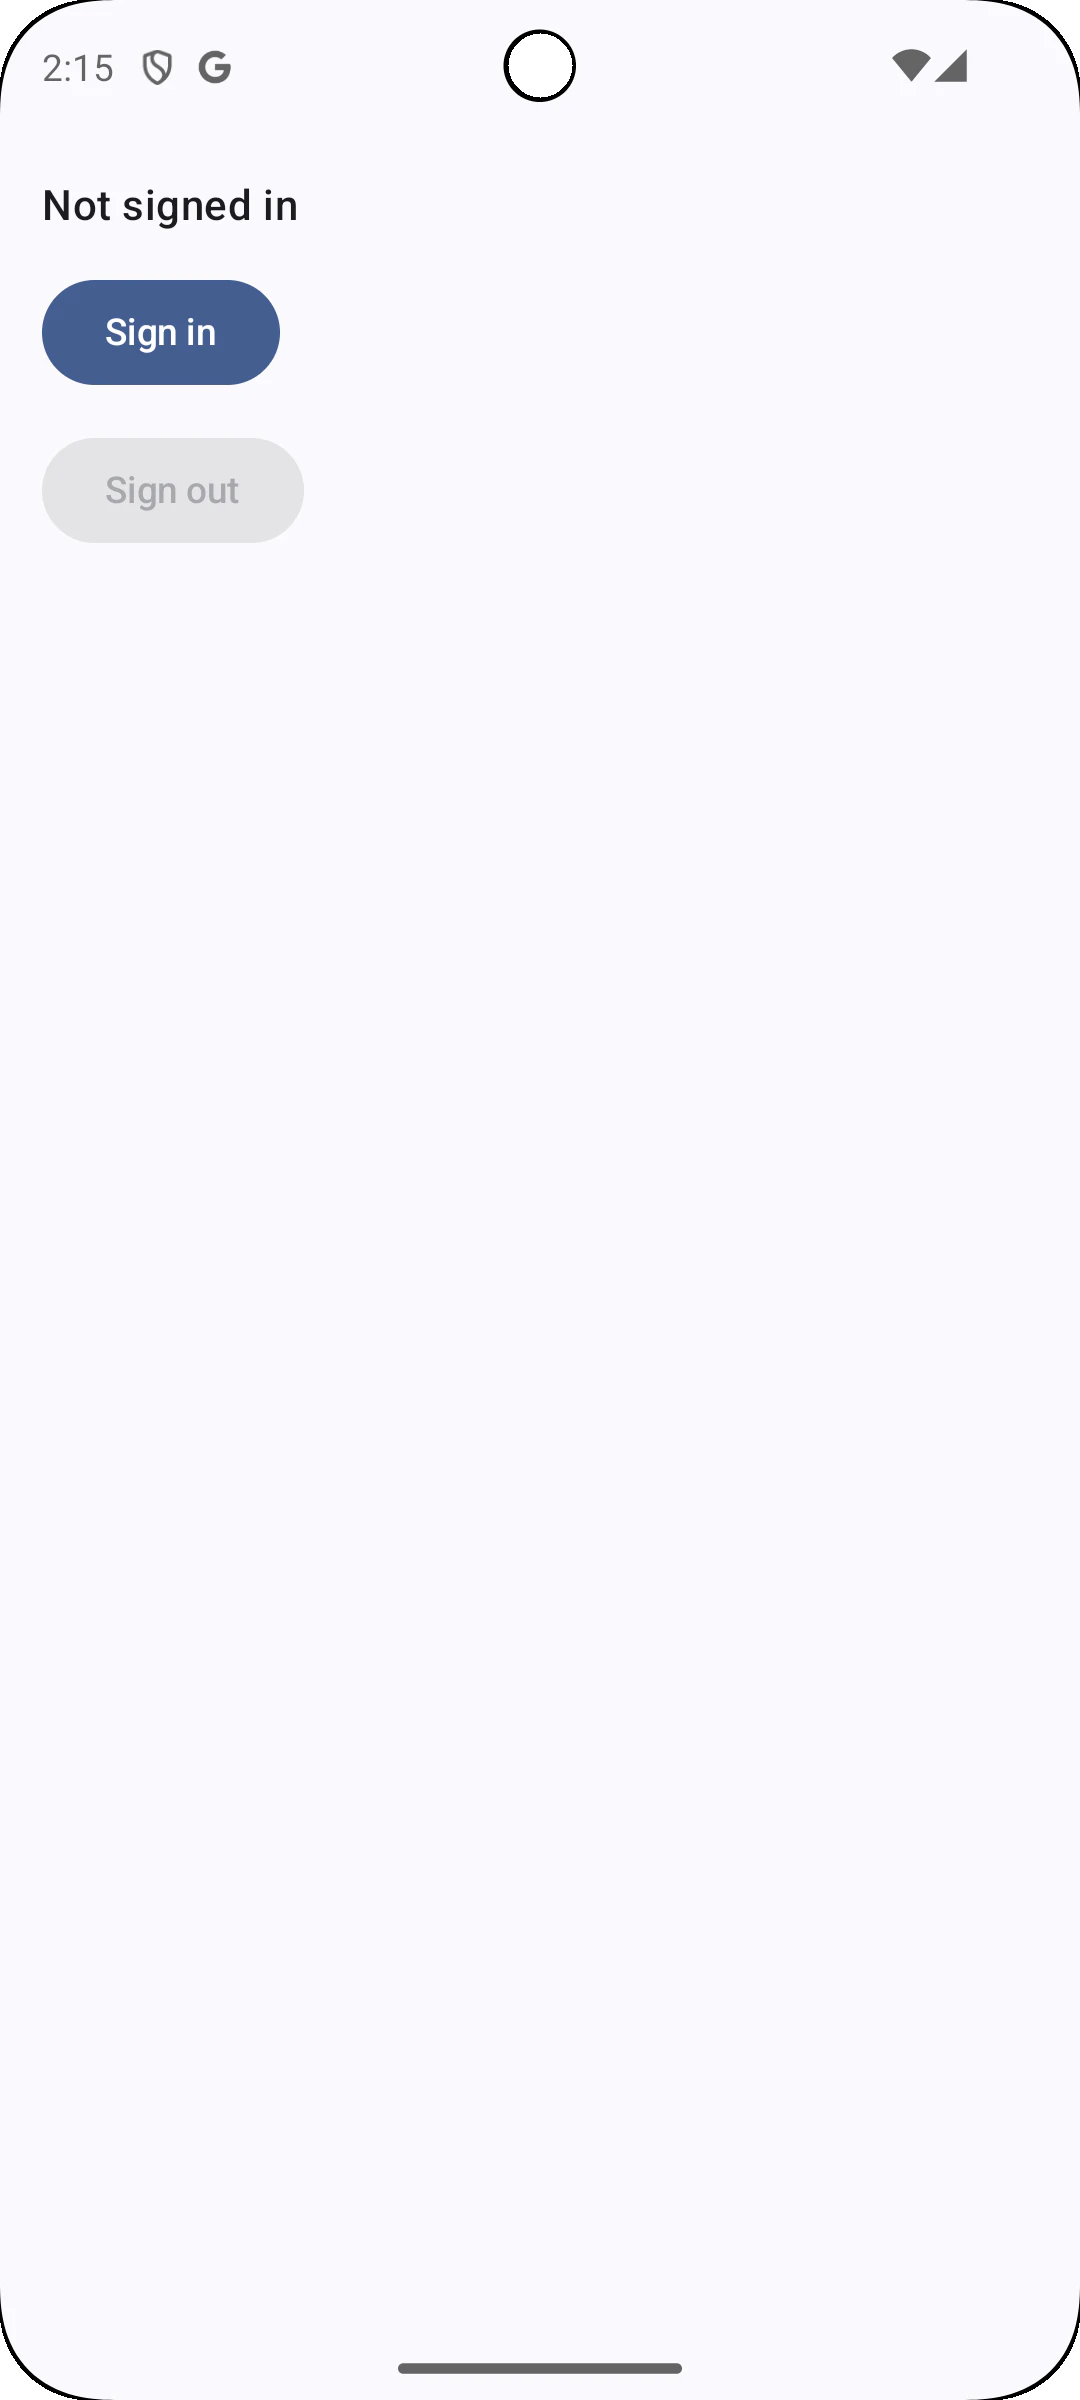
1. 初期画面(サインイン前)
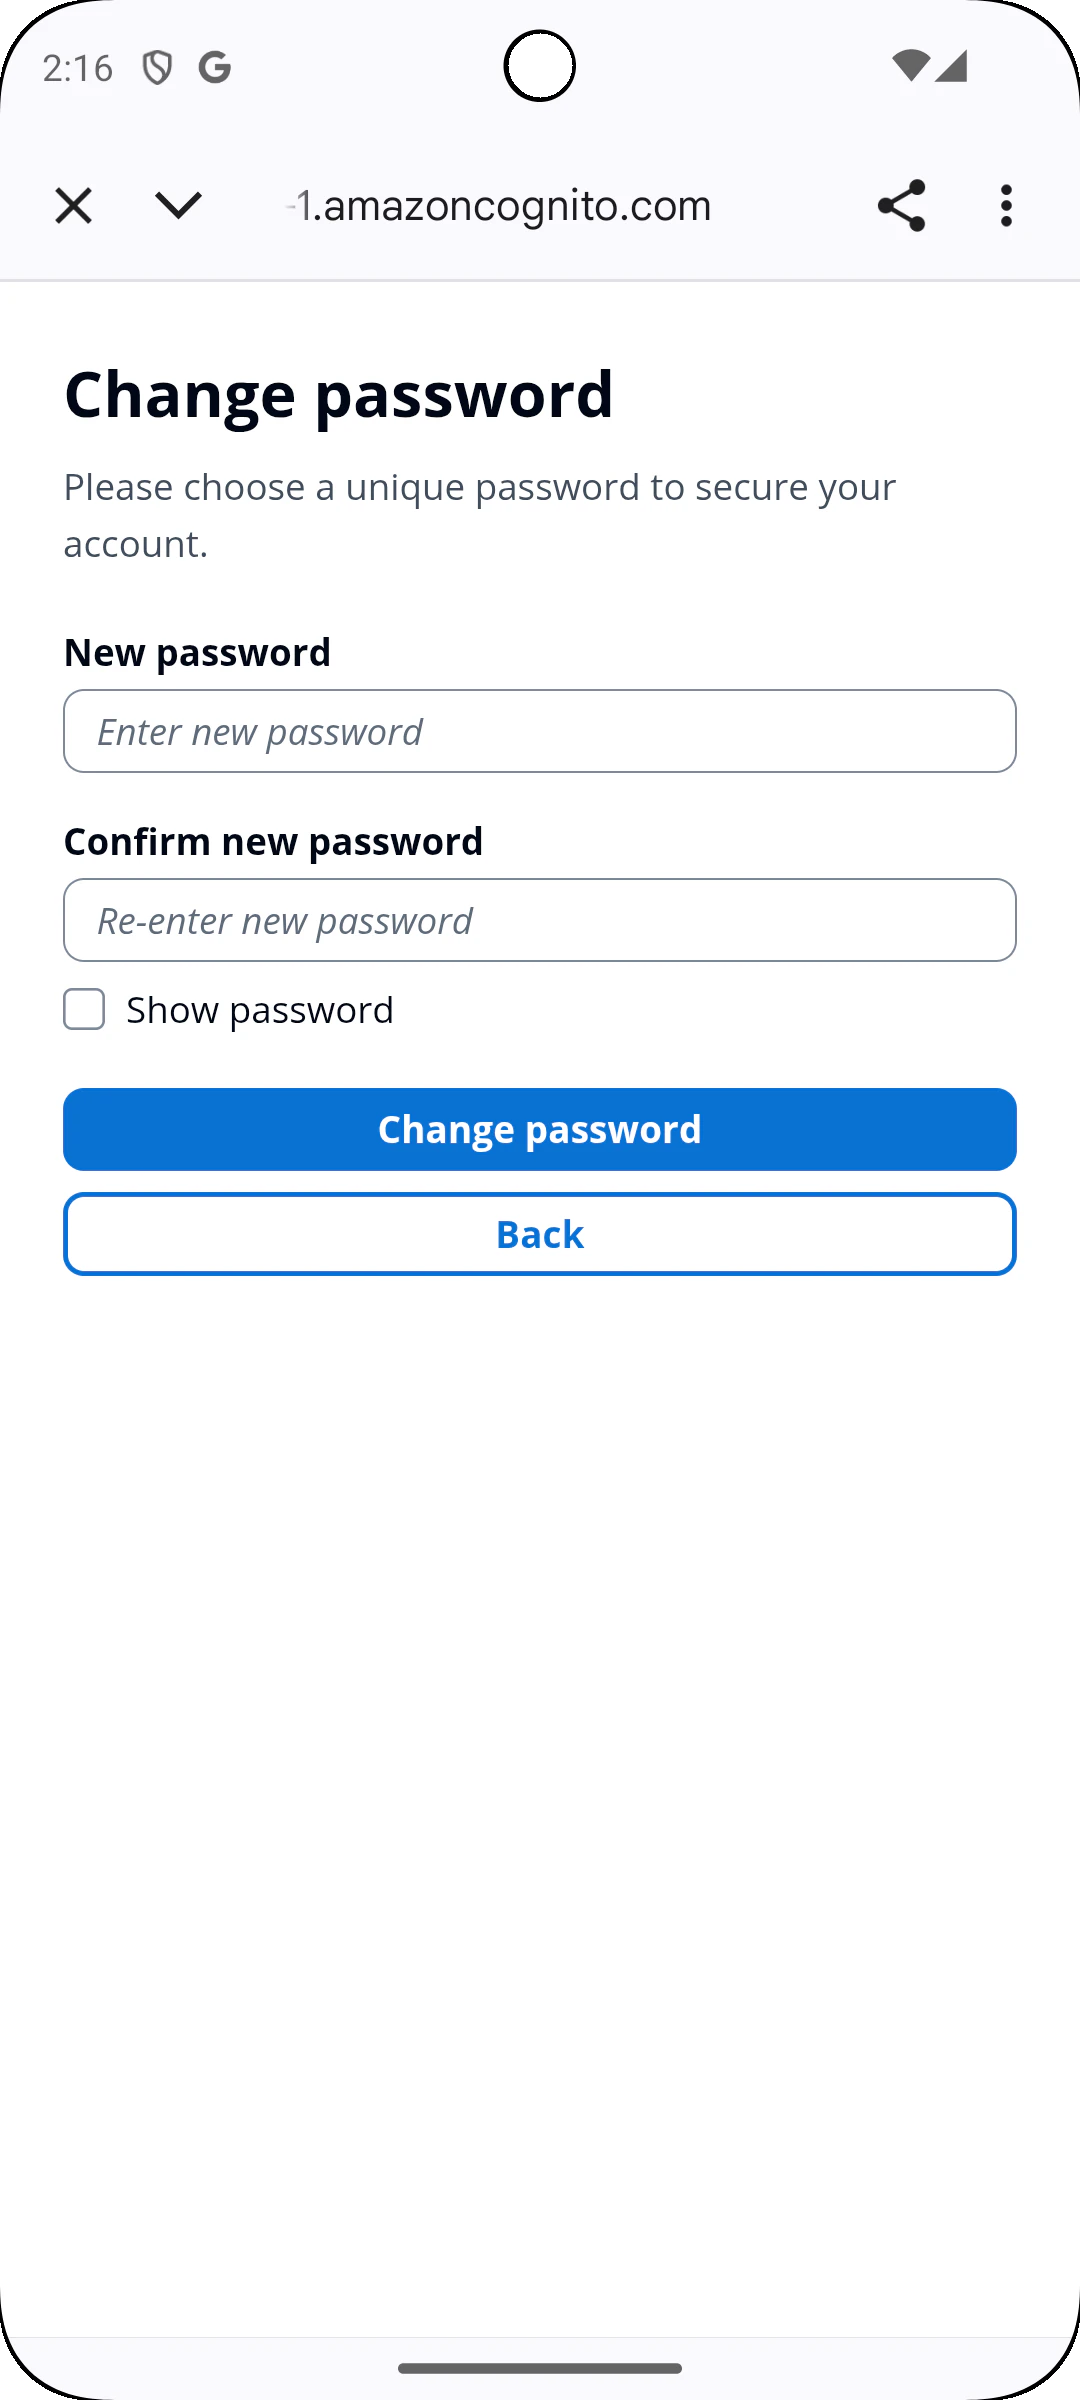
2. ボタンタップ後、初期パスワード変更
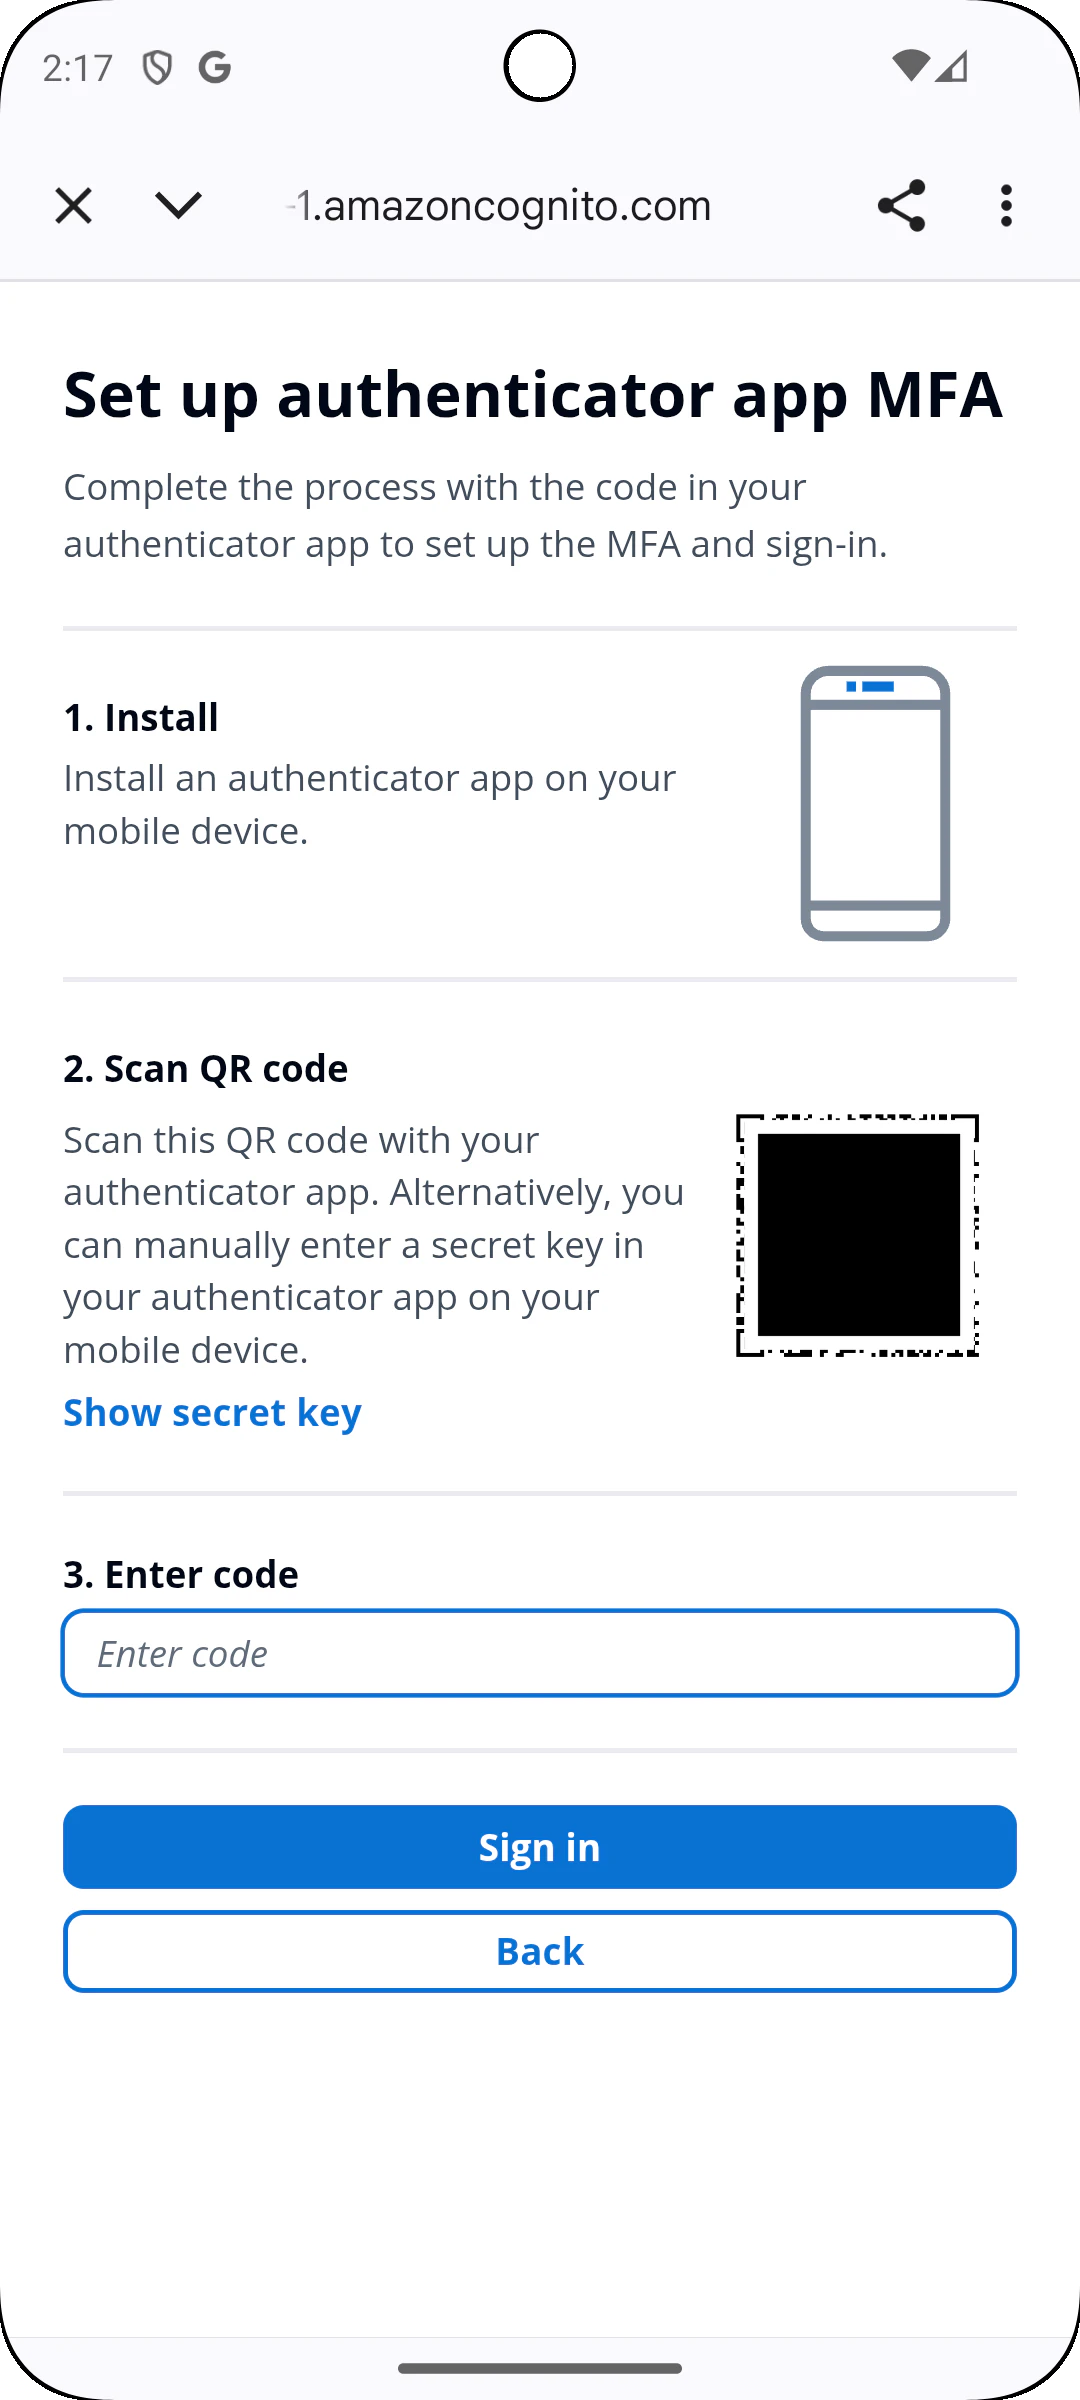
3. 二要素登録画面
4. アプリに戻ってきたら(サインインセッション継続)
