ディープラーニングの本をいくつか読んだけど、いまいちピンとこない。
技術的にすごいことはわかったけど、で?って感じでした。
画像認識したかったらAmazon Rekognitionとか使えばいいんでしょ?自分でディープラーニングすることなくない?と思ってました。
手を動かすことにしました。
→上手くいかなかった。。原因をだれか、教えて!!
題材
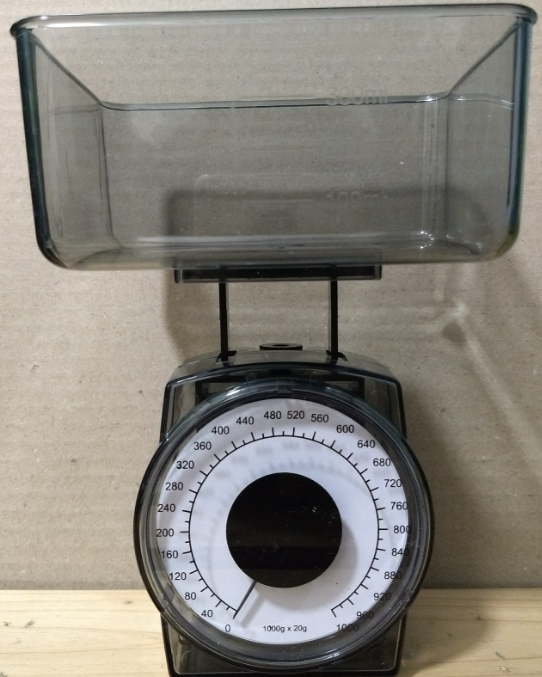
ダイソーで秤を買いました。
メモリが200g以下になったことを検知して「もうすぐ無くなるよ!」と言えれば、何かと役に立つのではないかと考えました。
画像の取得
画像はRaspberry Pi Zero にUSBカメラ(Logicool C200)をつけて撮りました。
環境セットアップ
Raspberry Pi でカメラ
https://qiita.com/suppy193/items/e9faedbc268d439bd02b
を参考に、インストールとmotion.confを変更。起動はこちらの方法で行いました。
sudo motion -n
起動後、http://xxx.xxx.xxx.xxx:8080にアクセスし、以下の設定を変えました。
| 設定項目 | 変更後の値 |
|---|---|
| target_dir | /home/pi/motion |
| text_right | (not defined) |
| text_event | (not defined) |
| snapshot_interval | 1 |
設定変更は即時反映のようです。
こうして1秒間隔で画像を取得しました。
取得した画像
秤のうえに牛乳パックをおいて、水をチョロチョロいてれるところを1秒間隔でキャプチャ。
こんな感じです。
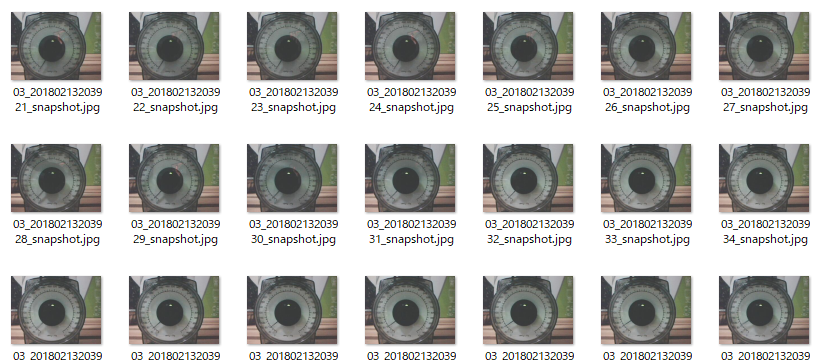
200g以下の画像を200枚、200g以上の画像を200枚ほど用意しました。
学習
Kerasを使いました。主にこちらを参考にしました。
kerasでCNN 自分で拾った画像でやってみる
https://qiita.com/haru1977/items/17833e508fe07c004119
モデルもそのまま参考にしても良かったのですが、何がなんやらわからなかったので、Kerasが予め対応している有名なモデルをそのまま使うことにしました。Googleの人が作ったものだとすごいんでしょ的な発想でMobileNetを選びました。
利用可能なモデル
https://keras.io/ja/applications/
また、作ったモデルを保存しました。
Keras modelを保存するには?
https://keras.io/ja/getting-started/faq/#keras-model
できたコードがこちら
# coding:utf-8

from keras.applications.mobilenet import MobileNet

from keras.preprocessing import image
from keras.preprocessing.image import array_to_img, img_to_array, list_pictures, load_img
import numpy as np
from keras.utils import np_utils
from sklearn.model_selection import train_test_split

X = []
Y = []

# 対象Aの画像
for picture in list_pictures('./test0212_1_50/'):
    img = img_to_array(load_img(picture, target_size=(224,224)))
    X.append(img)

    Y.append(0)

# 対象Bの画像
for picture in list_pictures('./test0212_2_100/'):
    img = img_to_array(load_img(picture, target_size=(224,224)))
    X.append(img)

    Y.append(1)

# arrayに変換
X = np.asarray(X)
Y = np.asarray(Y)

# 画素値を0から1の範囲に変換
X = X.astype('float32')
X = X / 255.0

# クラスの形式を変換
Y = np_utils.to_categorical(Y, 2)

# 学習用データとテストデータ
X_train, X_test, y_train, y_test = train_test_split(X, Y, test_size=0.33, random_state=111)

# MobileNetのモデルを利用
model = MobileNet(include_top=True, weights=None, classes=2)

# コンパイル
model.compile(loss='categorical_crossentropy',
              optimizer='SGD',
              metrics=['accuracy'])

# 学習
history = model.fit(X_train, y_train, epochs=15,
                   validation_data = (X_test, y_test), verbose = 1)

filepath = '0212_my_model.h5'
model.save(filepath)
学習開始!
python -m 0212_train
処理が終わるとモデルが出来上がります。
躓いた点1「ファイル名問題」
画像のファイル名に-があるとだめでした。-はファイル名に使えないってそういうもんなんでしょうか?-を_に一括置換して対処しました。
ファイル名を一括置換するワンライナー
https://qiita.com/goking/items/ff6ea22a4b5559d30896
ls -1 *.jpg | awk '{print;gsub(/-/,"_");print}' | xargs -n 2 mv
躓いた点2「パソコンスペック低すぎ問題」
書くのも恥ずかしいスペックのパソコンしか持ってないので、学習にすごーーーーく時間がかかりました。
正確には、時間がかかりそうだったので途中でやめました。
ちょうど見つけた以下の内容を参考にColaboratoryを使いました。するとあっという間に終わりました。すごい、GPU!!
【秒速で無料GPUを使う】深層学習実践Tips on Colaboratory
https://qiita.com/tomo_makes/items/b3c60b10f7b25a0a5935
予測
Raspberyy Pi zeroにkerasとTensorFlowをインストールしようとしましたが、pip install kerasでは時間がめっちゃかかるのとエラーになっちゃいました。調べると、ビルド済みのものがあるようなので、そちらを利用することにしました。
RasPiでKeras/TensorFlowを動かす
https://qiita.com/kazunori279/items/1e23679c534a49c0e837
http://ci.tensorflow.org/view/Nightly/
にあるnightly-pi-zero-python3の成果物tensorflow-1.6.0rc0-cp34-none-any.whlを使うことにしました。
その先のインストールが結構手間取ったので、正しい手順が示せません。。
ソースはこちら
# coding:utf-8

from time import sleep

from keras.applications import mobilenet

from keras.models import load_model
from keras.preprocessing import image
from keras.preprocessing.image import img_to_array, load_img
import numpy as np
from keras.utils import np_utils

model = load_model('0212_my_model.h5', custom_objects={
                   'relu6': mobilenet.relu6,
                   'DepthwiseConv2D': mobilenet.DepthwiseConv2D})

while True:
    X = []

    picture = '/home/pi/motion/lastsnap.jpg'
    img = img_to_array(load_img(picture, target_size=(224, 224)))
    X.append(img)

    X = np.asarray(X)
    X = X.astype('float32')
    X = X / 255.0

    features = model.predict(X)

    print(features)

    if features[0][0] > 0.5:
        print('水が減っています! (' + str(features[0][0]) + ')')
    else:
        print('水は十分あります! (' + str(features[0][0]) + ')')

    sleep(60)
予測結果
失敗。。。
ものをおいても、置かなくても「水が減っています!」
(venv) pi@pizero:~/motion/python/project $ python -m 0212_predict
Using TensorFlow backend.
[[1.000000e+00 5.362379e-25]]
水が減っています! (1.0)
[[1.000000e+00 6.591085e-25]]
水が減っています! (1.0)
[[1.0000000e+00 6.2064603e-25]]
水が減っています! (1.0)
[[1.000000e+00 6.305497e-25]]
水が減っています! (1.0)
[[1.0000000e+00 1.2839705e-24]]
水が減っています! (1.0)
終わりに
ダイソーの秤が200g以下かどうかは、残念ながらAmazon Rekognitionではわかりません。
クラウドが提供しているものはあくまで汎用的な画像認識。
クラウドのAPIでできない画像認識/分類をしたければ、自分でモデルを作らなくちゃいけない。逆にモデルさえ作っちゃえば、世界にひとつだけの、画像認識システムができるんですね。
失敗しちゃったけど。。。