Agents for Amazon BedrockがGAしましたね。
触ってみた感じですが、いくつか気になる点がありました。
- APIとして各アクションを作成する必要がある
- OpenAPIスキーマが必要
- イベントの形式がAgents for Amazon Bedrock専用
言葉で表現するのが難しいですが、AWSがよく表現する 差別化に繋がらない重労働 が、結構残っている印象です。
少しでも開発体験を向上させたいと思い、検討しました。
先に結論
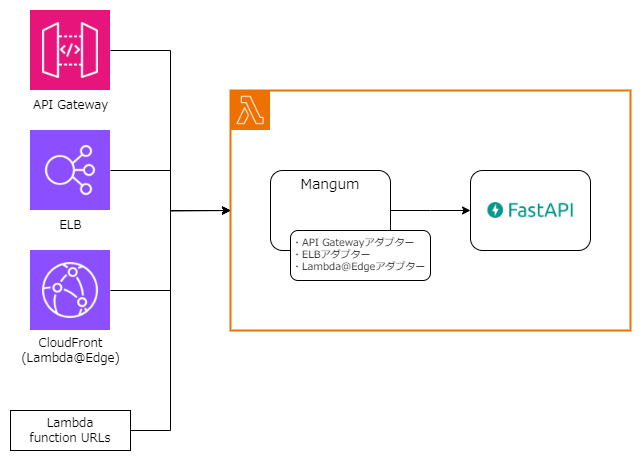
- FastAPIを使ってAPIを構築する。(OpenAPIの生成が可能!)
- Mangumを使ってFastAPIをLambda上で動作させる(プロキシの役割)
- Agents for Amazon Bedrockのイベントを処理する カスタムハンドラー を作成する
これだけお膳立てをすることで、FastAPIのAPI開発だけに注力 することができます。
カスタムハンドラーを含めたSAMのサンプルプロジェクトを置いてますのでコードで見たい方はこちらを参照ください。
Mangumについて
公式サイトでは以下のように説明されています。
Mangum is an adapter for running ASGI applications in AWS Lambda to handle Function URL, API Gateway, ALB, and Lambda@Edge events.
Lambdaで受け付けるイベントを上手に変換して一般的なWebアプリケーションとの間を中継してくれます。ライブラリーのサイズもそれほど大きくないので、ZIP圧縮形式でLambdaに登録可能です。
AWSのサイトで掲載されているbuilders.flashでも取り上げられていて、ある程度メジャーなOSSだと思います。(私は今回の検討で知りましたw)
Mangum自体はAgents for Amazon Bedrockのイベント形式には対応していませんが、カスタムハンドラーを作成することが可能です。
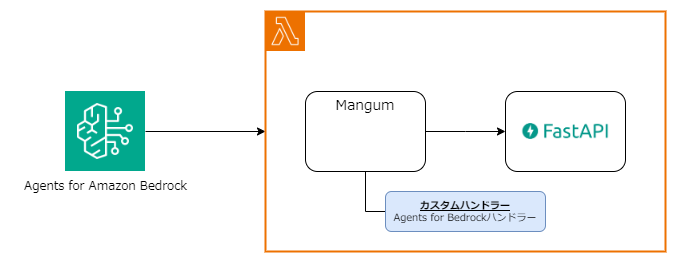
Agents for Amazon Bedrock用カスタムハンドラー
他のハンドラーを参考に、Agents for Amazon Bedrock用のカスタムハンドラーを作成しました。
間違ってるかもしれませんが、解析したところこんな感じだと思います。
- infer:どのハンドラーなのか(API GatewayかELBか)を判断する関数
- body:バックエンドのWebアプリケーションに渡すボディを生成する関数
- scope:body以外の情報を生成する関数
- call:バックエンドのWebアプリケーションからのレスポンスを、Lambdaのレスポンスに整形する関数
import json
from typing import Dict, List

from mangum.handlers.utils import maybe_encode_body
from mangum.types import (LambdaConfig, LambdaContext, LambdaEvent, Response,
                          Scope)


class AgentsForBedrock:
    @classmethod
    def infer(
        cls, event: LambdaEvent, context: LambdaContext, config: LambdaConfig
    ) -> bool:
        return (
            "agent" in event
        )

    def __init__(
        self, event: LambdaEvent, context: LambdaContext, config: LambdaConfig
    ) -> None:
        self.event = event
        self.context = context
        self.config = config

    @property
    def body(self) -> bytes:

        items = {}

        requestBody = self.event.get("requestBody", {})
        content = requestBody.get("content", {})
        application_json = content.get("application/json", {})
        properties = application_json.get("properties", [])
        for item in properties:
            items[item["name"]] = item["value"]

        return maybe_encode_body(
            json.dumps(items) if len(items) > 0 else None,
            is_base64=False,
        )

    @property
    def scope(self) -> Scope:

        return {
            "type": "http",
            "method": self.event["httpMethod"],
            "http_version": "1.1",
            "headers": [],
            "path": self.event["apiPath"],
            "scheme": "https",
            "query_string": None,
            "asgi": {"version": "3.0", "spec_version": "2.0"},
            "aws.event": self.event,
            "aws.context": self.context,
        }

    def __call__(self, response: Response) -> dict:

        return {
                "messageVersion": "1.0",
                "response": {
                    "actionGroup": self.event["actionGroup"],
                    "apiPath": self.event["apiPath"],
                    "httpMethod": self.event["httpMethod"],
                    "httpStatusCode": response["status"],
                    "responseBody": {
                        "application/json": {
                            "body": response["body"]
                        }
                    },
                    "sessionAttributes": self.event["sessionAttributes"],
                    "promptSessionAttributes": self.event["promptSessionAttributes"]
                }
        }
同様の仕組みでAWS謹製のAWS Lambda Web Adapterというものがあります。
AWS Lambda Web Adapterについても調査したのですが、Bedrockのイベントに独自で対応させる方法がなさそうでした。機能リクエストを出しましたが、すぐに対応して貰えそうにはありませんでした。
FastAPIについて
公式サイトでは以下のように説明されています。
FastAPI is a modern, fast (high-performance), web framework for building APIs with Python 3.8+ based on standard Python type hints.
存在は知っていたのですが、これまで使用する機会がありませんでした。
今回始めて使ってみて、 なんて素敵なんだ と感動しました。
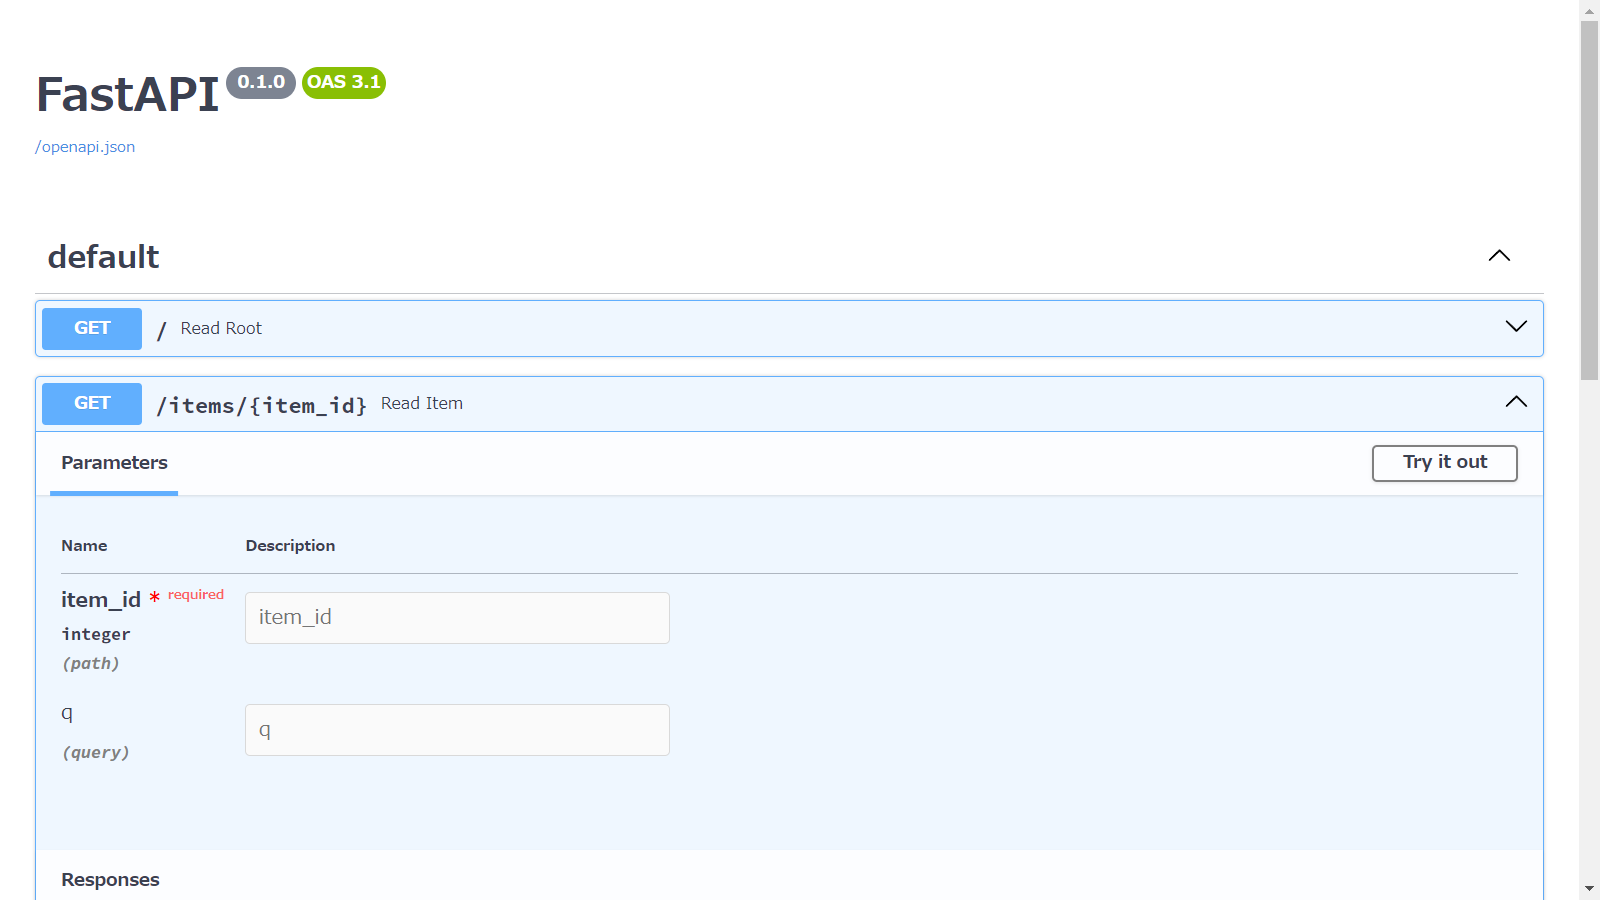
公式サイトからの引用ですが、以下のコードで/へのGETアクセスと/items/{item_id}へのGETアクセスの2つのAPIが作成できます。
from typing import Union
from fastapi import FastAPI

app = FastAPI()

@app.get("/")
def read_root():
    return {"Hello": "World"}

@app.get("/items/{item_id}")
def read_item(item_id: int, q: Union[str, None] = None):
    return {"item_id": item_id, "q": q}
FastAPIをuvicorn main:app --reloadで起動して、http://127.0.0.1:8000/docへアクセスするとOpenAPIのAPI定義を確認することができます。
Agents for Amazon Bedrockではスキーマ定義からAPIがどのような内容なのかを判断しますので、descriptionをしっかり書きましょう。
一例ですが、EC2インスタンスの一覧取得と詳細情報取得でAPIを作ってみました。(全体はこちら
class list_response(BaseModel):
    InstanceIds: List[str] = Field(description="List of instances.")

class describe_request(BaseModel):
    InstanceId: str = Field(description="The instance ID.")

class describe_response(BaseModel):
    InstanceName: str = Field(description="The name of the instance.")
    StateName: str = Field(description="The state of the instance ( pending | running | shutting-down | terminated | stopping | stopped).")


@app.get("/list", description="""
Returns instance ID for all instances.
If you need information such as the name or status of an instance, use the /describe API to obtain it.
""")
def list_instances() -> list_response:
    (省略)


@app.post("/describe", description="""
Describe instance. Returns the name and status of the instance.
""")
def describe_instance(request: describe_request) -> describe_response:
    (省略)
OpenAPIスキーマの出力方法
FastAPIでは、OpenAPIのスキーマをJSONで出力することが可能です。
import json
import main

with open('openapi-schema.json', mode='w') as f:
  f.write(json.dumps(main.app.openapi()))
openapi-schema.json
{
  "openapi": "3.1.0",
  "info": {
    "title": "FastAPI",
    "version": "0.1.0"
  },
  "paths": {
    "/": {
      "get": {
        "summary": "Read Root",
        "operationId": "read_root__get",
        "responses": {
          "200": {
            "description": "Successful Response",
            "content": {
              "application/json": {
                "schema": {}
              }
            }
          }
        }
      }
    },
    "/items/{item_id}": {
      "get": {
        "summary": "Read Item",
        "operationId": "read_item_items__item_id__get",
        "parameters": [
          {
            "name": "item_id",
            "in": "path",
            "required": true,
            "schema": {
              "type": "integer",
              "title": "Item Id"
            }
          },
          {
            "name": "q",
            "in": "query",
            "required": false,
            "schema": {
              "anyOf": [
                {
                  "type": "string"
                },
                {
                  "type": "null"
                }
              ],
              "title": "Q"
            }
          }
        ],
        "responses": {
          "200": {
            "description": "Successful Response",
            "content": {
              "application/json": {
                "schema": {}
              }
            }
          },
          "422": {
            "description": "Validation Error",
            "content": {
              "application/json": {
                "schema": {
                  "$ref": "#/components/schemas/HTTPValidationError"
                }
              }
            }
          }
        }
      }
    }
  },
  "components": {
    "schemas": {
      "HTTPValidationError": {
        "properties": {
          "detail": {
            "items": {
              "$ref": "#/components/schemas/ValidationError"
            },
            "type": "array",
            "title": "Detail"
          }
        },
        "type": "object",
        "title": "HTTPValidationError"
      },
      "ValidationError": {
        "properties": {
          "loc": {
            "items": {
              "anyOf": [
                {
                  "type": "string"
                },
                {
                  "type": "integer"
                }
              ]
            },
            "type": "array",
            "title": "Location"
          },
          "msg": {
            "type": "string",
            "title": "Message"
          },
          "type": {
            "type": "string",
            "title": "Error Type"
          }
        },
        "type": "object",
        "required": [
          "loc",
          "msg",
          "type"
        ],
        "title": "ValidationError"
      }
    }
  }
}
「このスキーマをAgents for Amazon Bedrockで使用します」と言いたいところですが、 2023/12/24時点でこのスキーマは使用できません。
結構ハマったのですが、出力するスキーマのバージョンを3.0.0にすることで解決できました。ドキュメントでは"3.0.0" or higherとあるのですが、、
OpenAPIスキーマのバージョンを明示的に指定する場合は、出力するコードがこちらになります。
import json
from fastapi.openapi.utils import get_openapi
import main

with open("openapi-schema_3.0.0.json", mode="w") as f:
    import json
    f.write(json.dumps(
        get_openapi(
            title="Agents for Bedrock Sample",
            version="1.0.0",
            openapi_version="3.0.0",
            routes=main.app.routes)
        ))
このスキーマをAgents for Amazon Bedrockで使用します!
ちょっとしたスクリプトを作成
開発効率化のため、いくつかスクリプトを作成しました。
sam buildのタイミングで、OpenAPIスキーマも生成したいと考えたので、以下のスクリプトを用意しました。
#!/bin/bash

python agents/export_openapi_schema.py
sam build
同じようにsam deployのタイミングで色々やってくれるスクリプトを用意しました。こちらは少し処理が多いので、かなり効率化しました。
- OpenAPIスキーマをS3にアップロード
- Agentに、Lambdaを呼べる権限を付与。ドキュメント、参考にした投稿
- Action Groupの更新
※OpenAPIスキーマの変更は、S3のファイル更新だけでは反映されないので明示的に再読み込みさせる必要があります - Agentの準備(Prepare)
#!/bin/bash

source .env

if [[ -n "${AWS_PROFILE}" ]]; then
  PROFILE="--profile ${AWS_PROFILE}"
else
  PROFILE=""
fi

aws s3 cp ./open-api-schema.json s3://${S3_BUCKET}/${S3_SCHEMA_DIR}/ ${PROFILE}
sam deploy --no-fail-on-empty-changeset ${PROFILE}

if [[ -n "${AGENT_ID}" ]]; then

  aws lambda add-permission \
   --function-name ${LAMBDA_NAME} \
   --action lambda:InvokeFunction \
   --statement-id amazon-bedrock-agent \
   --principal bedrock.amazonaws.com \
   --source-arn arn:aws:bedrock:${AWS_REGION}:${AWS_ACCOUNT_ID}:agent/${AGENT_ID} \
   ${PROFILE}

  aws bedrock-agent update-agent-action-group \
  --agent-id ${AGENT_ID} \
  --agent-version ${AGENT_VERSION} \
  --action-group-id ${ACTION_GROUP_ID} \
  --action-group-name ${ACTION_GROUP_NAME} \
  --action-group-executor "lambda=arn:aws:lambda:${AWS_REGION}:${AWS_ACCOUNT_ID}:function:${LAMBDA_NAME}" \
  --api-schema "s3={s3BucketName=${S3_BUCKET},s3ObjectKey=${S3_SCHEMA_DIR}/open-api-schema.json}" \
  --no-cli-pager \
  ${PROFILE}

  aws bedrock-agent prepare-agent \
  --agent-id ${AGENT_ID} \
  --no-cli-pager \
  ${PROFILE}
fi
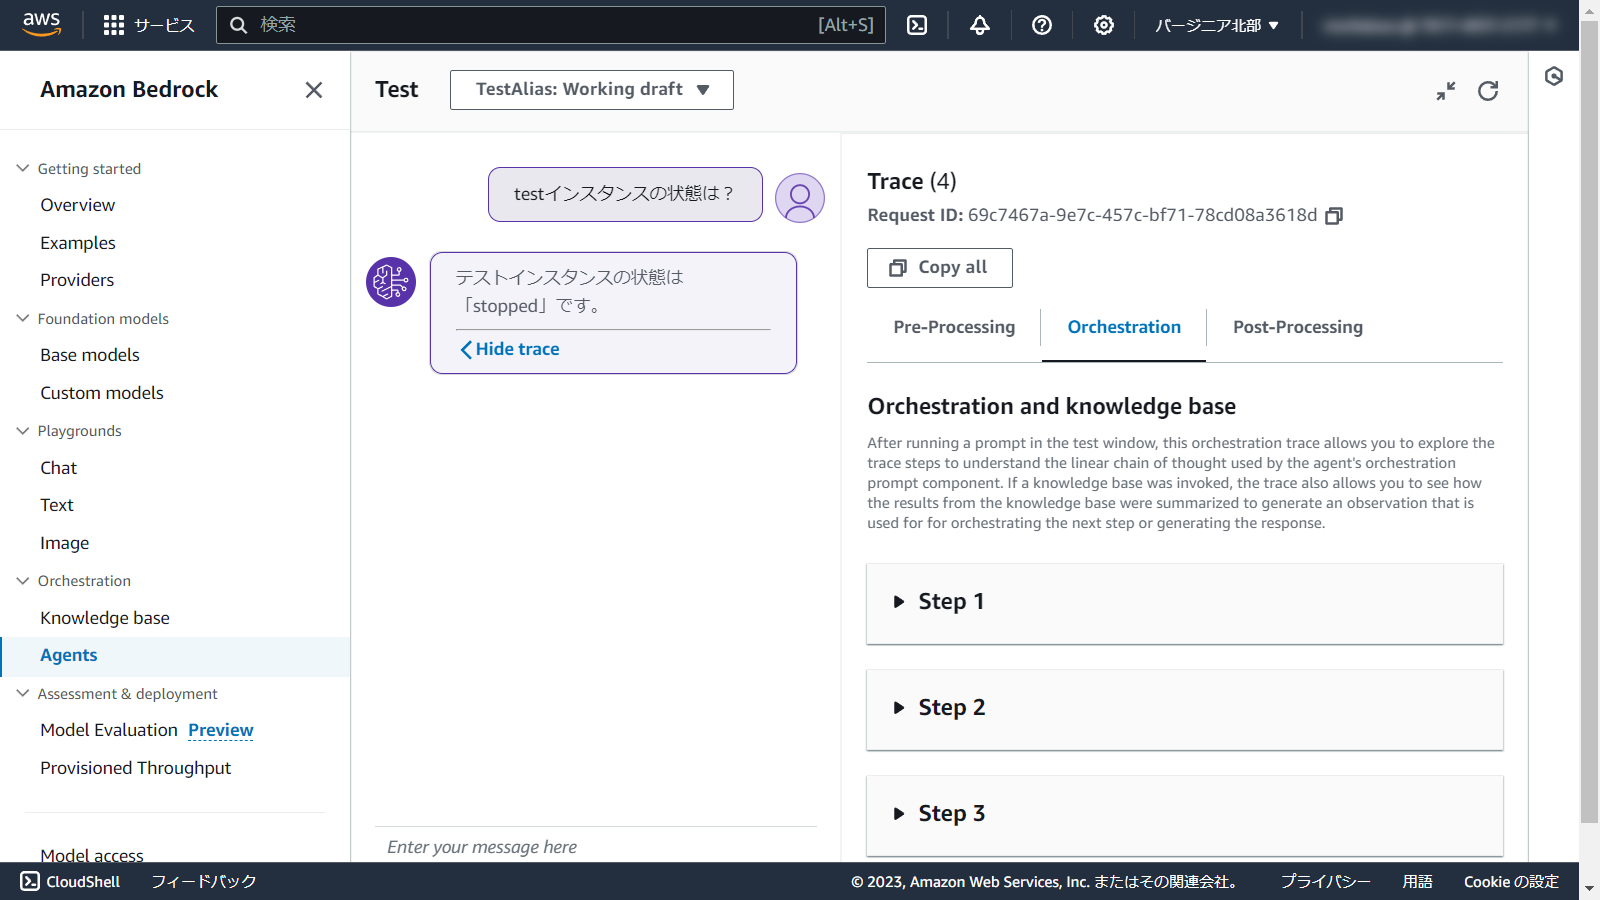
deploy.shの実行後、すぐにマネジメントコンソールでテストが可能です。
SAMのプロジェクトをGitHubで公開しましたので、よろしければ参考にしてください。