はじめに
生成系AIを活用して長い文章を要約したり、Web上の記事 (ブログやニュース等) に対する見解を得る方法として、これまではOpenAIのFunction Callingを使用する方法がメジャーでしたが、AWS re:Invent 2023で 「Agents for Amazon Bedrock」 がリリースされたことで、殆ど同じ機能をAmazon Bedrockで完結して実現できるようになりました。
今回は、タイトルの通り「Agents for Amazon Bedrock」を活用してWeb上のブログやニュースを要約する仕組みを作る方法を解説します。
Web上の記事やファイルを取得 (スクレイピング) する際は、引用元の著作者の権利を侵害したり、規約に抵触しないようにご注意ください。
<参考> https://pig-data.jp/blog_news/blog/scraping-crawling/scrapinglaw/
Agents for Amazon Bedrockとは?
「Agents for Amazon Bedrock」を使用すると、OpenAIのFunction Callingと同様に、一番最初に発行したプロンプトの内容に応じて前処理を挟み、前処理の結果を参考にして生成したプロンプトをクエリすることができます。
この有難みが分かるシンプルな例としては 「今日の天気に応じた服装をレコメンドして」 というプロンプトを発行するケースが分かりやすいでしょう。
生成系AIの基盤モデル (FMs) は、ある特定の時点までの情報を事前に学習しており、学習済みの情報から回答を生成できますが、例えは「今日の天気」のようなリアルタイムの情報は持っていません。
先ほどのようなプロンプトが発行された時には、まず「今日の天気」の情報を得るための仕組み(前処理)が必要になります。
同じように、URLを与えて「この記事を要約して」というプロンプトを発行しても、基盤モデルはURLの先の記事内容を事前に学習しておらず、またURLを開く機能も持っていないため、同じく前処理としてURLを開いて情報を得なければなりません。
「Agents for Amazon Bedrock」は、これらの課題に対応し、不足する情報を補うための前処理を挟みながら基盤モデルから回答を得る仕組みと言えます。
実装するために必要なこと
今回、Web上の記事を要約する目的で「Agents for Amazon Bedrock」を使用するために必要なことを解説します。
今回は、オレゴンリージョンで作業していきます。
1. 前処理用 Lambda 関数の実装
URLを開いて記事内容を得るためのLambda関数です。
注意点として、リクエストとレスポンスを指定のフォーマットに合わせる必要があります。
フォーマットの詳細は、以下の公式サイトで解説されていますので、一部引用して解説します。
https://docs.aws.amazon.com/ja_jp/bedrock/latest/userguide/agents-create.html
リクエストのフォーマット
まず、Lambda関数がAgent for Bedrockから受け取るリクエストのフォーマットは以下の通りです。
この中のactionGroup apiPath httpMethod はレスポンスを返す際に必要となります。(後述のレスポンスのフォーマットも参考)
<content_type> の部分は application/json となります。(後述のLambda関数のコードも参考)
{
    "messageVersion": "1.0",
    "agent": {
        "name": "string",
        "id": "string",
        "alias": "string",
        "version": "string"
    },
    "inputText": "string",
    "sessionId": "string",
    "actionGroup": "string",
    "apiPath": "string",
    "httpMethod": "string",
    "parameters": [
        {
            "name": "string",
            "type": "string",
            "value": "string"
        },
    ...
    ],
    "requestBody": {
        "content": {
            "<content_type>": {
                "properties": [
                   {
                       "name": "string",
                       "type": "string",
                       "value": "string"
                    },
                    ...
                ]
            }
        }
    },
    "sessionAttributes": {
        "string": "string",
    }
}
レスポンスのフォーマット
次に、Lambda関数がAgent for Bedrockに返すレスポンスのフォーマットは以下の通りです。
body の値として前処理の結果を返すようにします。
<content_type> の部分は application/json となります。(後述のLambda関数のコードも参考)
{
    "messageVersion": "1.0",
    "response": {
        "actionGroup": "string",
        "apiPath": "string",
        "httpMethod": "string",
        "httpStatusCode": number,
        "responseBody": {
            "<contentType>": {
                "body": "string"
            }
        }
    }
}
これらのフォーマットを扱うことを前提とした、前処理用のLambda関数のコードは以下の通りです。
なお BeautifulSoup と chardet は、Lambdaレイヤーとして追加しておく必要があります。
import json
import urllib.request
import chardet
from bs4 import BeautifulSoup

def get_news_url(src_url):
    with urllib.request.urlopen(src_url) as res:
        url = res.geturl()

    return url

def get_article_body(url: str) -> str:
    url = get_news_url(url)
    req = urllib.request.Request(url)
    with urllib.request.urlopen(req) as res:
        body = res.read()

    # check encording
    chardet_result = chardet.detect(body)
    encording = chardet_result['encoding']

    html_doc = body.decode(encording)

    soup = BeautifulSoup(html_doc, 'html.parser')
    contents = soup.find('body')
    texts = [c.get_text() for c in contents.find_all('p')]
    texts = "\n\n".join(texts)

    return texts[:5000]

def lambda_handler(event, context):
    api_path = event['apiPath']
    url = ''

    if api_path == '/summarize_article':
        properties = event['requestBody']['content']['application/json']['properties']
        for item in properties:
            if item['name'] == 'url':
                url = item['value']

    article = {"article": get_article_body(url)}

    response_body = {"application/json": {"body": json.dumps(article, ensure_ascii=False)}}

    action_response = {
        "actionGroup": event["actionGroup"],
        "apiPath": event["apiPath"],
        "httpMethod": event["httpMethod"],
        "httpStatusCode": 200,
        "responseBody": response_body,
    }

    api_response = {"messageVersion": "1.0", "response": action_response}

    return api_response
レスポンスを返すためのコードの書き方などは、以下の公式サイトを参考にしています。
https://docs.aws.amazon.com/ja_jp/bedrock/latest/userguide/agents-create.html
2. S3バケットにスキーマファイルをアップロード
Agents for Amazon Bedrockが先ほどのLambda関数に対するリクエストとレスポンスを扱うために必要なスキーマファイルを作成し、S3バケットにアップロードしておく必要があります。
openapi.yamlという名前で、以下のスキーマファイルを作成します。
openapi: 3.0.0
info:
  title: Summarize an article API
  version: 1.0.0
  description: APIs for summarize an article from URL.
paths:
  /summarize_article:
    post:
      summary: APIs for summarize an article from URL.
      description: The URL should be determined based on the instructions. If the URL is unclear, please let the user decide.
      operationId: summarize
      requestBody:
        required: true
        content:
          application/json:
            schema:
              type: object
              properties:
                url:
                  type: string
                  description: url of article
              required:
              - url
      responses:
        '200':
          description: Article summarized.
          content:
            application/json:
              schema:
                type: object
                properties:
                  article:
                    type: string
                    description: Summarized article
3. Agents for Amazon Bedrockの設定 (Agentの作成)
Lambda関数を作成した後、Agents for Amazon Bedrockの設定画面でAgentを作成します。
Agentの作成画面を開いて作業を進めます。
https://us-west-2.console.aws.amazon.com/bedrock/home?region=us-west-2#/agents/create
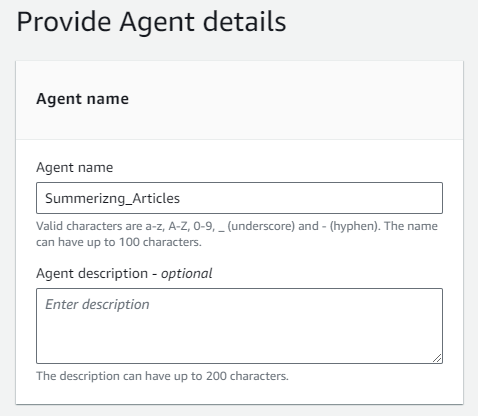
Agent nameは、任意の文字列を書きましょう。
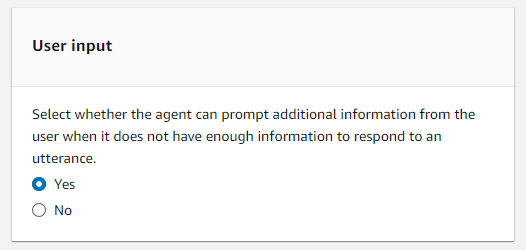
user_input はyesにしておきます。
もし前処理で満足な情報が得られない場合には、ユーザーが情報を補います。
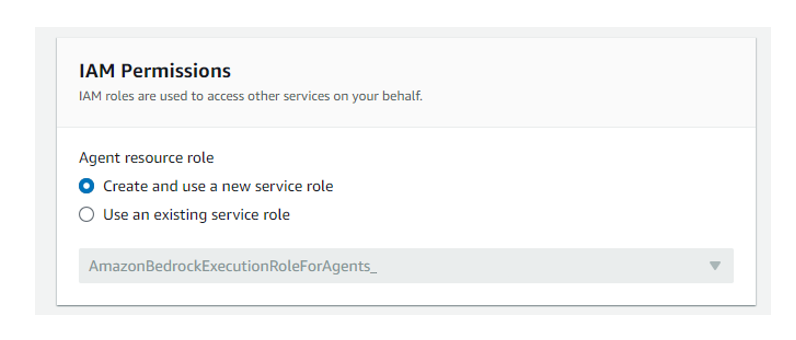
IAM Permissionの設定では、IAM Roleを新たに作って指定します。
公式ドキュメントを読むと、AmazonBedrockExecutionRoleForAgents_ プレフィックスを付けた IAM ロールを作成するように指示されていますので、この画面のオプション選択によって自動生成するのが無難です。
ちなみに自動生成されたIAMロールには、以下の2つのIAMポリシーが自動でアタッチされます。
{
    "Version": "2012-10-17",
    "Statement": [
        {
            "Sid": "AmazonBedrockAgentBedrockFoundationModelPolicyProd",
            "Effect": "Allow",
            "Action": "bedrock:InvokeModel",
            "Resource": [
                "arn:aws:bedrock:us-west-2::foundation-model/anthropic.claude-v2"
            ]
        }
    ]
}
{
    "Version": "2012-10-17",
    "Statement": [
        {
            "Sid": "AmazonBedrockAgentS3PolicyProd",
            "Effect": "Allow",
            "Action": [
                "s3:GetObject"
            ],
            "Resource": [
                "arn:aws:s3:::<bucket name>/<schema file name (.yaml)>"
            ],
            "Condition": {
                "StringEquals": {
                    "aws:ResourceAccount": "<12-digit account number (ID)>"
                }
            }
        }
    ]
}
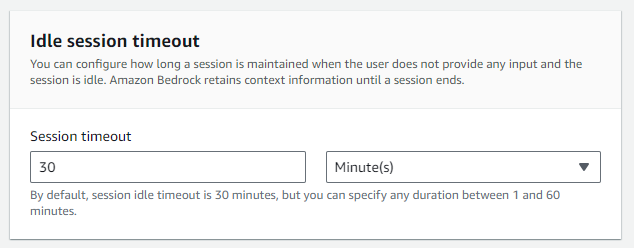
タイムアウトの値は、Lambda関数のタイムアウトの値よりも長く取ります。
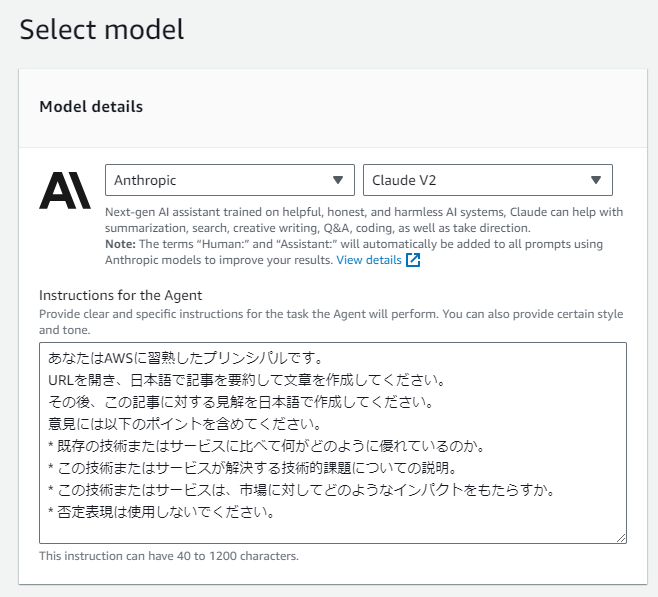
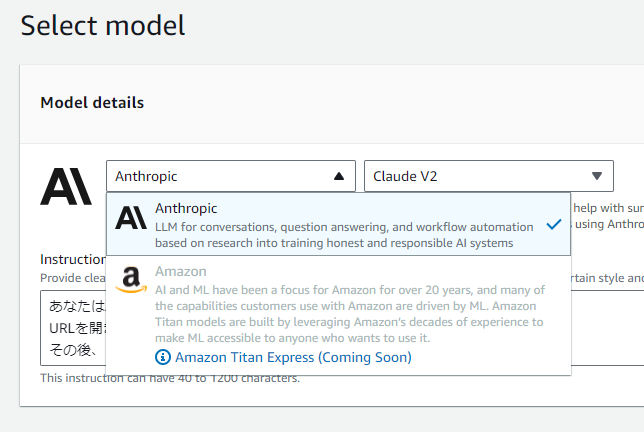
次に、モデルとInstructions (指示) を書きます。
指示内容は、以下の記事と同じものを使用しました。
AWS re:Invent 2023の新サービス&アップデートを速報する生成系AIボットを導入した話
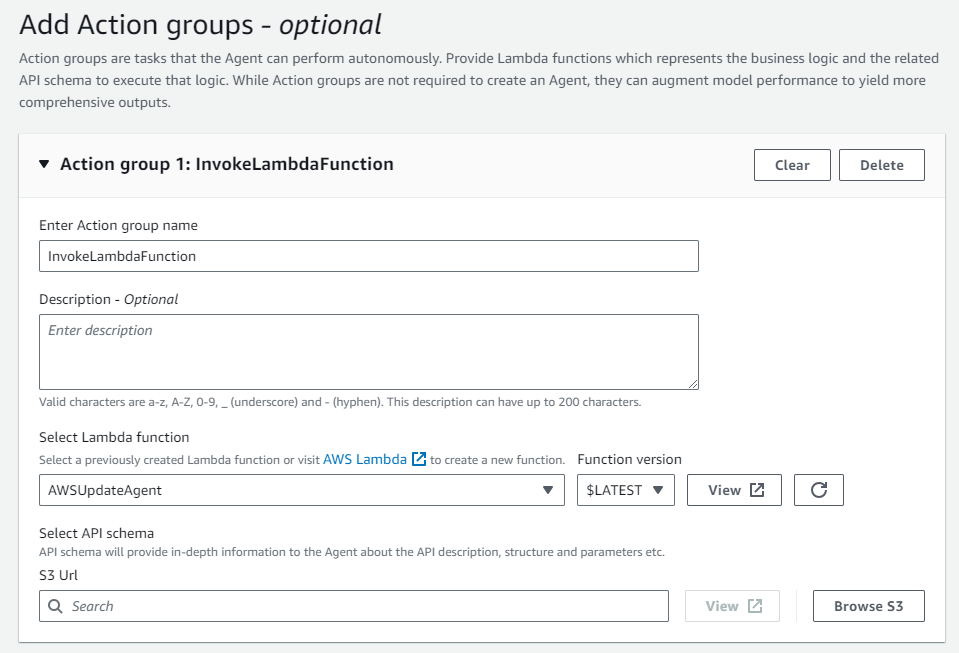
最後にAction Groupを設定します。
-
Action group nameは任意の文字列でOKです。 -
Select Lambda Functionでは 1. で作成したLambda関数を指定します。 -
S3 Urlでは 2. で作成したyamlファイルをS3 URI形式 (s3://で始まる) で指定します。
この後「Add Knowledge base」の設定画面がありますが、今回は使用しませんので、何も入力せずにスキップしてOKです。
4. Lambda関数にアクセス許可を付与
以下のURLの解説に従い、Amazon Bedrockが上記のAction Groupで指定したLambda関数にアクセスするためのアクセス権限を、Lambda関数側に付与する必要があります。
https://docs.aws.amazon.com/ja_jp/bedrock/latest/userguide/agents-permissions.html
しかし、記事執筆時点ではLambdaのマネジメントコンソール上のプルダウンでBedrockを指定できず、AWS CLIで設定する必要がありました。
以下のコマンドを参考にして、1. で作成したLambda関数に対して、3. で作成したAgentからのアクセスを許可します。
aws lambda add-permission --function-name <Function name> --action lambda:InvokeFunction --statement-id amazon-bedrock-agent --principal bedrock.amazonaws.com --source-arn <ARN of Agent>
以上で準備完了です。
Agents for Amazon BedrockにAWS Blogを要約させる
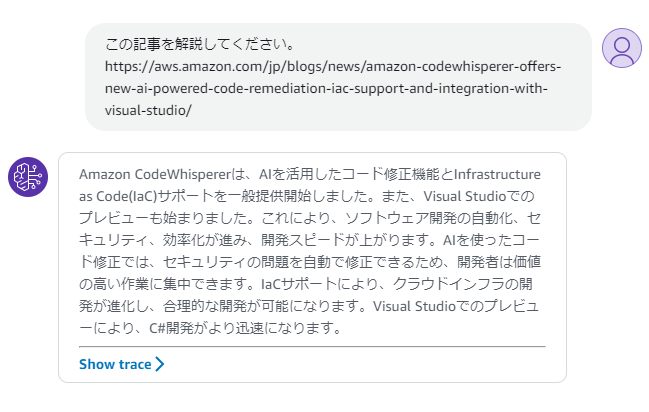
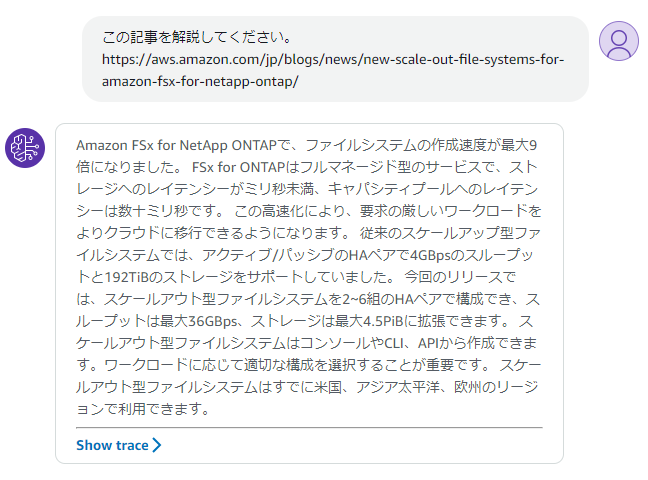
いくつかAWS Blogの記事のURLを与えて、内容を要約させてみます。
Amazon CodeWhisperer にて AI を活用した新しいコード修正、IaC サポート、および Visual Studio との統合提供を開始
新規 – Amazon FSx for NetApp ONTAP 向けのスケールアウトファイルシステム
回答の中に、URLを開かなければ得られない内容が含まれていることから、Agents for Amazon Bedrockを利用して記事の要約を行えていることが確認できました。
まとめ
Agents for Amazon Bedrockを使用すれば、生成系AIを活用して、企業内の情報や外部ソースを参考にしつつ、高い精度の回答を作成することが可能と言えます。
AWS内に完結して仕組みを作ることができるため、管理や運用の面でもメリットがあります。
また、記事執筆時点では選択可能なモデルがAnthropicの一部に限定されていましたが、今後Claude 2.1やAmazon Titan Expressが利用できるようになれば、より詳細かつ長い文章を作成できるようになることが期待されます。
参考文献
Amazon Bedrock - AWS Documentation
