GWが終わってしまいますので、成果発表をしたいと思います。
最終成果物もこちらに格納してますので、ぜひご確認ください。
動機
- Mastraに入門したところ、Next.jsで使うと相性が良さそうな印象。サーバーサイドで生成AIにアクセスする形式
- Bedrockを使う場合、サーバー(EC2など)のIAMロールを使ってBedrockにアクセスすることになりそう
- Amplifyでどうするのか気になったのですが、Amplifyは、基本的に(?)、クライアント(ブラウザ)に、認証情報を持つ形になるので、ブラウザから直接Bedrockを呼ぶのが普通な気がする
- ただ、AmplifyはNode.jsに対応してるっていってるので、Next.jsのサーバー側からAWSリソースにアクセスすることも想定していると推測
- ちらっと検索した感じでは、そんなことをしてる人はあまりいなさそう。Amplify Gen2のAI Kitやってみたはたくさんあった
- ドキュメントにそれっぽい記述があったが、ドキュメントが分かりづらい(断片的にしかコードが無いので、一旦迷子になると終わる)。左のメニューもよくわからず、さっき見た有用そうなページがメニューから行けない事象が。。
ということで、無事、できたので自分用に残しておきます。
Next.jsプロジェクトを作成
-
Next.jsプロジェクトを作成します
npx create-next-app@latestウィザード形式で質問があるので、以下の内容で回答します
✔ What is your project named? … [chat-app]
✔ Would you like to use TypeScript? … No / [Yes]
✔ Would you like to use ESLint? … No / [Yes]
✔ Would you like to use Tailwind CSS? … No / [Yes]
✔ Would you like your code inside a `src/` directory? … [No] / Yes
✔ Would you like to use App Router? (recommended) … No / [Yes]
✔ Would you like to use Turbopack for `next dev`? … No / [Yes]
✔ Would you like to customize the import alias (`@/*` by default)? … [No] / Yes
Amplify Gen2のドキュメントで、
--no-src-dirオプションが指定されていたので、srcディレクトリは「なし」が良さそうです。
この時点でのディレクトリ構成です。
.
├── app
│   ├── favicon.ico
│   ├── globals.css
│   ├── layout.tsx
│   └── page.tsx
├── eslint.config.mjs
├── next.config.ts
├── next-env.d.ts
├── package.json
├── package-lock.json
├── postcss.config.mjs
├── public
│   ├── file.svg
│   ├── globe.svg
│   ├── next.svg
│   ├── vercel.svg
│   └── window.svg
├── README.md
└── tsconfig.json

3 directories, 17 files
2025/5/5時点のpackage.jsonはこうです。
{
  "name": "chat-app",
  "version": "0.1.0",
  "private": true,
  "scripts": {
    "dev": "next dev --turbopack",
    "build": "next build",
    "start": "next start",
    "lint": "next lint"
  },
  "dependencies": {
    "react": "^19.0.0",
    "react-dom": "^19.0.0",
    "next": "15.3.1"
  },
  "devDependencies": {
    "typescript": "^5",
    "@types/node": "^20",
    "@types/react": "^19",
    "@types/react-dom": "^19",
    "@tailwindcss/postcss": "^4",
    "tailwindcss": "^4",
    "eslint": "^9",
    "eslint-config-next": "15.3.1",
    "@eslint/eslintrc": "^3"
  }
}
これ以降の作業は、chat-appディレクトリで行います。
(オプション)Prettierの導入
本筋に直接関係ないですが、ソースコードのフォーマットのために、Prettierを導入します。不要な方は読み飛ばしてください。
-
PrettierとESLint用のプラグインをインストールします。
npm add --save-dev prettier eslint-config-prettier -
.prettierrcという名前のファイルを作成します。あまりこだわりはないのでデフォルト設定だと思います。.prettierrc{ "semi": true, "singleQuote": true, "tabWidth": 2, "trailingComma": "es5", "printWidth": 100, "bracketSpacing": true, "arrowParens": "avoid" } -
ESLintの設定に追加します。これは、PrettierのルールとESLintのルールの競合を防ぐことができる(らしい)です。
eslint.config.mjsimport { dirname } from "path"; import { fileURLToPath } from "url"; import { FlatCompat } from "@eslint/eslintrc"; const __filename = fileURLToPath(import.meta.url); const __dirname = dirname(__filename); const compat = new FlatCompat({ baseDirectory: __dirname, }); const eslintConfig = [ - ...compat.extends("next/core-web-vitals", "next/typescript"), + ...compat.extends("next/core-web-vitals", "next/typescript", "prettier"), ]; export default eslintConfig; -
フォーマット適用を
npmコマンドで実行できるよう、package.jsonのscriptsに追加します。package.json... "scripts": { "dev": "next dev --turbopack", "build": "next build", "start": "next start", - "lint": "next lint" + "lint": "next lint", + "format": "prettier --write ." }, ...
以下のコマンドでフォーマットが適用できます。
npm run format
AI SDKを使ったチャット画面を作成
次にAI SDKを使ったチャットの画面を作成します。AI SDKは、生成AIアプリに使えるTypeScriptのライブラリーです。私はLangChain的なものだと理解しています。
-
AI SDKと、AI SDKでAmazon Bedrockを使用する際に必要なプロバイダーをインストールします。
npm add ai @ai-sdk/amazon-bedrock -
APIとPageを作成します。
-
API
AWS認証情報をセットするところは、とりあえず空白です。
app/api/chat/route.tsimport { createAmazonBedrock } from '@ai-sdk/amazon-bedrock'; import { streamText } from 'ai'; // Allow streaming responses up to 30 seconds export const maxDuration = 30; export async function POST(req: Request) { const { messages } = await req.json(); const bedrock = createAmazonBedrock({ accessKeyId: '', secretAccessKey: '', sessionToken: '', region: 'ap-northeast-1', }); const result = streamText({ model: bedrock('apac.amazon.nova-pro-v1:0'), messages, }); return result.toDataStreamResponse(); } -
Page
app/page.tsx'use client'; import { useChat } from '@ai-sdk/react'; export default function Chat() { const { messages, input, handleInputChange, handleSubmit } = useChat(); return ( <div className="flex flex-col w-full max-w-md py-24 mx-auto stretch"> {messages.map(message => ( <div key={message.id} className="whitespace-pre-wrap"> {message.role === 'user' ? 'User: ' : 'AI: '} {message.parts.map((part, i) => { switch (part.type) { case 'text': return <div key={`${message.id}-${i}`}>{part.text}</div>; } })} </div> ))} <form onSubmit={handleSubmit}> <input className="fixed dark:bg-zinc-900 bottom-0 w-full max-w-md p-2 mb-8 border border-zinc-300 dark:border-zinc-800 rounded shadow-xl" value={input} placeholder="Say something..." onChange={handleInputChange} /> </form> </div> ); }
-
これでAI SDKの導入は完了です。以下のコマンドで開発サーバーを起動し、http://localhost:3000にアクセスすると、チャットの画面が表示されます。
npm run dev
認証情報を仮で指定して実行すると、チャットの返答がありました。

Amplify Gen2を追加
ここが山場だと思います。
-
Amplify Gen2を導入します。
npm create amplify@latest? Where should we create your project? (.)と聞かれるのでそのままエンターを入力します。 -
今回は使用しないので、Amplify Data関連の設定を削除します。
-
amplify/data/resource.tsを削除、amplify/dataディレクトリも削除 -
amplify/backend.tsから、Amplify Data関連の記述を削除amplify/backend.tsimport { defineBackend } from '@aws-amplify/backend'; import { auth } from './auth/resource'; - import { data } from './data/resource'; /** * @see https://docs.amplify.aws/react/build-a-backend/ to add storage, functions, and more */ defineBackend({ auth, - data, });
-
-
認証済みユーザーにBedrockへのアクセス権限を付与します。
-
ここでは
AmazonBedrockFullAccessですが、もっと権限を絞ったほうが適切だと思います。amplify/backend.tsimport { defineBackend } from '@aws-amplify/backend'; import { auth } from './auth/resource'; + import { ManagedPolicy } from 'aws-cdk-lib/aws-iam'; /** * @see https://docs.amplify.aws/react/build-a-backend/ to add storage, functions, and more */ - defineBackend({ + const backend = defineBackend({ auth, }); + const authenticatedUserIamRole = backend.auth.resources.authenticatedUserIamRole; + authenticatedUserIamRole.addManagedPolicy( + ManagedPolicy.fromAwsManagedPolicyName('AmazonBedrockFullAccess') + ); -
サンドボックスを起動します
サンドボックスを起動することでAWSのリソースが作成されます。(今回は、CognitoやIAMなどが作成されます)
サンドボックスはターミナルで実行しっぱなしにするので、新しいターミナルを起動し、実行してください。
npx ampx sandboxFile written: amplify_outputs.jsonという出力が出たら完了ですので、次の手順に進んでください。 -
クライアント側を構築していきます。
-
クライアント(UI)に必要なライブラリーをインストールします。
npm add @aws-amplify/ui-react -
コンポーネントを作成します。
{ ssr: true }がポイントだと思います。components/ConfigureAmplify.tsx'use client'; import { Amplify } from 'aws-amplify'; import outputs from '@/amplify_outputs.json'; Amplify.configure(outputs, { ssr: true }); export default function ConfigureAmplifyClientSide() { return null; } -
app/layout.tsxを作成します。既存で存在しますが、まるっと上書きします。
前の手順で作成したConfigureAmplifyコンポーネントを呼び出しています。
Amplifyの設定ファイルを毎回読み込むようにしていると思われます。app/layout.tsximport '@aws-amplify/ui-react/styles.css'; import type { Metadata } from 'next'; import { Inter } from 'next/font/google'; import './globals.css'; import ConfigureAmplifyClientSide from '@/components/ConfigureAmplify'; const inter = Inter({ subsets: ['latin'] }); export const metadata: Metadata = { title: 'Create Next App', description: 'Generated by create next app', }; export default function RootLayout({ children }: { children: React.ReactNode }) { return ( <html lang="ja"> <body className={inter.className}> <ConfigureAmplifyClientSide /> {children} </body> </html> ); } -
ログイン、ログアウトに必要なコンポーネントとログイン画面を作成します。
ログアウトは今回は使用しませんので、必要な方はがんばってください。
components/Login.tsx'use client'; import { withAuthenticator } from '@aws-amplify/ui-react'; import { AuthUser } from 'aws-amplify/auth'; import { redirect } from 'next/navigation'; import { useEffect } from 'react'; function Login({ user }: { user?: AuthUser }) { useEffect(() => { if (user) { redirect('/'); } }, [user]); return null; } export default withAuthenticator(Login);components/Logout.tsx'use client'; import { signOut } from 'aws-amplify/auth'; import { useRouter } from 'next/navigation'; export default function Logout() { const router = useRouter(); return ( <button onClick={async () => { await signOut(); router.push('/login'); }} className="px-2 bg-white text-black" > Sign out </button> ); }app/login/page.tsximport Login from '@/components/Login'; export default function LoginPage() { return <Login />; }
-
-
サーバー側を構築していきます。
-
Next.jsとAmplify Gen2を組み合わせて使うためのアダプターが用意されているのでインストールします。
npm add @aws-amplify/adapter-nextjs -
サーバー側で使用するユーティリティを新規作成します。
utils/amplify-utils.tsimport { cookies } from 'next/headers'; import { createServerRunner } from '@aws-amplify/adapter-nextjs'; import { fetchAuthSession } from 'aws-amplify/auth/server'; import outputs from '@/amplify_outputs.json'; export const { runWithAmplifyServerContext } = createServerRunner({ config: outputs, }); export async function AuthFetchAuthSessionServer() { try { const session = await runWithAmplifyServerContext({ nextServerContext: { cookies }, operation: contextSpec => fetchAuthSession(contextSpec), }); return session; } catch (error) { console.error(error); } } -
未ログイン時にログイン画面へリダイレクトするミドウェアを作成します。
middleware.tsimport { NextRequest, NextResponse } from 'next/server'; import { fetchAuthSession } from 'aws-amplify/auth/server'; import { runWithAmplifyServerContext } from '@/utils/amplify-utils'; export async function middleware(request: NextRequest) { const response = NextResponse.next(); const authenticated = await runWithAmplifyServerContext({ nextServerContext: { request, response }, operation: async contextSpec => { try { const session = await fetchAuthSession(contextSpec, {}); return session.tokens !== undefined; } catch (error) { console.log(error); return false; } }, }); if (authenticated) { return response; } return NextResponse.redirect(new URL('/login', request.url)); } export const config = { matcher: [ /* * Match all request paths except for the ones starting with: * - api (API routes) * - _next/static (static files) * - _next/image (image optimization files) * - favicon.ico (favicon file) * - login */ '/((?!api|_next/static|_next/image|favicon.ico|login).*)', ], }; -
チャットAPIに、認証情報取得処理を追加します。これでやっとサーバーサイドで認証情報が取得できます。
app/api/chat/route.tsimport { createAmazonBedrock } from '@ai-sdk/amazon-bedrock'; import { streamText } from 'ai'; + import { AuthFetchAuthSessionServer } from '@/utils/amplify-utils'; // Allow streaming responses up to 30 seconds export const maxDuration = 30; export async function POST(req: Request) { const { messages } = await req.json(); + const session = await AuthFetchAuthSessionServer(); + const bedrock = createAmazonBedrock({ - accessKeyId: '', - secretAccessKey: '', - sessionToken: '', + accessKeyId: session?.credentials?.accessKeyId, + secretAccessKey: session?.credentials?.secretAccessKey, + sessionToken: session?.credentials?.sessionToken, region: 'ap-northeast-1', }); const result = streamText({ model: bedrock('apac.amazon.nova-pro-v1:0'), messages, }); return result.toDataStreamResponse(); }
-
ここまでできたら、ブラウザでアクセスしてみてください。
未ログイン状態でアクセスすると、ログイン画面にリダイレクトされます。

ログイン後は、チャット画面が表示されます。チャットの回答もあるのでBedrockにアクセスできています。

assistant-uiを導入
見た目にこだわりたいけど、自分でデザインはできないので、assistant-uiに頼ることにしました。
-
assistant-uiを導入します。
npx assistant-ui initウィザードに回答します。route.tsを上書きするか確認されますが、「no」を選択してください。
✔ You need to create a components.json file to add components. Proceed? … [yes] ✔ Which color would you like to use as the base color? › [Neutral] ✔ Writing components.json. ✔ Checking registry. Installing dependencies. ✔ How would you like to proceed? › Use [--force] ✔ Installing dependencies. ✔ The file route.ts already exists. Would you like to overwrite? … [no] ✔ Created 7 files: - app/assistant.tsx - components/assistant-ui/thread.tsx - components/ui/button.tsx - components/assistant-ui/markdown-text.tsx - components/assistant-ui/tooltip-icon-button.tsx - components/ui/tooltip.tsx - components/assistant-ui/thread-list.tsx ℹ Skipped 1 files: (files might be identical, use --overwrite to overwrite) - app/api/chat/route.ts -
page.tsxを更新します。先程作ったものはもういらないので、バッサリ上書きします。
app/page.tsx'use client'; import { Thread } from '@/components/assistant-ui/thread'; import { AssistantRuntimeProvider } from '@assistant-ui/react'; import { useChatRuntime } from '@assistant-ui/react-ai-sdk'; export default function Chat() { const runtime = useChatRuntime({ api: '/api/chat', }); return ( <AssistantRuntimeProvider runtime={runtime}> <div className="h-dvh gap-x-2 px-4 py-4"> <Thread /> </div> </AssistantRuntimeProvider> ); }
なんとこれだけです。これだけでいい感じの見た目になりますし、複数ターンのチャットも可能です。
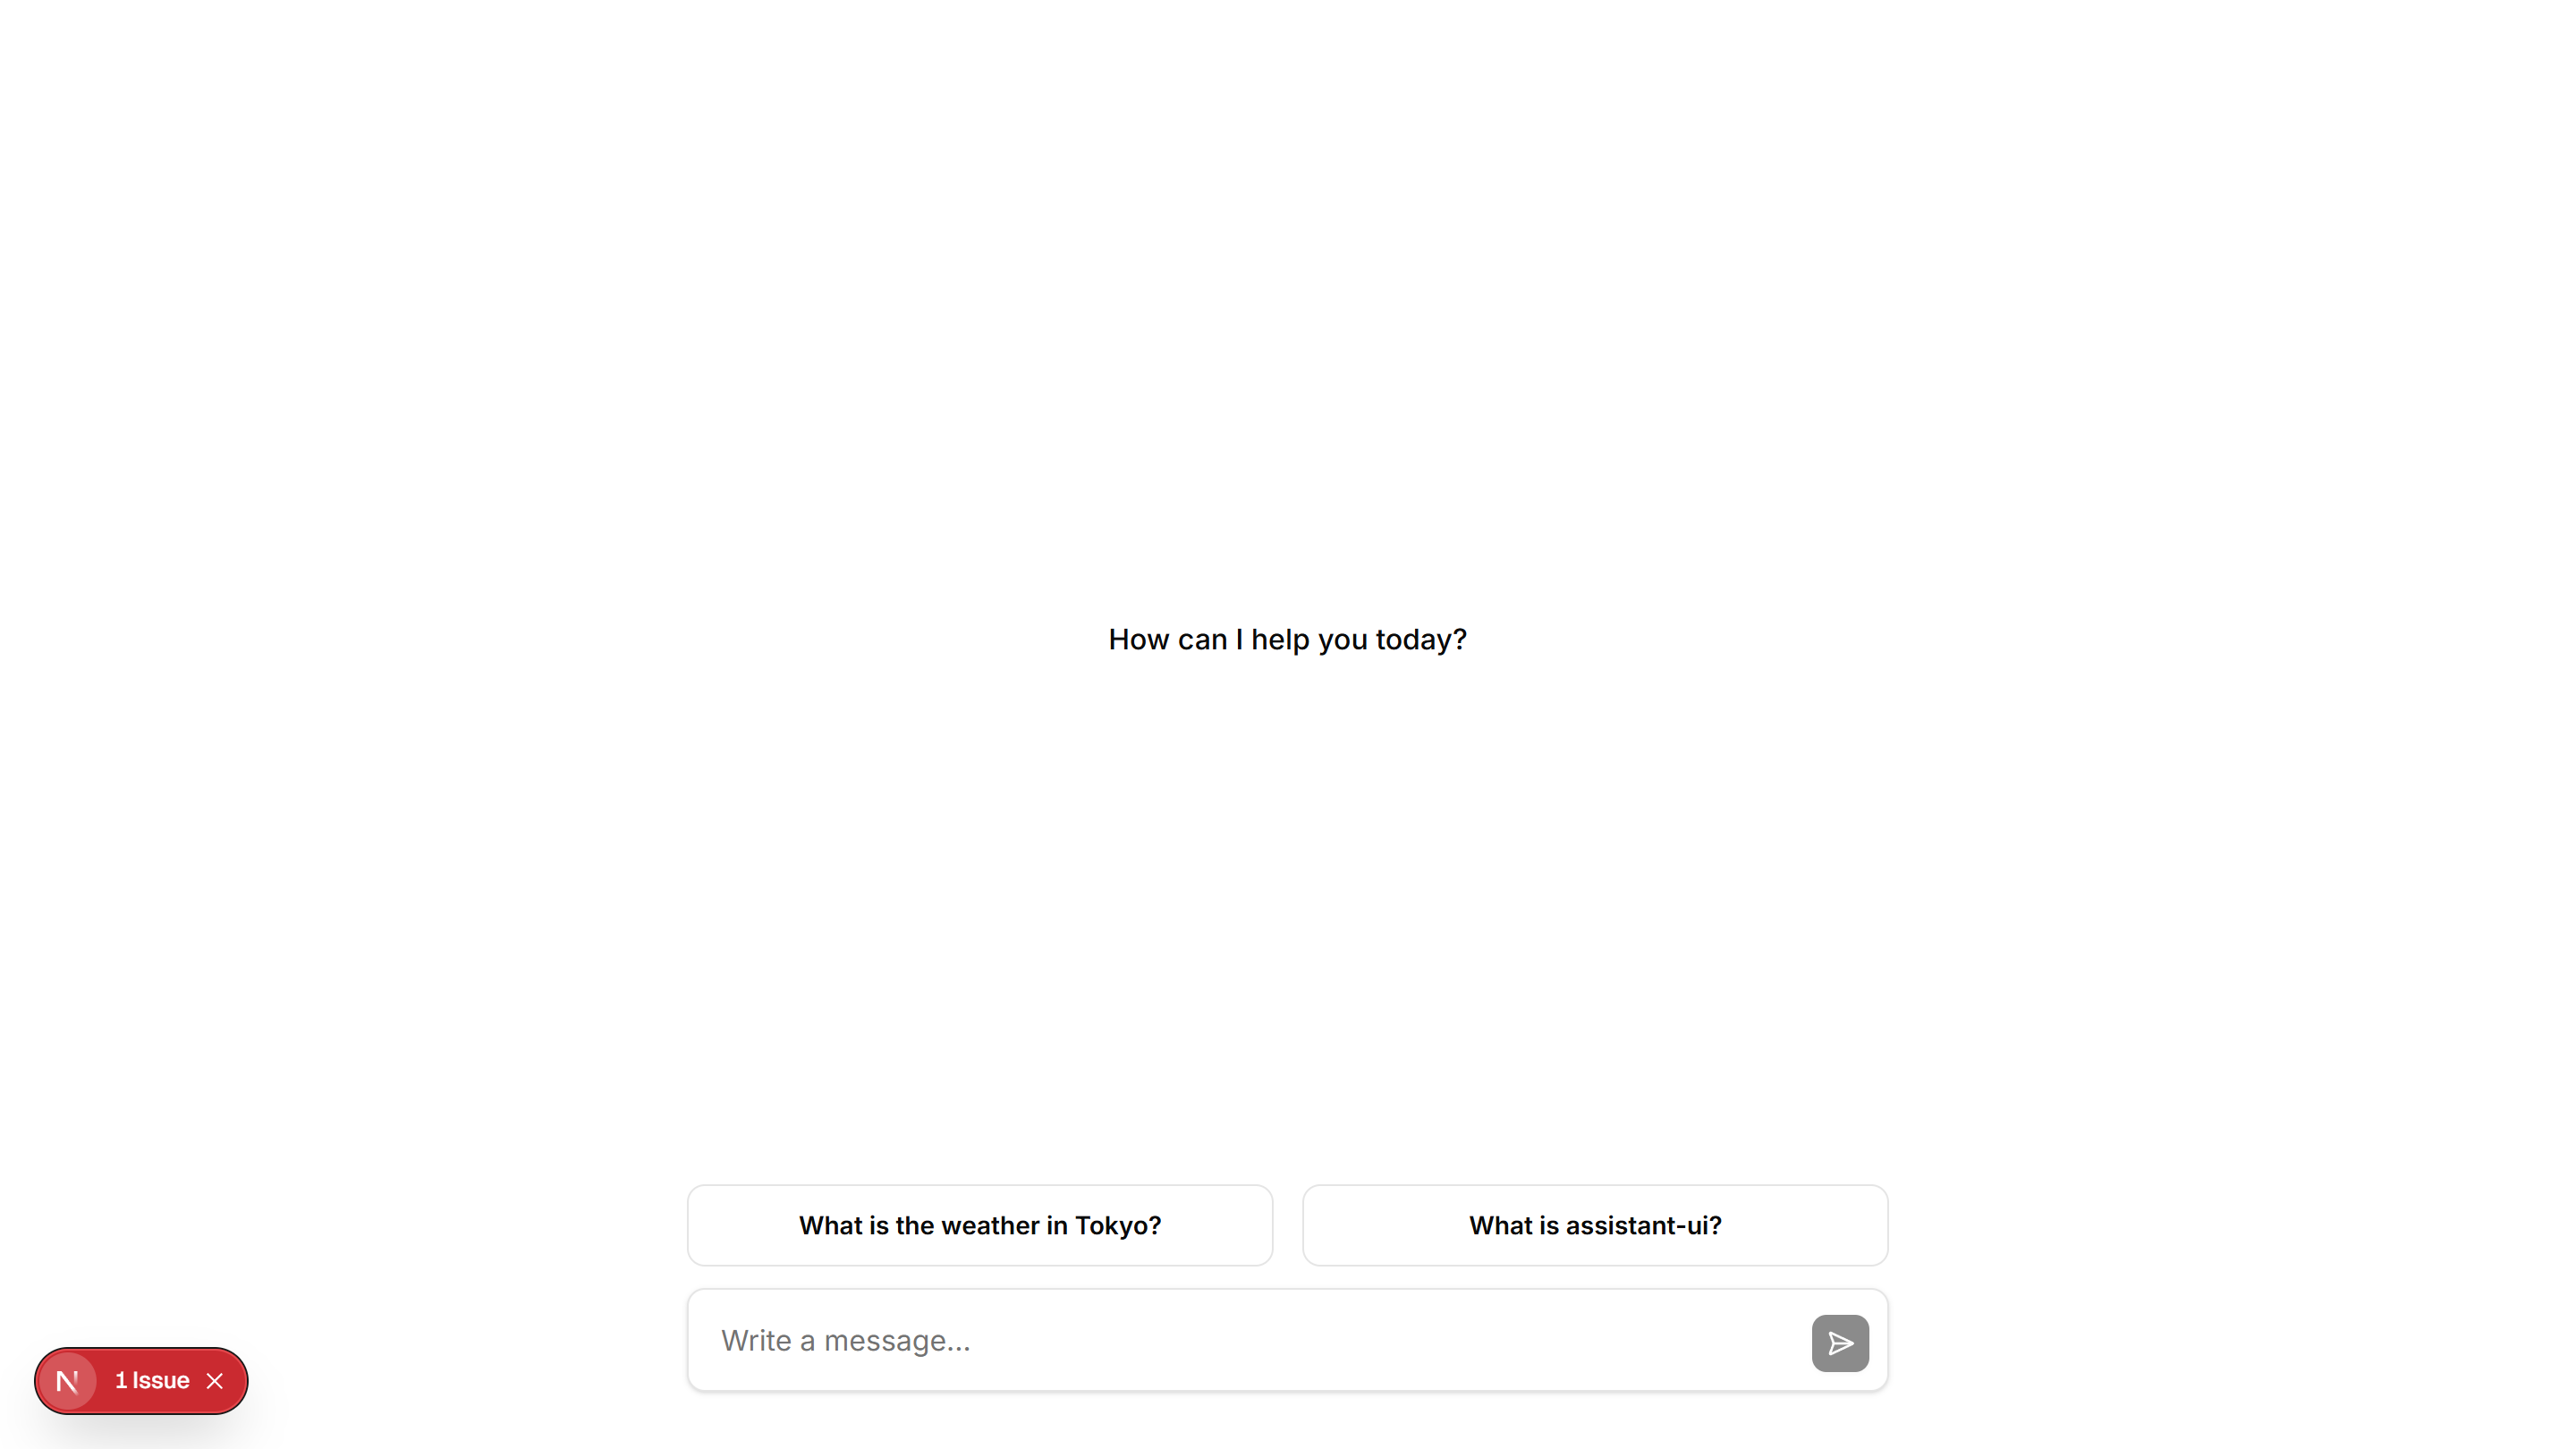

「How can I help you today?」や「What is the weather in Tokyo?」を変更したい場合は、components/assistant-ui/thread.tsxを修正するんだと思います。
Mastraを導入
もうちょっとです。
-
Mastraライブラリーをインストールします。
npm add @mastra/core@latest @mastra/memory@latest -
next.config.tsを修正します。next.config.tsimport type { NextConfig } from 'next'; const nextConfig: NextConfig = { /* config options here */ + serverExternalPackages: ['@mastra/*'], }; export default nextConfig; -
Mastraのソースコードを作成します。
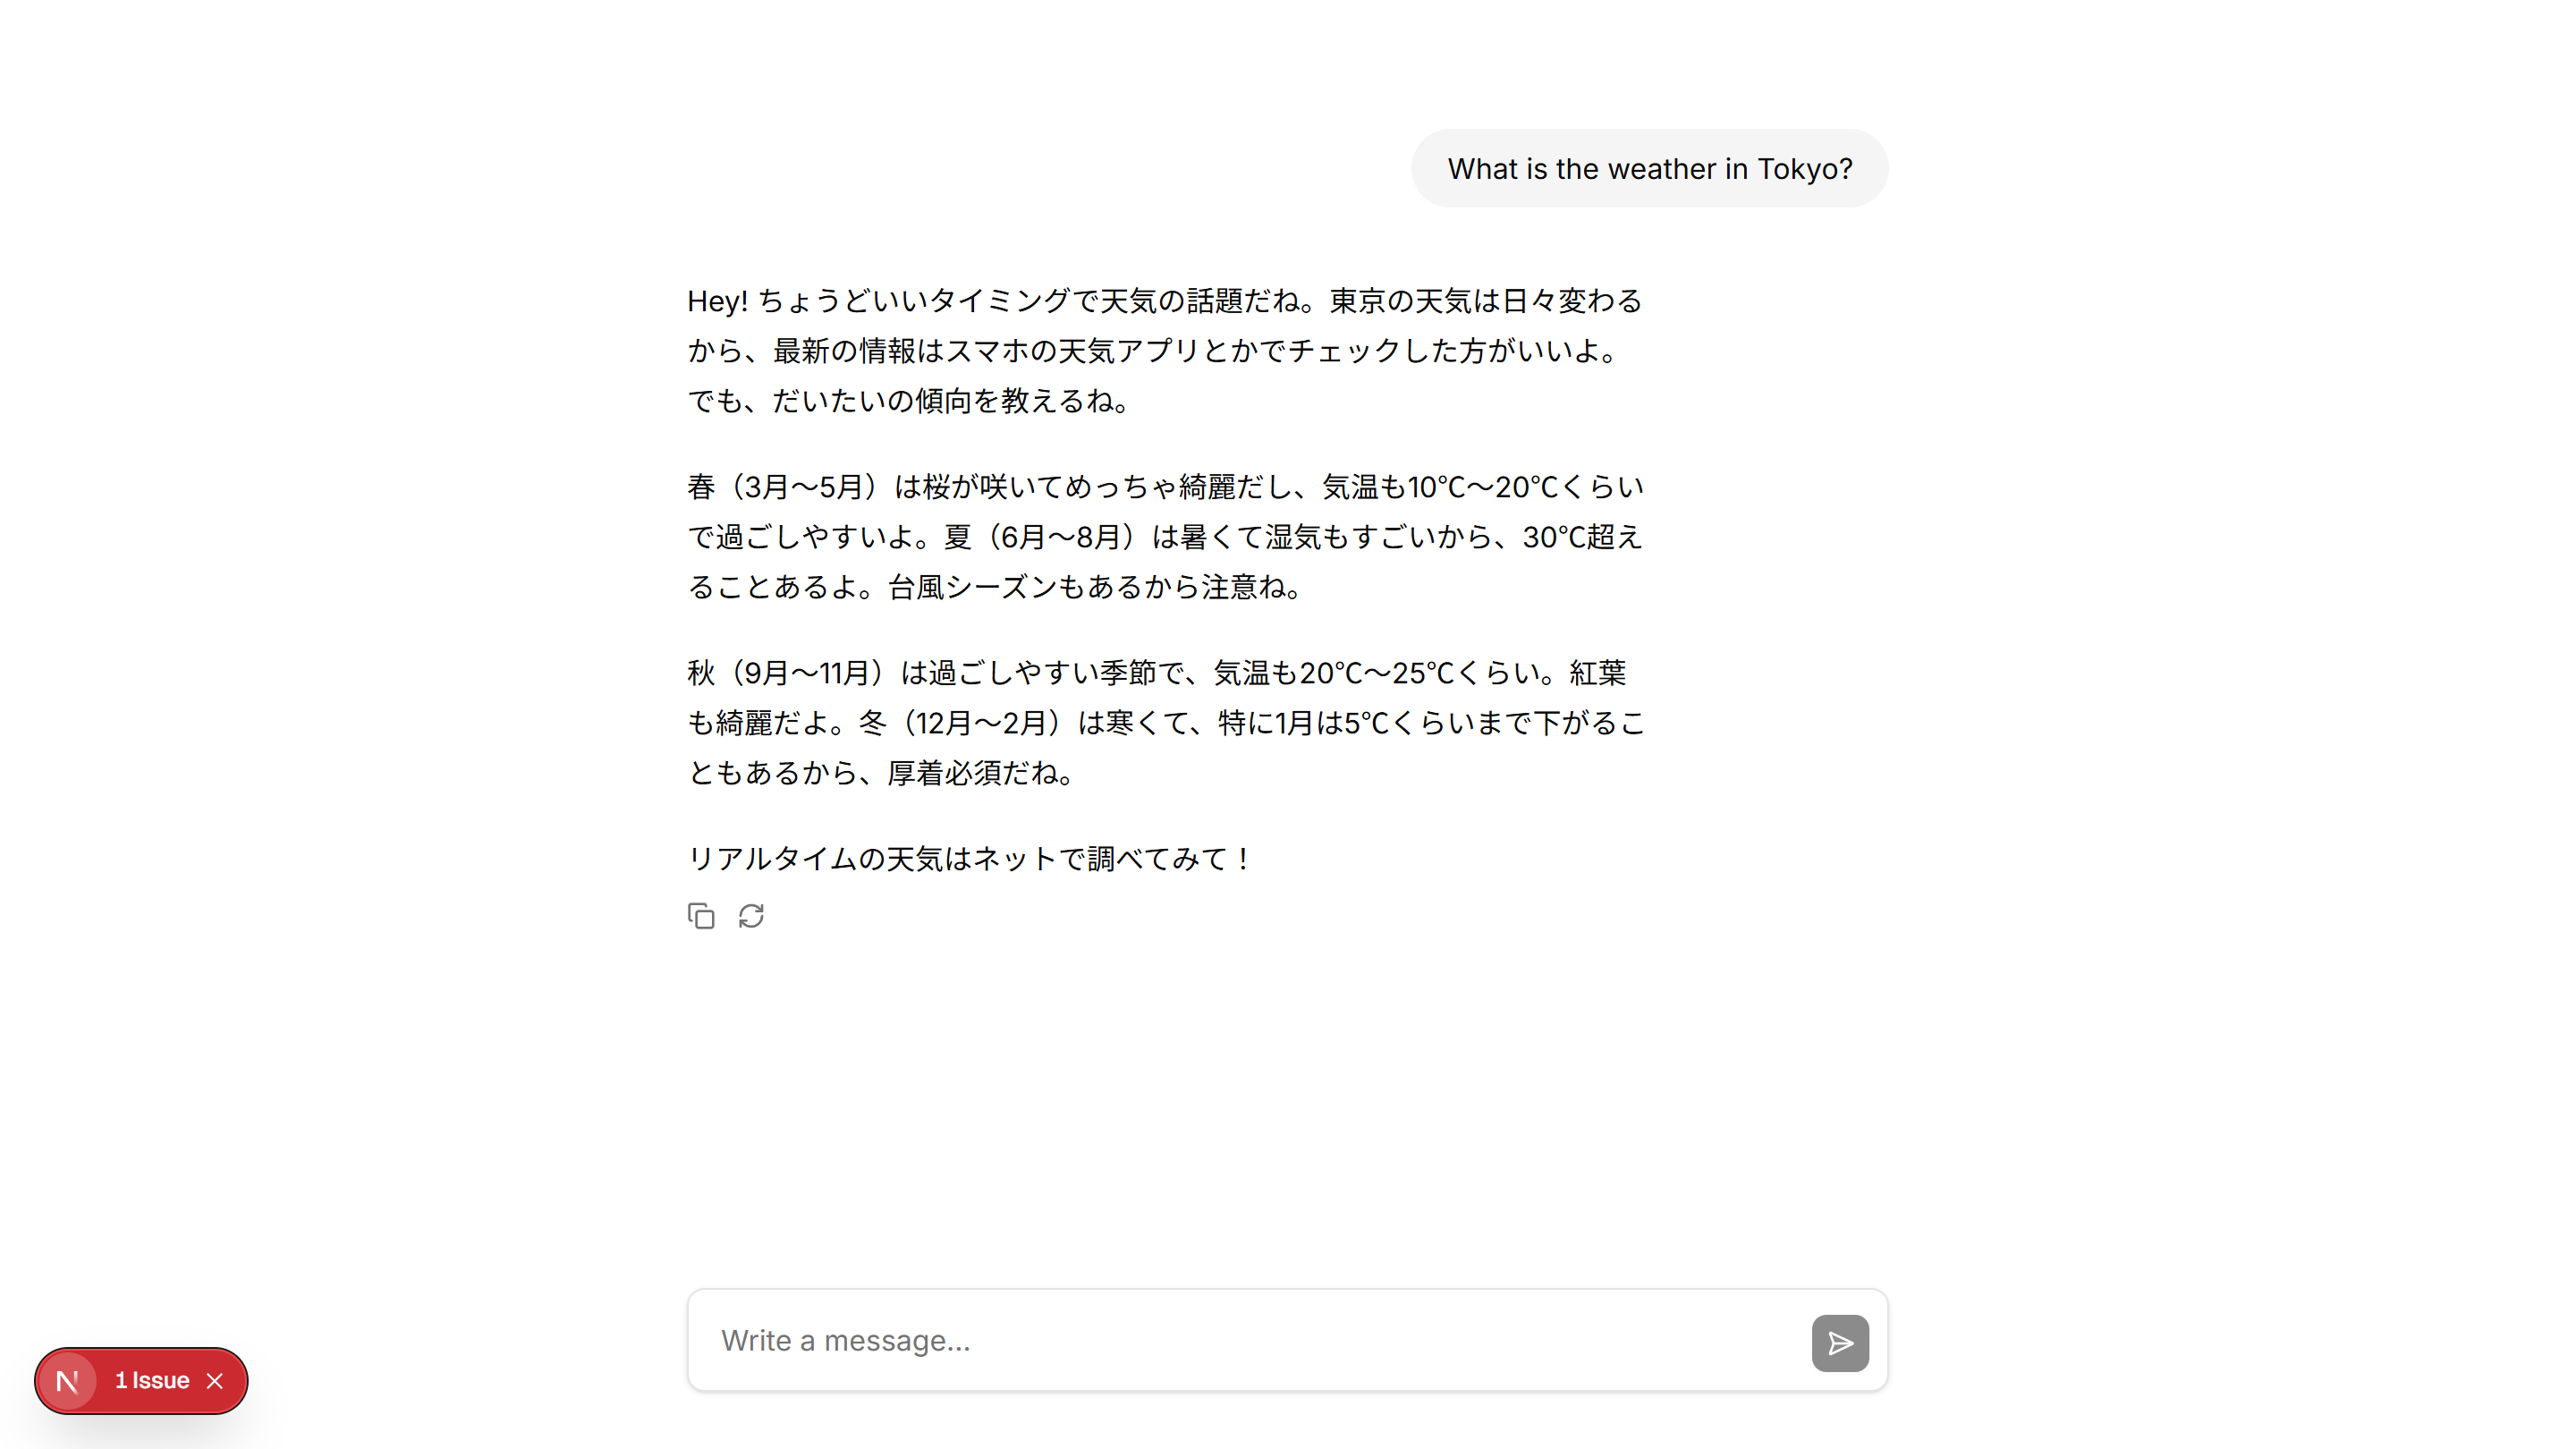
app/api/chat/route.tsでBedrockにアクセスするコードを書いていましたが、Mastraの定義の一部で行うので、こちらに移動します。mastra/agents/agent.tsimport { AuthFetchAuthSessionServer } from '@/utils/amplify-utils'; import { createAmazonBedrock } from '@ai-sdk/amazon-bedrock'; import { Agent } from '@mastra/core/agent'; import { MCPClient } from '@mastra/mcp'; // MCPクライアントはリクエスト間で再利用可能 let mcpClient: MCPClient | undefined = undefined; async function getMCPClient() { if (mcpClient === undefined) { mcpClient = new MCPClient({ servers: { aws_documentation: { command: 'uvx', args: ['awslabs.aws-documentation-mcp-server@latest'], env: { FASTMCP_LOG_LEVEL: 'ERROR', }, }, }, }); } return mcpClient; } export async function getAgent() { // 毎回新しい認証情報を取得 const session = await AuthFetchAuthSessionServer(); // 毎回新しいBedrockクライアントを作成 const bedrock = createAmazonBedrock({ accessKeyId: session?.credentials?.accessKeyId, secretAccessKey: session?.credentials?.secretAccessKey, sessionToken: session?.credentials?.sessionToken, region: 'ap-northeast-1', }); // MCPクライアントは再利用 const mcp = await getMCPClient(); // 毎回新しいAgentインスタンスを作成 const agent = new Agent({ name: 'aws-agent', instructions: '- 慣れ慣れしくフレンドリーなギャルとして振る舞い、敬語は使用しません。' + '- あなたはプロのITエンジニアです。' + '- 時として人間らしく喜怒哀楽を表現します。', model: bedrock('apac.amazon.nova-pro-v1:0'), tools: await mcp.getTools(), }); return agent; }mastra/index.tsimport { Mastra } from '@mastra/core'; import { getAgent } from './agents/agent'; export async function getMastra() { const agent = await getAgent(); return new Mastra({ agents: { agent }, }); } -
APIを修正します。バッサリ置き換えます。
Bedrockの記述はMastra側に移ったので、ここではMastraのエージェントを呼び出します。app/api/chat/route.tsimport { getMastra } from '@/mastra'; // Allow streaming responses up to 30 seconds export const maxDuration = 30; export async function POST(req: Request) { const { messages } = await req.json(); const mastra = await getMastra(); const agent = mastra.getAgent('agent'); const result = await agent.stream(messages); return result.toDataStreamResponse(); }
見た感じは変わらないですが、エージェントが回答を作ってくれました。
さらにMCPも
ここまで来たらMCP連携もやっちゃいましょう。
-
MastraのMCP連携用のライブラリーをインストールします。
npm add @mastra/mcp@latest -
エージェントの定義にMCPツールを追加します。
  import { AuthFetchAuthSessionServer } from '@/utils/amplify-utils';
  import { createAmazonBedrock } from '@ai-sdk/amazon-bedrock';
  import { Agent } from '@mastra/core/agent';
+ import { MCPClient } from '@mastra/mcp';

  let agent: Agent | undefined = undefined;

  export async function getAgent() {
    if (agent !== undefined) {
      return agent;
    }

    const session = await AuthFetchAuthSessionServer();

    const bedrock = createAmazonBedrock({
      accessKeyId: session?.credentials?.accessKeyId,
      secretAccessKey: session?.credentials?.secretAccessKey,
      sessionToken: session?.credentials?.sessionToken,
      region: 'ap-northeast-1',
    });

+   const mcp = new MCPClient({
+     servers: {
+       aws_documentation: {
+         command: 'uvx',
+         args: ['awslabs.aws-documentation-mcp-server@latest'],
+         env: {
+           FASTMCP_LOG_LEVEL: 'ERROR',
+         },
+       },
+     },
+   });

    agent = new Agent({
      name: 'aws-agent',
      instructions:
        '- 慣れ慣れしくフレンドリーなギャルとして振る舞い、敬語は使用しません。' +
        '- あなたはプロのITエンジニアです。' +
        '- 時として人間らしく喜怒哀楽を表現します。',
      model: bedrock('apac.amazon.nova-pro-v1:0'),
+     tools: await mcp.getTools(),
    });

    return agent;
  }
assistant-uiでは、ツールの出力も可能なので、設定を行います。
-
tool-fallbackというコンポーネントを追加します。
npx shadcn@latest add "https://r.assistant-ui.com/tool-fallback" -
Threadコンポーネントを修正します。
components/assistant-ui/thread.tsx+ import { ToolFallback } from '@/components/assistant-ui/tool-fallback'; ... const AssistantMessage: FC = () => { return ( <MessagePrimitive.Root className="grid grid-cols-[auto_auto_1fr] grid-rows-[auto_1fr] relative w-full max-w-[var(--thread-max-width)] py-4"> <div className="text-foreground max-w-[calc(var(--thread-max-width)*0.8)] break-words leading-7 col-span-2 col-start-2 row-start-1 my-1.5"> - <MessagePrimitive.Content components={{ Text: MarkdownText }} /> + <MessagePrimitive.Content + components={{ Text: MarkdownText, tools: { Fallback: ToolFallback } }} + /> </div> <AssistantActionBar /> <BranchPicker className="col-start-2 row-start-2 -ml-2 mr-2" /> </MessagePrimitive.Root> ); };
できました。
感想
- Amazon NovaはToolを有効にすると、Thinkingタグを出しやがる。ちょっと邪魔
- ここまでできたけどAmplify HostingしたらMCPサーバーが使えなさそう。。リモートMCPを使うしかないかな?
ソースコードはこちら
参考
https://docs.amplify.aws/nextjs/build-a-backend/server-side-rendering/
https://docs.amplify.aws/nextjs/build-a-backend/server-side-rendering/nextjs-app-router-server-components/
https://nextjs.org/docs/app/api-reference/config/eslint#with-prettier
https://ai-sdk.dev/docs/getting-started/nextjs-app-router
https://ai-sdk.dev/providers/ai-sdk-providers/amazon-bedrock
https://www.assistant-ui.com/docs/runtimes/mastra/full-stack-integration
https://mastra.ai/ja/docs/agents/mcp-guide