M5Stack Creativitiy Contestなるものが開催されていたので、面白そうなので投稿してみました。本記事はその詳細となります。
M5Stack Creativitiy Contestでの投稿記事はこちらです。
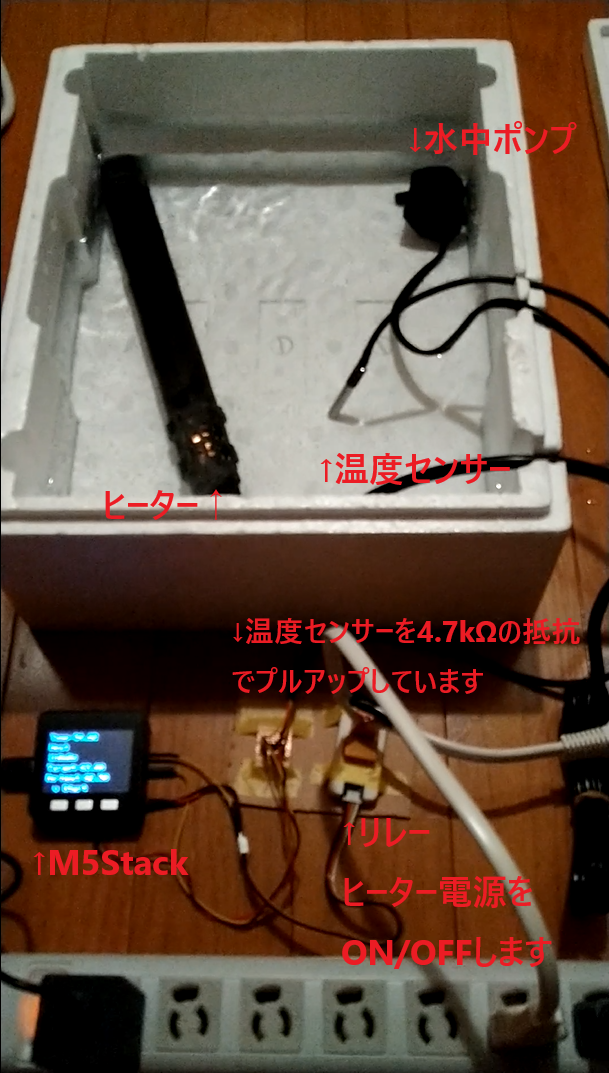
作ったものは低温調理器です。
仕組みとしては単純で水温センサーの値をM5Stackで監視し、設定温度に保つようにヒーター電源をリレーで制御します。
完成図
低温調理器を使ってみた

コンビニでよく見るサラダチキンです。鶏むね肉なのに非常にやわかくジューシーに仕上がりました。それなりに満足のいく出来になりました。
設定は60℃で90分で調理しました。
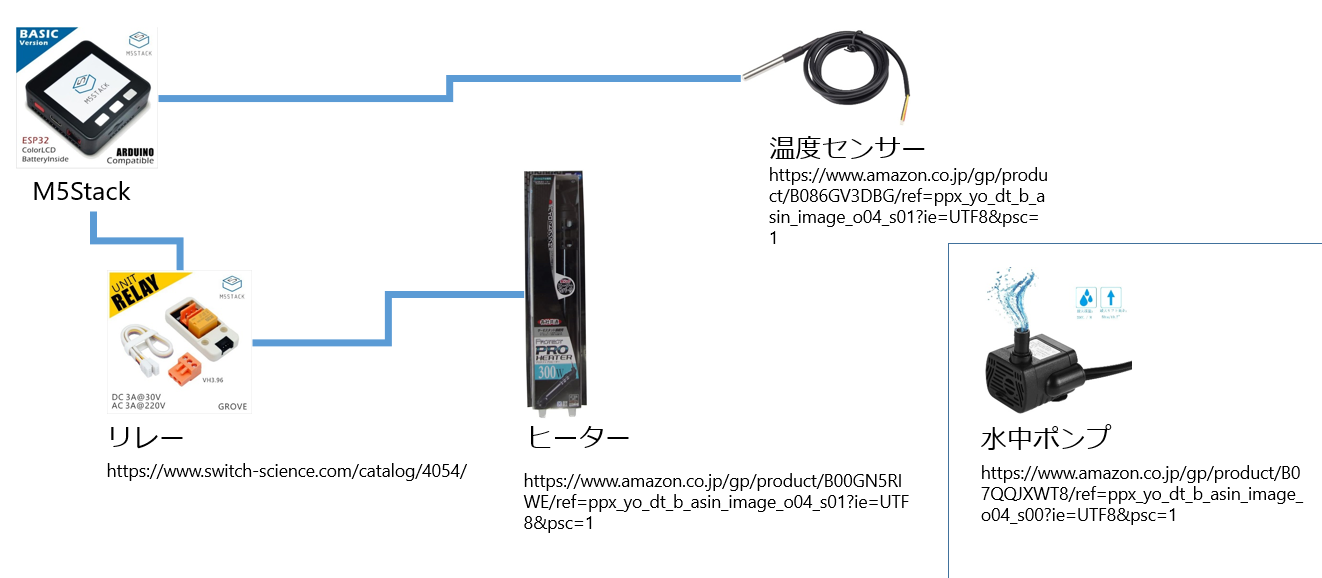
設計図
機能
-
設定された温度に水温を保つ
設定温度に達したらヒーターをOFFにし、一定温度下がったらまたヒーターをONにすることで水温を保つ仕組みです。 -
水中ポンプで水を撹拌しムラをなくす
容器の形状やヒーターの位置などでポンプがなくてもいいのかもしれませんが、温度ムラが結構あったので必要でした。 -
タイマー機能
時間になったらブザーでお知らせします。 -
温度設定、タイマー設定はブラウザから設定可能
M5StackでWebサーバーを立てて、Wifi内にいるスマホ等のブラウザから温度設定、タイマー設定を入力できるようにしました。
ソースコード
.cpp
# include <OneWire.h>
# include <DS18B20.h>
# include <M5Stack.h>
# include <WiFi.h>
# include <WiFiClient.h>
# include <WebServer.h>
# include <ESPmDNS.h>

# define ONE_WIRE_BUS 26
# define RELAY_PIN 2

// Wifi関連
const char* host = "M5Stack";
const char* ssid = "*******";
const char* password = "******";

// Webページ関連
WebServer server(80);
const char* serverIndex = "<form method='POST' action='/regist' enctype='multipart/form-data'>Target Temp<input type='text' name='temp1'><br/>Re heat Temp<input type='text' name='temp2'><br />timer[min]<input type='text' name='timer'><br /><input type='submit' value='Regist'></form><a href= '../' >return top</a>";

// 温度センサー関連
OneWire oneWire(ONE_WIRE_BUS);
DS18B20 sensor(&oneWire);

// 温度制御関連
float settei_temp = 63;     // 設定温度
float saiKanetsu_temp = 62.5; // 再加熱温度
bool totatsu = false;       // 設定温度に到達したか
unsigned long timer = 60 * 60 * 1000;    // タイマー[ms]
unsigned long targetTimer = 0;  // 出来上がり時間[ms]
bool isStart = false;       // タイマー開始しているかどうか
bool relay = false;         // リレーをONにしているかどうか

void setup(void)
{
  M5.begin();

  M5.Lcd.fillScreen(BLACK);
  M5.Lcd.setCursor(10, 10);
  M5.Lcd.setTextColor(WHITE);
  M5.Lcd.setTextSize(3);
  M5.Lcd.printf("Wake up!");

  Serial.begin(115200);
  Serial.println(__FILE__);
  Serial.print("DS18B20 Library version: ");
  Serial.println(DS18B20_LIB_VERSION);

  sensor.begin();

  pinMode(RELAY_PIN, OUTPUT);// RELAY Pin setting

  // Wifi接続
  WiFi.mode(WIFI_AP_STA);
  WiFi.begin(ssid, password);
  if (WiFi.waitForConnectResult() == WL_CONNECTED) {
    Serial.println(WiFi.localIP());
    M5.Lcd.printf("IP:%d.%d.%d.%d", WiFi.localIP()[0], WiFi.localIP()[1], WiFi.localIP()[2], WiFi.localIP()[3] );
    MDNS.begin(host);
    // 温度設定画面
    server.on("/", HTTP_GET, []() {
      server.sendHeader("Connection", "close");
      server.send(200, "text/html", serverIndex);
    });
    // 温度入力受付
    server.on("/regist", HTTP_POST, []() {
      String message = "Parameter received.";
      message += "URI: ";
      message += server.uri();
      message += "\nMethod: ";
      message += (server.method() == HTTP_GET) ? "GET" : "POST";
      message += "\nArguments: ";
      message += server.args();
      message += "\n";
      for (uint8_t i = 0; i < server.args(); i++) {
        message += " " + server.argName(i) + ": " + server.arg(i) + "\n";
        if (server.argName(i) == "temp1")
        {
          settei_temp = server.arg(i).toFloat();
        }
        else if (server.argName(i) == "temp2")
        {
          saiKanetsu_temp = server.arg(i).toFloat();
        }
        else if (server.argName(i) == "timer")
        {
          timer = (unsigned long)(server.arg(i).toInt()) * 60 * 1000;  // min -> msec
        }
        isStart = false;
      }
      Serial.println(message);

      server.sendHeader("Connection", "close");
      server.send(200, "text/html", "<br /><a href= '../' >return top</a>");
    });
    server.begin();
    MDNS.addService("http", "tcp", 80);

    Serial.printf("Ready! Open http://%s.local in your browser\n", host);
    M5.Lcd.printf("Ready!");
  } else {
    Serial.println("WiFi Failed");
    M5.Lcd.printf("WiFi Failed.");
  }

  delay(5000);
}

// ビープ音鳴らす1秒周期5回
void beep()
{
  for (int i = 0; i < 5; i ++)
  {
    M5.Speaker.tone(990, 500);
    M5.update();
    delay(500);
    M5.update();
    delay(100);
    M5.update();
    delay(100);
    M5.update();
    delay(100);
    M5.update();
    delay(100);
    M5.update();
    delay(100);
    M5.update();
  }
}

void loop(void)
{
  M5.update();

  server.handleClient();  // Webリクエスト受信

  sensor.requestTemperatures();
  while (!sensor.isConversionComplete());  // wait until sensor is ready
  float temp = sensor.getTempC(); // 温度取得

  Serial.print("Temp: ");
  Serial.println(temp);

  M5.Lcd.clear(0x0000);
  M5.Lcd.setCursor(10, 10);
  M5.Lcd.printf("Temp:%.2f",temp);

  // 温度制御
  bool kanetsu = false;         // 加熱して良いかどうか
  if (temp < saiKanetsu_temp)
  {
    totatsu = false;
    kanetsu = true;
  }
  else if (temp < settei_temp)
  {
    if (totatsu)
    {
      kanetsu = false;
    }
    else
    {
      kanetsu = true;
    }
  }
  else
  {
    totatsu = true;
    kanetsu = false;
  }

  // リレー制御して加熱
  if (kanetsu)
  {
    if (relay == false)
    {
      digitalWrite(RELAY_PIN, HIGH);// RELAY Unit work
      Serial.println("HIGH");
      relay = true;
    }

    M5.Lcd.setCursor(10, 50);
    M5.Lcd.printf("Heat");
  }
  else
  {
    if (relay)
    {
      digitalWrite(RELAY_PIN, LOW);// RELAY Unit stop work
      Serial.println("LOW");
      relay = false;
    }
  }

  // タイマー制御
  int rhour = 0;
  int rmin = 0;
  int rsec = 0;
  if (isStart)
  {
    if (targetTimer <= millis())
    {
      // 出来上がり
      isStart = false;
      beep();
    }
    // 残り時間計算
    else
    {
      unsigned long remain = targetTimer - millis();
      rhour = (int)(remain / 1000 / 60 / 60);
      rmin = (int)(remain % (1000 * 60 * 60) / 1000 / 60);
      rsec = (int)(remain % (1000 * 60) / 1000);
    }
  }
  // タイマースタートしていない場合は設定時間を表示
  else
  {
    rhour = (int)(timer / 1000 / 60 / 60);
    rmin = (int)(timer % (1000 * 60 * 60) / 1000 / 60);
    rsec = (int)(timer % (1000 * 60) / 1000);
  }
  M5.Lcd.setCursor(10, 90);
  M5.Lcd.printf("%dh%dm%ds", rhour, rmin, rsec);

  // 設定温度表示
  M5.Lcd.setCursor(10, 130);
  M5.Lcd.printf("Target:%.2f",settei_temp);
  M5.Lcd.setCursor(10, 170);
  M5.Lcd.printf("Re-heat:%.2f",saiKanetsu_temp);
  M5.Lcd.setCursor(40, 210);
  M5.Lcd.printf("v Start");

  // Aボタンでタイマースタート
  if (M5.BtnA.wasReleased()) {
    isStart = true;
    targetTimer = millis() + timer; // 出来上がり時刻を設定
    Serial.println("Pushed Start.");
    M5.Speaker.beep();
  }
  // Bボタンでビープテスト
  else if (M5.BtnB.wasReleased())
  {
    beep();
  }

  delay(1000);
}
動画
youtubeに上げた動画です。
https://www.youtube.com/watch?v=jReJCWKfKi4&feature=emb_logo