Unity5.6でNavMeshBuilderが強化され、動的にナビゲーションメッシュを生成し、エージェントを柔軟に適切なルートで移動させることが可能となりました。
HoloLensは環境認識に優れたMRデバイスであり、この新機能と相性が良いと考え、実装してみましたので、まとめます。
環境
OS:Windows 10 CreatersUpdate
Unity:5.6.0f3
HoloToolkit:1.5.5.0
完成イメージ
Unity5.6 NavMeshの確認。 pic.twitter.com/T32p3JAMZe
— morio (@morio36) 2017年4月13日
ホワイトボードを置いた場合とどかした場合で選択するパス(目的地までのルート)が変わっているのがわかると思います。
5.5までのようにstaticにした上でBakeするといった事前処理は不要ですし、環境の変化にも対応できています。
NavMeshBuilder.UpdateNavMeshData、およびUpdateNavMeshDataAsyncで実装しています。
流れ
- サンプルの確認
- Unity単体で実装し、動作確認
- HoloLens用に実装
サンプルの確認
参照元:https://github.com/Unity-Technologies/NavMeshComponents
シーン:Examples/Scenes/2_drop_plank.unity
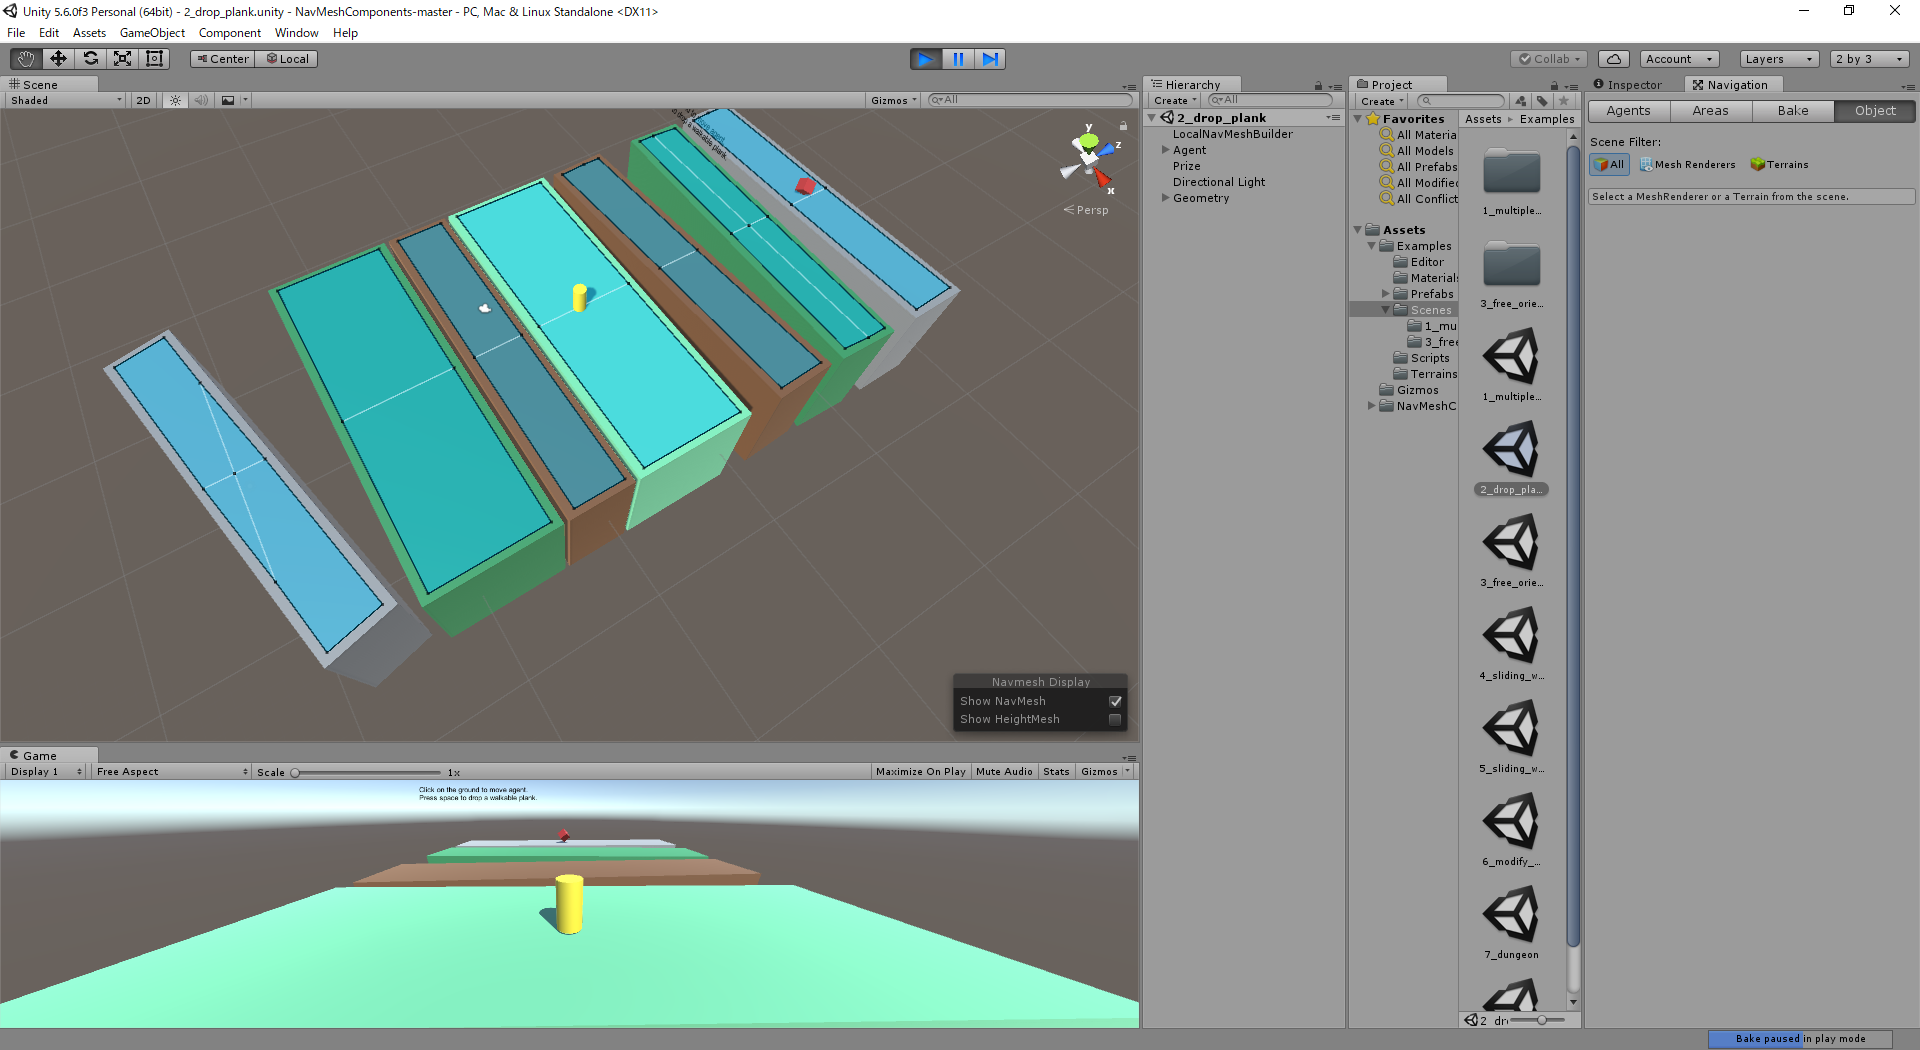
実行前のNavMesh状態

Staticに配置されたGeometry配下のCubeにメッシュがベイクされています。
各Cube間には溝があるため、今のままではゴールにたどり着けません。
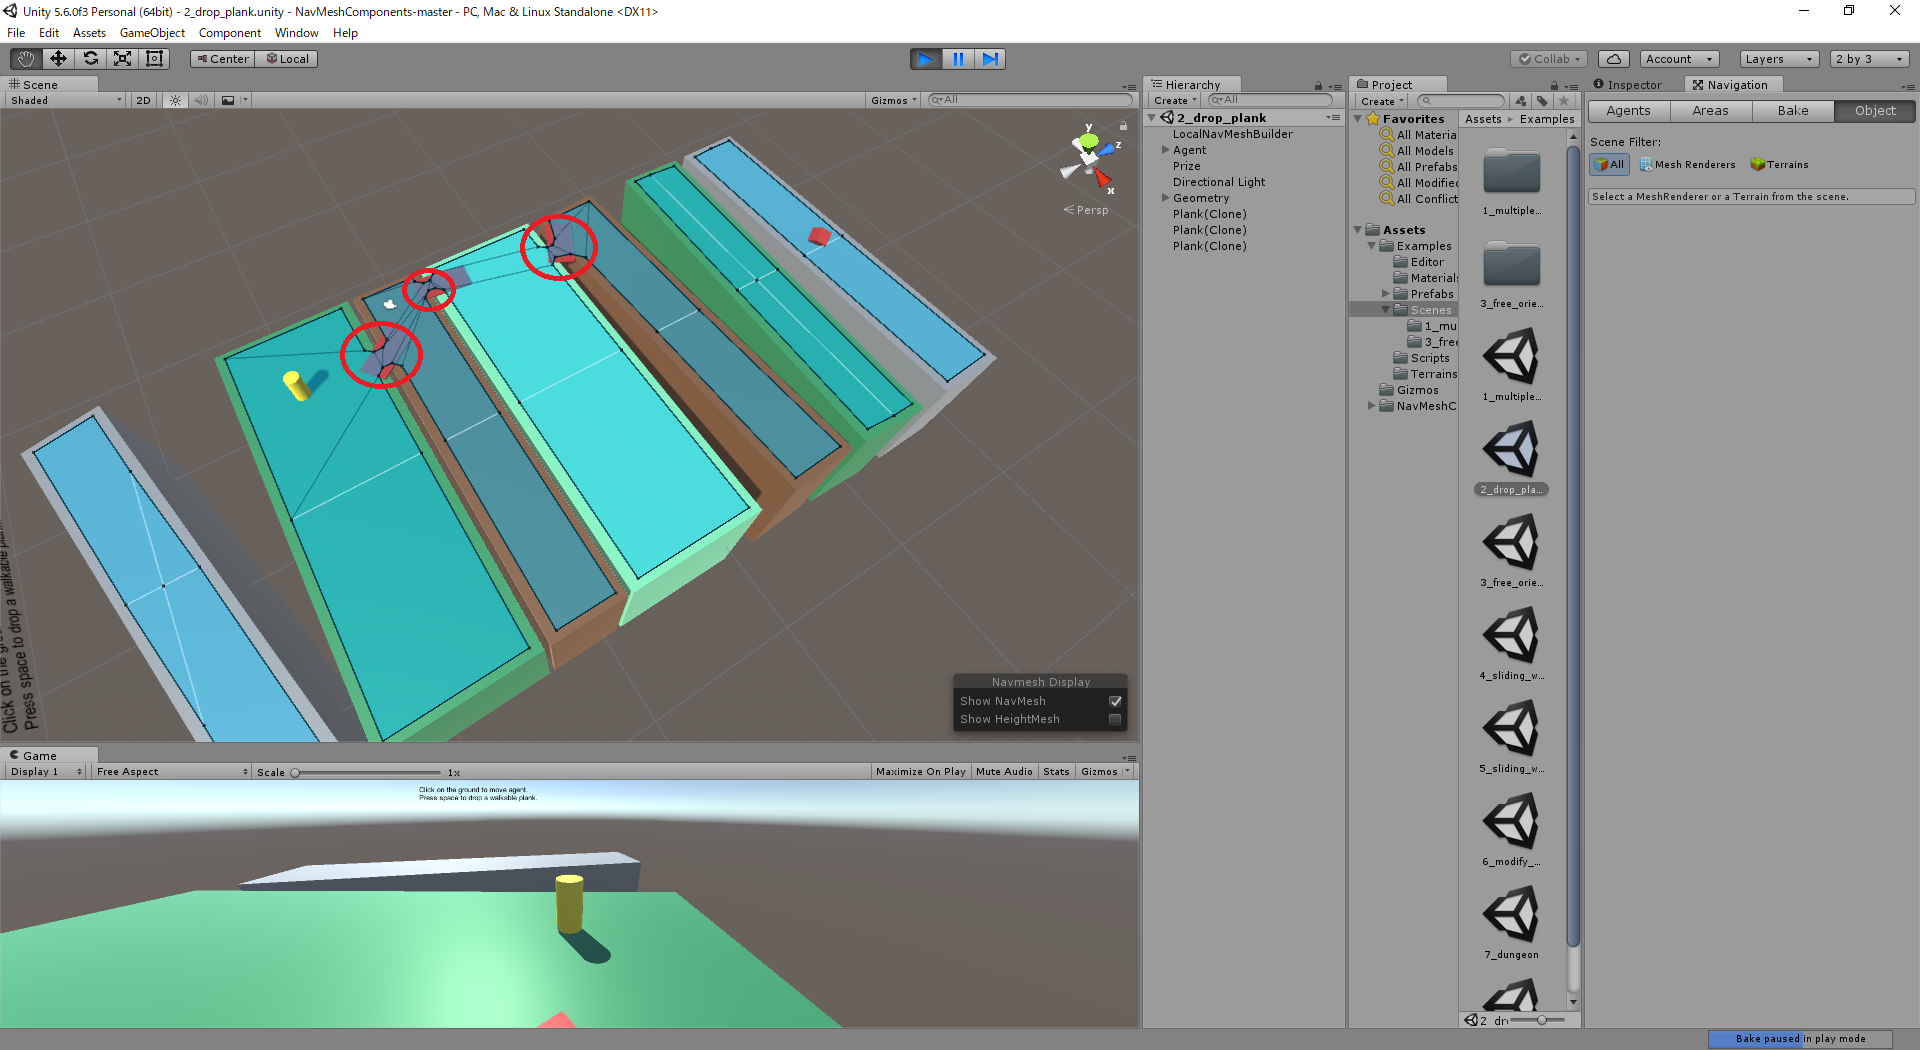
実行後、Plankを配置した状態

赤枠部分、Spaceキーで配置したPlankに動的にメッシュが設定され、Cube間が陸続きになり、対岸へ渡れるようになります。
コードを参照
鍵となるのはLocalNavMeshBuilder.csとNavMeshSourceTag.csです。
上述のCubeにはもともとNavMeshSourceTagコンポーネントがセットされています。
そのため、実行後に動的にメッシュを生成する対象として色づけられています。
PlankプレファブにもNavMeshSourceTagがセットされており、実行後、Spaceキー押下で生成した都度メッシュが生成されます。
動的にメッシュを生成するのはLocalNavMeshBuilderです。
空のGameObjectにLocalNavMeshBuilderコンポーネントをセットしただけの「LocalNavMeshBuilder」が
シーンに配置されており、Start()関数内でUpdateNavMeshを呼び出し続けることで、動的にメッシュを生成し続けています。
using UnityEngine;
using UnityEngine.AI;
using System.Collections;
using System.Collections.Generic;
using NavMeshBuilder = UnityEngine.AI.NavMeshBuilder;

// Build and update a localized navmesh from the sources marked by NavMeshSourceTag
[DefaultExecutionOrder(-102)]
public class LocalNavMeshBuilder : MonoBehaviour
{
    // The center of the build
    public Transform m_Tracked;

    // The size of the build bounds
    public Vector3 m_Size = new Vector3(80.0f, 20.0f, 80.0f);

    NavMeshData m_NavMesh;
    AsyncOperation m_Operation;
    NavMeshDataInstance m_Instance;
    List<NavMeshBuildSource> m_Sources = new List<NavMeshBuildSource>();

    IEnumerator Start()
    {
        while (true)
        {
            UpdateNavMesh(true);            //←このメソッドを呼び出し続ける
            yield return m_Operation;
        }
    }

    void OnEnable()
    {
        // Construct and add navmesh
        m_NavMesh = new NavMeshData();
        m_Instance = NavMesh.AddNavMeshData(m_NavMesh);
        if (m_Tracked == null)
            m_Tracked = transform;
        UpdateNavMesh(false);
    }

    void OnDisable()
    {
        // Unload navmesh and clear handle
        m_Instance.Remove();
    }

    void UpdateNavMesh(bool asyncUpdate = false)
    {
        NavMeshSourceTag.Collect(ref m_Sources);    //←NavMeshSourceTagタグをセットしたオブジェクトをすべて集めてListに格納
        var defaultBuildSettings = NavMesh.GetSettingsByID(0);
        var bounds = QuantizedBounds();   //←メッシュ生成の範囲をセット

        if (asyncUpdate)
            m_Operation = NavMeshBuilder.UpdateNavMeshDataAsync(m_NavMesh, defaultBuildSettings, m_Sources, bounds);    //←実際のメッシュ生成を行っている部分。
        else
            NavMeshBuilder.UpdateNavMeshData(m_NavMesh, defaultBuildSettings, m_Sources, bounds);
    }

    static Vector3 Quantize(Vector3 v, Vector3 quant)
    {
        float x = quant.x*Mathf.Floor(v.x/quant.x);
        float y = quant.y*Mathf.Floor(v.y/quant.y);
        float z = quant.z*Mathf.Floor(v.z/quant.z);
        return new Vector3(x, y, z);
    }

    Bounds QuantizedBounds()
    {
        // Quantize the bounds to update only when theres a 10% change in size
        var center = m_Tracked ? m_Tracked.position : transform.position;
        return new Bounds(Quantize(center, 0.1f*m_Size), m_Size);
    }

    void OnDrawGizmosSelected()
    {
        if (m_NavMesh)
        {
            Gizmos.color = Color.green;
            Gizmos.DrawWireCube(m_NavMesh.sourceBounds.center, m_NavMesh.sourceBounds.size);
        }

        Gizmos.color = Color.yellow;
        var bounds = QuantizedBounds();
        Gizmos.DrawWireCube(bounds.center, bounds.size);

        Gizmos.color = Color.green;
        var center = m_Tracked ? m_Tracked.position : transform.position;
        Gizmos.DrawWireCube(center, m_Size);
    }
}
NavMeshSourceTagコンポーネントがAddされているオブジェクトをCollectメソッドで都度収集し、
すべてまとめてUpdateNavMeshDataAsyncメソッドでメッシュを生成し続けることで、
状況の変化をキャッチしてエージェントが動ける範囲を拡張・縮小しています。
そのため、サンプルを元に実装するためにはこのNavMeshSourceTagにあたるものが必須となります。
Unity単体で実装し、動作確認
HoloLensで実装する前に、まずはUnityのみで単体動作するよう実装してみます。
万が一動作不備があった場合に、NavMesh自体の設定に原因があるのか、HoloLensのSpatialMapping側に原因があるのか切り分けるためです。
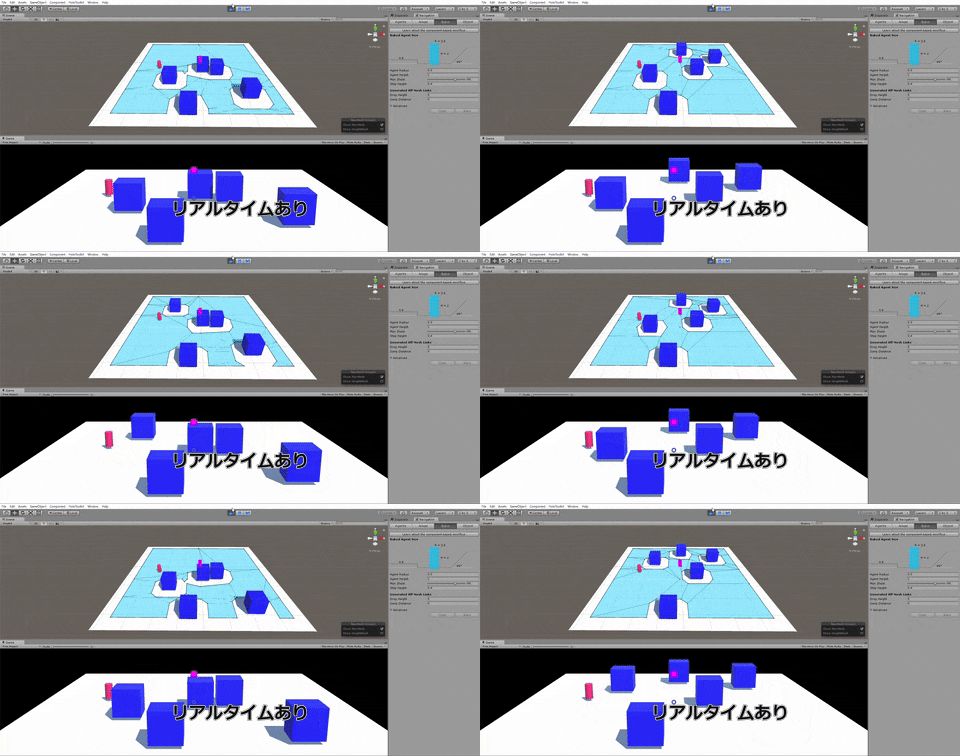
できるのはこのようなものです。
NavMeshの範囲が動的に変化しているのがわかると思います。
エージェントはこの水色部分を「歩行可能領域」と判断し、最適な到達経路を探索します。

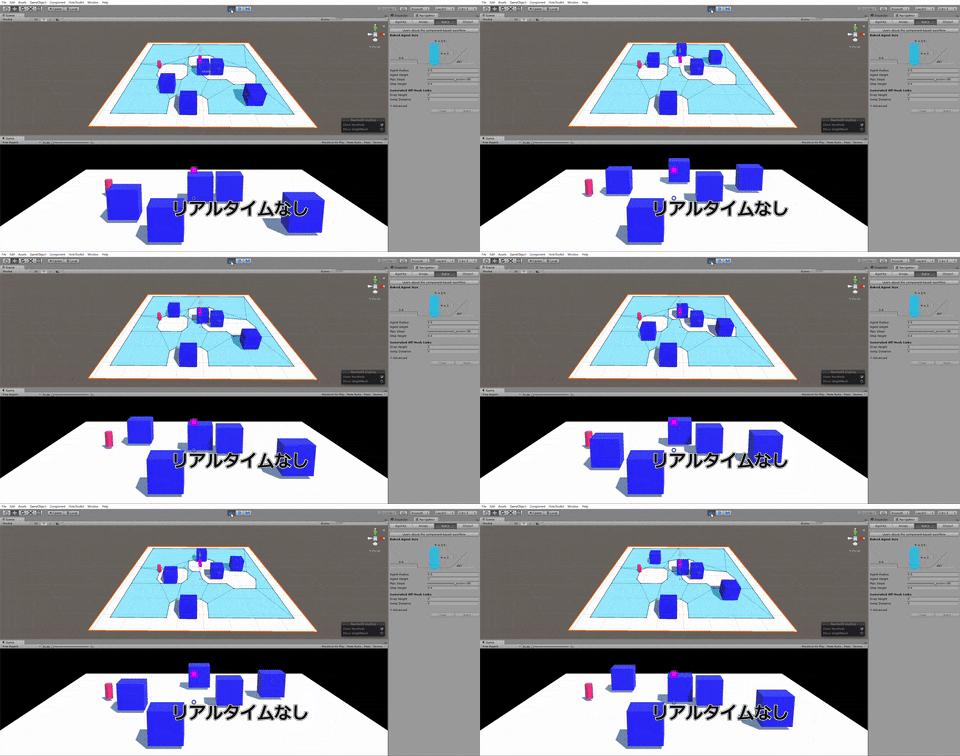
ちなみにリアルタイムのメッシュ生成がなしだとこんな感じです。

1.事前準備としてLocalNavMeshBuilder.csとNavMeshSourceTag.csをサンプルからコピーしておく。HoloToolkitもインポートしておく。
2.シーンにPleneを配置し、NavMeshSourceTagをAddする
3.Cubeを適当に配置し、NavMeshSourceTagをAddする。
Cubeを動かすスクリプトをセット(下記は例)。
using System.Collections;
using System.Collections.Generic;
using UnityEngine;

public class MovingCube: MonoBehaviour {

    Vector3 startPosition;
    public float amplitude;  //←移動させる幅値を各Cubeごとにインスペクタからセットする
    public float speed;      //←移動スピードを各Cubeごとにインスペクタからセットする

	// Use this for initialization
	void Start () {
        startPosition = transform.localPosition;

    }

	// Update is called once per frame
	void Update () {
        float z = amplitude * Mathf.Sin(Time.time * speed);
        transform.localPosition = startPosition + new Vector3(0,0,z);
	}
}
4.Cylinderを新規追加し、NavAgentコンポーネントをAdd。
クリックしたポイントまで移動するスクリプトをAdd(下記は例)
// MoveToClickPoint.cs
using HoloToolkit.Unity.InputModule;
using UnityEngine;
using UnityEngine.AI;
using UnityEngine.UI;

public class MoveToClickPoint : MonoBehaviour, IInputClickHandler
{
    NavMeshAgent agent;

    // パス、座標リスト、ルート表示用Renderer
    NavMeshPath path = null;
    Vector3[] positions = new Vector3[9];
    public LineRenderer lr;


    void Start()
    {
        agent = GetComponent<NavMeshAgent>();
        InputManager.Instance.PushFallbackInputHandler(gameObject);
        lr.enabled = false;
    }

    void Update()
    {


    }

    public void OnInputClicked(InputEventData eventData)
    {
        lr.enabled = true;

        var headPosition = Camera.main.transform.position;
        var gazeDirection = Camera.main.transform.forward;

        RaycastHit hitInfo;

        //目的地の設定
        if (Physics.Raycast(headPosition, gazeDirection, out hitInfo))
        {
            agent.destination = hitInfo.point;
        }

        // パスの計算
        path = new NavMeshPath();
        NavMesh.CalculatePath(agent.transform.position, agent.destination, NavMesh.AllAreas, path);
        positions = path.corners;

        // ルートの描画
        lr.widthMultiplier = 0.2f;
        lr.positionCount = positions.Length;

        for (int i = 0; i < positions.Length; i++) {
            Debug.Log("point "+i+"="+ positions[i]);

            lr.SetPosition(i, positions[i]);

        }
    }

}
5.空のGameObjectを作成し、Component→Effects→LineRendererをAdd。
上述スクリプトの public LineRenderer lr; にアタッチ。
6.空のGameObjectを作成し、LocalNavMeshBuilderをAdd。
7.すべて白だとわかりづらいので適当にマテリアル貼り付けても可
8.HoloToolkitのHoloLensCamera、InputManager、BasicCursolをシーンに配置する。
カメラの位置はPlaneが見渡せるように修正してください。
9.アプリ実行。タップした位置に向かってCylinderが進んでいったら成功です。
HoloLens用に実装
さて、いよいよ現実環境で動かすためにSpatialMappingを実装していきます。
前述のとおり、NavMeshSourceTagが鍵となりますので、HoloLensがメッシュを生成するたびに
NavMeshSourceTagをAddできるよう、HoloToolkitのスクリプトを改修しましょう。
「Unity単体で実装し、動作確認」で実装したプロジェクトをコピーして作るのが安全かつ早いかと思います。
1.HoloToolkitのSpatialMappingをシーンに追加。
2.Plane、Cubeを削除(もしくは非表示化)。
3.Cylinderが元のままだと巨大なのでスケールをx,y,zすべて0.3程度に縮小。姿勢安定のためRigidBody追加し、ConstraintsのFreeze Rotationをすべてチェック。
4.何もしないとメッシュが生成される間にCylinderが奈落に落ちてしまうので、コントロール部分を実装(下記参考)。
// MoveToClickPoint.cs
using HoloToolkit.Unity.InputModule;
using UnityEngine;
using UnityEngine.AI;
using UnityEngine.UI;

public class MoveToClickPoint : MonoBehaviour, IInputClickHandler
{
    NavMeshAgent agent;

    // パス、座標リスト、ルート表示用Renderer
    NavMeshPath path = null;
    Vector3[] positions = new Vector3[9];
    public LineRenderer lr;

    public GameObject cl; //追加

    void Start()
    {
        agent = cl.GetComponent<NavMeshAgent>();//変更
        InputManager.Instance.PushFallbackInputHandler(gameObject);
        cl.SetActive(false); //追加
        lr.enabled = false;
    }

    void Update()
    {


    }

    public void OnInputClicked(InputEventData eventData)
    {
        //追加
        Vector3 hitPos, hitNormal;
        RaycastHit hitInfo;
        Vector3 uiRayCastOrigin = Camera.main.transform.position;
        Vector3 uiRayCastDirection = Camera.main.transform.forward;
        if (Physics.Raycast(uiRayCastOrigin, uiRayCastDirection, out hitInfo))
        {

            if (!cl.activeSelf)
            {
                cl.SetActive(true);
                hitPos = hitInfo.point;
                hitNormal = hitInfo.normal;
                agent.transform.position = hitPos;

            }
        }


        lr.enabled = true;

        var headPosition = Camera.main.transform.position;
        var gazeDirection = Camera.main.transform.forward;

        //目的地の設定
        if (Physics.Raycast(headPosition, gazeDirection, out hitInfo))
        {
            agent.destination = hitInfo.point;
        }

        // パスの計算
        path = new NavMeshPath();
        NavMesh.CalculatePath(agent.transform.position, agent.destination, NavMesh.AllAreas, path);
        positions = path.corners;

        // ルートの描画
        lr.widthMultiplier = 0.2f;
        lr.positionCount = positions.Length;

        for (int i = 0; i < positions.Length; i++)
        {
            Debug.Log("point " + i + "=" + positions[i]);

            lr.SetPosition(i, positions[i]);

        }
    }
}
5.HoloToolkit.Unity.SpatialMapping.SpatialMappingObserverに一文追加。
随時生成されるメッシュにタグを追加し、ナビメッシュ生成対象に含まれるようにします。
        private GameObject GetSurfaceObject(int surfaceID, Transform parentObject)
        {
            //If we have surfaces ready for reuse, use those first
            if (availableSurfaces.Count > 1)
            {
                GameObject existingSurface = availableSurfaces.Dequeue();
                existingSurface.SetActive(true);
                existingSurface.name = string.Format("Surface-{0}", surfaceID);

                UpdateSurfaceObject(existingSurface, surfaceID);

                return existingSurface;
            }

            // If we are adding a new surface, construct a GameObject
            // to represent its state and attach some Mesh-related
            // components to it.
            GameObject toReturn = AddSurfaceObject(null, string.Format("Surface-{0}", surfaceID), transform, surfaceID);

            toReturn.AddComponent<WorldAnchor>();
            toReturn.AddComponent<NavMeshSourceTag>(); //←追加

            return toReturn;
        }
6.空のGameObjectを生成し、MoveToClickPointをAdd。CylinderとLineRenedererをアタッチ。もともとCylinderにアタッチしていたMoveToClickPoint は削除。
7.HoloLens用にconfig周りを設定し、ビルド&デプロイ。PlayerSettings-CapabilitiesのSpatialPerceptionは必須。
これでメッシュが貼られたところをタップするとシリンダーが現れ、次にタップした場所に向けて動き出すはず。
うまく狙ったところに移動してくれない場合、WindowからNavigationタブを呼び出し、AgentsのRadiusを0.1などに下げてあげれば、狭い道にも入っていけるはず。
最後に
シリンダーは当然ほかのオブジェクト(例えばユニティちゃん)に変更可能です。
その場合、歩行アニメーションなどは別途作成してつけてあげる必要がありますが、
カメラの位置に追従するように作り変えればお好みのキャラと一緒に散歩も可能!
夢が広がります!
実装例(2017/5/7補記)
HoloLensでユニティちゃんを召喚して会話してみました。こちらも歩行部分はUnity5.6のNavMeshBuilderを使用。会話部分は外部のAPIを呼び出し。#HoloLens #HoloLensJP pic.twitter.com/KBh17vGDqa
— morio (@morio36) 2017年4月17日
ユニティちゃんが階段登ってくれた。#HoloLens #HoloLensJP pic.twitter.com/AN1002L8uI
— morio (@morio36) 2017年4月17日
こちらのブログも参考になります。
HoloLens の空間マップで NavMesh を使ってみる
【Unity】変化する地形で、マップから落ちないように移動させる手っ取り早い方法