はじめに
Keras の Functional API を使った基本的なモデルの実装と多入力・多出力モデルを実装する方法について紹介します。
環境
今回は Tensorflow に統合された Keras を利用しています。
tensorflow==2.3.0
ゴール
- Functional API が使える
- 多入力・多出力モデルを実装できる
Functional API とは
Sequential モデルより柔軟なモデルを実装できるものになります。
今回は、Sequential モデルでは表現できないモデルの中から多入力・多出力モデルを実装していきます。
基本的な使い方
まずは、Functional API の基本的な使い方を説明していきます。
Functional API はモデルを定義する方法なので、学習・評価・予測は Sequential モデルと同じになります。
入力層
まずは、keras.Inputで入力層を定義します。
inputs = keras.Input(shape=(128,))
中間層・出力層
以下のように層を追加していくことができ、最後の層が出力層になります。
x = layers.Dense(64, activation="relu")(inputs)
outputs = layers.Dense(10)(x)
モデル作成
層の定義が完了したら、入力層と出力層を指定して、モデルを作成します。
model = keras.Model(inputs=inputs, outputs=outputs, name="model")
Sequential モデルとの比較
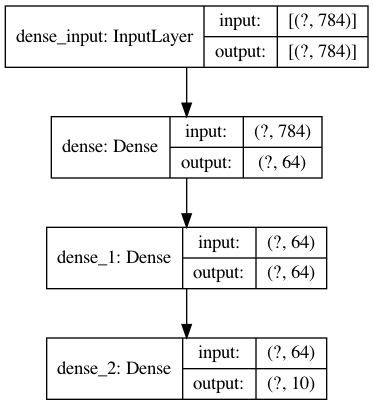
Sequential モデルと Functional API で同じモデルを実装してみます。
実装するモデルは以下の通りです。
Sequential モデル
from tensorflow import keras
from tensorflow.keras import layers
from tensorflow.keras.models import Sequential

model = Sequential()
model.add(layers.Dense(64, activation='relu', input_shape=(784,)))
model.add(layers.Dense(64, activation='relu'))
model.add(layers.Dense(10, activation='softmax'))
Functional API
from tensorflow import keras
from tensorflow.keras import layers

inputs = keras.Input(shape=(784,))
x = layers.Dense(64, activation='relu')(inputs)
x = layers.Dense(64, activation='relu')(x)
outputs = layers.Dense(10, activation='softmax')(x)
model = keras.Model(inputs=inputs, outputs=outputs)
多入力・多出力モデル
Functional API で多入力・多出力モデルを実装していきます。
多入力
入力層を複数定義することで、多入力にすることができます。
複数の層をまとめるときは、layers.concatenateを利用します。
inputs1 = keras.Input(shape=(64,), name="inputs1_name")
inputs2 = keras.Input(shape=(32,), name="inputs2_name")

x = layers.concatenate([inputs1, inputs2])
多出力
中間層を複数に渡すことで、層を分岐させることができます。
終点となる層が複数になることで、多出力になります。
outputs1 = layers.Dense(64, name="outputs1_name")(x)
outputs2 = layers.Dense(32, name="outputs2_name")(X)
コンパイル
複数の出力層がある場合は、それぞれに損失関数と重みを指定できます。
model.compile(
    optimizer=keras.optimizers.RMSprop(1e-3),
    loss={
        "outputs1_name": keras.losses.BinaryCrossentropy(from_logits=True),
        "outputs2_name": keras.losses.CategoricalCrossentropy(from_logits=True),
    },
    loss_weights=[1.0, 0.5],
)
学習
層につけた名前で入力データと出力データ(ターゲット)を指定して、学習させることができます。
model.fit(
    {"inputs1_name": inputs1_data, "inputs2_name": inputs2_data},
    {"outputs1_name": outputs1_targets, "outputs2_name": outputs2_targets},
    epochs=2,
    batch_size=32,
)
具体例
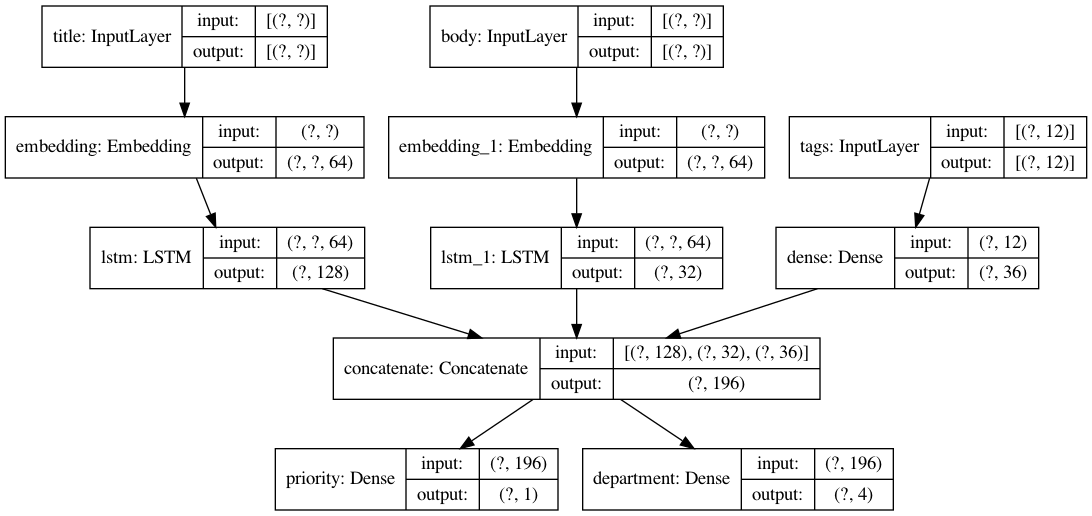
具体的な例を用いて実装してきます。
ここでは、顧客からの問い合わせのタイトルと本文とタグから、その問い合わせの優先度と対応部門を予測します。
入力
- タイトル
- 本文
- タグ
出力
- 優先度
- 対応部門
from tensorflow import keras
from tensorflow.keras import layers
import numpy as np

num_tags = 12
num_words = 10000
num_departments = 4

# ダミーデータの作成
title_data = np.random.randint(num_words, size=(1280, 10))
body_data = np.random.randint(num_words, size=(1280, 100))
tags_data = np.random.randint(2, size=(1280, num_tags)).astype("float32")
priority_targets = np.random.random(size=(1280, 1))
dept_targets = np.random.randint(2, size=(1280, num_departments))

# タイトルの層
title_input = keras.Input(
    shape=(None,), name="title"
)
title_features = layers.Embedding(num_words, 64)(title_input)
title_features = layers.LSTM(128)(title_features)

# 本文の層
body_input = keras.Input(shape=(None,), name="body")
body_features = layers.Embedding(num_words, 64)(body_input)
body_features = layers.LSTM(32)(body_features)

# タグの層
tags_input = keras.Input(
    shape=(num_tags,), name="tags"
)
tags_features = layers.Dense(36, activation='relu')(tags_input)

# 層を結合
x = layers.concatenate([title_features, body_features, tags_features])

# 出力層
priority_output = layers.Dense(1, name="priority")(x)
department_output = layers.Dense(num_departments, name="department")(x)

model = keras.Model(
    inputs=[title_input, body_input, tags_input],
    outputs=[priority_output, department_output],
)

# モデルをコンパイル
model.compile(
    optimizer=keras.optimizers.RMSprop(1e-3),
    loss={
        "priority": keras.losses.BinaryCrossentropy(from_logits=True),
        "department": keras.losses.CategoricalCrossentropy(from_logits=True),
    },
    loss_weights=[1.0, 0.5],
)

# 学習
model.fit(
    {"title": title_data, "body": body_data, "tags": tags_data},
    {"priority": priority_targets, "department": dept_targets},
    epochs=2,
    batch_size=32,
)
まとめ
- Functional API を使うと多入力・多出力のモデルを実装できる

