2020/9/27 更新
ディスクサイズ 縮小 に必要なコマンドにつき、Githubのコードに追記がありディスクGenerationバージョンが必要となりソースが更新されています。
下記の情報も参考にしながらコードの調整をされてください。
# Variables
$DiskID = ""# eg. "/subscriptions/203bdbf0-69bd-1a12-a894-a826cf0a34c8/resourcegroups/rg-server1-prod-1/providers/Microsoft.Compute/disks/Server1-Server1"
$VMName = "VM-Server1"
$DiskSizeGB = 32
$AzSubscription = "Prod Subscription"

# Script
# Provide your Azure admin credentials
Connect-AzAccount

# Provide the subscription Id of the subscription where snapshot is created
Select-AzSubscription -Subscription $AzSubscription

# VM to resize disk of
$VM = Get-AzVm | ? Name -eq $VMName

# Provide the name of your resource group where snapshot is created
$resourceGroupName = $VM.ResourceGroupName

# Get Disk from ID
$Disk = Get-AzDisk | ? Id -eq $DiskID

# Get VM/Disk generation from Disk
$HyperVGen = $Disk.HyperVGeneration

# Get Disk Name from Disk
$DiskName = $Disk.Name

# Get SAS URI for the Managed disk
$SAS = Grant-AzDiskAccess -ResourceGroupName $resourceGroupName -DiskName $DiskName -Access 'Read' -DurationInSecond 600000;

# Provide the managed disk name
# $managedDiskName = "yourManagedDiskName"

# Provide Shared Access Signature (SAS) expiry duration in seconds e.g. 3600.
# $sasExpiryDuration = "3600"

# Provide storage account name where you want to copy the snapshot - the script will create a new one temporarily
$storageAccountName = "shrink" + [system.guid]::NewGuid().tostring().replace('-','').substring(1,18)

# Name of the storage container where the downloaded snapshot will be stored
$storageContainerName = $storageAccountName

# Provide the key of the storage account where you want to copy snapshot.
# $storageAccountKey = "yourStorageAccountKey"

# Provide the name of the VHD file to which snapshot will be copied.
$destinationVHDFileName = "$($VM.StorageProfile.OsDisk.Name).vhd"

# Generate the SAS for the managed disk
# $sas = Grant-AzureRmDiskAccess -ResourceGroupName $resourceGroupName -DiskName $managedDiskName -Access Read -DurationInSecond $sasExpiryDuration

# Create the context for the storage account which will be used to copy snapshot to the storage account
$StorageAccount = New-AzStorageAccount -ResourceGroupName $resourceGroupName -Name $storageAccountName -SkuName Standard_LRS -Location $VM.Location
$destinationContext = $StorageAccount.Context
$container = New-AzStorageContainer -Name $storageContainerName -Permission Off -Context $destinationContext

# Copy the snapshot to the storage account and wait for it to complete
Start-AzStorageBlobCopy -AbsoluteUri $SAS.AccessSAS -DestContainer $storageContainerName -DestBlob $destinationVHDFileName -DestContext $destinationContext
while(($state = Get-AzStorageBlobCopyState -Context $destinationContext -Blob $destinationVHDFileName -Container $storageContainerName).Status -ne "Success") { $state; Start-Sleep -Seconds 20 }
$state

# Revoke SAS token
Revoke-AzDiskAccess -ResourceGroupName $resourceGroupName -DiskName $DiskName

# Emtpy disk to get footer from
$emptydiskforfootername = "$($VM.StorageProfile.OsDisk.Name)-empty.vhd"

# Empty disk URI
# $EmptyDiskURI = $container.CloudBlobContainer.Uri.AbsoluteUri + "/" + $emptydiskforfooter

$diskConfig = New-AzDiskConfig `
    -Location $VM.Location `
    -CreateOption Empty `
    -DiskSizeGB $DiskSizeGB `
    -HyperVGeneration $HyperVGen

$dataDisk = New-AzDisk `
    -ResourceGroupName $resourceGroupName `
    -DiskName $emptydiskforfootername `
    -Disk $diskConfig

$VM = Add-AzVMDataDisk `
    -VM $VM `
    -Name $emptydiskforfootername `
    -CreateOption Attach `
    -ManagedDiskId $dataDisk.Id `
    -Lun 63

Update-AzVM -ResourceGroupName $resourceGroupName -VM $VM

$VM | Stop-AzVM -Force


# Get SAS token for the empty disk
$SAS = Grant-AzDiskAccess -ResourceGroupName $resourceGroupName -DiskName $emptydiskforfootername -Access 'Read' -DurationInSecond 600000;

# Copy the empty disk to blob storage
Start-AzStorageBlobCopy -AbsoluteUri $SAS.AccessSAS -DestContainer $storageContainerName -DestBlob $emptydiskforfootername -DestContext $destinationContext
while(($state = Get-AzStorageBlobCopyState -Context $destinationContext -Blob $emptydiskforfootername -Container $storageContainerName).Status -ne "Success") { $state; Start-Sleep -Seconds 20 }
$state

# Revoke SAS token
Revoke-AzDiskAccess -ResourceGroupName $resourceGroupName -DiskName $emptydiskforfootername

# Remove temp empty disk
Remove-AzVMDataDisk -VM $VM -DataDiskNames $emptydiskforfootername
Update-AzVM -ResourceGroupName $resourceGroupName -VM $VM

# Delete temp disk
Remove-AzDisk -ResourceGroupName $resourceGroupName -DiskName $emptydiskforfootername -Force;

# Get the blobs
$emptyDiskblob = Get-AzStorageBlob -Context $destinationContext -Container $storageContainerName -Blob $emptydiskforfootername
$osdisk = Get-AzStorageBlob -Context $destinationContext -Container $storageContainerName -Blob $destinationVHDFileName

$footer = New-Object -TypeName byte[] -ArgumentList 512
write-output "Get footer of empty disk"

$downloaded = $emptyDiskblob.ICloudBlob.DownloadRangeToByteArray($footer, 0, $emptyDiskblob.Length - 512, 512)

$osDisk.ICloudBlob.Resize($emptyDiskblob.Length)
$footerStream = New-Object -TypeName System.IO.MemoryStream -ArgumentList (,$footer)
write-output "Write footer of empty disk to OSDisk"
$osDisk.ICloudBlob.WritePages($footerStream, $emptyDiskblob.Length - 512)

Write-Output -InputObject "Removing empty disk blobs"
$emptyDiskblob | Remove-AzStorageBlob -Force


# Provide the name of the Managed Disk
$NewDiskName = "$DiskName" + "-new"

# Create the new disk with the same SKU as the current one
$accountType = $Disk.Sku.Name

# Get the new disk URI
$vhdUri = $osdisk.ICloudBlob.Uri.AbsoluteUri

# Specify the disk options
$diskConfig = New-AzDiskConfig -AccountType $accountType -Location $VM.location -DiskSizeGB $DiskSizeGB -SourceUri $vhdUri -CreateOption Import -StorageAccountId $StorageAccount.Id -HyperVGeneration $HyperVGen

# Create Managed disk
$NewManagedDisk = New-AzDisk -DiskName $NewDiskName -Disk $diskConfig -ResourceGroupName $resourceGroupName

$VM | Stop-AzVM -Force

# Set the VM configuration to point to the new disk
Set-AzVMOSDisk -VM $VM -ManagedDiskId $NewManagedDisk.Id -Name $NewManagedDisk.Name

# Update the VM with the new OS disk
Update-AzVM -ResourceGroupName $resourceGroupName -VM $VM

$VM | Start-AzVM

start-sleep 180
# Please check the VM is running before proceeding with the below tidy-up steps

# Delete old Managed Disk
Remove-AzDisk -ResourceGroupName $resourceGroupName -DiskName $DiskName -Force;

# Delete old blob storage
$osdisk | Remove-AzStorageBlob -Force

# Delete temp storage account
$StorageAccount | Remove-AzStorageAccount -Force
その1)Azure Virtual Machines ディスク(特にOSディスク)サイズの減少ができないとあきらめている記事が多い
Azure Portalではディスクサイズの減少をさせようとしてもエラーでできないことで、あきらめている記事が多い気がする。わたしもあきらめかけた。いろいろ調べてみると実はよくつかわれているWindows機はOSディスク(OSパーティションも)減少が可能なことが分かったので私の実例を載せておく。最低でも128GBスタートになっているAzureですが、ストレージの**ランニングコストが高くつくとあきらめないでください。**少なくとも私は4分の1程度に削減できています。次のような記事を見るとあきらめてしまうことが多いと思う !!!
(1) https://sevenb.jp/wordpress/ura/2019/04/26/azuremanaged-disk%E3%81%AE%E3%82%B5%E3%82%A4%E3%82%BA%E3%81%AF%E5%B0%8F%E3%81%95%E3%81%8F%E3%81%A7%E3%81%8D%E3%81%AA%E3%81%84/
(2) https://qiita.com/hiro871_/items/d380ceff7d6de39d3692
OSディスクサイズ減少、コスト削減方法
各自バックアップをとるなどし自己責任で行ってください。**こちらの方法は公式資料ではありません。私の環境では正常動作を確認しました。**なお、一番最初のVM作成時に直ちに実施してしまうほうが安全だと思いました。
参考資料:https://github.com/jrudlin/Azure/blob/master/General/Shrink-AzDisk.ps1
※最新Azureに対応できていないのかGitHub コード不具合があります。
基本は自動で流れますが、最後の方のstorageAccountId指定がないとコマンドが失敗するため、
前後で区切って実行するか変数に格納して実行するなど工夫してください
(こちらの不具合まで自動化していません)
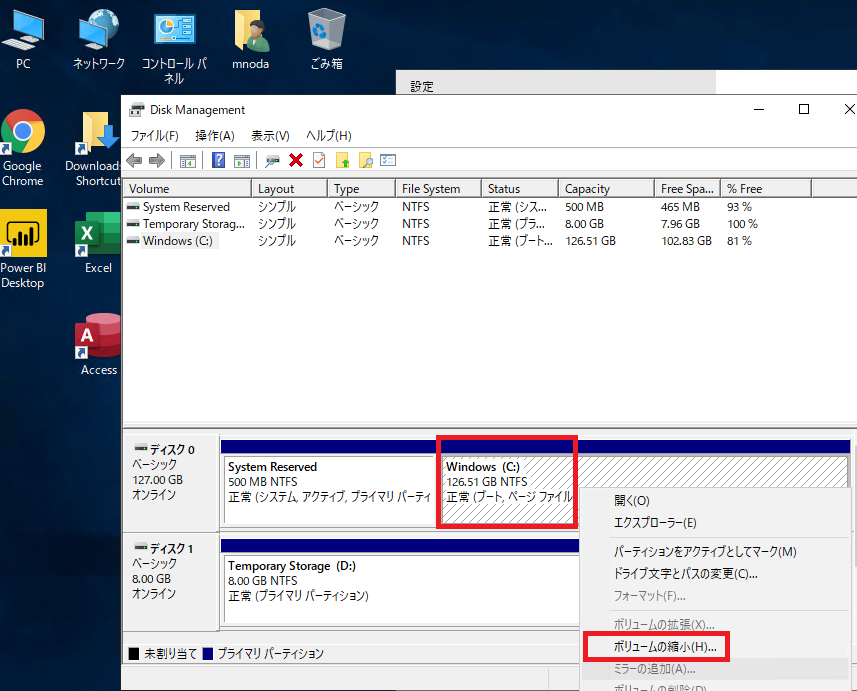
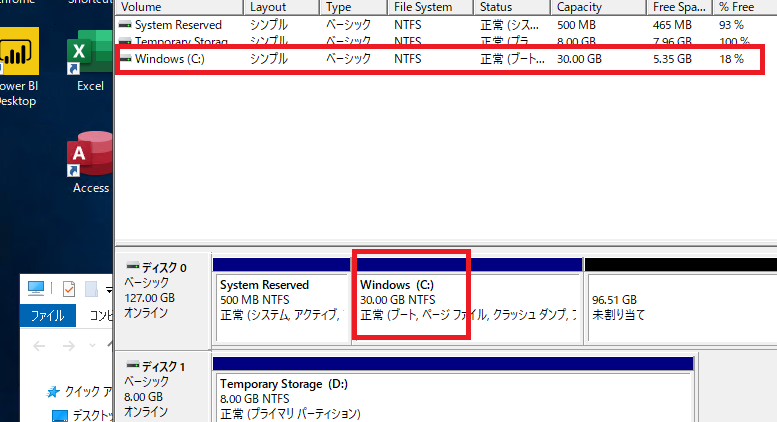
・まずはOSのコンピューターの管理から
Cドライブ(OSディスクの)ディスクサイズを減少させる。この事例では30GBにしている。30GB, System パーティション合わせても新たに作成する32GB以内に収める事例。
・Azure Portalから該当のマシンを停止するなどし、停止済みとすること。その後しばらく待った方がよい。完全停止されていないとスクリプトを実行してもエラーになります!!!
・https://github.com/jrudlin/Azure/blob/master/General/Shrink-AzDisk.ps1
のスクリプトをダウンロードし必要に応じて書き換え:
・Azure Portalから「OSディスク」の「プロパティ」の中にあるリソースIDを $DiskID にコピーする
・Azure Subscriptionを確認し$AzSubscriptionに記載。
Azure PortalかWindows PowerShell ISE などから確認。私の場合は「無料試用版」になっていました。
・Standard_LRSかPremium_LRSか指定できるところがあるので、見直してください。
・$NewDiskName が新しいディスク名になります。自動で問題があり変更が必要な方は変更してください。
・最低必要権限(Azureサインアップした特権なら問題なし):
VM Contributor、Storage Account Contributor、create Managed Disks
・Windows PowerShell ISE コンソールを立ち上げ変更後のShrink-AzDisk.ps1をコピペして実行(おそらくこちらのコンソールでの実行が一番実行しやすいです)。
環境によっては Install-Module Azを実行しないと認証が通りません。
※処理をきりの良いタイミングで分割して実行、概ね30分位待っていたら処理が終わりました
(ディスクのコピー処理があるので時間がかかります。処理が終わるまで冷静に待ってコンソールの切断はしないこと)。
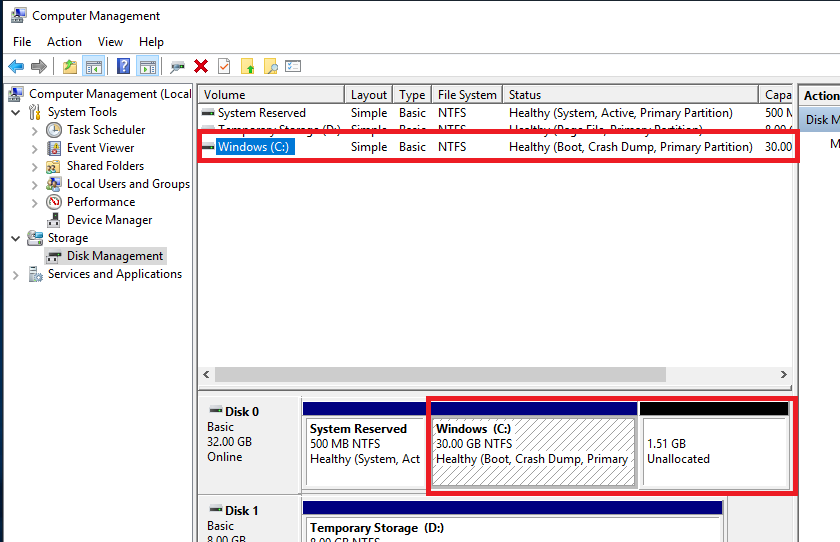
・移行した32GBのサイズに若干の余裕があり、余っている領域があるので、コンピューターの管理よりCドライブを拡張します(別にしなくてもよいが・・・)。
・削除されるべき不要な一時ファイルが削除されていることも確認しましょう。変なものが残っていると課金されちゃいます。
Shrink-AzDisk.ps1コード例(そのままの実行はできません。特に先頭の部分を中心に書き換えください。):
古いのでそのままでは動きません。2020/9現在のコードは一番上に貼りつけています。
# Variables
$DiskID = ""
$VMName = ""
$DiskSizeGB = 32
$AzSubscription = "無料試用版"

# Script
# Provide your Azure admin credentials
Connect-AzAccount

# 認証が無事に通ることを確認する
##################################################################
# Provide the subscription Id of the subscription where snapshot is created
Select-AzSubscription -Subscription $AzSubscription

# VM to resize disk of
$VM = Get-AzVm | ? Name -eq $VMName

# Provide the name of your resource group where snapshot is created
$resourceGroupName = $VM.ResourceGroupName

# Get Disk Name from ID
$Disk = Get-AzDisk | ? Id -eq $DiskID
$DiskName = $Disk.Name

# Get SAS URI for the Managed disk
$SAS = Grant-AzDiskAccess -ResourceGroupName $resourceGroupName -DiskName $DiskName -Access 'Read' -DurationInSecond 600000;

# Provide the managed disk name
# $managedDiskName = "yourManagedDiskName"

# Provide Shared Access Signature (SAS) expiry duration in seconds e.g. 3600.
# $sasExpiryDuration = "3600"


# ここでリソースグループの下に作成されるストレージアカウント名を定義する
# Provide storage account name where you want to copy the snapshot - the script will create a new one temporarily
# $storageAccountName = "storageaccount" + ($($VMName -replace '[^a-zA-Z0-9]', '')).ToLower()
$storageAccountName = "storageaccountwin"
# ここでリソースグループの下に作成されるストレージアカウント名を定義する

# Name of the storage container where the downloaded snapshot will be stored
$storageContainerName = $storageAccountName

# Provide the key of the storage account where you want to copy snapshot.
# $storageAccountKey = "yourStorageAccountKey"

# Provide the name of the VHD file to which snapshot will be copied.
$destinationVHDFileName = "$($VM.StorageProfile.OsDisk.Name).vhd"

# Generate the SAS for the managed disk
# $sas = Grant-AzureRmDiskAccess -ResourceGroupName $resourceGroupName -DiskName $managedDiskName -Access Read -DurationInSecond $sasExpiryDuration

# Create the context for the storage account which will be used to copy snapshot to the storage account
$StorageAccount = New-AzStorageAccount -ResourceGroupName $resourceGroupName -Name $storageAccountName -SkuName Standard_LRS -Location $VM.Location
$destinationContext = $StorageAccount.Context
$container = New-AzStorageContainer -Name $storageContainerName -Permission Off -Context $destinationContext

# Copy the snapshot to the storage account and wait for it to complete
Start-AzStorageBlobCopy -AbsoluteUri $SAS.AccessSAS -DestContainer $storageContainerName -DestBlob $destinationVHDFileName -DestContext $destinationContext
while(($state = Get-AzStorageBlobCopyState -Context $destinationContext -Blob $destinationVHDFileName -Container $storageContainerName).Status -ne "Success") { $state; Start-Sleep -Seconds 10 }
$state

# ここまででディスク内容のコピーがそっくりストレージアカウントに作成される。一番時間がかかるところ。
#############################################################################################

# Revoke SAS token
Revoke-AzDiskAccess -ResourceGroupName $resourceGroupName -DiskName $DiskName

# Emtpy disk to get footer from
$emptydiskforfootername = "$($VM.StorageProfile.OsDisk.Name)-empty.vhd"

# Empty disk URI
# $EmptyDiskURI = $container.CloudBlobContainer.Uri.AbsoluteUri + "/" + $emptydiskforfooter

$diskConfig = New-AzDiskConfig `
    -Location $VM.Location `
    -CreateOption Empty `
    -DiskSizeGB $DiskSizeGB

$dataDisk = New-AzDisk `
    -ResourceGroupName $resourceGroupName `
    -DiskName $emptydiskforfootername `
    -Disk $diskConfig

$VM = Add-AzVMDataDisk `
    -VM $VM `
    -Name $emptydiskforfootername `
    -CreateOption Attach `
    -ManagedDiskId $dataDisk.Id `
    -Lun 63

Update-AzVM -ResourceGroupName $resourceGroupName -VM $VM

$VM | Stop-AzVM -Force

##################################################################################################

# Get SAS token for the empty disk
$SAS = Grant-AzDiskAccess -ResourceGroupName $resourceGroupName -DiskName $emptydiskforfootername -Access 'Read' -DurationInSecond 600000;

# Copy the empty disk to blob storage
Start-AzStorageBlobCopy -AbsoluteUri $SAS.AccessSAS -DestContainer $storageContainerName -DestBlob $emptydiskforfootername -DestContext $destinationContext
while(($state = Get-AzStorageBlobCopyState -Context $destinationContext -Blob $emptydiskforfootername -Container $storageContainerName).Status -ne "Success") { $state; Start-Sleep -Seconds 10 }
$state

# Revoke SAS token
Revoke-AzDiskAccess -ResourceGroupName $resourceGroupName -DiskName $emptydiskforfootername

# ここまででスナップショットのコピーデータがストレージアカウントコンテナの-emptyという名前にコピーされる。
##################################################################################################

# Remove temp empty disk
Remove-AzVMDataDisk -VM $VM -DataDiskNames $emptydiskforfootername
Update-AzVM -ResourceGroupName $resourceGroupName -VM $VM

# ここでマウントされている一時ディスクをVMからリンクを外す
##################################################################################################

# Delete temp disk
Remove-AzDisk -ResourceGroupName $resourceGroupName -DiskName $emptydiskforfootername -Force;

# ここでマウントされていた一時ディスク(中身は空)を削除する
##################################################################################################


# Get the blobs
$emptyDiskblob = Get-AzStorageBlob -Context $destinationContext -Container $storageContainerName -Blob $emptydiskforfootername
$osdisk = Get-AzStorageBlob -Context $destinationContext -Container $storageContainerName -Blob $destinationVHDFileName

$footer = New-Object -TypeName byte[] -ArgumentList 512
write-output "Get footer of empty disk"

$downloaded = $emptyDiskblob.ICloudBlob.DownloadRangeToByteArray($footer, 0, $emptyDiskblob.Length - 512, 512)

$osDisk.ICloudBlob.Resize($emptyDiskblob.Length)
$footerStream = New-Object -TypeName System.IO.MemoryStream -ArgumentList (,$footer)
write-output "Write footer of empty disk to OSDisk"
$osDisk.ICloudBlob.WritePages($footerStream, $emptyDiskblob.Length - 512)

#########################################################################################################

# Write-Output -InputObject "Removing empty disk blobs"
$emptyDiskblob | Remove-AzStorageBlob -Force
# ここでコンテナにある二つのファイルのうち、不要な一つを削除する

# Provide the name of the Managed Disk
$NewDiskName = "$DiskName" + "-new"
# Provide the storage type for the Managed Disk. PremiumLRS or StandardLRS.
$accountType = "Standard_LRS"
# Get the new disk URI
$vhdUri = $osdisk.ICloudBlob.Uri.AbsoluteUri
###
###
###
# Specify the disk options
$diskConfig = New-AzDiskConfig -AccountType $accountType -Location $VM.location -DiskSizeGB $DiskSizeGB -SourceUri $vhdUri -CreateOption Import -StorageAccountId '**********'
# GitHubにあるコードをそのまま使うとエラーになる。AzureでstorageAccountIdが必要になった模様。
# Create Managed disk
$NewManagedDisk = New-AzDisk -DiskName $NewDiskName -Disk $diskConfig  -ResourceGroupName $resourceGroupName
###
###
###

$VM | Stop-AzVM -Force

# Set the VM configuration to point to the new disk
Set-AzVMOSDisk -VM $VM -ManagedDiskId $NewManagedDisk.Id -Name $NewManagedDisk.Name

# Update the VM with the new OS disk
Update-AzVM -ResourceGroupName $resourceGroupName -VM $VM
#######################################################

$VM | Start-AzVM

start-sleep 180

#######################################################
# Please check the VM is running before proceeding with the below tidy-up steps

# Delete old Managed Disk
Remove-AzDisk -ResourceGroupName $resourceGroupName -DiskName $DiskName -Force;

# Delete old blob storage
$osdisk | Remove-AzStorageBlob -Force

# Delete temp storage account
$StorageAccount | Remove-AzStorageAccount -Force
その2)AシリーズからDシリーズなどへのインスタンスタイプの変更ができないという記事が多い
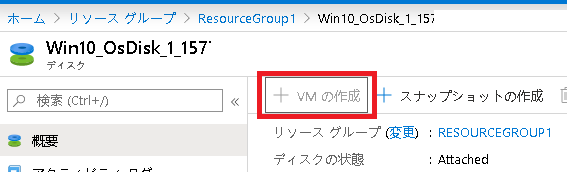
正確には動的な変更はできないが一度「停止」して作成済のOSディスクから
Virtual Machinesを作成しなおせば別のシリーズでシステムを動作させることができるので
コスト削減ないしはパワーアップを期待したい場合はこの方法で実現しましょう。
・ ・ ・ ・ ・ ・ ・ ・ ・ ・
Azure Disk Size Decrease & Instance Type Change