最近PhoenixとLiveViewの勉強をしながら自分のポートフォリオPhoenixアプリmnishiguchi.comに磨きをかけているのですが、ある程度テストが書けたのでCI/CD(継続的インテグレーションと継続的デプロイ)に取り組もうと思います。プラットフォームとしては色々ありますが、Github Actionsを使うことにしました。想像していたより簡単に設定できたので、まだ試したことない方がいましたらオススメします。
忘れないうちにメモっておこうと思います。自分もなんとなくやっているので詳細は説明しませんが、問題ないと思います。
注意点
以下のサンプルコードは2021年4月時点のものです。サードパーティーのアクション名やバージョンがたまに変わるので、それらを確認することをおすすめします。
A: 必要最低限の設定
最もシンプルな設定の例がerlef/setup-beamアクションのリポジトリにありました。
手順
-
.github/workflowsフォルダを作成 -
.github/workflows/ci.ymlYAMLファイルを作成(ファイル名は任意) - YAMLファイルに下記の設定を記述 (OTP/Elixirバージョンは任意)
on: push

jobs:
  test:
    runs-on: ubuntu-latest
    services:
      db:
        image: postgres:latest
        ports: ['5432:5432']
        env:
          POSTGRES_PASSWORD: postgres
        options: --health-cmd pg_isready --health-interval 10s --health-timeout 5s --health-retries 5
    steps:
      - uses: actions/checkout@v2
      - uses: erlef/setup-beam@v1
        with:
          otp-version: '23.3.1'
          elixir-version: '1.11.3'
      - run: mix deps.get
      - run: mix test
小さめのPhoenixアプリではこれで十分だと思います。一つ問題点を挙げるとすれば、CIが走る毎に依存関係がインストールされることです。そこに時間がかかり、小さいアプリでも完了に3分くらいかかります。
B: キャッシュ追加
公式のactions/cacheがありました。各言語の基本的な設定方法も説明されています。後々の事を考えて、依存性のインストールを別のジョブとして切り離しました。そうすることにより、そのキャッシュされた依存性を使用して他のJobを走らせることができます。
on: push

jobs:
  dependencies:
    runs-on: ubuntu-latest
    strategy:
      matrix:
        elixir: ['1.11.3']
        otp: ['23.3.1']
    steps:
      - name: Cancel previous runs
        uses: styfle/cancel-workflow-action@0.9.0
        with:
          access_token: ${{ github.token }}
      - name: Checkout Github repo
        uses: actions/checkout@v2
      - name: Sets up an Erlang/OTP environment
        uses: erlef/setup-beam@v1
        with:
          elixir-version: ${{ matrix.elixir }}
          otp-version: ${{ matrix.otp }}
      - name: Retrieve cached dependencies
        uses: actions/cache@v2
        id: mix-cache
        with:
          path: |
            deps
            _build
          key: ${{ runner.os }}-${{ matrix.otp }}-${{ matrix.elixir }}-${{ hashFiles('mix.lock') }}
      - name: Install dependencies
        if: steps.mix-cache.outputs.cache-hit != 'true'
        run: |
          mix local.rebar --force
          mix local.hex --force
          mix deps.get
          mix deps.compile

  mix-test:
    needs: dependencies
    runs-on: ubuntu-latest
    strategy:
      matrix:
        elixir: ['1.11.3']
        otp: ['23.3.1']
    services:
      db:
        image: postgres:latest
        ports: ['5432:5432']
        env:
          POSTGRES_PASSWORD: postgres
        options: --health-cmd pg_isready --health-interval 10s --health-timeout 5s --health-retries 5
    steps:
      - name: Cancel previous runs
        uses: styfle/cancel-workflow-action@0.9.0
        with:
          access_token: ${{ github.token }}
      - name: Checkout Github repo
        uses: actions/checkout@v2
      - name: Sets up an Erlang/OTP environment
        uses: erlef/setup-beam@v1
        with:
          elixir-version: ${{ matrix.elixir }}
          otp-version: ${{ matrix.otp }}
      - name: Retrieve cached dependencies
        uses: actions/cache@v2
        id: mix-cache
        with:
          path: |
            deps
            _build
          key: ${{ runner.os }}-${{ matrix.otp }}-${{ matrix.elixir }}-${{ hashFiles('mix.lock') }}
      - run: mix test --trace --slowest 10
dependenciesジョブでは、キャッシュがヒットした場合if: steps.mix-cache.outputs.cache-hit != 'true'により、依存性のインストールがスキップされます。これによりCIにかかる時間がかなり削減できます。
マトリックスを使うと複数のElixirバージョンに対してテストすることができ便利そうです。
mix testに--traceオプションと--slowest 10オプションを追加することにより付加的情報が得られます。
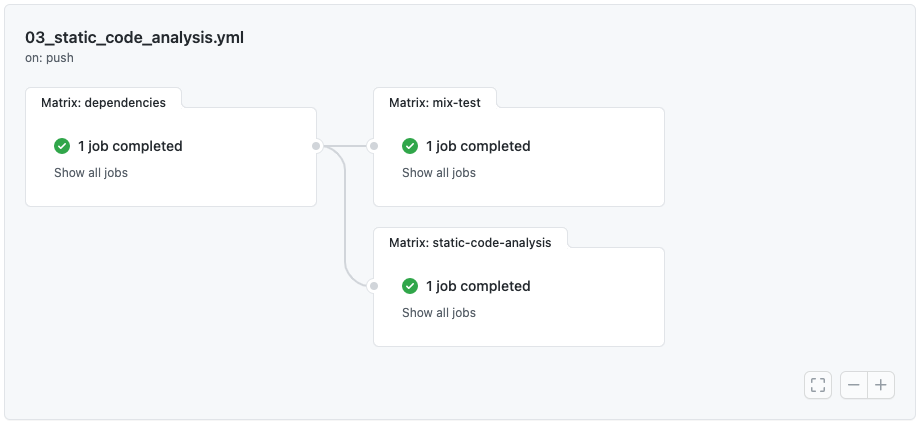
C: 静的コード解析追加
せっかくキャシュできるようになったので、いちからやると10分以上かかる静的コード解析も追加しました。Pierre-Louis Gottfroisさんの記事Github actions for Elixir & Phoenix app with cacheが参考になりました。成果物をキャッシュすることで1分程度で完了するようになりました。
手順
- credo と dialyxir を
mix.exsに追加し、mix deps.get。 - YAMLファイルのワークフロー設定を以下のように変更。
 defmodule Mnishiguchi.MixProject do
   use Mix.Project

   ...

   defp deps do
     [
       {:phoenix, "~> 1.5.7"},
       ...
+      {:credo, "~> 1.4", only: [:dev, :test], runtime: false},
+      {:dialyxir, "~> 1.0", only: [:dev, :test], runtime: false}
     ]
   end

   ...
on: push

jobs:
  dependencies:
    runs-on: ubuntu-latest
    strategy:
      matrix:
        elixir: ['1.11.3']
        otp: ['23.3.1']
    steps:
      - name: Cancel previous runs
        uses: styfle/cancel-workflow-action@0.9.0
        with:
          access_token: ${{ github.token }}
      - name: Checkout Github repo
        uses: actions/checkout@v2
      - name: Sets up an Erlang/OTP environment
        uses: erlef/setup-beam@v1
        with:
          elixir-version: ${{ matrix.elixir }}
          otp-version: ${{ matrix.otp }}
      - name: Retrieve cached dependencies
        uses: actions/cache@v2
        id: mix-cache
        with:
          path: |
            deps
            _build
            priv/plts
          key: ${{ runner.os }}-${{ matrix.otp }}-${{ matrix.elixir }}-${{ hashFiles('mix.lock') }}
      - name: Install dependencies
        if: steps.mix-cache.outputs.cache-hit != 'true'
        run: |
          mkdir -p priv/plts
          mix local.rebar --force
          mix local.hex --force
          mix deps.get
          mix deps.compile
          mix dialyzer --plt

  static-code-analysis:
    needs: dependencies
    runs-on: ubuntu-latest
    strategy:
      matrix:
        elixir: ['1.11.3']
        otp: ['23.3.1']
    steps:
      - name: Cancel previous runs
        uses: styfle/cancel-workflow-action@0.9.0
        with:
          access_token: ${{ github.token }}
      - name: Checkout Github repo
        uses: actions/checkout@v2
      - name: Sets up an Erlang/OTP environment
        uses: erlef/setup-beam@v1
        with:
          elixir-version: ${{ matrix.elixir }}
          otp-version: ${{ matrix.otp }}
      - name: Retrieve cached dependencies
        uses: actions/cache@v2
        id: mix-cache
        with:
          path: |
            deps
            _build
            priv/plts
          key: ${{ runner.os }}-${{ matrix.otp }}-${{ matrix.elixir }}-${{ hashFiles('mix.lock') }}
      - run: mix format --check-formatted
      - run: mix credo
      - run: mix dialyzer --no-check --ignore-exit-status

  mix-test:
    runs-on: ubuntu-latest
    needs: dependencies
    strategy:
      matrix:
        elixir: ['1.11.3']
        otp: ['23.3.1']
    services:
      db:
        image: postgres:latest
        ports: ['5432:5432']
        env:
          POSTGRES_PASSWORD: postgres
        options: --health-cmd pg_isready --health-interval 10s --health-timeout 5s --health-retries 5
    steps:
      - name: Cancel previous runs
        uses: styfle/cancel-workflow-action@0.9.0
        with:
          access_token: ${{ github.token }}
      - name: Checkout Github repo
        uses: actions/checkout@v2
      - name: Sets up an Erlang/OTP environment
        uses: erlef/setup-beam@v1
        with:
          elixir-version: ${{ matrix.elixir }}
          otp-version: ${{ matrix.otp }}
      - name: Retrieve cached dependencies
        uses: actions/cache@v2
        id: mix-cache
        with:
          path: |
            deps
            _build
            priv/plts
          key: ${{ runner.os }}-${{ matrix.otp }}-${{ matrix.elixir }}-${{ hashFiles('mix.lock') }}
      - run: mix test --trace --slowest 10
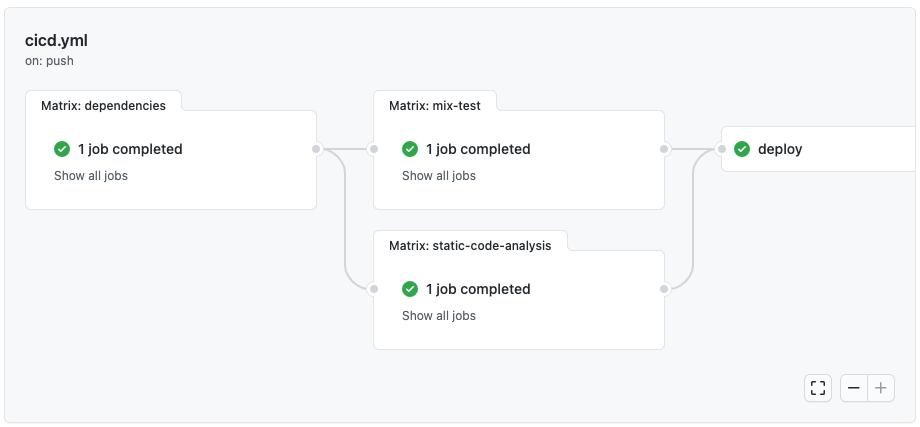
D: Gigalixirに自動でデプロイ
今まではCI(継続的インテグレーション)の部分に取り組んできましたが、これはCD(継続的デプロイ)になります。@mokichi さんのElixir/PhoenixアプリをGitHub ActionsでGigalixirに継続的デプロイするで詳しく説明されています。サードパーティーのアクションを全く使用しなくても、数行で設定できます。
基本的なコンセプトはGigalixirの公式ドキュメントで説明されています。
3つの秘密の変数(GIGALIXIR_EMAIL, GIGALIXIR_API_KEY and GIGALIXIR_APP_NAME)を取り組んでいるプロジェクトのGithubリポジトリに登録する必要があります。それについては、Githubの公式ドキュメントがあります。
一つ注意点はGIGALIXIR_EMAILの値はURIエンコーディングされていないといけないことです。
- 良い例
foo%40gigalixir.com - 悪い例
foo@gigalixir.com
name: CI/CD
on:
  pull_request:
    branches: [main]
  push:
    branches: [main]

jobs:
  dependencies:
    ...

  static-code-analysis:
    ...

  mix-test:
    ...

  deploy:
    needs:
      - static-code-analysis
      - mix-test
    runs-on: ubuntu-latest
    steps:
      - name: Checkout Github repo
        uses: actions/checkout@v2
        with:
          fetch-depth: 0
      - name: Deploy to Gigalixir
        run: |
          git remote add gigalixir https://${{ secrets.GIGALIXIR_EMAIL }}:${{ secrets.GIGALIXIR_API_KEY }}@git.gigalixir.com/${{ secrets.GIGALIXIR_APP_NAME }}.git
          git push -f gigalixir HEAD:refs/heads/master
他にもデータベースのマイグレーションの自動化等課題がありますが、それらについてはまた追って取り組みます。
以上!


