やること
タイトルの通りです。下記に一度記事を書いてますが、少し違う環境でも実行したので、メモ的に残しておきます。Coral Dev Board で Tensorflow Lite を動かすところまで mac で設定する
関連記事

やったこと
fastbootのインストール
Arduino Studioは使う予定が今は無いので、homebrewで入れる
$ brew cask install android-platform-tools
Python3 の仮想環境を作り、ライブラリを入れ、パスを通す
$ python3 -m venv dev
$ source dev/bin/activate
mdt (mendel development tool) は使用してません。
OSのイメージファイルの取得
(dev) $ curl -O https://dl.google.com/coral/mendel/enterprise/mendel-enterprise-chef-13.zip
(dev) $ unzip mendel-enterprise-chef-13.zip
(dev) $ cd mendel-enterprise-chef-13
Silicon Labsのシリアルポートドライバのインストール
下記よりMac OSX VCP Driverを取得
セキュリティ警告が出るものの、画面の指示に従って許可するといけた。あと意外とインストールに時間がかかる。
シリアルポートの確認
注)ボードとMacは、シリアルで(micro-USBケーブル)で繋いでから以下の確認をすること
(dev) ls /dev/cu.*
/dev/cu.Bluetooth-Incoming-Port		/dev/cu.SLAB_USBtoUART1
/dev/cu.SLAB_USBtoUART			/dev/cu.SoundBudsSportIE20-CSRG
SLAB_USBtoUARTというのがあればOK。ちなみにここですごくはまって、uninstall.shを実行してみて再インストールや再起動をくりかえしてみたりしたり、 リカバリーモード(電源切って、cmd + Rで起動)から、ターミナルにて以下のように打ちこんでみたりしたけど変わらず。
$ spctl kext-consent disable
...
...
色々やってその後、リカバリーモードにて元に戻す
$ spctl kext-consent enable
色々やったけど、結果的には、本体とMacを繋いでないから、確認すべきシリアルポートが存在し得ないという話でありました。
本体の各種確認
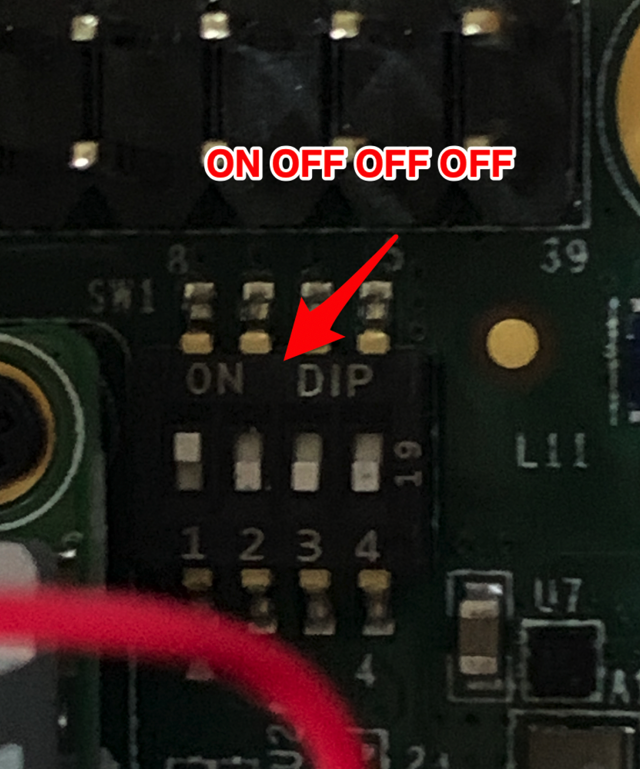
DIPスイッチの確認
- ファンの横にある小さなDIPスイッチの1234がON/OFF/OFF/OFFになっていること
バージョンの確認
- ヒートシンクに書いてあるバージョンを確認すること

9410以上ならば、fastbootモードとのこと。こちらのは9522であったのでfastbootモードでインストールして良い。
Macでのconsoleの出力を見る
- ここでUSB-C Powerのほうにケーブルをさす。
- USB-C dataの方には何もささないこと(これで随分はまりました)
- あと、micro-USBがダメなやつだったようで、替えたらいけました。
(dev) $ screen /dev/cu.SLAB_USBtoUART 115200
...
**********************************************************************
Welcome to your new Coral EdgeTPU Development Board!
**********************************************************************

To get started, you need to download and flash the latest firmware.
Please follow the instructions at g.co/coral/setup.


Configured USB Switch for UFP
...
screenでのセッションの終了
- CTRL-a k
fastbootコマンドの確認
- ここでUSB-C dataにケーブルをさす
(dev) $ fastboot devices
171791d6f3*****	fastboot
なんらかの文字が出るまで確認する
OSなどのインストール
先程展開したmandel-enterprise-chef-13ディレクトリに移動、flash.shを実行する
(dev) $ bash flash.sh
Sending 'bootloader0' (1006 KB)                    OKAY [  0.061s]
Writing 'bootloader0'                              OKAY [  0.235s]
Finished. Total time: 0.315s
Rebooting into bootloader                          OKAY [  0.025s]
Finished. Total time: 0.025s
Sending 'gpt' (33 KB)                              OKAY [  0.018s]
Writing 'gpt'                                      OKAY [  0.361s]
Finished. Total time: 0.403s
Rebooting into bootloader                          OKAY [  0.023s]
Finished. Total time: 0.023s
Erasing 'misc'                                     OKAY [  0.071s]
Finished. Total time: 0.081s
Sending 'boot' (131072 KB)                         OKAY [  5.078s]
Writing 'boot'                                     OKAY [  4.119s]
Finished. Total time: 9.222s
Sending sparse 'rootfs' 1/3 (397265 KB)            OKAY [ 15.390s]
Writing 'rootfs'                                   OKAY [ 29.182s]
Sending sparse 'rootfs' 2/3 (408325 KB)            OKAY [ 16.026s]
Writing 'rootfs'                                   OKAY [ 57.158s]
Sending sparse 'rootfs' 3/3 (352960 KB)            OKAY [ 13.159s]
Writing 'rootfs'                                   OKAY [103.173s]
Finished. Total time: 234.188s
Rebooting                                          OKAY [  0.005s]
Finished. Total time: 0.005s
ログインと設定
screen経由でログインする。ID/PASSWORDはどちらもmendel
例によってscreenでの通信がうまくいかなかったので、
- ケーブルを全部抜く
- micro-USBだけさす
- screenコマンドを打つ
- USB-C Powerをさす
とやったらうまくいきました
(dev) $ screen /dev/cu.SLAB_USBtoUART 115200
Mendel GNU/Linux (chef) undefined-eft ttymxc0

undefined-eft login: mendel
Password:
Last login: Fri Apr 19 22:59:14 UTC 2019 on tty7
Linux undefined-eft 4.9.51-imx #1 SMP PREEMPT Fri Apr 5 00:17:46 UTC 2019 aarch64

The programs included with the Mendel GNU/Linux system are free software;
the exact distribution terms for each program are described in the
individual files in /usr/share/doc/*/copyright.

Mendel GNU/Linux comes with ABSOLUTELY NO WARRANTY, to the extent
permitted by applicable law.
mendel@undefined-eft:~$
デフォルトエディタをvimに
デフォルトは nano になっているので、nano 以外にしたい場合は変更します。
$ sudo update-alternatives --config editor
2 choices for the alternative editor (providing /usr/bin/editor).

  Selection    Path                Priority   Status
------------------------------------------------------------
* 0            /bin/nano            40        auto mode
  1            /bin/nano            40        manual mode
  2            /usr/bin/vim.basic   30        manual mode
2を選択
無線LANの設定
network managerの使用
hostname も変更します。
$ sudo nmtui
$ sudo reboot
CUIのツールが立ちあがるので
- Activate connectionを実行
- Wi-Fiの所に出ている、希望するSSIDを選択
- 最初の画面に戻って、Edit a connectionを実行
- IP v4 CONFIGURATIONをに変更して、適時IP addressなどを設定する
- Set system hostnameにて適時名前を変更
/etc/NetworkManagers/system-connections/以下を編集する模様です。
sudo で sudo: unable to resolve host toなんとかと怒られたので、/etc/hostsを編集
$ sudoedit /etc/hosts
昔のhostnameを現在のものに変更
$ sudo ping www.yahoo.co.jp
PING edge12.g.yimg.jp (183.79.219.252) 56(84) bytes of data.
64 bytes from 183.79.219.252 (183.79.219.252): icmp_seq=1 ttl=54 time=5.28 ms
64 bytes from 183.79.219.252 (183.79.219.252): icmp_seq=2 ttl=54 time=8.88 ms
64 bytes from 183.79.219.252 (183.79.219.252): icmp_seq=3 ttl=54 time=8.81 ms
^C
--- edge12.g.yimg.jp ping statistics ---
3 packets transmitted, 3 received, 0% packet loss, time 2003ms
rtt min/avg/max/mdev = 5.289/7.664/8.886/1.681 ms
システムのアップデート
$ sudo apt -y update
$ sudo apt -y upgrade
個人的に必要なものを導入
以下は必須ではないので、お好みに応じて
lv
単純に、ついこのコマンドを打ってしまうので入れます
$ sudo apt -y install lv
adduser
$ sudo apt -y install adduser
$ sudo adduser hoge
$ sudoedit /etc/sudoers
mendelでなぜか入れなくて、結局recovery.imgを試すはめになったのでユーザを増やしておく。sudoができるようにもしておく。
sshの導入
githubからの公開鍵の取得と登録
githubに登録し、公開鍵も登録します
$ wget https://github.com/<username>.keys
...
Saving to: '<username>.keys'
$ mkdir .ssh
$ cat <username>.keys > ~/.ssh/authorized_keys
$ chmod 700 .ssh/
$ chmod 600 .ssh/authorized_keys
パスワード接続の禁止と公開鍵認証を許可
$ sudoedit /etc/ssh/sshd_config
Port 1234
PubkeyAuthentication yes
AuthorizedKeysFile .ssh/authorized_keys

$ sudo systemctl restart ssh
- ChallengeResponseAuthentication no
- PasswordAuthentication no
どちらもデフォルトでnoになっていたので、この二点は触っていません
Macから接続
(dev) $ ssh -i ~/.ssh/<公開鍵と一致する秘密鍵> -p 1234 mendel@hoge
mendel@hoge:~$
ssh オプションの保存
指定しておくことによって、次からの接続が楽になります
(dev) $ vi ~/.ssh/config

Host hoge
  User mendel
  HostName hoge
  Port 1234
  IdentityFile ~/.ssh/<公開鍵と一致する秘密鍵>

(dev) $ ssh hoge
mendel@hoge:~$
Tensorflow Lite のインストール
$ wget https://dl.google.com/coral/python/tflite_runtime-1.14.0-cp37-cp37m-linux_aarch64.whl
$ pip3 install tflite_runtime-1.14.0-cp37-cp37m-linux_aarch64.whl
flite_runtime-1.14.0-cp37-cp37m-linux_aarch64.whl is not a supported wheel on this platform.という赤い文字でエラー出て、えっとなるけど無視いたしました。
車認識のデモプログラム起動
HDMI端子を繋ぐ場合
- HDMI端子にケーブルを繋ぐと内容をモニタに出力できる
- q で終了します
$ edgetpu_demo --device

しかし、こんな処理をしていながら、ファンが回らないってどういうことだろう。ヒートシンクの熱がえらいことになるのは当然かと。
HDMI端子を使わない場合
$ edgtpu_demo --stream
- 上記を実行
- ブラウザで、ボードのIP:4664を実行(例えば、192.168.1.10:4664みたいなのをブラウザのアドレスバーに入れる)

このようなデモが動くページが開きます。
(by 団員H)