
経緯
- Adobe製品は以前からAdobe Extend Script ToolkitというツールでJavascriptを使った制御が出来ていたが、MacOS 10.15では起動もインストールも出来なくなっていました。
- そこで他に方法が無いか調べてみるとVSCodeの機能拡張がAdobeから提供されていたので試しに利用してみました。
環境
- MacOS Catalina 10.15.1
- Visual Studio Code 1.39.2(以下VSCode)
- Adobe製品(大抵は動作すると思います)
1.機能拡張をインストール
- VSCodeの機能拡張検索で「estk」と入力すると候補が2つ出てくるので「ExtendScript Debugger」をインストールします。
2.コマンドパレットからアプリケーションを選択
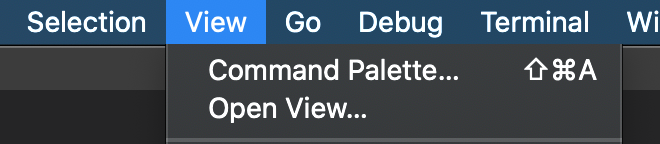
View->Command Palette...を選択してコマンドパレットを表示し、targetと入力してSelect the target applicationを選択してください。
すると、アプリケーション一覧が出るので、使用するアプリケーションを選択してください。
今回はPhotoshopで試してみます。
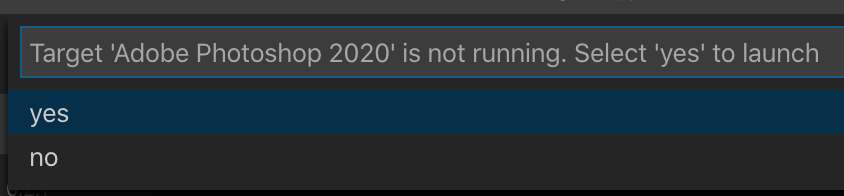
さらに、当該アプリケーションが起動していない場合は、起動するかどうかを聞いてくるので起動してください。

3.プロジェクト作成
空のフォルダを用意して、File->Openを選択してフォルダを開いてください。
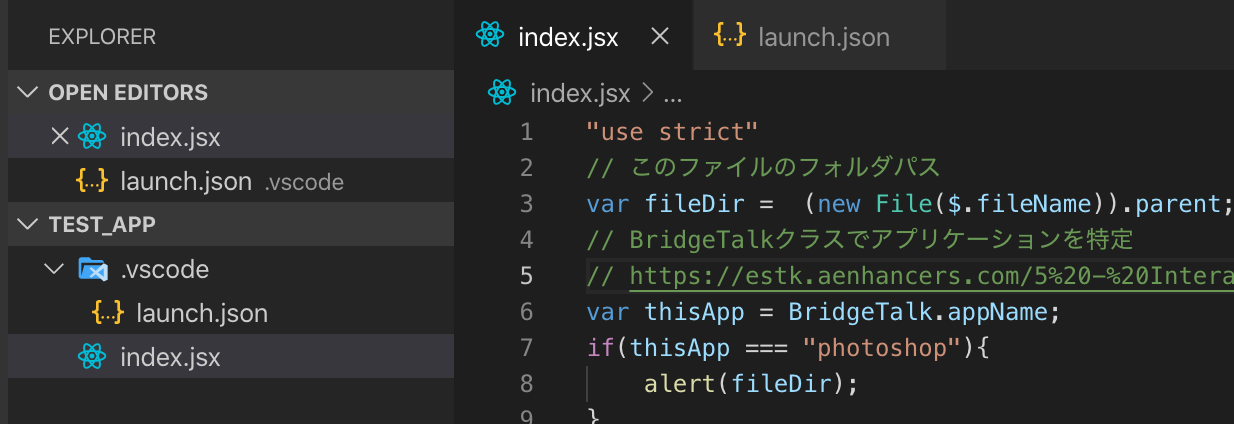
開いたら、適当なjsファイルを作成してください。(今回の名前はindex.jsx)
4.スクリプト記述
index.jsxに以下の内容を記述します。
index.jsx
"use strict"
// このファイルのフォルダパス
var fileDir =  (new File($.fileName)).parent;
// BridgeTalkクラスでアプリケーションを特定
// https://estk.aenhancers.com/5%20-%20Interapplication%20Communication%20with%20Scripts/bridgetalk-class.html
var thisApp = BridgeTalk.appName;
// photoshopだけで実行
if(thisApp === "photoshop"){
    alert(fileDir);
}
5. 設定ファイル
Debug->Add Configurationを選択し、一覧にExtendScript Debugがあると思いますので選択します。
エラーが表示されるようでしたらOpen Configurationを選択します。


すると、launch.jsonが生成されるので、そのままでOKです。
launch.json(変更しない)
{
    // Use IntelliSense to learn about possible attributes.
    // Hover to view descriptions of existing attributes.
    // For more information, visit: https://go.microsoft.com/fwlink/?linkid=830387
    "version": "0.2.0",
    "configurations": [
        {
            "type": "extendscript-debug",
            "request": "launch",
            "name": "Ask for script name",
            "program": "${workspaceFolder}/${command:AskForScriptName}",
            "stopOnEntry": false
        }
    ]
}
6. デバッグ
Debug->Start Debuggingを選択して、ファイル名を入力し(デフォルトはindex.jsx)実行すると、Photoshop上でindex.jsxのフォルダ名が表示されるはずです。


最後に
ESTKを使えばファイルを作成したり、描画したり、アプリケーション固有の操作をしたり、色々自動化出来るので色々試してみてください。
下記URLのガイドに色々書いてありました。
Welcome to The Javascript Tools Guide — JavaScript Tools Guide CC 1.0 documentation