1. はじめに
- 業務でAurora Global Database (PostgreSQL) を使っている。通常時は東京(Act)・大阪(Sby)の構成となっており、災害や大規模障害の場合は系切り替えを行う必要がある。
- Aurora DSQLでは、両リージョンをAct/Actとして利用可能、また双方向に同期処理が行われるとのこと。将来的にシステムをマルチリージョンAct/Act構成にできたらいいな、という期待の元、現時点(2025/2)でのAurora DSQL(Preview)について学習する。
- 自分のDBレベルとしては、なんとなくselectできるくらいなので、これを機についでにDB力の強化も図りたい。
2. やったこと
- Aurora DSQLクラスターを作成する。
- psqlコマンド及びPythonスクリプトからDSQLへの接続・操作ができることを確認する。
- us-east-1側のDSQLクラスターに書き込んで、同期されたレコードをus-east-2側のDSQLクラスターで読み出せることを確認する(逆方向も確認)。
3. 構成図
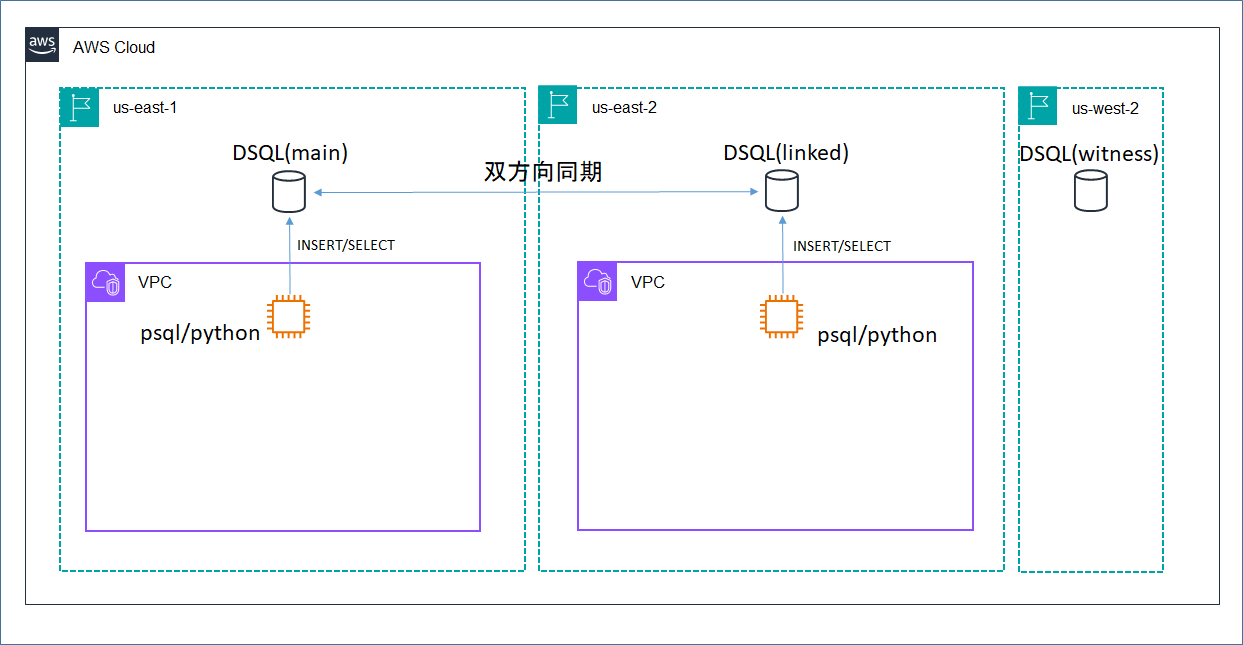
- クライアントはCloudShellでもよいが、インスタンスタイプ変更の可能性などを考慮して、EC2インスタンス(Amazon Linux 2023, t2.small)にしている。
- 比較検証のためAurora Global Database(PostgreSQL) をAurora DSQLと同じリージョンに作成(別記事にて利用予定)。
4. 手順
4.1 DSQLクラスターの作成
-
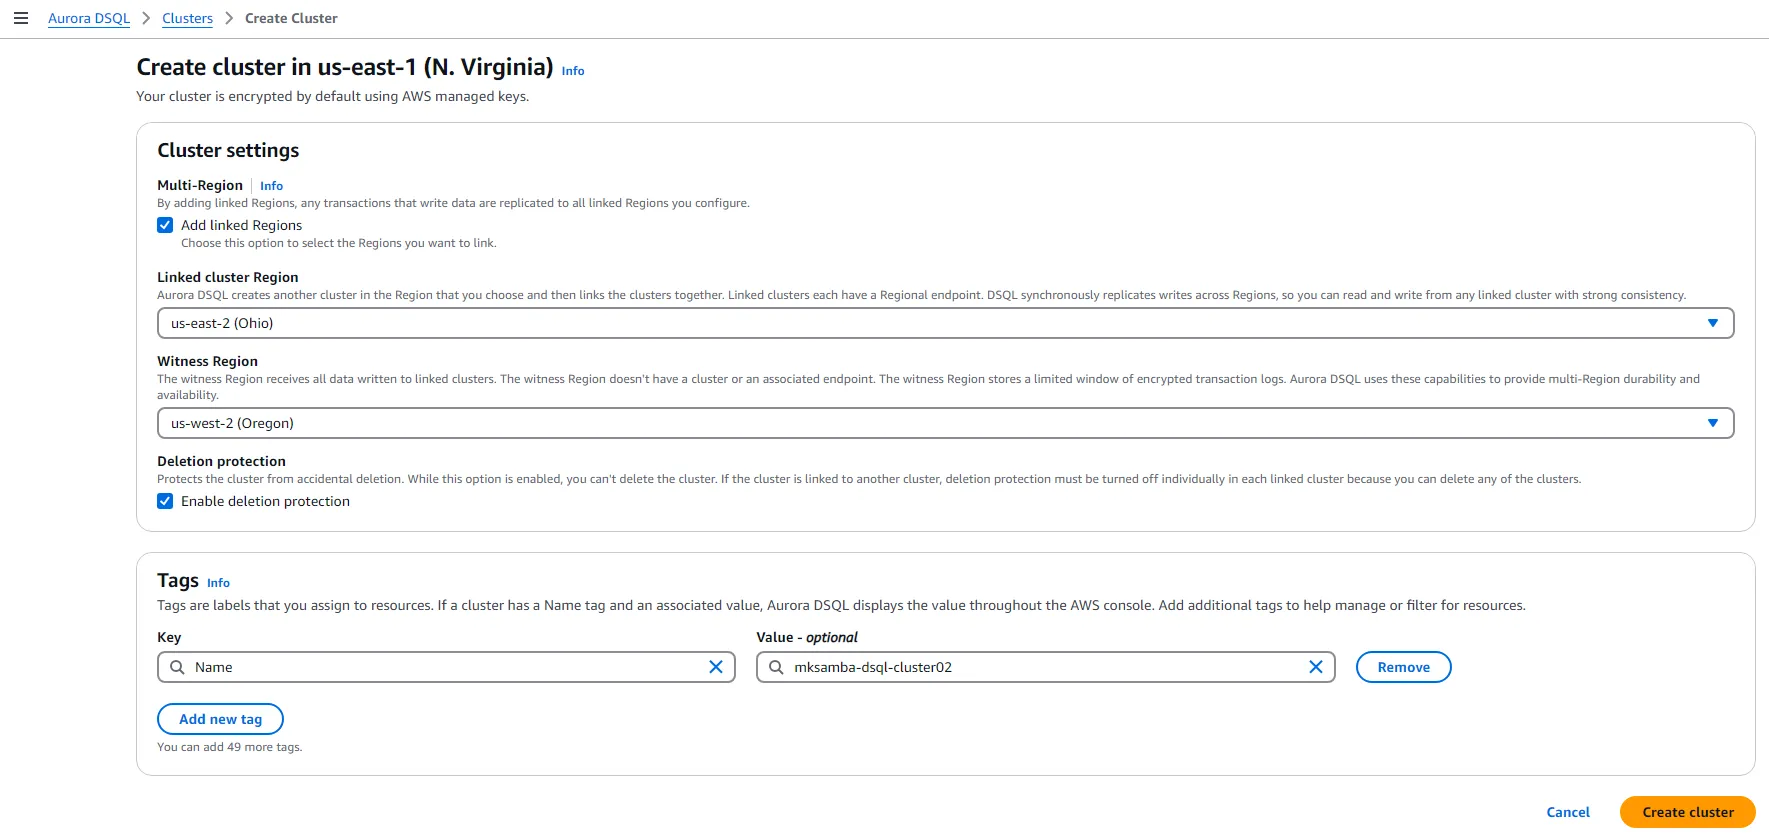
DQSLクラスター(マルチリージョン)を作成する。作成時の設定画面は非常にシンプルで、クラスター名、クラスターを作成したいリージョン、Witnessリージョンの選択のみ。
-
クラスターの作成が完了すると、us-east-1及びus-east-2それぞれのクラスターにアクセスするためのエンドポイントが表示される。どちらかのエンドポイントにアクセスすることによりデータベースの操作が可能。
-
今回作成した環境では、エンドポイント:xxxxxxxxlt4.dsql.us-east-1.on.aws、もしくはxxxxxxxxxxycq.dsql.us-east-2.on.awsにアクセスして操作を行う。

4.2 psqlのインストール・接続
まずは普通にpsqlコマンドから接続できることを確認する。
- Amazon Linux 2023へのpsqlコマンドのインストールは以下。
[ec2-user@ip-10-0-0-110 ~]$ sudo dnf install postgresql16
[ec2-user@ip-10-0-0-110 ~]$ psql --version
psql (PostgreSQL) 16.5
- Aurora DSQLのus-east-1もしくはus-east-2のエンドポイントを指定して接続する。
- この時、パスワードはAurora DSQLのマネコン画面から取得する。(マネコンでDSQLクラスターを選択し「Connect」を押すと、15分間有効なトークンが発行される。
[ec2-user@ip-10-0-0-110 ~]$ PGSSLMODE=require psql --dbname postgres --username admin --host xxxxxxxxxxxxxlt4.dsql.us-east-1.on.aws
Password for user admin: [マネコンからcopyしたトークン文字列]
psql (16.5, server 16.6)
SSL connection (protocol: TLSv1.3, cipher: TLS_AES_128_GCM_SHA256, compression: off)
Type "help" for help.
postgres=>

4.3 Python(psycopg3)のインストール・接続
後でスクリプトでの連続INSERT操作などを行いたいため、Pythonからも接続できるようにする。
-
以下のサイトを参考に、Python用PostgreSQLアダプタの「psycopg3」を用いて接続する。
-
Amazon Linux 2023へboto3とpsycopg3をインストールする。
[ec2-user@ip-10-0-0-110 ~]$ sudo yum install pip
[ec2-user@ip-10-0-0-110 ~]$ pip install boto3
[ec2-user@ip-10-0-0-110 ~]$ pip install "psycopg[binary]>=3"
- Aurora DSQLに接続してSQL文を実行するスクリプトは以下。
dsql.py
import psycopg
import boto3
import os, sys

def main(cluster_endpoint):
    region = 'us-east-1'

    # Generate a password token
    client = boto3.client("dsql", region_name=region)
    password_token = client.generate_db_connect_admin_auth_token(cluster_endpoint, region)

    # connection parameters
    dbname = "dbname=postgres"
    user = "user=admin"
    host = f'host={cluster_endpoint}'
    sslmode = "sslmode=require"
    #sslrootcert = "sslrootcert=system"
    password = f'password={password_token}'

    # Make a connection to the cluster
    conn = psycopg.connect('%s %s %s %s %s' % (dbname, user, host, sslmode, password))
    conn.set_autocommit(True)
    cur = conn.cursor()
    # Insert some rows
    cur.execute("INSERT INTO name_list(id, name, fruites) VALUES(3, 'James', 'Banana')")

if __name__ == "__main__":
    cluster_endpoint = "xxxxxxxxxxxxxxxxxlt4.dsql.us-east-1.on.aws"
    main(cluster_endpoint)
- スクリプトについて少し補足する。
- 「Using Psycopg3 to interact with Aurora DSQL」内のサンプルコードのままだとエラーになるため、エラーメッセージに従い以下を修正した。
- sslmode=verify-full から sslmode=requireに変更
- sslrootcert設定を削除
- パスワードとして使用するトークン(4.2項のpsqlを用いた接続手順の際はマネコンから取得)をスクリプト内で取得する。この際にDSQLアクセスのためのIAM権限が必要なため、作業用EC2インスタンスにIAMロールで権限付与している。(必要なアクセス権は厳密には「Understanding authentication and authorization for Aurora DSQL」に記載のものだが、いったんPowerUserを付与)
- 「Using Psycopg3 to interact with Aurora DSQL」内のサンプルコードのままだとエラーになるため、エラーメッセージに従い以下を修正した。
4.4 基本的な操作
psqlを用いた手順に戻り、基本的な操作を確認する。
# データベースの確認
postgres=> SELECT datname FROM pg_database;
 datname
----------
 postgres
(1 row)

# スキーマの確認
postgres=> SELECT schema_name FROM information_schema.schemata;
    schema_name
--------------------
 pg_catalog
 sys
 public
 information_schema
 example
(5 rows)

# テーブルの作成 (好きなフルーツ一覧表)
postgres=> CREATE TABLE name_list (id INTEGER not null, name VARCHAR(50) not null, fruites VARCHAR(50) not null, PRIMARY KEY(id));
CREATE TABLE

# テーブルの一覧表示
postgres=> \dt
         List of relations
 Schema |   Name    | Type  | Owner
--------+-----------+-------+-------
 public | name_list | table | admin
 public | owner     | table | admin
(2 rows)

# 行の挿入
postgres=> INSERT INTO name_list (id, name, fruites) VALUES (1, 'John', 'Apple');
INSERT 0 1

# テーブルの内容表示
postgres=> select * from name_list;
 id | name | fruites
----+------+---------
  1 | John | Apple
(1 row)
4.5 リージョン間同期の確認
us-east-1のエンドポイントに対してINSERTした後、レコードが自動同期され、us-east-2のエンドポイントでSELECTしてレコードが表示されることを確認する。(逆向きも同様)
- us-east-1, us-east-2のエンドポイントに別々にpsql接続し、以下の順で動作確認を行う。
# 1.us-east-1にて1行のみレコードがあることを確認

postgres=> select * from name_list;
id | name | fruites
----+------+---------
1 | John | Apple
(1 row)

# 2.us-west-2にて1行のみレコードがあることを確認

postgres=> select * from name_list;
id | name | fruites
----+------+---------
1 | John | Apple
(1 row)

# 3.us-east-1にて1行INSERT

postgres=> INSERT INTO name_list (id, name, fruites) VALUES (2, 'Mary', 'Orange');
INSERT 0 1

postgres=> SELECT * FROM name_list;
id | name | fruites
----+------+---------
1 | John | Apple
2 | Mary | Orange
(2 rows)

# 4. us-east-2にて、us-east-1からレコードが同期されてきていることを確認

postgres=> select * from name_list;
id | name | fruites
----+------+---------
1 | John | Apple
2 | Mary | Orange
(2 rows)

# 5. us-east-2にて1行INSERT

postgres=> INSERT INTO name_list (id, name, fruites) VALUES (3, 'James', 'Banana');
INSERT 0 1
postgres=> select * from name_list;
id | name  | fruites
----+-------+---------
1 | John  | Apple
2 | Mary  | Orange
3 | James | Banana
(3 rows)

# 6. us-east-1にて、us-east-2からレコードが同期されてきていることを確認

postgres=> SELECT * FROM name_list;
id | name  | fruites
----+-------+---------
1 | John  | Apple
2 | Mary  | Orange
3 | James | Banana
(3 rows)
5. 所感
- やっと噂のAurora DSQLに入門することができた。引き続き既存のAurora Global Databaseとの比較検証などにより理解を深めたい。