やりたいこと
Raspberry Pi と Arduino を、USBではなく、GPIOで直結して、Raspberry Pi から JavaScript(Node.js + johnny-five)で Arduino をコントロールしたい。
目的
- 単純にそういうことができたらいろいろ応用できそうだという好奇心の満足
- 将来的に、Arduino 互換ボードで動くロボット Rapiro を Raspberry Pi から Node.js(johnny-five や socket.io) で制御することで、Rapiro を IoT 化したい
- ひまつぶし
方法
材料
- Raspberry Pi
- 家で眠っていた、Pi 1 の Model B
- NOOBS_v2_1_0 をインストール済
- 適当な電源(Micro-USBから供給)
- 今回は SSH や VNC で PC から操作
- Arduino UNO R3
- PC の Arduino IDE で StandardFirmata を書込済
- オス-メス ジャンパワイヤ 4本
手順
Raspberry Pi でシリアル通信を使えるようにする
- /boot/cmdline.txt をエディタで開く
pi@raspberrypi:~ $ sudo nano /boot/cmdline.txt
- ファイル中の "console=" で始まる記述のうち、"115200"のようにボーレートが付随している記述(例:console=ttyAMA0,115200)を削除
- 以下のようにして、保存
/boot/cmdline.txt
dwc_otg.lpm_enable=0 console=tty1 root=/dev/mmcblk0p7 rootfstype=ext4 elevator=deadline fsck.repair=yes rootwait quiet splash plymouth.ignore-serial-consoles
- Raspberry Pi 3 の場合はさらにオンボード Bluetooth を無効化する作業を行う(今回は Pi 1 なのでやっていませんが参考まで)
- /boot/config.txt をエディタで開く
pi@raspberrypi:~ $ sudo nano /boot/config.txt
- config.txt の末尾に以下のように記述を追加して保存
/boot/config.txt
# Disable onboard Bluetooth
dtoverlay=pi3-disable-bt
- さらにコマンドで Bluetooth のシリアル通信サービスを停止
pi@raspberrypi:~ $ sudo systemctl disable hciuart
Removed symlink /etc/systemd/system/multi-user.target.wants/hciuart.service.
- 最後に、「Raspberry Pi の設定」の「インターフェイス」タブで、「シリアル」を「●有効」にする
- Raspberry Pi を再起動
Raspberry Pi に Node.jsを設定する
- いったん古いバージョンのNode.jsをアンインストール
pi@raspberrypi:~ $ sudo apt-get remove nodejs
- nodebrew (Node.js のバージョン管理ツール)をインストール
pi@raspberrypi:~ $ curl -L git.io/nodebrew | perl - setup
  % Total    % Received % Xferd  Average Speed   Time    Time     Time  Current
                                 Dload  Upload   Total   Spent    Left  Speed
  0     0    0     0    0     0      0      0 --:--:-- --:--:-- --:--:--     0
  0     0    0     0    0     0      0      0 --:--:--  0:00:01 --:--:--     0
  0     0    0     0    0     0      0      0 --:--:--  0:00:02 --:--:--     0
100 24340  100 24340    0     0   9989      0  0:00:02  0:00:02 --:--:--  9989
Fetching nodebrew...
Installed nodebrew in $HOME/.nodebrew

========================================
Export a path to nodebrew:

export PATH=$HOME/.nodebrew/current/bin:$PATH
========================================
- .bashrc に "export PATH=$HOME/.nodebrew/current/bin:$PATH" の1行を追加
pi@raspberrypi:~ $ nano .bashrc

# ファイルの末尾に以下の行を追加
export PATH=$HOME/.nodebrew/current/bin:$PATH
- Paspberry Pi を再起動するか、または、以下を実行
pi@raspberrypi:~ $ source .bashrc
- nodebrew がインストールされたか確認
pi@raspberrypi:~ $ nodebrew help
nodebrew 0.9.6

Usage:
    nodebrew help                         Show this message
    nodebrew install <version>            Download and install <version> (compile from source)
    nodebrew install-binary <version>     Download and install <version> (binary file)
    nodebrew uninstall <version>          Uninstall <version>
    nodebrew use <version>                Use <version>
    nodebrew list                         List installed versions
    nodebrew ls                           Alias for `list`
    nodebrew ls-remote                    List remote versions
    nodebrew ls-all                       List remote and installed versions
    nodebrew alias <key> <value>          Set alias
    nodebrew unalias <key>                Remove alias
    nodebrew clean <version> | all        Remove source file
    nodebrew selfupdate                   Update nodebrew
    nodebrew migrate-package <version>    Install global NPM packages contained in <version> to current version
    nodebrew exec <version> -- <command>  Execute <command> using specified <version>

Example:
    # install from binary
    nodebrew install-binary v0.10.22

    # use a specific version number
    nodebrew use v0.10.22

    # io.js
    nodebrew install-binary io@v1.0.0
    nodebrew use io@v1.0.0
- Node.js をインストール(所望のバージョンで)
pi@raspberrypi:~ $ nodebrew install-binary 4.6.0
Fetching: https://nodejs.org/dist/v4.6.0/node-v4.6.0-linux-armv6l.tar.gz
######################################################################## 100.0%
Installed successfully
- 所望の Node.js のバージョンを選ぶ
# 利用するバージョンを選ぶ時
pi@raspberrypi:~ $ nodebrew use 4.6.0
use v4.6.0

# 特定のバージョンをデフォルトにしたい時
pi@raspberrypi:~ $ nodebrew alias default 4.7.2
default -> 4.7.2
- Node.js がインストールされたか確認
pi@raspberrypi:~ $ node -v
v4.6.0
- npm で johnny-five をインストール
pi@raspberrypi:~ $ npm install johnny-five
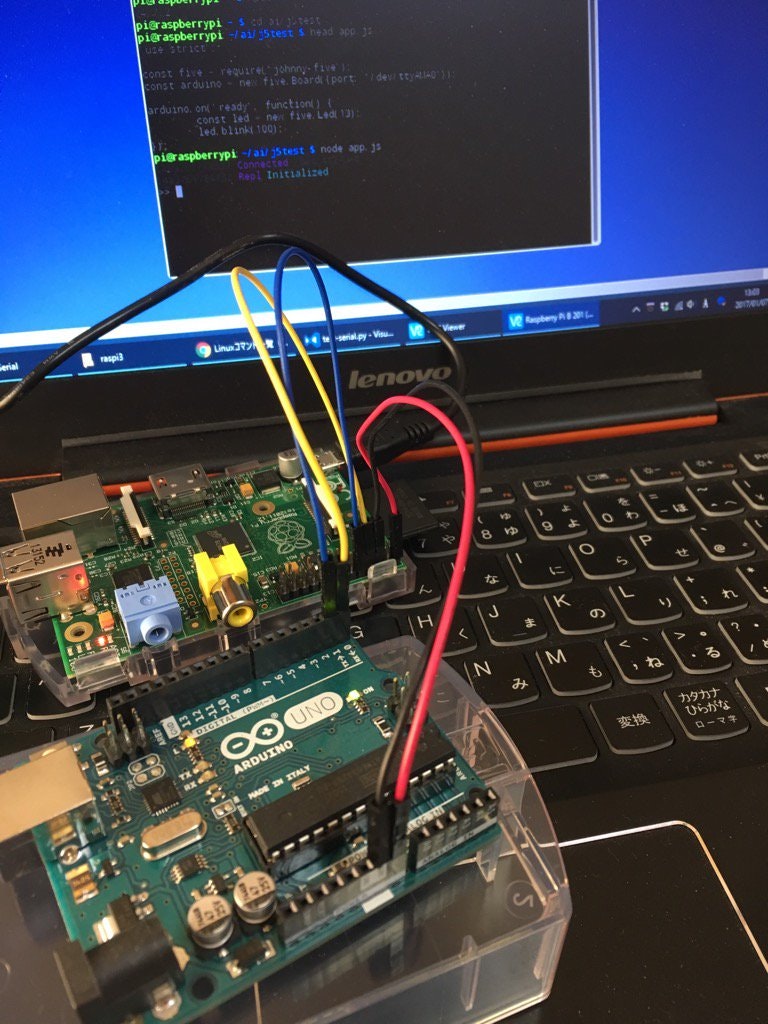
Raspberry Pi と Arduino をシリアル接続
- 以下のようにジャンパケーブルでつなぐ
| Raspberry Pi の GPIO(ピン) | Arduino の ピン | |
|---|---|---|
| 5V(2) | ---> | Vin (※1) |
| GND(6) | <--> | GND |
| UART0 TXD(8) | ---> | D0 RX |
| UART0 RXD(10) | <--- | D1 TX (※2) |
※1: Arduino に Raspberry Pi から電源供給するオプション、必須ではない
※2: 本来は Arduino の 5V出力を 3.3Vに変換する必要があるが、手抜き
- つないだ様子
JavaScript で Lチカのコードを書いてテスト
- 例えば /home/pi/five/app.js として
app.js
'use strict';							// 厳格モードにする

const five = require('johnny-five');	// johnny-fiveモジュールの読み込み
const arduino = new five.Board({	    // Arduinoを取得
	port: '/dev/ttyAMA0'                // シリアルポート名を指定(環境による)
});

arduino.on('ready', function() {		// Arduinoの準備ができたら
	const led = new five.Led(13);		// 13番ピン(基板上)のLEDを指定
	led.blink(500);						// 500ms間隔で点滅
});
- app.js を Node.js で実行
pi@raspberrypi:~/five $ node app.js
1483772050612 Connected /dev/ttyAMA0
1483772055790 Repl Initialized
>>
- LEDが点滅していればOK
- 終了は「Ctrl + C」を2回
所感
電子工作は Adruino で慣れ親しんできており、HTML と JavaScript はそこそこ書けます。で、Raspberry Pi を組み合わせて使う時、Python も覚える(メンテナンスする)のはメンドクサイと感じていました。はじめのうちは、Arduino を USB で Raspberry Pi につないで Node.js + johnny-five で制御して遊んでいましたが、スマートじゃないな(汗)と感じていました。
また、Rapiro はまさにこのシリアル接続方法を採用しているので、これでうまくいけば、Rapiroも制御できるだろうと考えました。今回は、それに向けてのテストです。おいおい、Rapiroでも試してみたい考えです。(試しました)