はじめに
前回の投稿にて、簡単なGeodeの構築をおこないました。
今回は、Geodeでのクラスタを構築します。公式にクラスタ構築のチュートリアルがあるのですが、1サーバないでクラスタを組むという事をやっていたり、色々余計な説明もあるので、実際にサーバを分散させた状態で構築する場合を想定し、最低限の設定で構築する手順を記載していきます。
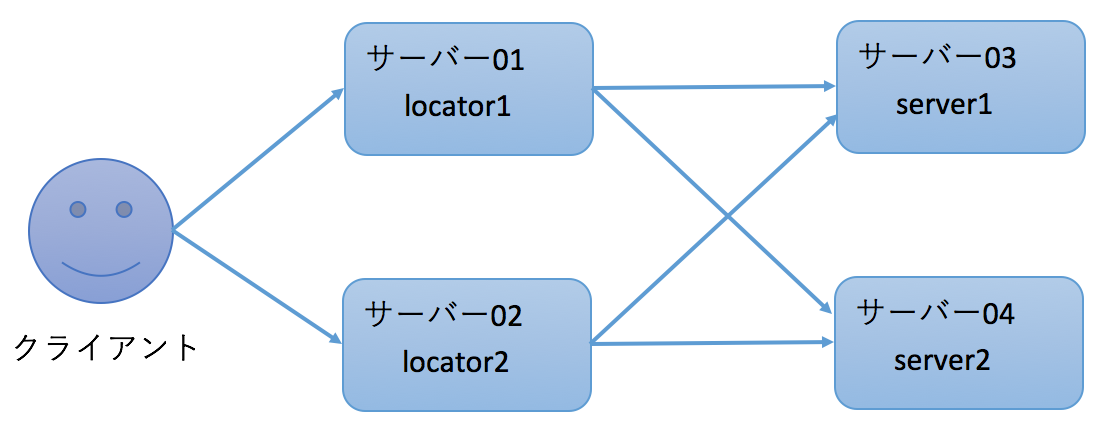
構築のイメージ
サーバーは4台使用したレプリケーション環境を構築します。locatorが2台、serverが2台、これにより、1台落ちたとしても、サービスを継続可能なクラスタとなります。(性能要件を満たせるかは別問題ですが)

Locatorの起動
locatorを起動します。単独起動の時とは違い、クラスタを構成するlocatorのホスト名とportを起動時に指定します。
# サーバー01
gfsh>start locator --name=locator1 --locators=xxx01.yahoo.co.jp[10334],xxx02.yahoo.co.jp[10334]
Starting a Geode Locator in /xxxx/geode/locator1...

# サーバー02
gfsh>start locator --name=locator2 --locators=xxx01.yahoo.co.jp[10334],xxx02.yahoo.co.jp[10334]
Starting a Geode Locator in /xxxx/geode/locator...
この時、nameはクラスタ内で一意である必要があります。台数の多いクラスタを構築する場合は、サーバ名を指定すると運用はやりやすいと思います。
Serverの起動
同様にserverを起動していきます。locator起動と同様にlocatorのホスト名とportを指定します。locatorは起動済みである必要があります。
# サーバー03
gfsh>start server --name=server1 --locators=xxx01.yahoo.co.jp[10334],xxx02.yahoo.co.jp[10334]
Starting a Geode Server in /xxxx/geode/server1...

# サーバー04
gfsh>start server --name=server2 --locators=xxx01.yahoo.co.jp[10334],xxx02.yahoo.co.jp[10334]
Starting a Geode Server in /xxxx/geode/server2...
スケールアウトの際は、serverに関しては、locatorを指定するだけで、クラスタに追加することができます。
また、クライアント側は、serverが追加されたとしても、locatorのみ知っておけばよいため影響を受けません。
クラスタの確認
サーバー01に戻り、listコマンドでクラスタが構築されたか確認しましょう。
# サーバー01
gfsh>list members
  Name   | Id
-------- | ----------------------------------------------------------------
locator2 | xxx.xxx.xxx.xx2(locator2:22489:locator)<ec><v5>:1024
server1  | xxx.xxx.xxx.xx3(server1:17404)<v6>:1024
server2  | xxx.xxx.xxx.xx4(server2:5771)<v7>:1024
locator1 | xxx.xxx.xxx.xx1(locator:12002:locator)<ec><v0>:1024 [Coordinator]
Regionの作成とget,put
regionの作成はlocatorから実行します。
# サーバー01
gfsh>create region --name=region1 --type=REPLICATE

gfsh>list region
List of regions
---------------
region1
これでクラスタ内にregionが作成されました。
データを入れてみます。
# サーバー01
gfsh>put --region=region1 --key=key2 --value=value2
Result      : true
Key Class   : java.lang.String
Key         : key2
Value Class : java.lang.String
Old Value   : <NULL>


gfsh>get  --region=region1 --key=key2
Result      : true
Key Class   : java.lang.String
Key         : key2
Value Class : java.lang.String
Value       : value2
サーバダウンを試す
では、試しにサーバが落ちてもクラスタが維持できるか見てみましょう。
gfsh>stop server --name=server2
serverが1台抜けた状態で、クラスタは維持されています。先程の値も取得できることが分かります。
gfsh>list members
  Name   | Id
-------- | ----------------------------------------------------------------
locator2 | xxx.xxx.xxx.xx2(locator2:22489:locator)<ec><v5>:1024
server1  | xxx.xxx.xxx.xx3(server1:17404)<v6>:1024
locator1 | xxx.xxx.xxx.xx1(locator1:12002:locator)<ec><v0>:1024 [Coordinator]

gfsh>get  --region=region1 --key=key2
Result      : true
Key Class   : java.lang.String
Key         : key2
Value Class : java.lang.String
Value       : value2
まとめ
最小限のクラスタ構築ができました。
今回は、コマンドラインでクラスタを構築しましたが、実際の開発現場では、規模にもよりますが、デプロイを自動化していたり、オートスケール環境を実装したいケースがあると思います。locatorsや、regionの設定をファイルで配ることも可能です。実際の運用では、メモリ関連の設定や、expire関連、多数のRegionなど多数の設定があるため、コマンドラインで運用するのは非効率になってきます。
次は、データを管理する上で切っても切り離せない、Regionについて解説していきます。
環境情報
Java1.8
Apache Geode1.6
ヤフー社内のクラウドを使用、OSはLinux