今年5月ごろに家で設定したものを今頃アウトプット。
SwitchBotとは
スマートホーム化できる簡単スイッチ
https://www.switchbot.jp/
スマートでないスイッチを、物理でポチッとするスマートなスイッチ押しガジェット。
やったこと
SwitchBot と RaspberryPi を使って GoogleHomeから物理スイッチをON/OFFする。
経緯
SwitchBotというかわいいやつを買ってスマスピにつなげておうちハックしよ![]()
っと思ったら、SwitchBotって、専用Hub買わないとインターネットにつなげられないことが判明。
しばらくなやんでいると、SwitchBotをON/OFFするコードが公式で公開されていることを知って、自力でつなげてみた。
必要なもの
- SwitchBot
- MQTTブローカー (今回は簡単にSaasでMQTTを提供している Beebotte を使用)
- RaspberryPi3 (Bluetoothがつかえること)
- GoogleHome
- IFTTT
やりかた概要
- MQTTサーバにTopicをつくる。
- RaspberryPiにPythonでうごくSwitchBotのプログラムをRaspbianのデーモンとしてデプロイする。
- IFTTTに1のURLでWebhookを登録する。
- SwitchBotを物理スイッチの適切な位置に配置する。(これが一番難しい)
全体像
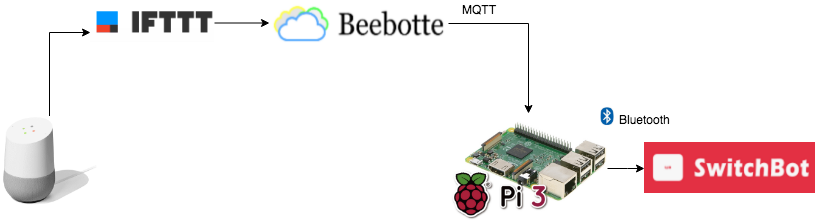
やりかた詳細
MQTTサーバにTopicをつくる。
今回は BeebotteというMQTTのSaaSを利用する。
こちらの記事を参考にさせていただきました。
-
ChannelとResourceを作成する。
「Channels」から、「Create New」 をクリックして [Channel Name]と [Resource name] を入力して「Create channel」をクリックする。 -
トークンを取得する。
1 で作成されたChannelをクリックすると、Channel Token:token_xxxxxxxxxxxxxxxxといった感じでトークンが表示されるのでメモっておく。 -
テストしてみる。
3-1. 左メニュー Account Setting -> Access Management に、 [Secret Key] が表示されているのでメモっておく。
3-2. 左メニュー Console で、 3-1でメモっておいた[Secret Key]を入力し、[Subscribe]のところに1 で作ったChannel name, Resource name を入力する。
3-3. curlコマンドでpublishする。3-2の右側の Messages と Logs に 3-3 でpublishした内容が表示されていればOK。
curl -i -H "Content-Type: application/json" -X POST -d '{"data":"Hello World"}' http://api.beebotte.com/v1/data/publish/[Channel名]/[Resource名]?token=[トークン]
- Beebotteの証明書をダウンロードしておく。(RaspberryPiにプログラムと一緒にデプロイするため)
https://beebotte.com/certs/mqtt.beebotte.com.pem
RaspberryPiにPythonプログラムをデーモンとしてデプロイする
SwitchBotを開発している Wonderlabs社公式のSwitchBot操作用Pythonのプログラムはこちら。
https://github.com/OpenWonderLabs/python-host
これだと、手動実行でしか機能しない。
以下、2点を変更する。
- MQTTブローカーからのメッセージをSubscribeしてスイッチを操作する。
- RaspberryPiを再起動した後も自動的に起動して欲しいので、デーモンに対応させる。
修正後のソースコード。
import os
import sys
import time
import json
import logging
import time

import paho.mqtt.client as mqtt
import binascii
from bluepy.btle import Peripheral

TOKEN = "Beebotteのトークン"
HOSTNAME = "mqtt.beebotte.com"
PORT = 8883
TOPIC = "Beebotteのチャンネル名/Beebotteのリソース名"
CACERT = "/usr/local/lib/switchbot/mqtt.beebotte.com.pem"

SWITCH_MAC = "スイッチボットのMACアドレス"
SWITCH_NAME = "スイッチボットの名前"

if __name__ == '__main__':
    logging.basicConfig(level=logging.DEBUG,format='%(asctime)s- %(name)s - %(levelname)s - %(message)s')

_LOGGER = logging.getLogger(__name__)

class SwitchBot:
    def __init__(self, name, mac):
        self._mac = mac
        self._name = name

    def action(self, act):
        for connection in range(1,6):
            try:
                p = Peripheral(self._mac, "random")
            except:
                _LOGGER.error('Connection attempt failed after {connection} tries')
                time.sleep(1)
                continue
            break
        else:
            _LOGGER.error('Connection to Switchbot failed')

        try:
            hand_service = p.getServiceByUUID("cba20d00-224d-11e6-9fb8-0002a5d5c51b")
            hand = hand_service.getCharacteristics("cba20002-224d-11e6-9fb8-0002a5d5c51b")[0]
            if act == "on":
                hand.write(binascii.a2b_hex("570101"))
            elif act == "off":
                hand.write(binascii.a2b_hex("570102"))
            elif act == "press":
                hand.write(binascii.a2b_hex("570100"))
            p.disconnect()
        except:
            _LOGGER.error("Cannot connect to switchbot.")

switch_bot = SwitchBot(SWITCH_NAME, SWITCH_MAC)


def on_connect(client, userdata, flags, respons_code):
    print('status {0}'.format(respons_code))
    client.subscribe(TOPIC)

def on_message(client, userdata, msg):
    data = json.loads(msg.payload.decode("utf-8"))["data"][0]
    data = {key:value.strip() for key, value in data.items()}
    if "action" in data.keys():
        switch_bot.action(data["action"])

def fork():
    pid = os.fork()
    if pid > 0:
        f = open('/var/run/switchbotd.pid','w')
        f.write(str(pid)+"\n")
        f.close()
        sys.exit()

    if pid == 0:
        main()


def main():
    client = mqtt.Client()
    client.username_pw_set("token:%s"%TOKEN)
    client.on_connect = on_connect
    client.on_message = on_message
    client.tls_set(CACERT)
    client.connect(HOSTNAME, port=PORT, keepalive=60)
    client.loop_forever()

if __name__=='__main__':
    fork()
Raspberry Pi にデプロイ。
$ tree /usr/local/lib/switchbot/
/usr/local/lib/switchbot/
├── mqtt.beebotte.com.pem
└── switchbotd.py

0 directories, 2 files
Raspberry Pi に以下を保存。
[Unit]
Description=SwitchBot

[Service]
ExecStart=/usr/bin/python3 /usr/local/lib/switchbot/switchbotd.py
Restart=always
Type=forking
PIDFile=/var/run/switchbotd.pid

[Install]
WantedBy=multi-user.target
以下を実行する
# サービス再読み込み
$ sudo systemctl daemon-reload

# switchbotデーモンスタート
$ sudo systemctl start switchbotd

# OS起動時有効設定
$ sudo systemctl enable switchbotd
以下のコマンドで稼働と設定を確認
$ systemctl status switchbotd
● switchbotd.service - SwitchBot
   Loaded: loaded (/etc/systemd/system/switchbotd.service; enabled)
   Active: active (running) since 日 2018-06-03 10:01:33 JST; 6 months 13 days ago
  Process: 10550 ExecStart=/usr/bin/python3 /usr/local/lib/switchbot/switchbotd.py (code=exited, status=0/SUCCESS)
 Main PID: 10555 (python3)
   CGroup: /system.slice/switchbotd.service
           └─10555 /usr/bin/python3 /usr/local/lib/switchbot/switchbotd.py

$ systemctl is-enabled switchbotd
enabled
GooglHomeから上記で設定したMQTTメッセージプロバイダーへの連携設定をする。
IFTTT にサインインする。
「New Applet」 クリックし、次の画面で [✚this] をクリック。
検索窓から「Google Assistant」を検索してクリック。
「Say a phrase with a text ingredient」 を選択。
呼びかける言葉と、GoogleHomeの返事の言葉をと言語を登録

次の画面で[+that]をクリックして検索窓から [WebHook] を検索してクリック。
URL には、MQTTのpublishのURL(curlでテストしたURL) http://api.beebotte.com/v1/data/publish/[Channel名]/[Resource名]?token=[トークン]
Method は POST
Content Type は、 application/json
Body には下記のJSONを設定
{"data":[{"room":"living","device":"電気","action":"on"}]}
電気を消す方も同様に設定し、最後のJSONは、actionの値を off にして登録する。
{"data":[{"room":"living","device":"電気","action":"off"}]}
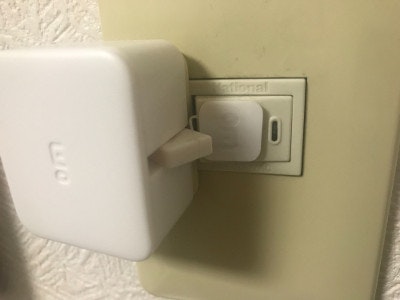
Switchbot を物理スイッチに取り付ける
斜めの部分にも貼れるのでなんとか工夫して貼り付ける。
今後のアップデート予定
- AWS IoTを使ったセキュアなMQTT通信
- RaspberryPiからマイコン(ESP32) へ
- Alexa Home Skill対応
- これを使って、会社の照明を「アレクサ、電気全部消して」を来年やります。
参考にさせていただいたサイト
http://xx-prime.hatenablog.com/entry/2017/07/01/211509
http://dreamerdream.hateblo.jp/entry/2016/01/08/000000