Azure Static Web App (以下 SWA) は、 Microsoft Azure 上で提供される静的サイトのホスティングサービスです。Netlify, Vercel, Cloudflare Pages と同じ位置付けのサービスだと考えれば良いと思います。
SWA は、SPA ベースの Web アプリ や SSG で出力された静的コンテンツはもちろん、ヘッドレス CMS を使ったいわゆる Jamstack 構成のサイトを運用することも可能です。
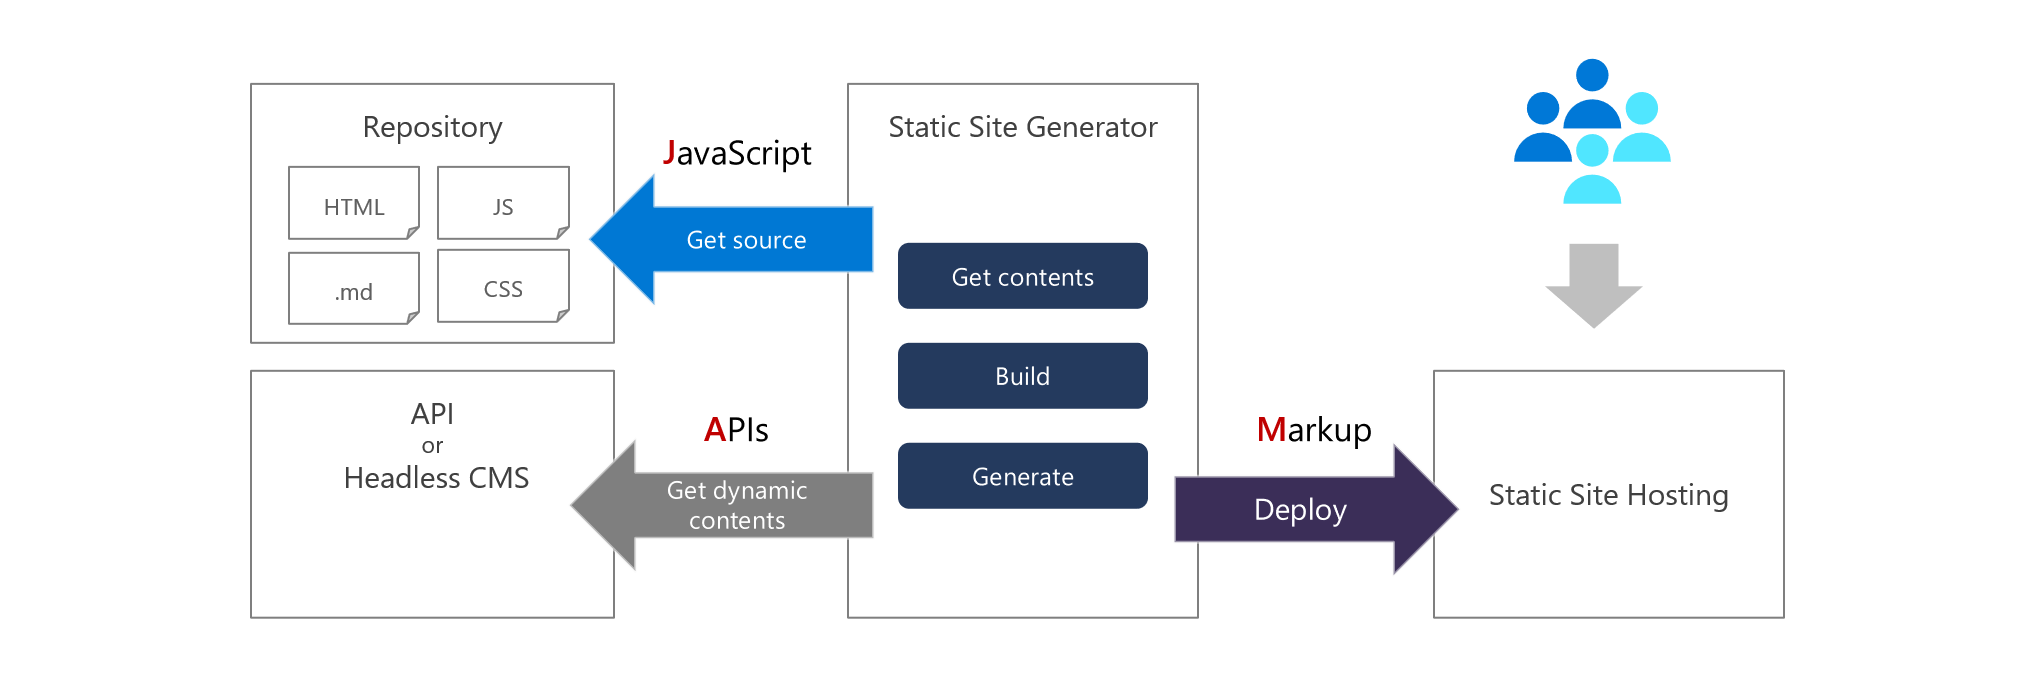
Jamstack のおおよそのイメージは以下図の通りです。
しかし、SWA の公式ドキュメントには Jamstack サイトの "コンテンツ運用方法" までは書かれていないので、自分が試した方法をこの記事で紹介したいと思います。
なお、この記事では以下のスタックを使った構成を例にします。
- ホスティング: Azure Static Web Apps
- CI/CD: GitHub Actions
- フロントエンドフレームワーク: Nuxt.js
- ヘッドレス CMS: Contentful
アプリケーション構築からデプロイまで
この記事ではコンテンツ運用部分に焦点を置くので、アプリケーションを構築して SWA にホスティングするまでの手順は詳しく説明しません。以下の記事などを参考にしてください。とても簡単なはずです。
- サーバーでレンダリングされた Nuxt.js の Web サイトを Azure Static Web Apps プレビューにデプロイする
- Vue.js で作るサイトを 無償の Azure Static Web Apps に CI/CD も含めて数分でホスティングする方法
あえて構築時のポイントをあげるとすると、 Nuxt 2.13 で導入された Full Static Generation を使うように構成することくらいでしょうか。上記の公式チュートリアルでは、 動的なルーティングを nuxt.config.js に generate の処理を書く方法で説明していますが、以下のように Full Static Generation を有効にする方法がシンプルになります。
export default {
  mode: 'universal',
  target: 'static',
}
あと、コンテンツについては、ヘッドレス CMS から取得するので、CMS の API 仕様にしたがってコンテンツ取得処理を書くようにします。これも本題からは外れるのでドキュメントとサンプルの紹介に留めておきます。
<template>
  <div class="container">
    <h1 class="title">{{ post.fields.title }}</h1>
    <div class="content" v-html="$md.render(post.fields.body)"></div>
  </div>
</template>
<script>
const client = createClient()
export default {
  async asyncData({ params, payload }) {
    const entry = await client.getEntry(params.id)
    return {
      post: entry
    }
  }
}

const contentful = require('contentful')
createClient() {
  return contentful.createClient({
    space: process.env.CTF_SPACE,
    accessToken: process.env.CTF_ACCESS_TOKEN
  })
}
</script>
ざっくり補足すると、Contentful の API からコンテンツを取得し( await client.getEntry(params.id) の部分 )、テンプレート側では post に入ったコンテンツを適宜レンダリングするという感じです。
コンテンツ更新時に GitHub Actions が動くようにする
Jamstack は、アプリケーションのビルド時に API を呼び出し静的ページを生成してコンテンツを更新する仕組みです。したがって、ヘッドレス CMS を使う場合は、コンテンツ更新時にビルドが走るようにしなければなりません。
具体的には、Contentful のコンテンツ更新イベントで GitHub Actions が動くように設定するようにします。
Contentful 側の設定
Contentful 自体の利用方法は、以下の公式ドキュメントをみるか、適当にググってみてください。大量に記事が見つかると思います。
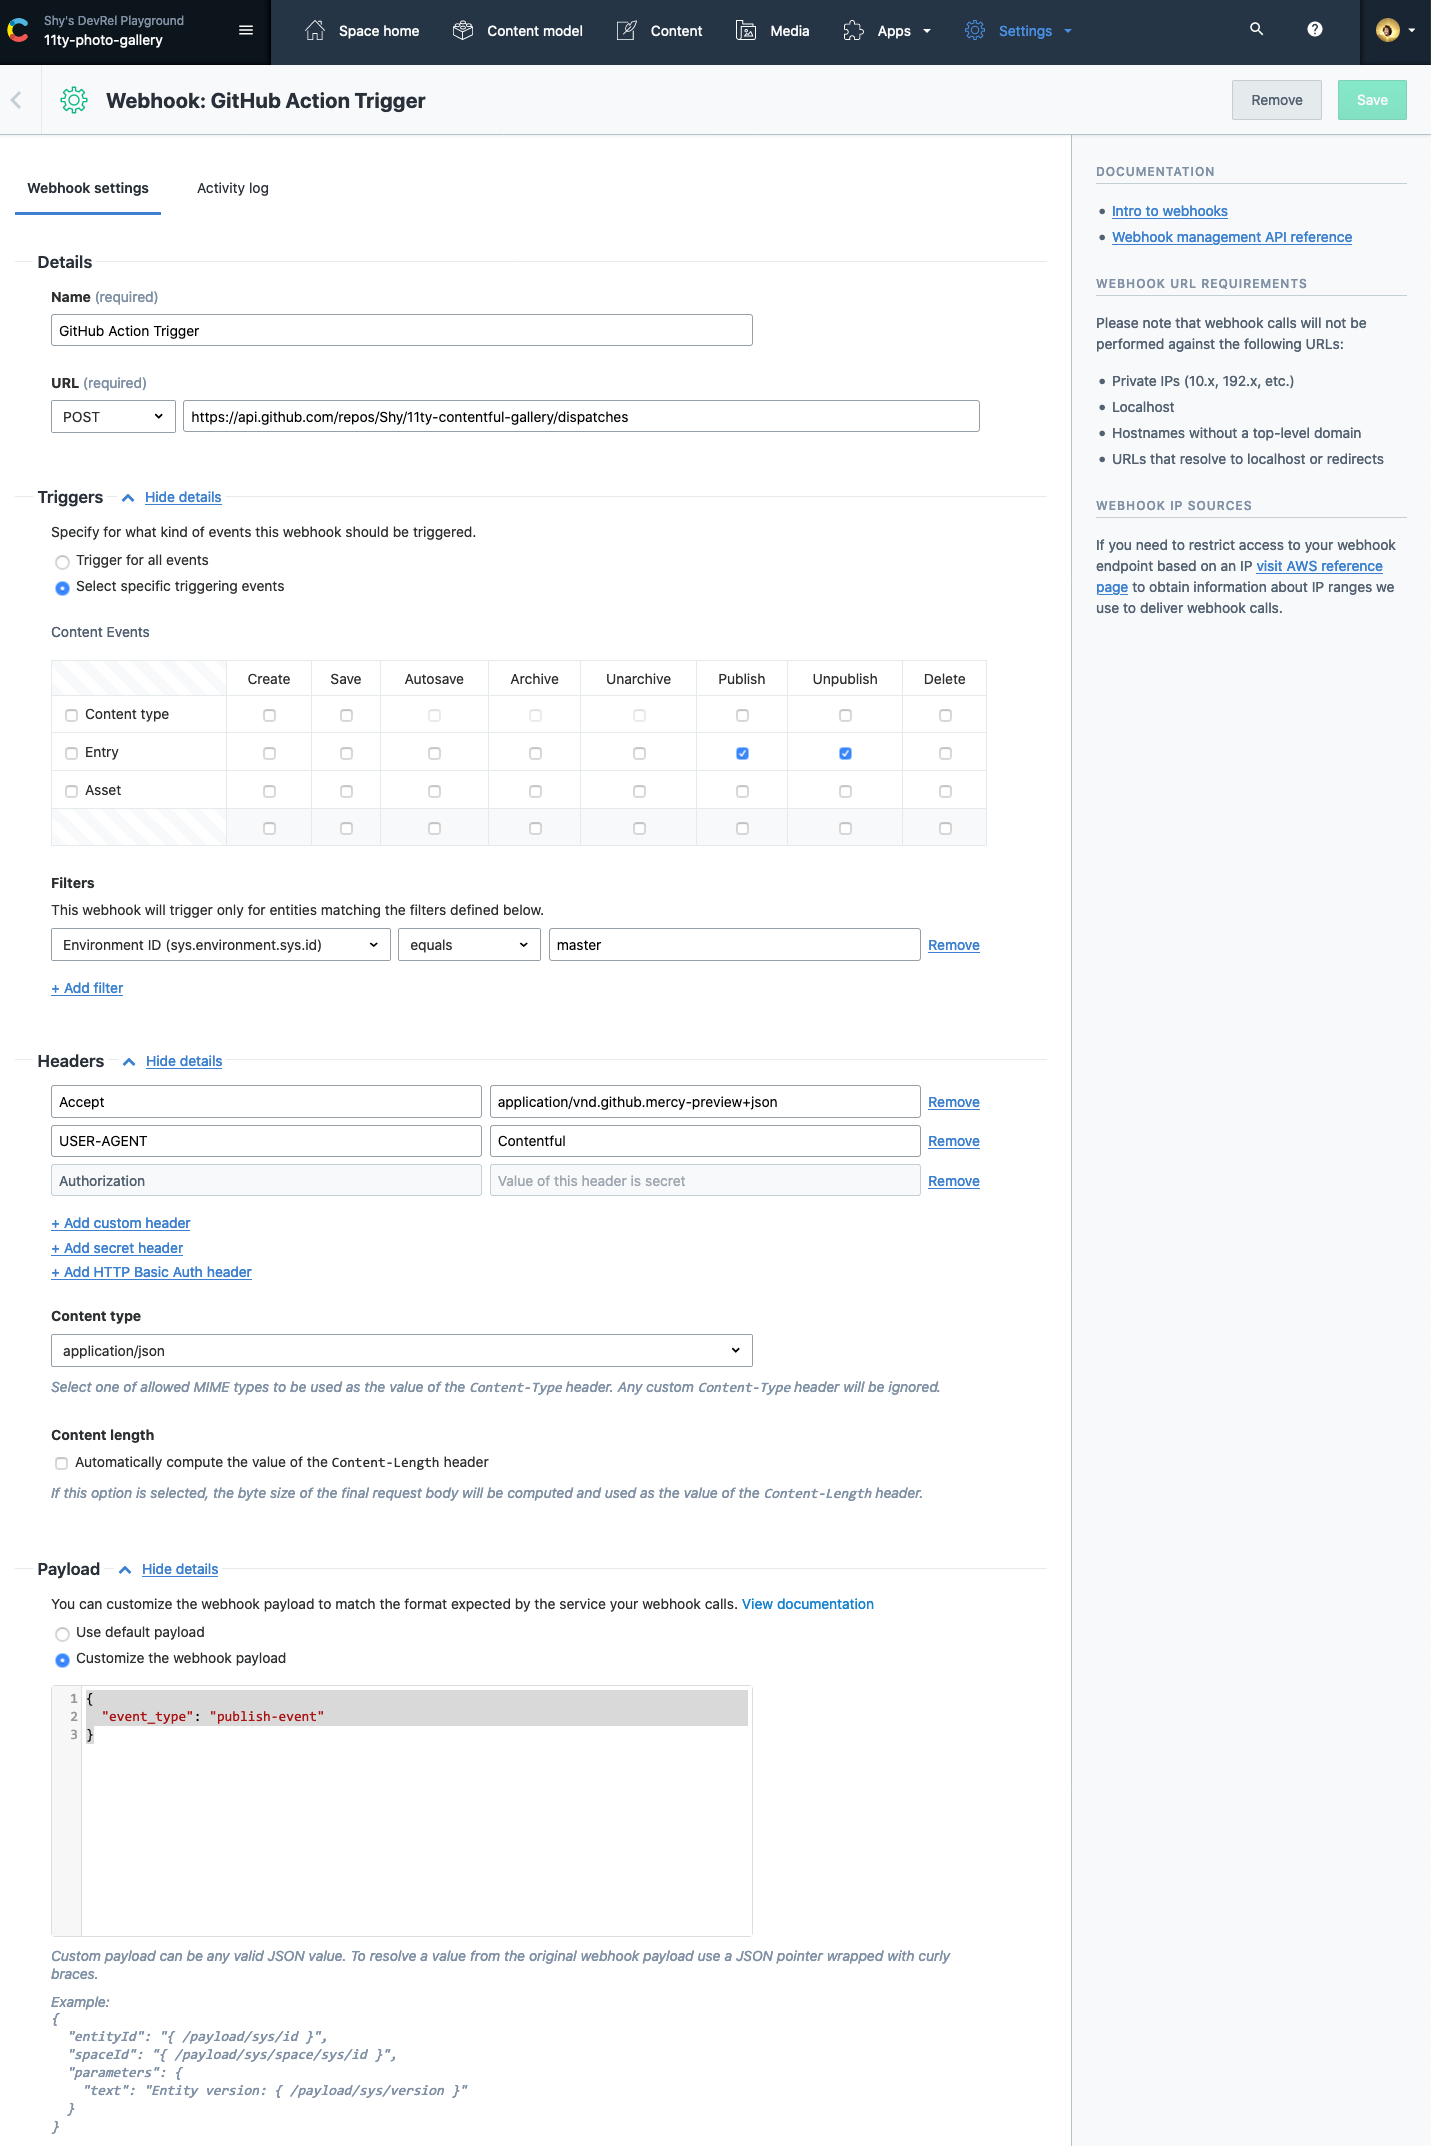
Contentful の Webhook 画面で以下のように GitHub との連携を設定します(スクリーンショットは、 Contentful 公式サイトに掲載されている例を引用)。
設定のポイントは以下の通りです。
- Details/URL:
https://api.github.com/repos/{ユーザー名}/{リポジトリ名}/dispatches - Trriger: GitHub Actinos を動かしたいタイミングを適当に選択する(Entry の Publish/Unpublish が基本)
- Headers に以下のキーを追加
- Accept:
application/vnd.github.mercy-preview+json; - Authorization:
Authorization: Bearer {GitHub で取得した Personal Access Token} - User-Agent:
Contentful
- Accept:
- Content type:
application/json - Payload に以下 JSON を設定(
update_contentful部分は任意の文字列){“event_type”: “update_contentful”}
GitHub Actions ワークフローの変更
SWA をデプロイした際に自動生成される GitHub Actions のワークフローは、外部からの Webhook トリガーでは起動しないので、以下のように変更します。
name: Azure Static Web Apps CI/CD

on:
  push:
    branches:
    - master
  pull_request:
    types: [opened, synchronize, reopened, closed]
    branches:
    - master
  repository_dispatch:
    types: [update_contentful]

jobs:
  build_and_deploy_job:
    if: github.event_name == 'push' || (github.event_name == 'pull_request' && github.event.action != 'closed') || github.event_name == 'repository_dispatch'
    runs-on: ubuntu-latest
    name: Build and Deploy Job
    steps:
    - uses: actions/checkout@v2
    - name: Build And Deploy
      id: builddeploy
      uses: Azure/static-web-apps-deploy@v1
      with:
        azure_static_web_apps_api_token: ${{ secrets.AZURE_STATIC_WEB_APPS_API_TOKEN_LEMON_COAST_0660E6A00 }}
        repo_token: ${{ secrets.GITHUB_TOKEN }}
        action: 'upload'
        app_location: '/'
        app_artifact_location: 'dist'
        app_build_command: 'npm run generate'
      env:
        CTF_SPACE: ${{ secrets.CTF_SPACE }}
        CTF_ACCESS_TOKEN: ${{ secrets.CTF_ACCESS_TOKEN }}
ワークフローファイルの変更ポイントは以下です。
- トリガーの種類を指定する
onブロックにrepository_dispatchを追加 -
build_and_deploy_jobの発火条件にもrepository_dispatchを追加 -
envに Contentful と接続するためのキーを設定する(上記例ではCTF_SPACEやCTF_ACCESS_TOKEN)
これで、Contentful 側でコンテンツを更新すると、GitHub Actions ワークフローが以下のように発火してサイトが更新されていることがわかります。
アプリケーションの作りにもよりますが、コンテンツを更新してから数分以内にはサイトに反映するので、まるで Wordpress のような CMS でサイトを運用しているかのような体験を得られつつ、ホスティングされているのは静的コンテンツのみなので、ページロードは圧倒的に速くセキュリティ面でも堅牢なサイトを構成することができます。
余談ですが、 repository_dispatch で SWA のビルドが正しく動くようになったのは、私があげた Issue に Azure のチームが対応してくれたからです。
SWA 本体は OSS ではありませんが、Issue は幅広く受け付けているようですので、気になる課題や機能の提案などはどんどんフィードバックしていきましょう。


