はじめに
Keras Applicationsのモデルを利用し、TensorRT用モデルへの変換・推論までをざっと書いています。
TensorRTなどのインストールは、NVIDIA GPU Cloudのコンテナを利用するのでスコープ外です。
準備
事前条件
- Dockerインストール済
- かつ、GPUコンテナが利用可能
実行環境 起動
以下で、実行環境を起動。
Jupyterがインストール済なので、以降のコードはJupyter上で試せます。
docker run -it --rm --gpus all -p 8888:8888 --shm-size=1g --ulimit memlock=-1 --ulimit stack=67108864 nvcr.io/nvidia/tensorflow:20.02-tf2-py3 bash

# (Optional)
jupyter lab
-
nvcr.io/nvidia/tensorflowは、NVIDIA GPU Cloudに登録されているコンテナです。- 本コンテナでは、TensorFlow 2.1, TensorRT 7.0, その他Jupyterなどがインストール済です。
- (Optional)
shm-size, ulimit: モデル変換時にメインメモリをごりごり使うので、メモリ確保失敗の対策も兼ね設定する。 - (Optional) 8888ポートは、Jupyterのため。
参考: Growth設定
Kerasを使うときよくでるエラー対策のメモリ制約。
import tensorflow as tf

for dev in tf.config.experimental.list_physical_devices('GPU'):
    tf.config.experimental.set_memory_growth(dev, True)
変換
まず、対象モデルを出力します。ポイントは、保存形式です。
save_format にtfを指定し、Tensorflow SavedModelで保存します。
(TensorFlow 2.Xではデフォルトなので不要ですが)
from tensorflow.keras.applications.vgg16 import VGG16

model = VGG16(weights='imagenet')
model.save('./vgg16', save_format='tf')
次にモデルを変換します。
from tensorflow.python.compiler.tensorrt import trt_convert as trt

converter = trt.TrtGraphConverterV2(input_saved_model_dir='./vgg16',
                                    conversion_params=trt.DEFAULT_TRT_CONVERSION_PARAMS)
converter.convert()
converter.save('./vgg16-tensorrt')
半精度浮動小数点版
Float16で変換したい場合は、converterのパラメータを変更します。
converter = trt.TrtGraphConverterV2(input_saved_model_dir='./vgg16',
                                    conversion_params=trt.DEFAULT_TRT_CONVERSION_PARAMS._replace(precision_mode=trt.TrtPrecisionMode.FP16))
整数版
8-bit整数にする場合、キャリブレーションが必要になります。学習に使用したデータを利用すればよいと思います。
今回のVGG16の設定では、$(N, 224, 224, 3)$のShapeで渡します。
import numpy as np

def calibration_input_fn():  # キャリブレーション用データ生成関数
    yield np.random.uniform(size=(5, 224, 224, 3)).astype(np.float32),  # 末尾の , を忘れないこと

converter = trt.TrtGraphConverterV2(input_saved_model_dir='./vgg16',
                                    conversion_params=trt.DEFAULT_TRT_CONVERSION_PARAMS._replace(precision_mode=trt.TrtPrecisionMode.INT8, use_calibration=True))
converter.convert(calibration_input_fn=calibration_input_fn)
converter.save('./vgg16-tensorrt')
推論
変換したモデルをロードし、推論に利用するオブジェクトを取り出します。
そして、そのオブジェクトを関数Callすることで推論が走ります。
model = tf.saved_model.load('./vgg16-tensorrt', tags=[tf.saved_model.SERVING])
infer = model.signatures[tf.saved_model.DEFAULT_SERVING_SIGNATURE_DEF_KEY]

# ダミーの入力
x = np.random.uniform(size=(3, 224, 224, 3)).astype(np.float32)
# 推論
y = infer(tf.convert_to_tensor(x))['predictions']
参考:入力のShapeは以下で取れます。
infer.inputs[0].shape
>>> TensorShape([None, 224, 224, 3])
実行結果比較
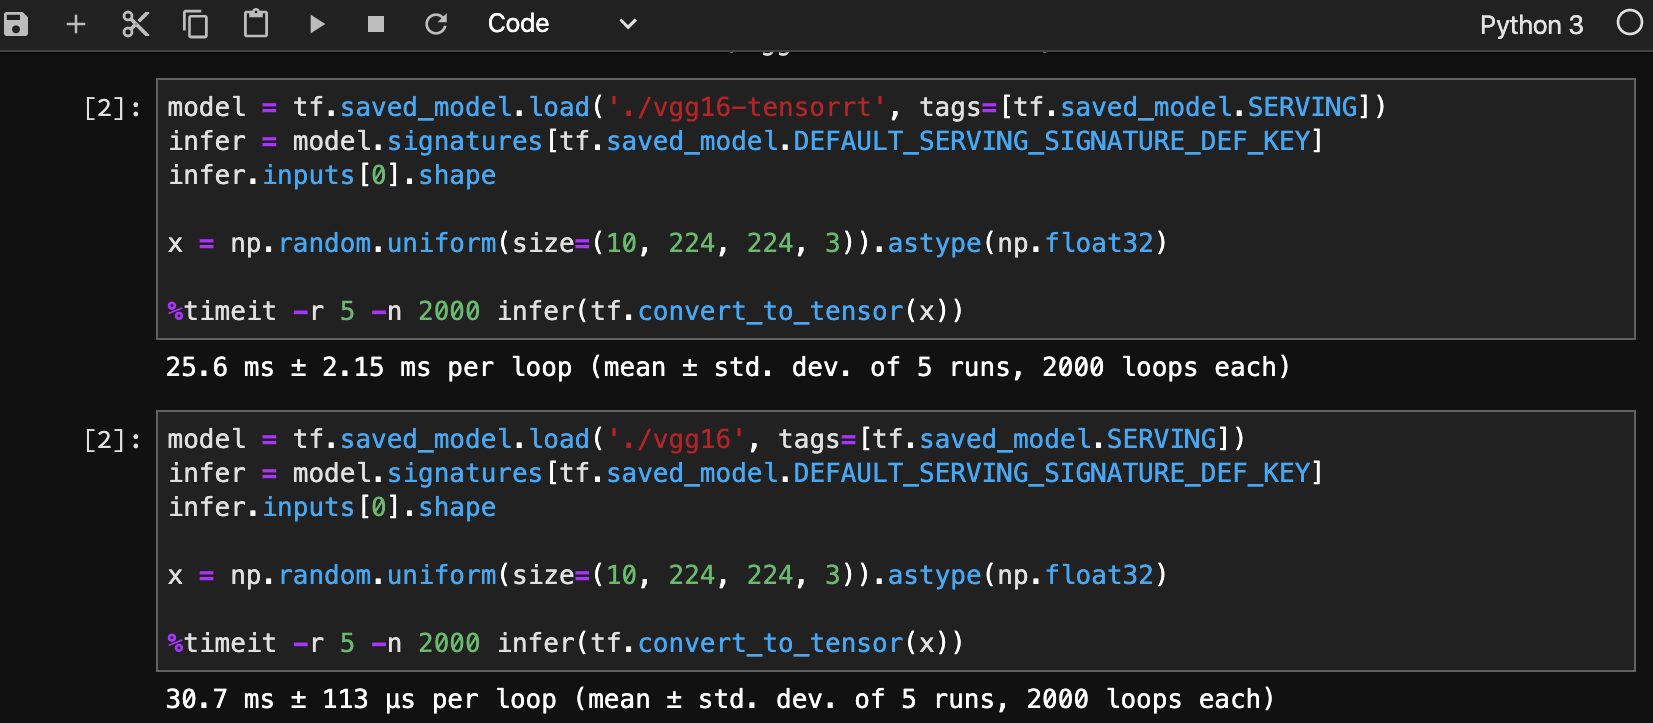
最後に大雑把ですが、実行結果の比較(上がTensorRT)になります。こんな適当でも実行速度が向上してます。
メモリ使用量も減少するので、複数モデル実行可能などいろいろできそうですし、実行環境のGPUアーキテクチャでも恩恵の度合いが大きく変わると思います。
