はじめに
TypeScriptで認証付きのバックエンドを実装する機会があったため、今回その手順を記事にまとめてみました。この記事では、Dockerを使ったMySQLデータベースの管理、Prismaを用いたデータ操作、そしてJWTによる認証機能の実装について書いてます。
目次
- はじめに
- 関連記事
- 該当ソースコード
- プロジェクトの初期設定
- Expressのセットアップ
- Dockerの環境構築
- Prisma設定
- ユーザー作成仮実装
- ユーザー登録とログイン
- 認証ミドルウェアの実装
- ログアウトの実装
- おわりに
該当ソースコード
プロジェクトの初期設定
nvmを使用してNode.jsのバージョンを管理するために.nvmrcファイルを作成し、使用するバージョンを指定します。nvm useで.nvmrcファイルで指定されたバージョンに切り変えることができます。nvmがインストールされていない場合は、以下のリンクからインストール手順をご確認ください。
NVMのインストールはこちら
21.6.2
npmプロジェクトの初期化。これにより、package.jsonが作成されます
npm init -y
TypeScriptと関連パッケージのインストール
TypeScriptやExpressの型定義を含むパッケージをインストール
npm install express typescript ts-node @types/express dotenv
開発用の型定義もインストール
npm install --save-dev @types/node
TypeScriptの設定を行うため、tsconfig.jsonファイルを確認または作成し、以下の内容に設定。
これにより、TypeScriptのコンパイル設定が行われ、コードの一貫性と互換性が確保されます。
{
  "compilerOptions": {
    "target": "ES2020",
    "module": "commonjs",
    "strict": true,
    "esModuleInterop": true,
    "skipLibCheck": true,
    "forceConsistentCasingInFileNames": true,
    "outDir": "./dist"
  },
  "include": ["src/**/*.ts"]
}
Expressのセットアップ
src/index.tsファイルを作成して、以下のコードを記述。このコードでは、.envファイルから環境変数を読み込み、サーバーを指定したポートで起動。
ルートパスにアクセスした際には、"Hello, Express with TypeScript!"と表示されます。
import express, { Request, Response } from 'express';
import dotenv from 'dotenv';

dotenv.config();

const app = express();
const port = process.env.PORT || 3000;

app.get('/', (req: Request, res: Response) => {
  res.send('Hello, Express with TypeScript!');
});

app.listen(port, () => {
  console.log(`Server is running on port ${port}`);
});
package.jsonに開発用サーバー起動のためのスクリプトを追加
"scripts": {
    "dev": "ts-node src/index.ts"
  }
次に、以下のコマンドでサーバーを起動し、http://localhost:3000/ にアクセスして動作を確認してください。
npm run dev

Dockerの環境構築
次に、MySQLデータベースをDockerでセットアップします。
プロジェクトのルートにdocker-compose.ymlファイルを作成し、以下の内容を記述します。
services:
  db:
    image: mysql:8.0.33
    environment:
      MYSQL_DATABASE: ${MYSQL_DATABASE}
      MYSQL_USER: ${MYSQL_USER}
      MYSQL_PASSWORD: ${MYSQL_PASSWORD}
      MYSQL_ROOT_PASSWORD: ${MYSQL_ROOT_PASSWORD}
    volumes:
      - mysql_data:/var/lib/mysql
    ports:
      - "3306:3306"
volumes:
  mysql_data:
.envファイルを作成して、データベースの接続情報を設定します。
機密情報を含むため、.gitignoreに追加して共有しないように注意してください。
MYSQL_DATABASE=express_db
MYSQL_USERE=user
MYSQL_PASSWORD=password
MYSQL_ROOT_PASSWORD=password
Dockerコンテナを起動
docker-compose up -d
これでMySQLコンテナがバックグラウンドで起動します。
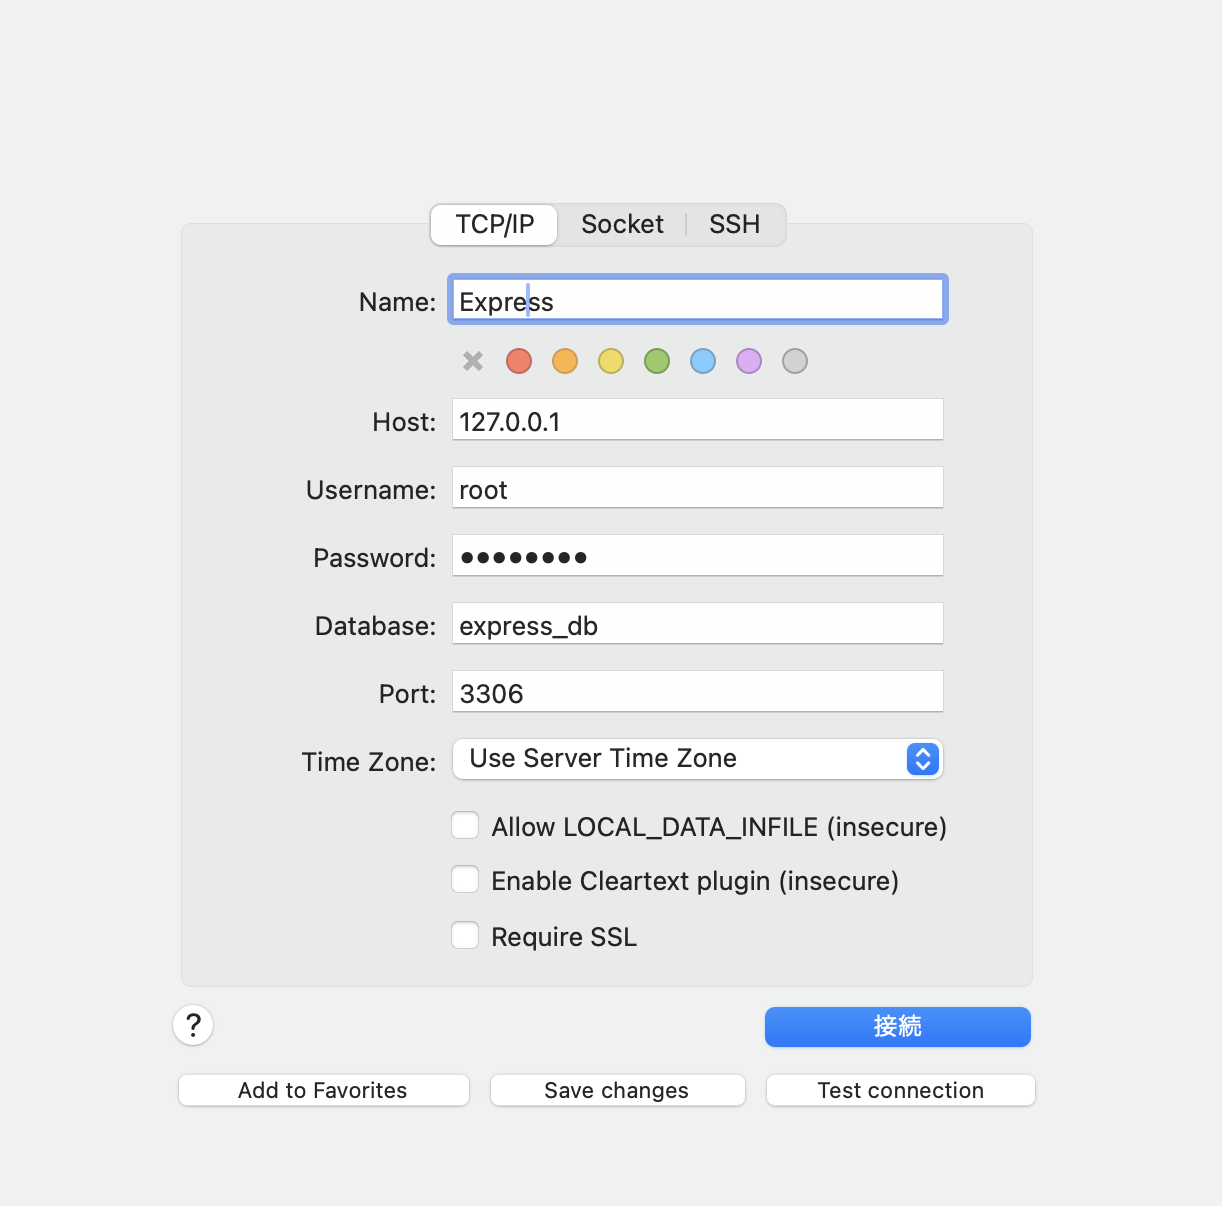
データベース接続確認として今回はSequel Aceを使用します。
MYSQL_PASSWORDの値をパスワードとして入力してください。
Prisma設定
Prismaを使用してMySQLとTypeScriptを接続します。まず、Prismaの初期化
npx prisma init
npm install @prisma/client
Prismaのschema.prismaファイルを開き、以下の内容に設定。
公式ドキュメントを参考にUserとPostモデルを定義。
この設定により、ユーザーとその投稿を管理するためのスキーマが作成。
generator client {
  provider = "prisma-client-js"
}

datasource db {
  provider = "mysql"
  url      = env("DATABASE_URL")
}

model User {
  id    Int     @id @default(autoincrement())
  email String  @unique
  password String
  name  String?
  posts Post[]
}

model Post {
  id        Int     @id @default(autoincrement())
  title     String
  content   String?
  published Boolean @default(false)
  author    User    @relation(fields: [authorId], references: [id])
  authorId  Int
}
次に、.envファイルにデータベース接続情報を追加します。
DATABASE_URL=mysql://root:password@localhost:3306/express_db
データベースにマイグレーションを適用
npx prisma migrate dev --name init
これにより、prisma/migrationsフォルダ内にマイグレーションファイルが生成され、データベースにテーブルが作成されます。
-- CreateTable
CREATE TABLE `User` (
    `id` INTEGER NOT NULL AUTO_INCREMENT,
    `email` VARCHAR(191) NOT NULL,
    `password` VARCHAR(191) NOT NULL,
    `name` VARCHAR(191) NULL,

    UNIQUE INDEX `User_email_key`(`email`),
    PRIMARY KEY (`id`)
) DEFAULT CHARACTER SET utf8mb4 COLLATE utf8mb4_unicode_ci;

-- CreateTable
CREATE TABLE `Post` (
    `id` INTEGER NOT NULL AUTO_INCREMENT,
    `title` VARCHAR(191) NOT NULL,
    `content` VARCHAR(191) NULL,
    `published` BOOLEAN NOT NULL DEFAULT false,
    `authorId` INTEGER NOT NULL,

    PRIMARY KEY (`id`)
) DEFAULT CHARACTER SET utf8mb4 COLLATE utf8mb4_unicode_ci;

-- AddForeignKey
ALTER TABLE `Post` ADD CONSTRAINT `Post_authorId_fkey` FOREIGN KEY (`authorId`) REFERENCES `User`(`id`) ON DELETE RESTRICT ON UPDATE CASCADE;
ユーザー作成仮実装
src/index.tsに以下のようにして、仮のユーザー作成エンドポイントを追加。
このエンドポイントは、新しいユーザーをデータベースに作成
app.post('/user', async (req: Request, res: Response) => {
  const newUser = await prisma.user.create({
    data: {
      name: 'Alice',
      email: 'alice@prisma.io',
      password: 'password',
    }
  })
  res.status(201).json(newUser);
});
サーバーを起動し、以下のコマンドでエンドポイントをテスト
curl -X POST http://localhost:3000/user
レスポンスが以下のように返ってくれば成功
{"id":1,"email":"alice@prisma.io","password":"password","name":"Alice"}%
Sequel Aceなどでデータベースを確認すると、Userテーブルにレコードが作成されていることが確認できます。

ユーザー登録とログイン
認証機能を追加するために、以下の手順で進めていきます。
今回は、メールアドレスとパスワードを使用した認証機能を構築します。パスワードのハッシュ化にはbcryptを使用し、JWT(JSON Web Token)を利用して認証トークンを発行します。
まず、bcryptとjsonwebtokenをインストールします。これにより、パスワードのハッシュ化とトークンの生成・検証ができるようになります。
npm install bcrypt jsonwebtoken
型定義も開発用にインストール
npm install --save-dev @types/bcrypt @types/jsonwebtoken
src/index.tsを以下のように書き換えます。
bcryptを使ってパスワードをハッシュ化してからデータベースに保存します。
import express, { Request, Response } from 'express';
import dotenv from 'dotenv';
import bcrypt from 'bcrypt';
import jwt from 'jsonwebtoken';
import { PrismaClient } from '@prisma/client'

dotenv.config();

const app = express();
const port = process.env.PORT || 3000;
const prisma = new PrismaClient()
const SECRET_KEY = process.env.JWT_SECRET || 'your-secret-key';

app.use(express.json());

app.post('/register', async (req: Request, res: Response) => {
  const { email, password, name } = req.body;

  try {
    const hashedPassword = await bcrypt.hash(password, 10);
    const newUser = await prisma.user.create({
      data: {
        email,
        password: hashedPassword,
        name,
      },
    });
    res.status(201).json({ message: 'User created successfully', user: newUser });
  } catch (error) {
    res.status(400).json({ error: 'User registration failed' });
  }
});

app.post('/login', async (req: Request, res: Response) => {
  const { email, password } = req.body;

  try {
    const user = await prisma.user.findUnique({
      where: { email },
    });

    if (!user) {
      res.status(404).json({ error: 'User not found' });
      return;
    }

    const isPasswordValid = await bcrypt.compare(password, user.password);
    if (!isPasswordValid) {
      res.status(401).json({ error: 'Invalid password' });
    }

    const token = jwt.sign({ userId: user.id }, SECRET_KEY, { expiresIn: '1h' });
    res.status(200).json({ message: 'Login successful', token });
  } catch (error) {
    res.status(500).json({ error: 'Login failed' });
  }
});

app.listen(port, () => {
  console.log(`Server is running on port ${port}`);
});
/registerエンドポイントでは、受け取ったパスワードをハッシュ化し、ユーザー情報と一緒に保存します。
/loginエンドポイントでは、以下の処理を行います。
- メールアドレスでユーザーを検索
- パスワードのハッシュをbcrypt.compareで検証
- パスワードが正しければ、JWTトークンを発行
ユーザー登録(/register)のテスト
curl -X POST http://localhost:3000/register \
  -H "Content-Type: application/json" \
  -d '{
    "email": "testuser@example.com",
    "password": "securepassword",
    "name": "Test User"
  }'
以下のようなレスポンスが返ってくれば成功です。
DBにuserが追加されてるはずです
{"message":"User created successfully","user":{"id":2,"email":"testuser@example.com","password":"$2....","name":"Test User"}}%
ログイン(/login)のテスト
curl -X POST http://localhost:3000/login \
  -H "Content-Type: application/json" \
  -d '{
    "email": "testuser@example.com",
    "password": "securepassword"
  }'
以下のようなレスポンスが返ってくれば成功です。
{"message":"Login successful","token":"eyJhbGciOiJIUzI1NiIsInR5cCI6IkpXVCJ9.eyJ1c2VySWQiOjIsImlhdCI6MTcyOTMxOTAyNCwiZXhwIjoxNzI5MzIyNjI0fQ.TSNrJeTGDLaloISvpQyRhZfBDhapVn5Y3I0B42--rek"}%
試しに誤ったパスワードを入力してみましょう
curl -X POST http://localhost:3000/login \
  -H "Content-Type: application/json" \
  -d '{
    "email": "testuser@example.com",
    "password": "securepassworddddddddddddddd"
  }'
エラーが返ってきます
{"error":"Invalid password"}%
認証ミドルウェアの実装
認証が必要なエンドポイント用に、JWTを検証するミドルウェアを追加します。
これにより、特定のエンドポイントにアクセスする際、ユーザーが認証されているか確認できます。
import { Request, Response, NextFunction } from 'express';
import jwt from 'jsonwebtoken';

const SECRET_KEY = process.env.JWT_SECRET || 'your-secret-key';

export interface AuthenticatedRequest extends Request {
  user?: { userId: number };
}

export const authenticateToken = (req: AuthenticatedRequest, res: Response, next: NextFunction) => {
  const authHeader = req.headers['authorization'];
  const token = authHeader && authHeader.split(' ')[1];

  if (!token) {
    res.status(401).json({ error: 'Access token required' });
    return;
  }

  jwt.verify(token, SECRET_KEY, (err, user) => {
    if (err) {
      res.status(403).json({ error: 'Invalid token' });
      return;
    }
    req.user = user as { userId: number };
    next();
  });
};
/profileエンドポイントを追加。このエンドポイントはJWTトークンを必要とするため、まずログインしてトークンを取得し、そのトークンを使用して/profileエンドポイントにアクセスする必要があります。
app.get('/profile', authenticateToken, async (req: AuthenticatedRequest, res: Response) => {
  if(!req.user) {
    res.status(403).json({ error: 'Invalid token' });
    return;
  }

  const userId = req.user.userId;

  try {
    const user = await prisma.user.findUnique({
      where: { id: userId },
      select: {
        id: true,
        email: true,
        name: true,
      },
    });
    if (user) {
      res.status(200).json(user);
    } else {
      res.status(404).json({ error: 'User not found' });
    }
  } catch (error) {
    res.status(500).json({ error: 'Failed to retrieve user profile' });
  }
});
動作確認としてログインしてみます
curl -X POST http://localhost:3000/login \
  -H "Content-Type: application/json" \
  -d '{
    "email": "testuser@example.com",
    "password": "securepassword"
  }'
成功を確認し、tokenをコピーします。
{"message":"Login successful","token":"ey..."}%
先ほどコピーしたtokenを使って/profileを実行
curl -X GET http://localhost:3000/profile \
  -H "Authorization: Bearer ey..."
以下のようなレスポンスが返ってくれば成功です。
{"id":2,"email":"testuser@example.com","name":"Test User"}%
試しにtokenの値をいじって/profileを実行してみましょう
curl -X GET http://localhost:3000/profile \
  -H "Authorization: Bearer ey...xxxxxxxxxxxxxxxxxxxxxxxxxx"
tokenが無効である旨のエラーが返ってきます
{"error":"Invalid token"}%
ログアウトの実装
サーバー側で、特定のトークンを無効化する方法としては、「ブラックリスト」を使用する方法があります。これは、ログアウトしたトークンを無効なトークンリストに追加し、リクエスト時にチェックします。(簡易的なブラックリストなので本番環境ではRedisなどを使用することを検討してください)
src/index.ts にエンドポイントを追加してください。
// 略

export const tokenBlacklist: Set<string> = new Set();

// 略

app.post('/logout', authenticateToken, (req: Request, res: Response) => {
  const token = req.headers['authorization']?.split(' ')[1];
  if (token) {
    tokenBlacklist.add(token);
    res.status(200).json({ message: 'Logged out successfully' });
    return;
  }
  res.status(400).json({ error: 'Token is required for logout' });
});
認証ミドルウェアで、トークンがブラックリストに登録されていないかチェックします。
  // 略

  if (!token) {
    res.status(401).json({ error: 'Access token required' });
    return;
  }
  // 追加
  if (tokenBlacklist.has(token)) {
    res.status(403).json({ error: 'Token is no longer valid' });
    return;
  }

  // 略
動作確認としてログイン。先ほどと同じでレスポンスのtokenをコピー
curl -X POST http://localhost:3000/login \
  -H "Content-Type: application/json" \
  -d '{
    "email": "testuser@example.com",
    "password": "securepassword"
  }'
コピーしたtokenを使って/profileを実行
curl -X GET http://localhost:3000/profile \
  -H "Authorization: Bearer ey..."
取得できることを確認
{"id":2,"email":"testuser@example.com","name":"Test User"}%
ログアウトを実行
curl -X POST http://localhost:3000/logout \
  -H "Authorization: Bearer ey..."
ログアウト成功を確認
{"message":"Logged out successfully"}%
ログアウト後に再度/profileを実行
curl -X GET http://localhost:3000/profile \
  -H "Authorization: Bearer ey..."
tokenが無効あることを確認
{"error":"Token is no longer valid"}%
おわりに
一通りの認証実装はできたと思います。ディレクトリ構成や型定義どこにまとめる?といった改善できる点はまだまだあると思います。
この記事が、TypeScriptでの認証付きバックエンドを始めるためのスターターキットとして役立てば幸いです。
最後までお読みいただきありがとうございます!