はじめに
API開発では、コードとAPI仕様を常に一致させることが大きな課題です。
tsoaを使うと、TypeScriptのデコレーター機能を活用して、コードから自動的にAPIドキュメントを生成できるため、コードと仕様の一貫性を保ちやすくなります。
今回公式ドキュメトを軸にスムーズにTsoaを用いたTypeScript環境構築ができるような記事を書いてみました。
目次
プロジェクトの初期設定
以下の手順に従って、プロジェクトの初期設定を行います。
まず、公式ドキュメントを参考にして、基本的な環境構築を進めます。
記事の You may want to add these scripts to your package.json at this point: の部分まで行います。
1点補足として、tsconfig.jsonは以下のように設定します。outDirはビルド時、srcディレクトリにJSファイルが生成されないようにする設定です。
また、experimentalDecoratorsとemitDecoratorMetadataはyarn start実行時、コンパイルエラーが発生しないようにするための追加です(参考記事)。
{
  "compilerOptions": {
    "target": "es2016",
    "module": "commonjs",
    "strict": true,
    "esModuleInterop": true,
    "skipLibCheck": true,
    "forceConsistentCasingInFileNames": true,
    "outDir": "./build",
    "experimentalDecorators": true,
    "emitDecoratorMetadata": true,
  },
  "include": ["src/**/*.ts"],
  "exclude": ["node_modules"]
}
上記の設定が完了したら、以下のコマンドでサーバーが正常に起動することを確認します。
yarn build
yarn start
http://localhost:3000/users/1 にアクセスして下記のような表示になれば成功です!

APIドキュメント自動生成
次に、Swagger UIを導入してAPIドキュメントを自動生成する手順を説明します。これにより、API仕様が常に最新の状態でドキュメント化され、開発中のAPIの動作確認が容易になります。
まず、開発環境に必要なパッケージをインストールします。
yarn add -D nodemon ts-node concurrently
次に、nodemon.jsonを作成します。
{
  "exec": "ts-node src/server.ts",
  "watch": ["src"],
  "ext": "ts"
}
package.jsonに以下のスクリプトを追加します。
  "scripts": {
    "dev": "concurrently \"nodemon\" \"nodemon -x tsoa spec-and-routes\"",
    "build": "tsoa spec-and-routes && tsc",
    "start": "node build/src/server.js"
  }
Swagger UIを利用するために必要なパッケージを追加します。
yarn add swagger-ui-express
Swagger UIの型定義も追加します。
yarn add -D @types/swagger-ui-express
次に、src/app.tsを編集してSwagger UIの設定を行います。
import express, {json, urlencoded, Response as ExResponse, Request as ExRequest} from "express";
import swaggerUi from "swagger-ui-express";
import { RegisterRoutes } from "../build/routes";

export const app = express();

app.use(
  urlencoded({
    extended: true,
  })
);
app.use(json());
app.use("/docs", swaggerUi.serve, async (_req: ExRequest, res: ExResponse) => {
  res.send(
    swaggerUi.generateHTML(await import("../build/swagger.json"))
  );
});

RegisterRoutes(app);
さらに、tsconfig.jsonを以下を追加します。このオプションをtrueに設定することで、TypeScriptは.jsonファイルをインポートすることができるようになります。
{
  "compilerOptions": {
    "resolveJsonModule": true
  }
}
これで、再度ビルドとサーバーの起動を行います。
yarn build
yarn dev
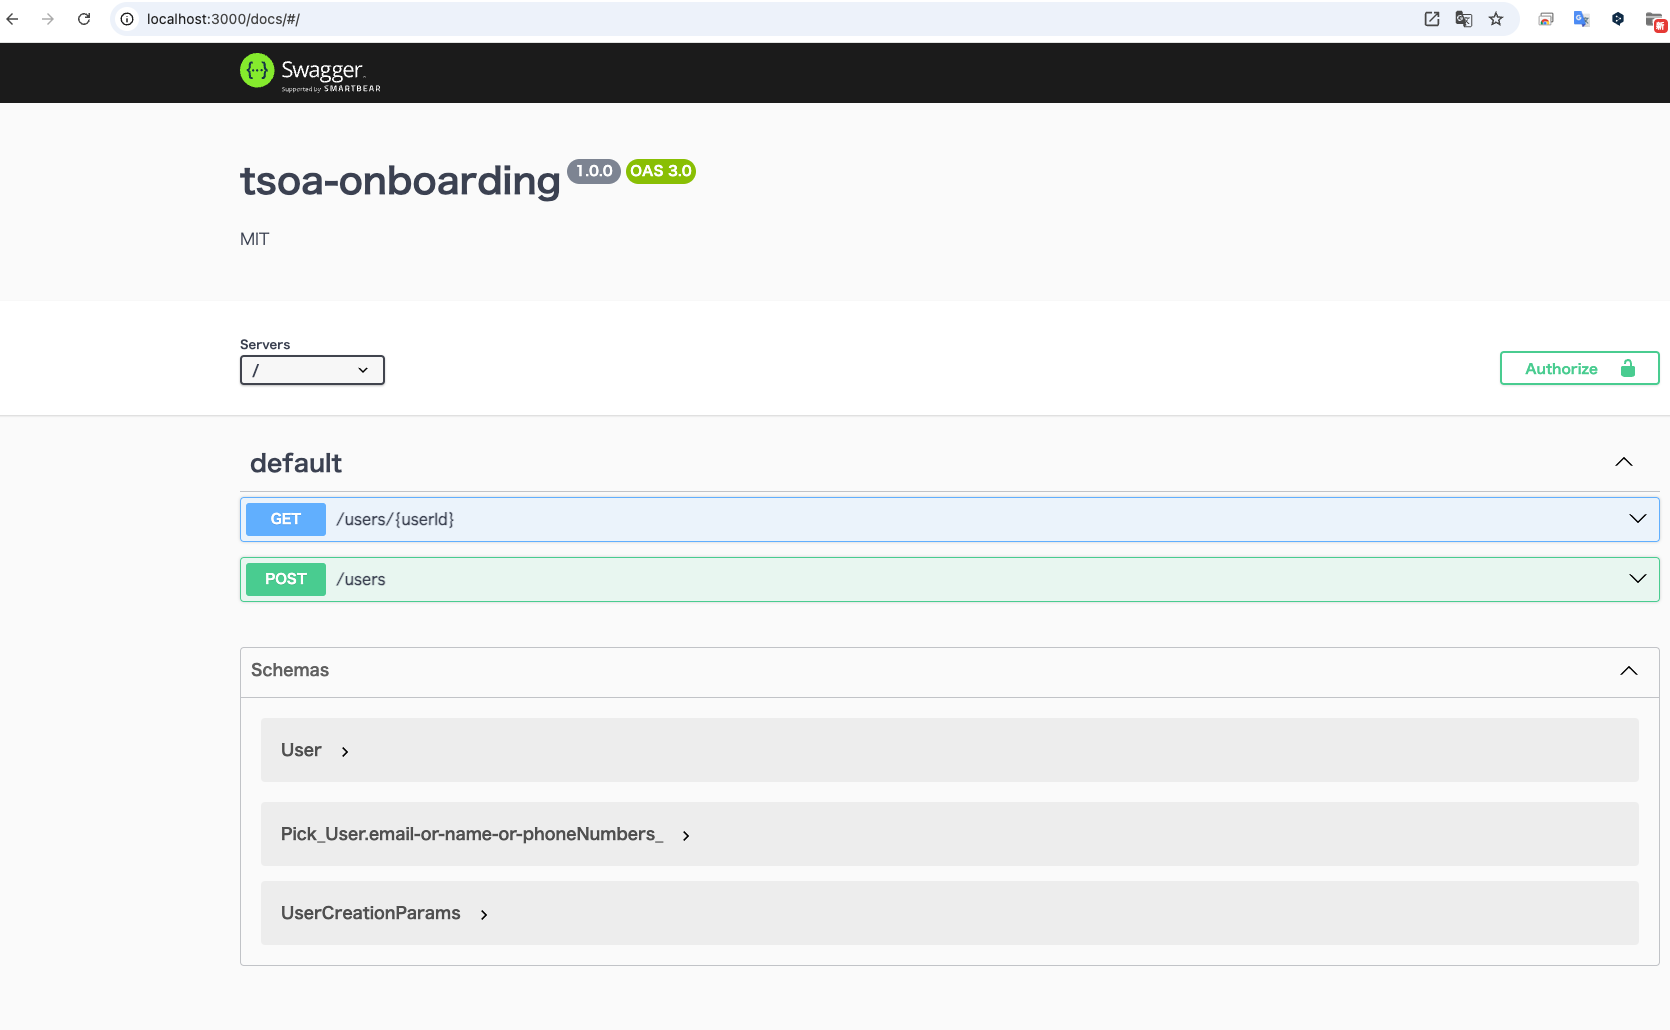
ブラウザで http://localhost:3000/docs/ にアクセスし、
Swagger UIが表示されれば設定完了です!

エラーハンドリング
Expressアプリケーションのエラーハンドリングを追加し、エラーが発生した際にその詳細を分かりやすくクライアントに伝える仕組みを実装します。以下記事を参考に設定を行います。
app.tsにエラーハンドリングのミドルウェアを追加します。
import express, {json, urlencoded, Response as ExResponse, Request as ExRequest, NextFunction} from "express";
import swaggerUi from "swagger-ui-express";
import { RegisterRoutes } from "../build/routes";
import { ValidateError } from "tsoa";

export const app = express();

app.use(
  urlencoded({
    extended: true,
  })
);
app.use(json());
app.use("/docs", swaggerUi.serve, async (_req: ExRequest, res: ExResponse) => {
  res.send(
    swaggerUi.generateHTML(await import("../build/swagger.json"))
  );
});

app.use(function errorHandler(
  err: unknown,
  req: ExRequest,
  res: ExResponse,
  next: NextFunction
) {
  if (err instanceof ValidateError) {
    console.warn(`Caught Validation Error for ${req.path}:`, err.fields);
    res.status(422).json({
      message: "Validation Failed",
      details: err?.fields,
    });
  }
  if (err instanceof Error) {
    res.status(500).json({
      message: "Internal Server Error",
    });
  }

  next();
});

RegisterRoutes(app);
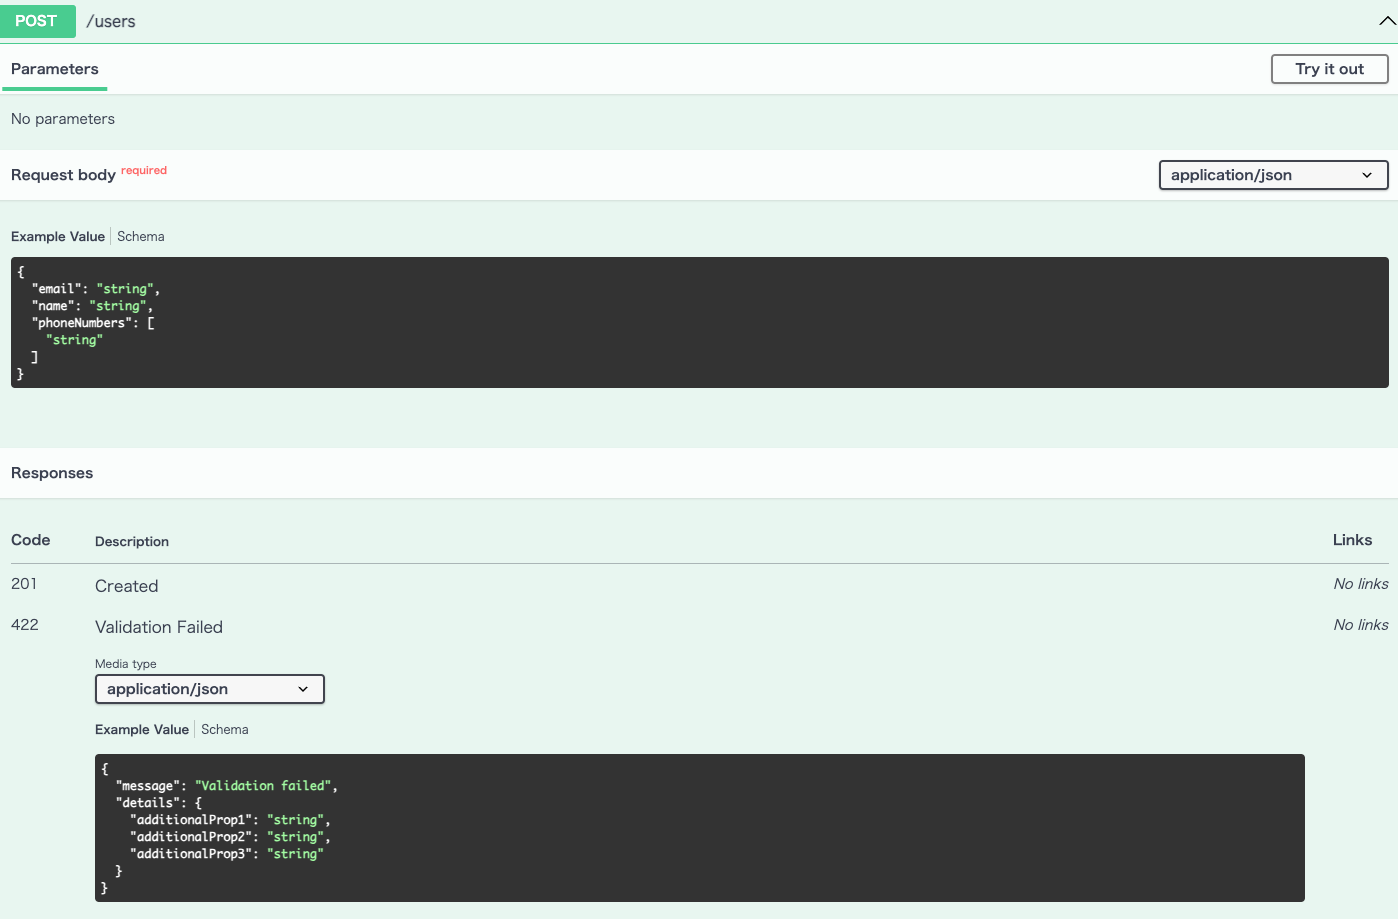
usersController.tsでエラーハンドリングに関連するレスポンスとステータスコードを定義。
import {
  Body,
  Controller,
  Get,
  Path,
  Post,
  Query,
  Route,
  SuccessResponse,
  Response,
} from "tsoa";
import { User } from "./user";
import { UsersService, UserCreationParams } from "./usersService";

interface ValidateErrorJSON {
  message: "Validation failed";
  details: { [name: string]: unknown };
}

@Route("users")
export class UsersController extends Controller {
  @Get("{userId}")
  public async getUser(
    @Path() userId: number,
    @Query() name?: string
  ): Promise<User> {
    return new UsersService().get(userId, name);
  }

  @Response<ValidateErrorJSON>(422, "Validation Failed")
  @SuccessResponse("201", "Created") // Custom success response
  @Post()
  public async createUser(
    @Body() requestBody: UserCreationParams
  ): Promise<void> {
    this.setStatus(201); // set return status 201
    new UsersService().create(requestBody);
    return;
  }
}
ドキュメントにはエラー内容が表示されるようになります。
Middleware
tsoa.jsonにmiddlewareを追加
"routes": {
    "routesDir": "build",
    "middleware": {
      "auth": "./src/middleware/authMiddleware"
    }
  }
middlewareを追加
import { Request, Response, NextFunction } from "express";

export interface AuthenticatedRequest extends Request {
  userId?: string;
  req: AuthenticatedRequest,
}

export const authMiddleware = (
  req: AuthenticatedRequest,
  res: Response,
  next: NextFunction
) => {
  // リクエストヘッダーからトークンを取得
  const token = req.headers["x-access-token"];

  // トークンが存在しない場合は401エラーを返す
  if (!token) {
    return res.status(401).json({ message: "No token provided" });
  }

  // 仮のトークン値を設定
  const expectedToken = "your-hardcoded-token-value";

  // トークンのチェック
  if (token === expectedToken) {
    // トークンが正しい場合、仮のユーザーIDをリクエストオブジェクトに追加
    req.userId = "123"; // 仮のユーザーID
    next(); // 認証成功、次のミドルウェアに進む
  } else {
    // トークンが不正な場合、403エラーを返す
    return res.status(403).json({ message: "Invalid token" });
  }
};
src/users/usersController.tsにMiddlewareを追加
src/users/usersController.tsにミドルウェアを追加します
import {
  Body,
  Controller,
  Get,
  Path,
  Post,
  Query,
  Route,
  SuccessResponse,
  Response,
  Middlewares,
  Request,
  Header,
} from "tsoa";
import { User } from "./user";
import { UsersService, UserCreationParams } from "./usersService";
import { AuthenticatedRequest, authMiddleware } from "../middleware/authMiddleware";

interface ValidateErrorJSON {
  message: "Validation failed";
  details: { [name: string]: unknown };
}

@Route("users")
@Middlewares([authMiddleware])
export class UsersController extends Controller {
  @Get("{userId}")
  public async getUser(
    @Header('X-Access-Token') _token: string,
    @Request() req: AuthenticatedRequest,
    @Path() userId: number,
    @Query() name?: string
  ): Promise<User> {
    return new UsersService().get(userId, name);
  }

  @Response<ValidateErrorJSON>(422, "Validation Failed")
  @SuccessResponse("201", "Created") // Custom success response
  @Post()
  public async createUser(
    @Header('X-Access-Token') _token: string,
    @Body() requestBody: UserCreationParams
  ): Promise<void> {
    this.setStatus(201); // set return status 201
    new UsersService().create(requestBody);
    return;
  }
}
おわりに
一通りのスキーマ作成はできたと思います。
ディレクトリ構成や型定義どこにまとめる?といった改善できる点はまだまだあると思います。
下記記事ではPrismaや認証といったDB関連のことについてまとめているので組み合わせると本格的なバックエンド実装ができるかもしれません。
最後までお読みいただきありがとうございます!