気がついたら、Cloud Run という新しいサーバーレスのサービスが追加されていました。
nginxで静的コンテンツをホスティングして、色々と動かしてみたいと思います。
*(2020/10/5追記) いつの間にか、自動デプロイの手順が少し簡素化されていましたので、追記しました。
Summary
- とりあえず、構築する。
- Gitへのプッシュをトリガーにしてビルド&デプロイを自動化する。
- トラフィック分割
- 監視
- パフォーマンス計測

ToDo
-
前準備と後始末
- プロジェクトを作る。
- プロジェクトを削除する。
-
手動ビルドとデプロイ
- API有効化(Cloud RunとBuildとRepositoryなど)
- Dockerfile等の準備
- コンテナイメージのビルド
- デプロイ
- 動作確認
-
自動ビルド&デプロイ
- 権限設定
- リポジトリの作成
- トリガーの作成
- コードおよびビルド構成ファイルのプッシュ
- デプロイ結果の確認
-
いろいろ確認
- トラフィック分割
- 監視
- パフォーマンス測定
- Worpressでパフォーマンス測定(参考)
Prepairing and cleanup
Create a new project
あとですぐに消せるように、一時的なプロジェクトを作成します。
- 画面の上にある [Select a project] を選択する。
- [NEW PROJECT] を選択する。
- 「Project Name」に任意の名前を入れる。
グローバルで一意になるように、IDには数字が付与される。 - [Create]を選択する。
Delete the project
無駄に課金されることを避けるため、プロジェクトを削除します。
- ハンバーガーから、「Home」を選択する。
- [Go to project settings]を選択する。
- [SHUT DOWN]を選択する。
30日間は消えずに残っている。
Procedure of a manual build and deployment.
Enable APIs
APIを有効化します。
- ハンバーガーから、「API & Services - Library」を選択する。
- 虫眼鏡欄に、「Cloud Run API」を入力する。
- 結果から、「Cloud Run API」を選択する。
- [ENABLE]を選択する。
- 同様に「Cloud Build API」も有効化する。
- 同様に「Google Container Registry API」も有効化する。
Prepare the code files
-
Cloud SDKを起動する。
-
プロジェクトを設定する。
$ gcloud config set project [上で作ったプロジェクトのID] -
任意のディレクトリを作成し、そこに移動する。
$ mkdir -p nginx-test/html $ mkdir -p nginx-test/nginx $ cd nginx-test -
htmlファイルを作成する。
./html/index.htmlOK -
default.conf を作成する。待ち受ける通信ポート番号をCloud Run側と合わせます。
./nginx/default.confserver { listen 8080; server_name localhost; location / { root /usr/share/nginx/html; index index.html; if ($request_method != GET ) { return 403; } } } -
Dockerfile を作成します。今回はDockerの公式イメージを使います。
DockerfileFROM nginx COPY html /usr/share/nginx/html COPY nginx/default.conf /etc/nginx/conf.d/default.conf
Build container image
-
Container Registry へ登録します。SUCCESS と出ればOK。
$ gcloud builds submit --tag gcr.io/[上で作ったプロジェクトのID]/nginx-test:v1 -
イメージの確認。v1タグがついたイメージが出来上がっていればOK。
$ gcloud container images list-tags gcr.io/[上で作ったプロジェクトのID]/nginx-test結果例DIGEST TAGS TIMESTAMP xxxxxxxxxxxx v1 yyyy-mm-ddTHH:MM:SS
Deploy to Cloud Run
-
Cloud Runにデプロイします。
今回はフルマネージドのサービスを東京リージョンにデプロイします。
また、外部からの未認証アクセスを許容します。$ gcloud run deploy nginx-test \ --image gcr.io/[上で作ったプロジェクトのID]/nginx-test:v1 \ --platform managed \ --region=asia-northeast1 \ --allow-unauthenticated -
デプロイ結果を確認するために、サービス一覧を出します。
gcloud run services list --platform managed --region=asia-northeast1結果例SERVICE REGION URL LAST DEPLOYED BY LAST DEPLOYED AT ✔ nginx-test asia-northeast1 https://nginx-test-xxxxxxxx-xx.x.run.app YOURMAILADDRESS@YOURDOMAIN yyyy-mm-ddTHH:MM:SS.000Z -
同じくリビジョン一覧を確認します。
$ gcloud run revisions list --platform managed --region=asia-northeast1結果例REVISION ACTIVE SERVICE DEPLOYED DEPLOYED BY
✔ nginx-test-99999-xxx yes nginx-test yyyy-mm-dd HH:MM:SS UTC YOURMAILADDRESS@YOURDOMAIN
```
-
リビジョンの設定値はdescribeで確認できます。
デフォルトでは、自動スケーリングは最大1,000。同時実行数は80。vCPUは1つ。メモリは256MiBとなるようです。$ gcloud run revisions describe [リビジョン] --platform managed --region=asia-northeast1結果例✔ Revision nginx-test-00001-baw in region asia-northeast1 Image: gcr.io/[プロジェクトID]/nginx-test:v1 Port: 8080 Memory: 256Mi CPU: 1000m Concurrency: 80 Max Instances: 1000 Timeout: 300s
Confirmation
-
先程のサービス一覧で表示されたURLにアクセスします。OKがでればOKです。
curl https://[表示されたURL]/結果例OK
Procedure of a automatic build and deployment(new).
新しい手順。
Enable APIs
APIを有効化します。
- ハンバーガーから、「API & Services - Library」を選択する。
- 虫眼鏡欄に、「Cloud Source Repositories API」を入力する。
- 結果から、「Cloud Source Repositories API」を選択する。
- [ENABLE]を選択する。
Create a repository
Cloud Source Repository上にリポジトリを作成します。
-
Cloud SDKを起動する。
-
プロジェクトを設定する。
$ gcloud config set project [上で作ったプロジェクトのID]
-
リポジトリの作成
「課金されるで」的なWARNINGは無視でOK。$ gcloud source repos create nginx-testCreated [nginx-test]. -
クローン
「空のリポジトリやで」的なWARNINGは無視でOK。$ gcloud source repos clone nginx-testCloning into '/home/ユーザ名/nginx-test-repository'... warning: You appear to have cloned an empty repository. Project [上で作ったプロジェクトのID] repository [nginx-test] was cloned to [/xxx/xxx/nginx-test].
Setting up Continuous deployment
-
ハンバーガーから、「Cloud Run - [上で作ったサービス]」を選択する。
-
画面の上の方にある「SET UP CONTINUOUS DEPLOYMENT」を選択する。
-
「Source Repository」で、以下のとおり設定する。
項目 設定値 Repository Provider Cloud Source Repositoies Repository nginx-test(上で作ったリポジトリ) -
「Build COnfigration」で、以下のとおり設定する。
項目 設定値 Branch ^master$ Build Type Dockerfile -
[SAVE]を選択する。
Register a code and build configuration file
リポジトリにコードと、ビルド構成ファイルを登録します。
-
Cloud SDKを起動する。
-
プロジェクトを設定する。
$ gcloud config set project [上で作ったプロジェクトのID] -
リポジトリをクローンしたディレクトリへ移動
$ cd ./nginx-test -
先ほど作成したDockerfileとhtml/index.htmlとnginx/default.confをコピーする。
-
index.html を編集します。
html/index.htmlOK this revision has deployed by Cloud Build. -
.gcloudignore を作成する。
.gcloudignore .git .gitignore node_modules *.exe *.exe~ *.dll *.so *.dylib *.test *.out -
ファイルの追加
$ git add . -
コミット
$ git commit -m "This is a first time of deploy container image."「*** Please tell me who you are.(つーかお前誰やねん)」が出たら、
git config --local user.email "your_name@your_domain.com" git config --local user.name "your_name" -
プッシュ
$ git push origin master
Confirm build result
ビルド結果を確認します。
-
ビルド結果の確認
STATUSがSUCCESSであれば、デプロイ成功です。$ gcloud builds listID CREATE_TIME DURATION SOURCE IMAGES STATUS xxxxxxxx-xxxx-xxxx-xxxx-xxxxxxxxxxxx yyyy-mm-ddTHH:MM:SS+00:00 xxS nginx-test@master - SUCCESS -
Cloud Runのリビジョン一覧を確認します。新しいリビジョンがACTIVEになっていればOKです。
$ gcloud run revisions list --platform managed --region=asia-northeast1結果例REVISION ACTIVE SERVICE DEPLOYED DEPLOYED BY
✔ nginx-test-99999-xxx yes nginx-test yyyy-mm-dd HH:MM:SS UTC YOURMAILADDRESS@YOURDOMAIN
```
-
Cloud Runの動作確認
以下のように結果がかえってくればOKです。$ curl https://[Cloud RUnのサービスのURL]/結果例OK this revision has deployed by Cloud Build.
Procedure of a automatic build and deployment.
従来の手順。新しい手順でやった場合、こちらは実施不要。
Enable APIs
APIを有効化します。
- ハンバーガーから、「API & Services - Library」を選択する。
- 虫眼鏡欄に、「Cloud Run API」を入力する。
- 結果から、「Cloud Run API」を選択する。
- [ENABLE]を選択する。
- 同様に「Cloud Build API」も有効化する。
- 同様に「Cloud Source Repositories API」も有効化する。
- 同様に「Google Container Registry API」も有効化する。
- 同様に「Cloud Resource Manager API」も有効化する。
Add roles for Service Account
Cloud Buildのサービスアカウントに役割を追加します。
-
ハンバーガーから、「Cloud Build - Settings」を選択する。
-
Service account permissionsの一覧より、「Cloud Run Admins」のStatusを[ENABLE]にする。
-
「GRANT ACCESS TO ALL SERVICE ACCOUNTS 」を選択する。
-
Cloud SDKを起動する。
-
プロジェクトを設定する。
$ gcloud config set project [上で作ったプロジェクトのID] -
プロジェクトを情報を確認する。
$ gcloud projects describe [上で作ったプロジェクトのID]createTime: 'yyyy-mm-ddTHH:MM:SS.000Z' lifecycleState: ACTIVE name: プロジェクトの名前 projectId: プロジェクトのID projectNumber: 'プロジェクトの番号' -
Cloud BuildのサービスアカウントをCloud Functionsのランタイムサービスアカウントとして機能させる。
([プロジェクトのID]と[プロジェクトの番号]を置き換えて実行する。)gcloud iam service-accounts add-iam-policy-binding \ [プロジェクトの番号]-compute@developer.gserviceaccount.com \ --member="serviceAccount:[プロジェクトの番号]@cloudbuild.gserviceaccount.com" \ --role="roles/iam.serviceAccountUser"
Create a repository
Cloud Source Repository上にリポジトリを作成します。
-
Cloud SDKを起動する。
-
プロジェクトを設定する。
$ gcloud config set project [上で作ったプロジェクトのID]
-
リポジトリの作成
「課金されるで」的なWARNINGは無視でOK。$ gcloud source repos create nginx-testCreated [nginx-test]. -
クローン
「空のリポジトリやで」的なWARNINGは無視でOK。$ gcloud source repos clone nginx-testCloning into '/home/ユーザ名/nginx-test-repository'... warning: You appear to have cloned an empty repository. Project [上で作ったプロジェクトのID] repository [nginx-test] was cloned to [/xxx/xxx/nginx-test].
Create a build trigger
-
ハンバーガーから「Cloud Build - Triggers」を選択する。
-
[CREATE TRIGGER]を選択する。
Item Defult Value Value Comment Name - nginx-test-trigger 任意のトリガー名(プロジェクト内で一意) Description - ← 説明文 Event Push to a branch ← トリガーとなるイベント(今回はプッシュを対象とする) Repository - nginx-test 今回は上で作ったリポジトリを選択 Branch - ^master$ 今回はmasterを対象とする Invert Regex No ← File Type Cloud Build configuration fle(yaml or json) ← Cloud Build configuration file location /cloudbuild.yaml ← ビルド構成ファイルを指定 -
[CREATE]を選択する。
Register a code and build configuration file
リポジトリにコードと、ビルド構成ファイルを登録します。
-
Cloud SDKを起動する。
-
プロジェクトを設定する。
$ gcloud config set project [上で作ったプロジェクトのID] -
リポジトリをクローンしたディレクトリへ移動
$ cd ./nginx-test -
先ほど作成したDockerfileとhtml/index.htmlとnginx/default.confをコピーする。
-
index.html を編集します。
html/index.htmlOK this revision has deployed by Cloud Build. -
ビルド構成ファイルを cloudbuild.yaml という名前で作成。
steps:
    - name: 'gcr.io/cloud-builders/docker'
      args: ['build', '-t', 'gcr.io/[上で作ったプロジェクトのID]/nginx-test:v2', '.']
    - name: 'gcr.io/cloud-builders/docker'
      args: ['push', 'gcr.io/[上で作ったプロジェクトのID]/nginx-test:v2']
    - name: 'gcr.io/cloud-builders/gcloud'
      args:
      - 'run'
      - 'deploy'
      - 'nginx-test'
      - '--image'
      - 'gcr.io/[上で作ったプロジェクトのID]/nginx-test:v2'
      - '--region'
      - 'asia-northeast1'
      - '--platform'
      - 'managed'
      - '--allow-unauthenticated'
Item Option Value Service name - nginx-test Image -image gcr.io/[上で作ったプロジェクトのID]/nginx-test:v2 Platform --platform managed Region --region asia-northeast1 Unauthenticated access --allow-unauthenticated allow vCPU --cpu (1000m) Memory --memory (256Mi) Max Instances --max-instances (1000) Concurrency per instance --concurrency (80) ※括弧のやつは、省略値。 -
.gcloudignore を作成する。
.gcloudignore .git .gitignore node_modules *.exe *.exe~ *.dll *.so *.dylib *.test *.out -
ファイルの追加
$ git add . -
コミット
$ git commit -m "This is a first time of deploy container image."「*** Please tell me who you are.(つーかお前誰やねん)」が出たら、
git config --local user.email "your_name@your_domain.com" git config --local user.name "your_name" -
プッシュ
$ git push origin master
Confirm build result
ビルド結果を確認します。
-
ビルド結果の確認
STATUSがSUCCESSであれば、デプロイ成功です。$ gcloud builds listID CREATE_TIME DURATION SOURCE IMAGES STATUS xxxxxxxx-xxxx-xxxx-xxxx-xxxxxxxxxxxx yyyy-mm-ddTHH:MM:SS+00:00 xxS nginx-test@master - SUCCESS -
Cloud Runのリビジョン一覧を確認します。新しいリビジョンがACTIVEになっていればOKです。
$ gcloud run revisions list --platform managed --region=asia-northeast1結果例REVISION ACTIVE SERVICE DEPLOYED DEPLOYED BY
✔ nginx-test-99999-xxx yes nginx-test yyyy-mm-dd HH:MM:SS UTC YOURMAILADDRESS@YOURDOMAIN
```
-
Cloud Runの動作確認
以下のように結果がかえってくればOKです。$ curl https://[Cloud RUnのサービスのURL]/結果例OK this revision has deployed by Cloud Build.
Various testing
Traffic management
-
ハンバーガーより、「Cloud Run」を選択する。
-
表示されたサービス一覧より、「nginx-test」を選択する。
-
「REVISIONS」タブを選択する。
-
「Revision」ごとの振り分けを「Traffic Percentage」で指定する。
今回は最初のリビジョンと2番目のリビジョンに50%:50%で振り分けます。 -
Cloud Runの動作確認
以下のように概ね50%:50%で振り分けられたことがわかると思います。$ while true;do curl https://[Cloud RUnのサービスのURL]/;sleep 1;done結果例OK OK this revision has deployed by Cloud Build. OK OK OK this revision has deployed by Cloud Build. OK OK
Monitoring
Stackdriver Monitoringで、アラートが上がるようにします。
今回は、なるべくAlways Freeの無料枠で安心して遊べるようにするための
通知ポリシーを考えてみます。
-
Cloud Runにおける料金
Cloud Runの料金は、このようになっています。
CPUとメモリがわかりにくいですが、インスタンスに割り当てたvCPUが1(1000ms)、
メモリが256MiBの場合、実行時間が1秒だと1vCPU秒/256MiB秒。500msであれば、
0.5vCPU秒/128MiB秒。3秒であれば、3vCPU秒/768MiB秒ということですね。
また、同時に複数リクエストを実行した際に、処理がかぶっていた場合には、最初の
リクエストを受け付けたタイミングから、最後のリクエストが完了したタイミングまで
の時間が請求対象となるようです。
さらに上記リンクには明記されていませんが、インスタンスが複数ある場合は、インスタンス
ごとの時間が積算されるものと思われます(当たり前といえば、当たり前ですが)。
-
Cloud Runにおける無料枠
Cloud Runには、月ごとにリセットされる無料枠があります(日、時間、分は筆者にて計算)。
今回はこれを基準にして、通知ポリシーを考えてみます。per Month per Day per Hour per Minute Requests 2,000,000 64,516 1,075 17.92 vCPU 180,000 vCPU sec 5,806 vCPU sec 97 vCPU sec 1.61 vCPU sec Memory 360,000 GiB sec 11,613 GiB sec 194 GiB sec 3.23 GiB sec Network band(MiB) 1,024 MiB 33 MiB 1 MiB 0.01 MiB -
通知ポリシーの条件
通知ポリシーの作り方|Resorce Type|Metric|Advanced Aggregation|Configuration
|:-:|:-:|:-:|:-:|:-:|
|Cloud Run Revision|Request Count|sum/1minute|Any time series violates/is above/18/1min|
|Cloud Run Revision|Billable Instance Time|sum/1minute|Any time series violates/is above/1610ms/1min|
|Cloud Run Revision|Container CPU Allocation|sum/1minute|Any time series violates/is above/1610ms/1min|
|Cloud Run Revision|Container CPU Allocation|sum/1minute|Any time series violates/is above/3463683303B.s/1min|
Performance measurement
-
環境条件
請求時間に影響する部分が大きい、インスタンス数を変えて、測定してみます。max1000instances
80 concurrencymax1instances
80 concurrencymax2instances
80 concurrencyvCPU per instance 1 1 1 Memory per instance 256MiB 256MiB 256MiB Concurrency per instance 80 80 80 Autoscalling (Min instances) 0 0 0 Autoscalling (Max instances) 1000 1 2 -
測定条件
Apache Benchの条件は以下のとおりです。
1多重あたり100リクエストを投げる感じでやってみます。同時実行数 リクエスト数 1 100 2 200 3 300 5 500 10 1,000 20 2,000 30 3,000 40 4,000 50 5,000 total 16,100 -
リクエストあたりレスポンスタイム(ms)
ちょっと予想と反して、インスタンス数に関わらず、ほぼ同じタイミングでレスポンス悪化が始まりました。
なお、AB搭載マシンは、n1-standardのDebian9を東京リージョンに配置してまして、
割と余裕がある状態(CPU使用率10%くらい)でしたので、クライアント側に原因はなさそうです。
Concurrency 1000inst/80con 1inst/80con 2inst/80con 1 44.949 47.628 45.382 2 44.612 44.388 44.011 3 44.621 44.351 44.795 5 44.561 44.730 43.951 10 45.064 45.006 44.963 20 44.875 45.150 45.831 30 58.851 46.252 45.873 40 49.047 47.082 48.567 50 55.483 53.768 53.198 -
秒間あたりの処理リクエスト
同様です。ひとまず、今回の使い方では40多重くらいまでは、健全にサービス提供できそうです。
Concurrency 1000inst/80con 1inst/80con 2inst/80con 1 22.25 21.00 22.04 2 44.83 45.06 45.44 3 67.23 67.64 66.97 5 112.21 111.78 113.76 10 221.91 222.19 222.40 20 445.68 433.37 436.39 30 509.76 648.62 653.98 40 815.55 849.58 823.60 50 901.18 928.22 939.89 -
Cloud Run サービスの請求対象のインスタンス時間
左から、最大1000インスタンス⇒1インスタンス⇒2インスタンスです。
-
CPU割り当て
並びは上と同じです。やってることは同じなのに、インスタンス数によって増減するということは、何かしらのオーバーヘッドがあるということなんでしょうか。
別途、確認してみたいですね。
-
メモリ
傾向はCPUと同じです。
(FYI)Wordpress
ちょっと意外な結果となりましたので、Wordpressを入れて、DBアクセス(Cloud SQL)ありのパターンも見てみます。
ついでにGAEでも計測してみます。
-
リクエストあたりレスポンスタイム(ms)
以下のGAEのような結果になると思ってましたが、Cloud Runだとインスタンス数に依存してないですね。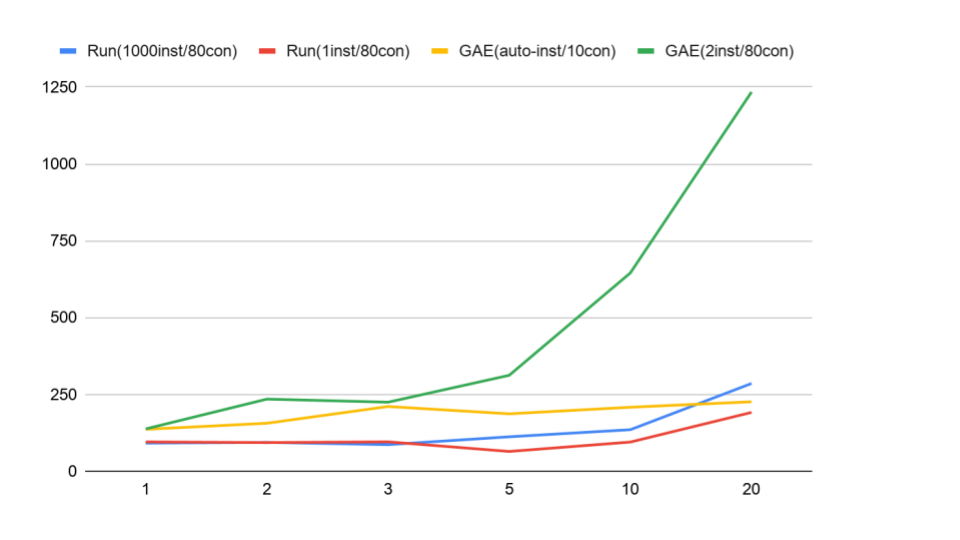
Concurrency Run(1000inst/80con) Run(1inst/80con) GAE(auto-inst/10con) GAE(2inst/80con) 1 91.565 95.494 136.453 137.882 2 93.994 93.286 156.219 234.754 3 86.566 95.769 210.714 224.766 5 112.16 64.442 186.916 312.255 10 135.246 95.019 208.332 645.477 20 285.680 191.509 226.097 1234.163 -
秒間あたりの処理リクエスト
GAEはまだまだスケールしそうな感じですので、こういうのを期待していたのですが、、今後もう少し検証してみたいと思います。。
Concurrency Cloud Run (1000inst/80con) Cloud Run (1inst/80con) App Engine (auto-inst/10con) App Engine (2inst/80con) 1 10.92 10.47 7.33 7.25 2 21.28 21.44 12.8 8.52 3 34.66 31.33 14.24 13.35 5 44.58 77.59 26.75 16.01 10 73.94 105.24 48 15.49 20 70.01 104.43 88.46 16.21