この記事はCanSatチームFUSiONのアドベントカレンダー2023,9日目(12月11日)の記事です。
実際C++で作ったけどSTL未使用だしstaticクラスしかないし動的メモリ確保ないしでCにできるやつ
やりたかったこと
Spresenseにつけたカメラで簡単な画像処理をしたかった。
したい処理
- 輪郭抽出
- 二値化
- 色空間の変換RGB->HSV
- バイナリ画像の重心とるやつ(findContoursみたいなの)
SpresenseはSonyのメモリが1.5MBあるCortex-M4マイコン
6コアで並列に動かせるが今回並列処理はしない
画像処理ライブラリはOpenCVとかが有名だけど組み込み系だともちろん動かない。
なんか軽そうな代わりの探したけどみつからなかった
制作の流れ
最終的にはSpresenseに書き込んで使うが、毎回書き込んでいてはデバッグしづらいのでPCでテストを行いながら作成した。
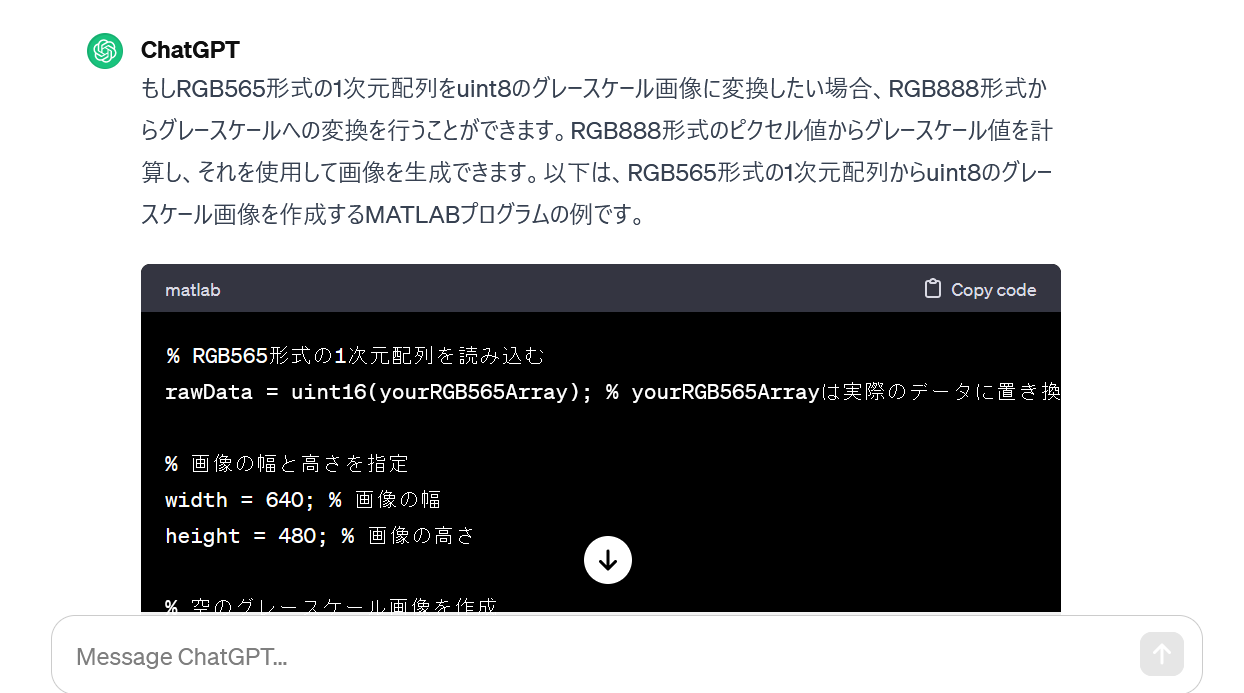
まずオンラインの変換ツールでRGB565形式のバイナリテスト用画像を作成。
次にバイナリ画像を表示するプログラムを作成。今回はMATLABを使用した。
% 画像の幅と高さを指定
width = 585; % 画像の幅
height = 440; % 画像の高さ

%読むファイル
fid = fopen("rgb565data.bin", "r");
rawData = fread(fid, [width*height], "uint16");


% 空のRGB画像を作成
outputImage = zeros(height, width, 3, 'uint8');

% RGB565形式からRGB888形式に変換
for i = 1:numel(rawData)
    pixel = rawData(i);
    red = bitshift(bitand(pixel, 0xF800), -8); % 5ビットの赤
    green = bitshift(bitand(pixel, 0x07E0), -3); % 6ビットの緑
    blue = bitshift(bitand(pixel, 0x001F), 3); % 5ビットの青

    % 画像にピクセルを設定
    row = floor((i - 1) / width) + 1;
    col = mod(i - 1, width) + 1;
    outputImage(row, col, 1) = red;
    outputImage(row, col, 2) = green;
    outputImage(row, col, 3) = blue;
end

% 画像を表示
imshow(outputImage);
ChatGPT先生に作ってもらったやつを修正して使った
ライブラリを実行するテスト用のプログラムも作成
///読み込み
ifstream ifs("../rgb565data.bin", ios::binary);
if ( !ifs.is_open() ) {
    cout <<  "file open error" << endl;
    return EXIT_FAILURE;
}
uint16_t uint16;
char buf[2];
int i = 0;
uint16_t imBuff[WIDTH*HEIGHT];
while (!ifs.eof()){
    ifs.read(buf, sizeof(buf));
    uint16 = (buf[1] << 8) | buf[0];
    imBuff[i] = uint16;
    i++;
}
ifs.close();

///処理

///書き出し
ofstream ofs(L"../out.bin", ios::out | ios::binary | ios_base::trunc );
if ( !ofs.is_open() ) {
    cout <<  "file open error2" << endl;
    return EXIT_FAILURE;
}
ofs.write(reinterpret_cast<const char *>(outBuff), sizeof(outBuff));
ofs.close();
仕様
RGB565形式の16bit非負整数の配列をいじっていく
画像サイズは固定(今回は320*240)
以下のようなコードでガンガンループを回して処理する
///右上から順番に処理するとき
uint16_t h = HEIGHT;
    while (h--){
        uint16_t w = WIDTH;
        while (w--){
            ///ここに処理を書く
        }
    }

///周辺のピクセルを見たり今どこを処理しているのか知りたいとき
for(uint16_t h = 0; h < HEIGHT; h++){
    for(uint16_t w = 0; w < WIDTH; w++){

    }
}

///補助的な関数
///幅と高さから画像の配列の位置を指定
///端っこを超えるものは端にクリップされる
int addrFromWidthAndHeight(int32_t w, int32_t h) {
    h = HEIGHT - 1 < h ? HEIGHT - 1 : h;
    h = h < 0  ? 0 : h;
    w = WIDTH - 1 < w ? WIDTH - 1 : w;
    w = w < 0  ? 0 : w;
    return h * WIDTH + w;
}
///エラー処理とかちゃんとする用
enum ImgProcError{
    SUCCESS,
    NOT_YET_IMPLEMENTED,
    TOO_MANY_CHUNKS,
    TOO_LONG_CONTOURS,
};
実際の実装
二値化。0-255のグレーの画像を二値化するやつ。一番シンプルだけど今回HSVに変換して処理したので使わなかった。ただ処理がかなり単純なのと最初はRGBで二値化しようとしてたのでここから作成した。
ImgProcError binarize(const uint8_t *grayImgBuff, bool *binImgBuff, const uint8_t threshold) {
    uint16_t h = HEIGHT;
    while (h--){
        uint16_t w = WIDTH;
        while (w--){
            *binImgBuff = *grayImgBuff > threshold;
            binImgBuff++;
            grayImgBuff++;
        }
    }
    return SUCCESS;
}
色空間の変換。今回一番面倒だったかもしれない。
参考にしたページとか
今回はH,S,Vを16bit整数の配列に押し込みたかったのでH:6bit S:5bit V:5bitにそろえる。またそれぞれ0-255の範囲で計算しているので
void rgb2hsv(const uint8_t r, const uint8_t g, const uint8_t b, uint8_t *h, uint8_t *s, uint8_t *v) {
    uint8_t  max = r < g ? g : r;
    max = max < b ? b : max;
    uint8_t min = r < g ? r : g;
    min = min < b ? min : b;
    *v = max;

    if(max > 0 & max!=min) {
        *s = (max-min)*255/max;
        if (max == r) {
            *h = (int)((g - b)*425 / (max-min)/10) % 255;
        }else if(max == g){
            *h = 85 +   (int)((b - r)*425 / (max-min)/10) % 255;
        }else{
            *h = 170 +  (int)((g - r)*425 / (max-min)/10) % 255;
        }
    }else{
        *h = 0;
        *s = 0;
    }
}

ImgProcError rgb2hsvImg(const uint16_t *rgbImgBuff, uint16_t *hsvImgBuff) {
    uint16_t h = HEIGHT;
    while (h--){
        uint16_t w = WIDTH;
        while (w--){
            uint8_t blue = (*rgbImgBuff & 0b0000000000011111) << 3;
            uint8_t green = (*rgbImgBuff & 0b0000011111100000) >> 3;
            uint8_t red = (*rgbImgBuff & 0b1111100000000000) >> 8;
            uint8_t h_hsv;
            uint8_t s_hsv;
            uint8_t v_hsv;
            rgb2hsv(red, green, blue, &h_hsv, &s_hsv, &v_hsv);
            s_hsv = s_hsv >> 3;
            v_hsv = v_hsv >> 3;
            h_hsv = h_hsv >> 2;
            *hsvImgBuff = h_hsv << 10 | s_hsv << 5 | v_hsv;
            rgbImgBuff++;
            hsvImgBuff++;
        }
    }
    return SUCCESS;
}
HSV色空間の画像の二値化。Hが色相環でなので、0をまたぐ範囲に注意する。
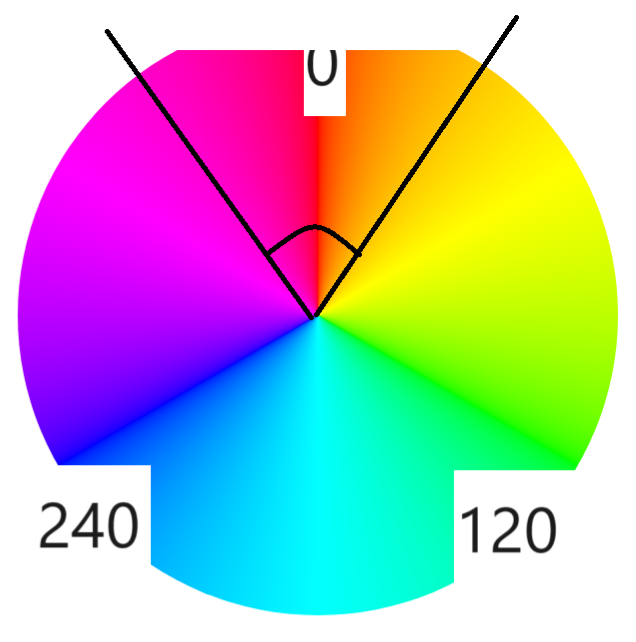
こういう範囲の時、300-30の範囲を指定できるようにする必要がある。とりあえず場合分けで実装した。
ImgProcError binarizeHsv(const uint16_t *hsvImgBuff, bool *binImgBuff, const uint8_t h_advanced_threshold, const  uint8_t h_fundamental_threshold,
                                  const  uint8_t s_upper_threshold, const uint8_t s_lower_threshold,
                                  const  uint8_t v_upper_threshold, const  uint8_t v_lower_threshold) {
    uint16_t h = HEIGHT;
    while (h--) {
        uint16_t w = WIDTH;
        while (w--) {
            uint8_t h_hsv = (*hsvImgBuff & 0b0111110000000000) >> 8;
            uint8_t s_hsv = (*hsvImgBuff & 0b0000001111100000) >> 2;
            uint8_t v_hsv = (*hsvImgBuff & 0b0000000000011111) << 3;
            if(h_advanced_threshold < h_fundamental_threshold) {
                *binImgBuff = ((h_hsv >= h_fundamental_threshold) | (h_advanced_threshold >= h_hsv)) &
                               (s_hsv <= s_upper_threshold) & (s_lower_threshold <= s_hsv) &
                               (v_hsv <= v_upper_threshold) & (v_lower_threshold <= v_hsv);
            }else{
                *binImgBuff = h_hsv <= h_advanced_threshold & h_fundamental_threshold <= h_hsv &
                               (s_hsv <= s_upper_threshold) & (s_lower_threshold <= h_hsv) &
                               (v_hsv <= v_upper_threshold) & (v_lower_threshold <= v_hsv);
            }
            binImgBuff++;
            hsvImgBuff++;
        }
    }
    return SUCCESS;
}
膨張、収縮、輪郭抽出
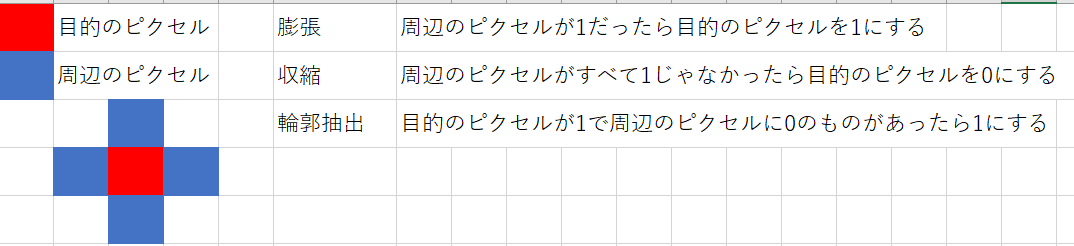
こんな感じで処理
///輪郭抽出
getContours(const bool *binImgBuffIn, bool *binImgBuffOut) {
    for(uint16_t h = 0; h < HEIGHT; h++){
        for(uint16_t w = 0; w < WIDTH; w++){
            bool isActivePixelAllAround = true;

            isActivePixelAllAround = isActivePixelAllAround & binImgBuffIn[addrFromWidthAndHeight(w + 1, h)] & w != WIDTH - 1;
            isActivePixelAllAround = isActivePixelAllAround & binImgBuffIn[addrFromWidthAndHeight(w - 1, h)] & w != 0;
            isActivePixelAllAround = isActivePixelAllAround & binImgBuffIn[addrFromWidthAndHeight(w, h + 1)] & h != HEIGHT - 1;
            isActivePixelAllAround = isActivePixelAllAround & binImgBuffIn[addrFromWidthAndHeight(w, h - 1)] & h != 0;

            binImgBuffOut[addrFromWidthAndHeight(w,h)] = !isActivePixelAllAround & binImgBuffIn[addrFromWidthAndHeight(w,h)];
        }
    }
    return SUCCESS;
}
///収縮の処理
///全部書くと長いのでループの中身だけ記入
///
bool isActivePixelAllAround = binImgBuffIn[addrFromWidthAndHeight(w, h)];
    for(uint8_t i = 1; i < kernelRadius + 1; i++){
        if(!isActivePixelAllAround){
            break;
        }
        isActivePixelAllAround = isActivePixelAllAround & binImgBuffIn[addrFromWidthAndHeight(w + i, h)];
        isActivePixelAllAround = isActivePixelAllAround & binImgBuffIn[addrFromWidthAndHeight(w - i, h)];
        isActivePixelAllAround = isActivePixelAllAround & binImgBuffIn[addrFromWidthAndHeight(w, h + i)];
        isActivePixelAllAround = isActivePixelAllAround & binImgBuffIn[addrFromWidthAndHeight(w, h - i)];
    }
binImgBuffOut[addrFromWidthAndHeight(w,h)] = isActivePixelAllAround;

///膨張の処理
///同上
bool isActivePixelAround = binImgBuffIn[addrFromWidthAndHeight(w, h)];
    for(uint8_t i = 1; i < kernelRadius + 1; i++){
        if(isActivePixelAround){
            break;
        }
        isActivePixelAround = isActivePixelAround | binImgBuffIn[addrFromWidthAndHeight(w + i, h)];
        isActivePixelAround = isActivePixelAround | binImgBuffIn[addrFromWidthAndHeight(w - i, h)];
        isActivePixelAround = isActivePixelAround | binImgBuffIn[addrFromWidthAndHeight(w, h + i)];
        isActivePixelAround = isActivePixelAround | binImgBuffIn[addrFromWidthAndHeight(w, h - i)];
    }
binImgBuffOut[addrFromWidthAndHeight(w,h)] = isActivePixelAround;
膨張収縮は遠くまで見れるようにしている(たぶん使わない)
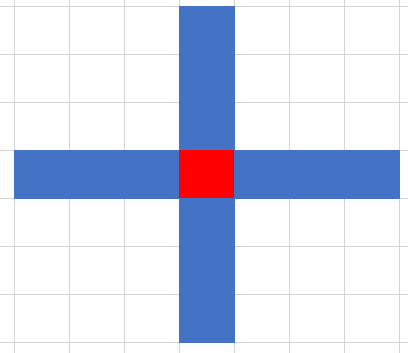
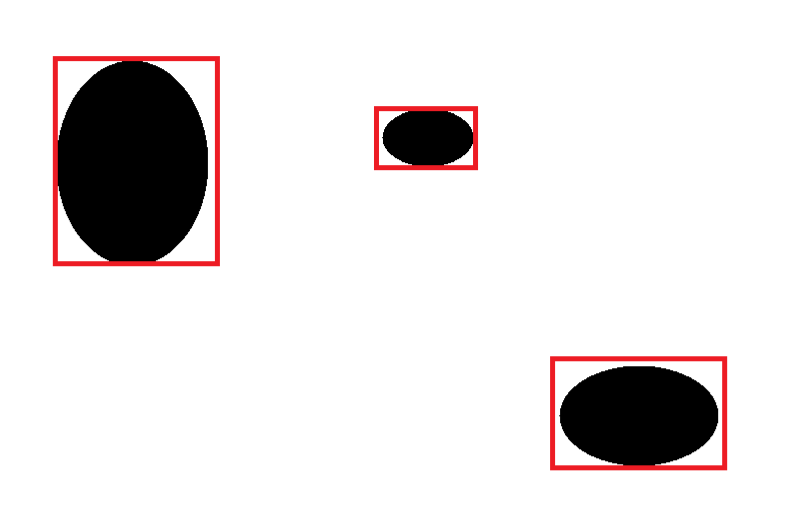
バイナリ画像の重心とる。わかりずらいのでイメージ。
こんな感じで二値化画像の黒い部分のまとまりをそれぞれ取得したい
取得する情報は以下の構造体に格納する
struct PixelChunk{
    bool isActive; ///配列で構造体を持つので、有効かどうか
    uint16_t ulv; ///左上のx座標
    uint16_t ulh; ///左上のy座標
    uint16_t lrv; ///右下のx座標
    uint16_t lrh; ///右下のy座標
    uint16_t weight; ///含まれるピクセル数。今回使ってない
    uint16_t gravity_center_v; ///重心。今回使ってない
    uint16_t gravity_center_h; ///重心。今回使ってない
    uint16_t length; ///輪郭の長さ
};
参考にした資料
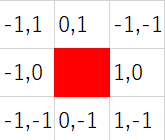
輪郭の一か所から、図の左上から時計回りに見ていって、つながっているピクセルがあればそちらに移動してまた探す。見つからなくなるまで行い、輪郭を追跡する
const Int8_pair freeman_chain[8] = {{1, 0}, {1, -1}, {0, -1}, {-1, -1}, {-1, 0}, {-1, 1}, {0, 1}, {1, 1}};


ImgProcError findObjects(bool *binImgContoursBuff, PixelChunk *pixelChunks,SortType sortType, uint16_t minLength,uint16_t maxChunk, uint16_t maxSearch) {
    int i = 0;
    for(uint16_t h = 0; h < HEIGHT; h++){
        for(uint16_t w = 0; w < WIDTH; w++){
            if (binImgContoursBuff[addrFromWidthAndHeight(w,h)]){
                bool found;
                uint16_t current_v = w;
                uint16_t current_h = h;
                binImgContoursBuff[addrFromWidthAndHeight(current_v,current_h)] = false;
                pixelChunks[i].isActive = true;
                pixelChunks[i].ulv = current_v;
                pixelChunks[i].ulh = current_h;
                pixelChunks[i].lrv = 0;
                pixelChunks[i].lrh = 0;
                int l = 0;
                uint8_t direction = 0;
                do{
                    found = false;
                    direction = (direction + 5) % 8;
                    for(int k = 0; k < 8; k++){
                        Int8_pair pair = freeman_chain[direction];
                        uint16_t searching_v = current_v + pair.x;
                        uint16_t searching_h = current_h + pair.y;
                        if(current_v != 0 && current_h != 0 && binImgContoursBuff[addrFromWidthAndHeight(searching_v,searching_h)]){
                            found = true;
                            binImgContoursBuff[addrFromWidthAndHeight(searching_v,searching_h)] = false;
                            pixelChunks[i].ulv = pixelChunks[i].ulv < searching_v ? pixelChunks[i].ulv : searching_v;
                            pixelChunks[i].ulh = pixelChunks[i].ulh < searching_h ? pixelChunks[i].ulh : searching_h;
                            pixelChunks[i].lrv = searching_v < pixelChunks[i].lrv ? pixelChunks[i].lrv : searching_v;
                            pixelChunks[i].lrh = searching_h < pixelChunks[i].lrh ? pixelChunks[i].lrh : searching_h;
                            current_v = searching_v;
                            current_h = searching_h;
                            break;
                        }
                        direction = (direction + 1) % 8;
                    }
                    l++;
                    if(l >= maxSearch - 1){
                        return TOO_LONG_CONTOURS;
                    }
                } while (found);
                if(l < minLength){
                    pixelChunks[i].isActive = false;
                }else {
                    pixelChunks[i].length = l + 1;
                    i++;
                }
            }
        }
    }
}
今後
現時点ではC++として作ってるけどCにすぐ変えれるので(見ての通りC++固有の構文をほぼ使用してない)両バージョン作って配布する予定。
- ちゃんとコメント書く
- エラー処理作る
参考になれば幸いです。