はじめに
Google Homeアプリ(Google Assistantアプリ)のリリースってどんな感じなんだろと思い、試しにリリースしてみました。
数度のリジェクトを食らいつつも無事承認され、皆様お持ちのGoogle HomeやスマホのGoogle Assistantからご利用頂けます。
アプリ(Dialogflow)の実装と、リリースはこんな感じでしたって内容を書いてこうと思います。
が、長くなってしまったのでまずは実装のお話です。
※2017/11/27追記 リリース申請についても書きました。
Google Homeアプリをリリースしてみた(申請編)
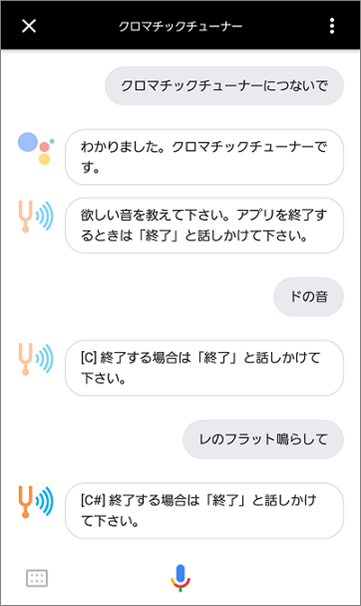
リリースしたGoogle Homeアプリ
「クロマチックチューナー」というアプリです。
「クロマチックチューナーにつないで」とかで起動すると思います。
機能としてはC4~B4までの正弦波を4秒鳴らすだけです。
楽器のチューニングに使うデジタル音叉です。
アプリ(Dialogflow)の実装
アプリはDialogflowで作成しました。
Fulfillmentを使用してますが、Inline Editorで済ませてます。
Actions on GoogleやDialogflowの基礎的な部分は以下の記事を参照してみて下さい。
IFTTTを使わずActions on Google(Dialogflow)でGoogle Homeから家電を音声操作してみる
なお正弦波はmp3を鳴らしてますが、ファイル置き場としてFirebase Hostingを使用しています。
音声アクション
音声アクションは単純に2つです。
- ユーザーがリクエストした音を鳴らす
- 「ドの音」「レのフラット鳴らして」とかで対象音のmp3を鳴らす
- 終了する
- 「終了」「チューナー停止」とかでアプリを終了する
Intents
インテントは以下の5つになります。
| インテント名 | 内容 |
|---|---|
| Welcome | アプリを起動して最初に呼ばれます。 ここでアプリの使い方の説明を入れないとリジェクトされます。 |
| Tune | ユーザがリクエストした音名を返します。 メイン機能です。 |
| End | アプリ終了用インテント。 |
| Fallback | 意図してないワードに対して「よくわかりません」とお茶を濁します。 |
Welcomeインテント
デフォルトで用意されてるやつの「Text response」を「欲しい音を教えて下さい。アプリを終了するときは「終了」と話しかけて下さい。」に変更しただけです。
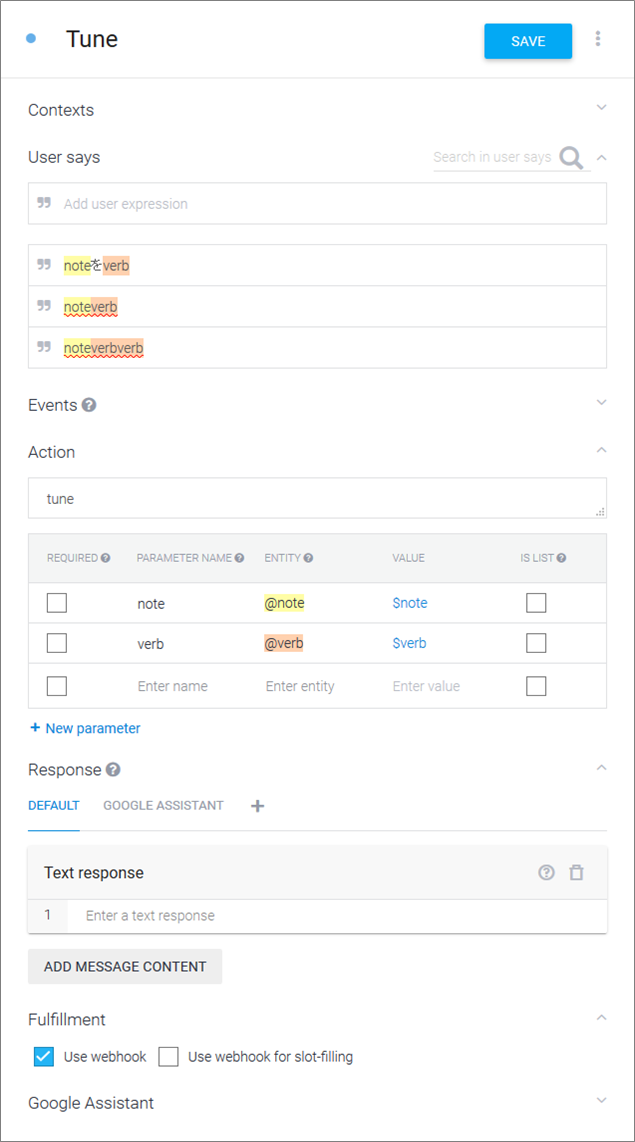
Tuneインテント
メインのインテントです。
エンティティをnoteという音名とverbという動詞とで分けてUser saysの記述量を減らしています。
Actionで指定したFulfillmentの関数tuneにnoteの値をパラメータとして渡しています。
動詞部のverbもパラメータとして渡されますが、値を見る必要はないのでスルーしています。
あくまで記述をまとめるだけの使い方です。
先日参加してきたGoogle Homeを使いたおす! DialogflowとAoG Meetup でも動詞部を何パターンも記述するのが大変という話がありましたが、このように動詞部をエンティティでまとめて使い回せば記述が大分ラクになると思います。
まとめたエンティティ側でシノニムを切れば、必要に応じてFulfillmentにパラメータとして渡して分岐かけるということもできますし。
いっそ助詞とかもまとめちゃってもいいかも。
Endインテント
アプリ終了用のインテントです。
アプリ名をappname、終了文言をendというエンティティにそれぞれまとめてます。
Fulfillmentに渡す必要はないのでそのままText responseを返します。

Fallbackインテント
デフォルトで用意されてるやつのEventsに「UNKNOWN」を追加してます。
Eventを定義することでFulfillmentから呼び出せるようになります。
Entities
エンティティは以下の5つになります。
| エンティティ名 | 内容 |
|---|---|
| note | 音名を定義。 |
| verb | 動詞(音名に続く「鳴らして」とか「頂戴」とか)を定義。 |
| appname | アプリの呼び方を定義。 |
| end | アプリ終了ワードを定義。 |
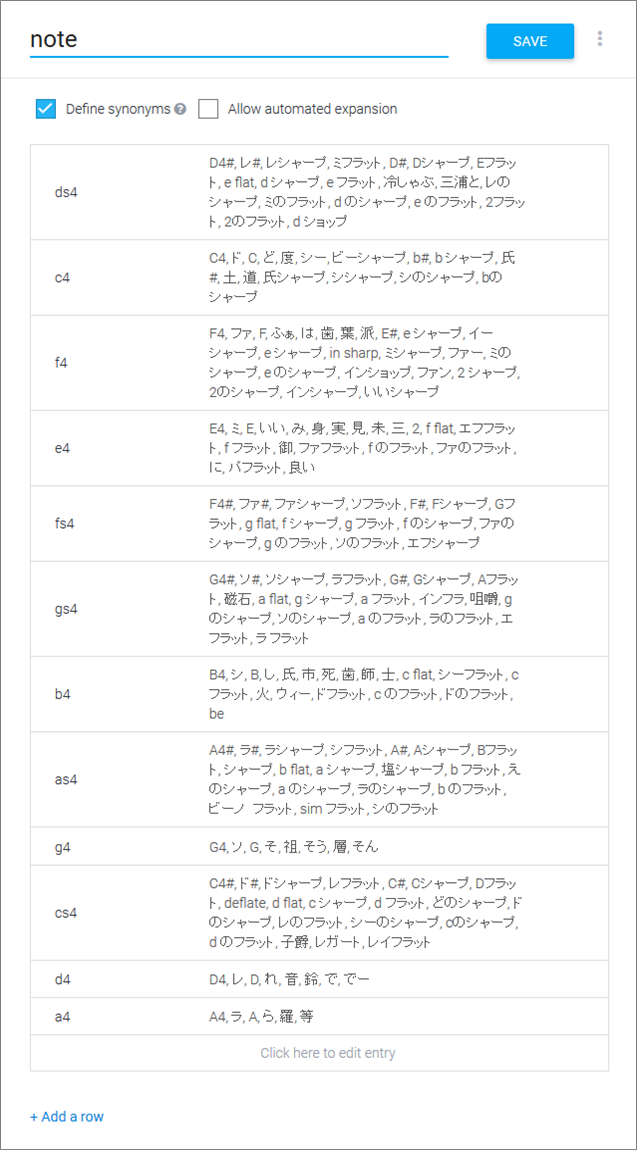
noteエンティティ
音名を定義します。
ひたすら無心で変換され得るワードを羅列していきます。
♯や♭は別エンティティに出してFulfillmentにてコードでがっちゃんこすれば良かったと後悔してます。
なお先日参加してきたGoogle Homeを使いたおす! DialogflowとAoG Meetup にてflatfisherさんが、csvをエンティティに流し込むご自身で作成されたツールをご紹介されてました。
とても便利そうで私もそのツールを使っておきたかったです…
またエンティティ入力画面のSAVEボタン横の「…」より「Switch to row mode」を選択すると、JSONやCSV形式での入力ができます。
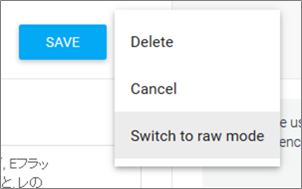
エンティティ入力画面の反応がちょっと微妙なのでツールやJSONでの入力をおすすめします。
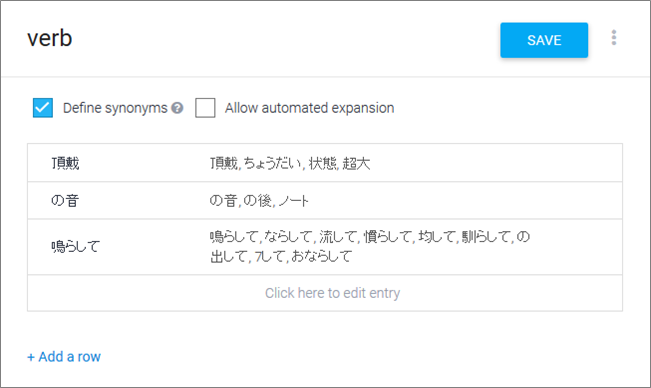
verbエンティティ
動詞部のエンティティです。
今回はシノニムを切る必要がありませんが、こうしておくことで動詞の種類によって後からFulfillmentで処理分けもできます。
appnameエンティティ
アプリの呼び方をまとめてます。
アプリ終了時に使うかもって思って。
endエンティティ
アプリ終了のワードをまとめます。
「終了」「停止」「バイバイ」とか。
Fulfillment
Inline Editorを使用してます。
actionHandlersの中にTuneインテントとExceptionインテントのActionに指定した関数の処理を追記してるだけです。
それ以外はデフォルトのままです。
tune関数はパラメータとして受け取った音名のmp3を返してます。
exception関数はFallbackインテントをEventから呼び出してます。
'use strict';

const functions = require('firebase-functions'); // Cloud Functions for Firebase library
const DialogflowApp = require('actions-on-google').DialogflowApp; // Google Assistant helper library

const googleAssistantRequest = 'google'; // Constant to identify Google Assistant requests

exports.dialogflowFirebaseFulfillment = functions.https.onRequest((request, response) => {
    console.log('Request headers: ' + JSON.stringify(request.headers));
    console.log('Request body: ' + JSON.stringify(request.body));

    // An action is a string used to identify what needs to be done in fulfillment
    let action = request.body.result.action; // https://dialogflow.com/docs/actions-and-parameters

    // Parameters are any entites that Dialogflow has extracted from the request.
    const parameters = request.body.result.parameters; // https://dialogflow.com/docs/actions-and-parameters

    // Contexts are objects used to track and store conversation state
    const inputContexts = request.body.result.contexts; // https://dialogflow.com/docs/contexts

    // Get the request source (Google Assistant, Slack, API, etc) and initialize DialogflowApp
    const requestSource = (request.body.originalRequest) ? request.body.originalRequest.source : undefined;
    const app = new DialogflowApp({request: request, response: response});

    // Create handlers for Dialogflow actions as well as a 'default' handler
    const actionHandlers = {

        //tuner
        'tune': () => {
            const tokenTable = {
                a4: "xxxxxxxx",
                as4: "xxxxxxxx",
                b4: "xxxxxxxx",
                c4: "xxxxxxxx",
                cs4: "xxxxxxxx",
                d4: "xxxxxxxx",
                ds4: "xxxxxxxx",
                e4: "xxxxxxxx",
                f4: "xxxxxxxx",
                fs4: "xxxxxxxx",
                g4: "xxxxxxxx",
                gs4: "xxxxxxxx",
            };
            const note = parameters.note;
            const noteStr = parameters.note.toUpperCase().replace("S", "#").replace("4", "");
            const token = tokenTable[note];

            if (token) {
                const url = `https://xxxxxxxx.firebaseapp.com/mp3/${note}.mp3`;
                const speak = `<speak><audio src="${url}">[${noteStr}]</audio><break time="1s"></break>終了する場合は「終了」と話しかけて下さい。</speak>`;

                // Use the Actions on Google lib to respond to Google requests; for other requests use JSON
                if (requestSource === googleAssistantRequest) {
                    sendGoogleResponse(speak); // Send simple response to user
                } else {
                    sendResponse(speak); // Send simple response to user
                }

            // 一致しない音名
            } else {
                response.send(
                    JSON.stringify({
                        followupEvent: {
                            name: "UNKNOWN"
                        }
                    })
                )
            }
        }
    };

    // If undefined or unknown action use the default handler
    if (!actionHandlers[action]) {
        action = 'default';
    }

    // Run the proper handler function to handle the request from Dialogflow
    actionHandlers[action]();

    // Function to send correctly formatted Google Assistant responses to Dialogflow which are then sent to the user
    function sendGoogleResponse (responseToUser) {
        if (typeof responseToUser === 'string') {
            app.ask(responseToUser); // Google Assistant response
        } else {
            // If speech or displayText is defined use it to respond
            let googleResponse = app.buildRichResponse().addSimpleResponse({
                speech: responseToUser.speech || responseToUser.displayText,
                displayText: responseToUser.displayText || responseToUser.speech
            });

            // Optional: Overwrite previous response with rich response
            if (responseToUser.googleRichResponse) {
                googleResponse = responseToUser.googleRichResponse;
            }

            // Optional: add contexts (https://dialogflow.com/docs/contexts)
            if (responseToUser.googleOutputContexts) {
                app.setContext(...responseToUser.googleOutputContexts);
            }

            app.ask(googleResponse); // Send response to Dialogflow and Google Assistant
        }
    }

    // Function to send correctly formatted responses to Dialogflow which are then sent to the user
    function sendResponse (responseToUser) {
        // if the response is a string send it as a response to the user
        if (typeof responseToUser === 'string') {
            let responseJson = {};
            responseJson.speech = responseToUser; // spoken response
            responseJson.displayText = responseToUser; // displayed response
            response.json(responseJson); // Send response to Dialogflow
        } else {
            // If the response to the user includes rich responses or contexts send them to Dialogflow
            let responseJson = {};

            // If speech or displayText is defined, use it to respond (if one isn't defined use the other's value)
            responseJson.speech = responseToUser.speech || responseToUser.displayText;
            responseJson.displayText = responseToUser.displayText || responseToUser.speech;

            // Optional: add rich messages for integrations (https://dialogflow.com/docs/rich-messages)
            responseJson.data = responseToUser.richResponses;

            // Optional: add contexts (https://dialogflow.com/docs/contexts)
            responseJson.contextOut = responseToUser.outputContexts;

            response.json(responseJson); // Send response to Dialogflow
        }
    }
});
mp3ファイルの置き場
mp3ファイルの置き場には少し制限がありました。
まずドキュメントに明記されている点として、SSMLのaudioタグのsrcはhttpsじゃないとダメです。
https://developers.google.com/actions/reference/ssml
そして恐らくフォーマット制約に引っかかってだと思われますが、URLパラメータを含んでいるとダメです。
そのためFirebase StorageやGoogle Driveは使えず。
とりあえずFirebase Hostingにmp3を置いています。
※FulfillmentコードのtokenTableはFirebase Storageに置こうとした名残です…
ただFirebase Hostingだと無料枠では10GB制限があるので、あまりアクセスがあるといずれサービスが止まってしまいます…
そうなると課金モードにするか場所変えなきゃで…
無料のレンタルサーバはSSL非対応とかばっかだったので、もしSSL対応してるとこご存知の方いらっしゃいましたらご教示下さい…
おわりに
すみません、実装で長引いてしまったためリリースに関する話は分けます。
アプリ(Dialogflow)実装をざっくりまとめると、
- 動詞部もエンティティにまとめちゃうとインテントの記述ラクだよ
- エンティティをDialogflowのGUIから作ると大変だからツールやJSON使うといいよ
てな感じです。