streampackのminsuです。
以前の記事で Docker + Rails + React の環境構築を行いindexページの表示まで行ったのでCRUD機能を追加します。
ですが期間も空いているため、折角なので以前の環境である
- Rails 5.1.4
- Ruby 2.4.1
- mysql 5.7
ではなく、新しい環境で作り直します。
最新版確認
https://rubygems.org/gems/rails
https://www.ruby-lang.org/ja/downloads/
作成環境
- Rails 6.0.2
- Ruby 2.7
- mysql 5.7
ファイルの用意
Gemfile Gemfile.lock Dockerfile docker-compose.yml を作成します。
source "https://rubygems.org"
gem "rails", "6.0.2"
FROM ruby:2.7.0

RUN apt-get update -qq && \
apt-get install -y \
nodejs \
build-essential

RUN apt-get update && apt-get install -y curl apt-transport-https wget && \
curl -sS https://dl.yarnpkg.com/debian/pubkey.gpg | apt-key add - && \
echo "deb https://dl.yarnpkg.com/debian/ stable main" | tee /etc/apt/sources.list.d/yarn.list && \
apt-get update && apt-get install -y yarn

RUN mkdir /app
WORKDIR /app

ADD Gemfile* /app/

RUN bundle install -j4 --retry 3

ADD . /app

WORKDIR /app

CMD ["bundle", "exec", "puma", "-C", "config/puma.rb"]
version: '3'
services:
  db:
    image: mysql:5.7
    command: mysqld --character-set-server=utf8 --collation-server=utf8_unicode_ci
    ports:
      - "4306:3306"
    environment:
      - MYSQL_ROOT_PASSWORD=root
    volumes:
      - mysql_vol:/var/lib/mysql
  app:
    build: .
    command: /bin/sh -c "rm -f /app/tmp/pids/server.pid && bundle exec rails s -p 3000 -b '0.0.0.0'"
    volumes:
      - .:/app
    ports:
      - "3000:3000"
    depends_on:
      - db
volumes:
  mysql_vol:
rails app作成
rails new
rails new を行います。
$ docker-compose run app rails new . --force --database=mysql
db設定を変更します。
  username: root
  password: root #docker-compose.ymlのMYSQL_ROOT_PASSWORD
  host: db #docker-compose.ymlのサービス名
今回も gem react-rails を利用するのでGemfileに追記します。
gem 'react-rails'
再度 build して
$ docker-compose build
reactを使うので下記コマンドを実行
$ docker-compose run app rails webpacker:install
$ docker-compose run app rails webpacker:install:react
$ docker-compose run app rails generate react:install
model 作成
$ docker-compose run app rails g model List title:string description:string
$ docker-compose run app rails db:create
$ docker-compose run app rails db:migrate
かなりの数の warning 出てきた。
Ruby 2.7.0に対応していないgemが存在することに起因しているようで非表示にすることもできる* が必要なwarningも見逃す可能性があるのでスルーすることにする。
*bash_profileにexport RUBYOPT='-W:no-deprecated -W:no-experimental'を追加
controller 作成
lists controller と view を作成
$ docker-compose exec app rails g controller Lists index
class ListsController < ApplicationController
  def index
    @lists = List.all
  end
end
<%= react_component 'ListsIndex', lists: @lists %>
react_component タグを用いてreactを呼び出します。
react file 作成
viewから呼び出すreact fileを実装していきます。
$ rails g react:component ListsIndex
コマンドで app/javascript/components/ListsIndex.js が作成されるので編集します。
import React from "react"
import PropTypes from "prop-types"
export default class Lists extends React.Component {
  constructor(props){
    super(props)
    this.state = {
      lists: []
    };
  }
  componentDidMount(){
    this.setState({
      lists: this.props.lists
    })
  }
  render () {
    return (
      <div>
        <table>
          <thead>
            <tr>
              <th>ID</th>
              <th>Title</th>
              <th>Description</th>
            </tr>
          </thead>
          <tbody>
            {this.state.lists.map((list) => {
              return (
                <tr key={list.id}>
                  <td>{list.id}</td>
                  <td>{list.title}</td>
                  <td>{list.description}</td>
                </tr>
              );
            })}
          </tbody>
        </table>
      </div>
    );
  }
}
動作確認
List モデルに適当な値を保存して動作確認をしてみます。

無事に一覧が表示されました。
simple CRUD の実装
railsにapiを追加します。
apiで行うアクションは index, create, update, destroy です。
/api/v1/xxxでアクセスできるようにrouteを設定し、controllerを追加します。
Rails.application.routes.draw do
  get 'lists/index'
  namespace :api do
    namespace :v1 do
     resources :lists, only: [:index, :create, :update, :destroy]
    end
  end
end
class Api::V1::ListsController < ApplicationController
  protect_from_forgery with: :null_session
  def index
    render json: List.all
  end
  def create
    list = List.create(list_params)
    render json: list
  end
  def update
    list = List.find(params[:id])
    list.update(list_params)
    render json: list
  end
  def destroy
    List.destroy(params[:id])
  end
  private
  def list_params
    params.require(:list).permit(:id, :title, :description)
  end
end
controllerには基本的なメソッド、そしてprotect_from_forgery with: :null_sessionを記述しました。
http://localhost:3000/api/v1/listsでindexが呼び出されリストが取得できるはずです。
index
reactからapiを利用してlists を取得します。
componentDidMountを書き換えます。
  componentDidMount(){
    this.getIndex();
  }
  getIndex(){
    fetch('/api/v1/lists.json')
    .then((response) => {return response.json()})
    .then((data) => {this.setState({ lists: data }) });
  }
delete
delete機能を実装します。
ボタンを追加
    return (
      <div>
        <div>this is list</div>
        <table>
          <thead>
            <tr>
              <th>ID</th>
              <th>Title</th>
              <th>Description</th>
              <th>function</th>
            </tr>
          </thead>
          <tbody>
            {this.state.lists.map((list) => {
              return (
                <tr key={list.id}>
                  <td>{list.id}</td>
                  <td>{list.title}</td>
                  <td>{list.description}</td>
                  <td>
                    <button onClick={() => this.handleDelete(list.id)}>delete</button>
                  </td>
                </tr>
              );
            })}
          </tbody>
        </table>
      </div>

    );
ボタンから呼び出されるhandleDeleteを実装します。
  handleDelete(id){
    fetch(`http://localhost:3000/api/v1/lists/${id}`,
      {
        method: 'DELETE',
        headers: {
          'Content-Type': 'application/json'
        }
    })
    .then((response) => {
        console.log('List was deleted');
        this.deleteList(id);
    })
  }
  deleteList(id){
    let lists = this.state.lists.filter((list) => list.id != id)
    this.setState({
      lists: lists
    })
  }
apiでのdestroyだけではstateの値は変わらないので、画面は更新されません。
そのためdeleteListにてstateの値を変更しています。
constructorに下記も追記します。
  constructor(props){
...
    this.getIndex = this.getIndex.bind(this);
    this.handleDelete = this.handleDelete.bind(this);
    this.deleteList = this.deleteList.bind(this);
  }
画面を確認すると deleteボタンが追加されており、要素の削除が行えます。

create
要素追加のformを作成します。
stateにてformの値を管理するために下記のように追記します。
  constructor(props){
    super(props)
    this.state = {
      // lists: this.props.lists
      lists: [],
      form: {
        title: "",
        description: "",
      }
    };
...
各inpuフォームとaddボタンを追加
    return (
      <div>
        <div>this is list</div>
        <table>
          <thead>
            <tr>
              <th>ID</th>
              <th>Title</th>
              <th>Description</th>
              <th>function</th>
            </tr>
          </thead>
          <tbody>
            {this.state.lists.map((list) => {
              return (
                <tr key={list.id}>
                  <td>{list.id}</td>
                  <td>{list.title}</td>
                  <td>{list.description}</td>
                  <td>
                    <button onClick={() => this.handleDelete(list.id)}>delete</button>
                  </td>
                </tr>
              );
            })}
            <tr>
              <td></td>
              <td><input type="text" value={this.state.form.title} onChange={e=>this.handleChange(e,'title')} /></td>
              <td><input type="text" value={this.state.form.description} onChange={e=>this.handleChange(e,'description')} /></td>
              <td><button onClick={() => this.handleCreate()}>add</button></td>
            </tr>
          </tbody>
        </table>
      </div>

    );
  }
ここで利用するhandleChangeとhandleCreateを実装します。
handleChangeではinputフォームの入力値をstateにて管理させています。
  handleChange(e,key){
    let target = e.target;
    let value = target.value;
    let form = this.state.form;
    form[key] = value;

    this.setState({
      form: form
    });
  }
handleCreateではapiのcreateメソッドを呼び出して要素の追加を行います。
追加後はstateのlistsの更新と
inputフォームの値のリセットを行なっています。
  handleCreate(){
    let body = JSON.stringify({
      list: {
        title: this.state.form.title,
        description: this.state.form.description
      }
    })
    fetch('http://localhost:3000/api/v1/lists', {
        method: 'POST',
        headers: {
          'Content-Type': 'application/json'
        },
        body: body,
    })
    .then((response) => {return response.json()})
    .then((list)=>{
      this.addList(list);
      this.formReset();
    })
  }
  addList(list){
    this.setState({
      lists: this.state.lists.concat(list)
    })
  }
  formReset(){
    this.setState({
      form:{
        title: "",
        description: ""
      }
    })
  }
constructorに下記を追記
    this.handleChange = this.handleChange.bind(this);
    this.addList = this.addList.bind(this);
    this.formReset = this.formReset.bind(this);
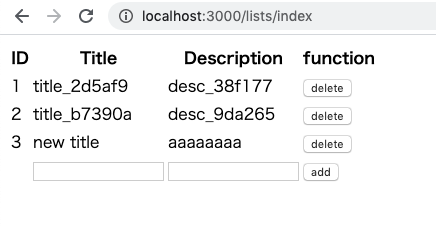
画面を確認するとcreate用のinputフォームが追加され、addボタンのクリックにより要素の追加を行えます。
完成したListIndex.js
import React from "react"
import PropTypes from "prop-types"
class ListsIndex extends React.Component {
  constructor(props){
    super(props)
    this.state = {
      // lists: this.props.lists
      lists: [],
      form: {
        title: "",
        description: "",
      }
    };
    this.getIndex = this.getIndex.bind(this);
    this.handleDelete = this.handleDelete.bind(this);
    this.deleteList = this.deleteList.bind(this);
    this.handleChange = this.handleChange.bind(this);
    this.addList = this.addList.bind(this);
    this.formReset = this.formReset.bind(this);
  }
  componentDidMount(){
    this.getIndex();
  }
  getIndex(){
    fetch('/api/v1/lists.json')
    .then((response) => {return response.json()})
    .then((data) => {this.setState({ lists: data }) });
  }
  handleDelete(id){
    fetch(`http://localhost:3000/api/v1/lists/${id}`,
      {
        method: 'DELETE',
        headers: {
          'Content-Type': 'application/json'
        }
    })
    .then((response) => {
        console.log('List was deleted');
        this.deleteList(id);
    })
  }
  deleteList(id){
    let lists = this.state.lists.filter((list) => list.id != id)
    this.setState({
      lists: lists
    })
  }
  handleChange(e,key){
    let target = e.target;
    let value = target.value;
    let form = this.state.form;
    form[key] = value;

    this.setState({
      form: form
    });
  }
  handleCreate(){
    let body = JSON.stringify({
      list: {
        title: this.state.form.title,
        description: this.state.form.description
      }
    })
    fetch('http://localhost:3000/api/v1/lists', {
        method: 'POST',
        headers: {
          'Content-Type': 'application/json'
        },
        body: body,
    })
    .then((response) => {return response.json()})
    .then((list)=>{
      this.addList(list);
      this.formReset();
    })
  }
  addList(list){
    this.setState({
      lists: this.state.lists.concat(list)
    })
  }
  formReset(){
    this.setState({
      form:{
        title: "",
        description: ""
      }
    })
  }
  render () {
    return (
      <div>
        <table>
          <thead>
            <tr>
              <th>ID</th>
              <th>Title</th>
              <th>Description</th>
              <th>function</th>
            </tr>
          </thead>
          <tbody>
            {this.state.lists.map((list) => {
              return (
                <tr key={list.id}>
                  <td>{list.id}</td>
                  <td>{list.title}</td>
                  <td>{list.description}</td>
                  <td>
                    <button onClick={() => this.handleDelete(list.id)}>delete</button>
                  </td>
                </tr>
              );
            })}
            <tr>
              <td></td>
              <td><input type="text" value={this.state.form.title} onChange={e=>this.handleChange(e,'title')} /></td>
              <td><input type="text" value={this.state.form.description} onChange={e=>this.handleChange(e,'description')} /></td>
              <td><button onClick={() => this.handleCreate()}>add</button></td>
            </tr>
          </tbody>
        </table>
      </div>

    );
  }
}

export default ListsIndex
まとめ
Ruby2.7, Rails6
Docker
react
での環境構築
reactからのrails api利用の実装を行いました。
自分用のまとめですが、誰かの助けとなれば幸いです。